Product Information Guide
Page 4
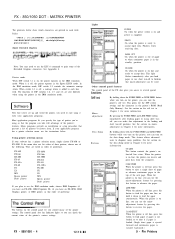
... that micro-adjustment can be used. Using printer selection menus If your application program has a printer selection menu. IBM Proprinter XL (if you can start using it is on line, you can use the microadjustment feature by pressing ...printer's features. Italics 0123456789: ;?@ABCDEFGH IJKLRNOPQRSTUVWXYZ[\]^_ abcdefghijklmnop qrstuvwxyz{:} Epson Extended Graphics Note: You may need to reverse the paper. FX-850 FX-86e EX-800 FX-85 FX-80+ FX-80 FX LX MX Epson printer Draft printer FX-1050 FX-286e EX-1000 FX-286 FX-185 FX-100+ FX-100 FX LX MX Epson printer Draft printer...
... that micro-adjustment can be used. Using printer selection menus If your application program has a printer selection menu. IBM Proprinter XL (if you can start using it is on line, you can use the microadjustment feature by pressing ...printer's features. Italics 0123456789: ;?@ABCDEFGH IJKLRNOPQRSTUVWXYZ[\]^_ abcdefghijklmnop qrstuvwxyz{:} Epson Extended Graphics Note: You may need to reverse the paper. FX-850 FX-86e EX-800 FX-85 FX-80+ FX-80 FX LX MX Epson printer Draft printer FX-1050 FX-286e EX-1000 FX-286 FX-185 FX-100+ FX-100 FX LX MX Epson printer Draft printer...
User Manual
Page 5
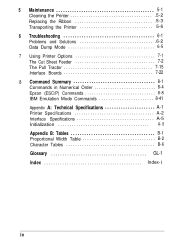
5 Maintenance 5-1 Cleaning the Printer 5-2 Replacing the Ribbon 5-3 Transporting the Printer 5-6 6 Troubleshooting 6-1 Problems and Solutions 6-2 Data Dump Mode 6-5 7 Using Printer Options 7-1 The Cut Sheet Feeder 7-2 The Pull Tractor 7-15 Interface Boards 7-22 8 Command Summary 8-1 Commands in Numerical Order 8-4 Epson (ESC/P) Commands 8-8 IBM Emulation Mode Commands 8-41 Appendix A: Technical Specifications A-1 Printer Specifications A-2 Interface Specifications A-5 Initialization A- 8 Appendix B: Tables B-1 Proportional Width...
5 Maintenance 5-1 Cleaning the Printer 5-2 Replacing the Ribbon 5-3 Transporting the Printer 5-6 6 Troubleshooting 6-1 Problems and Solutions 6-2 Data Dump Mode 6-5 7 Using Printer Options 7-1 The Cut Sheet Feeder 7-2 The Pull Tractor 7-15 Interface Boards 7-22 8 Command Summary 8-1 Commands in Numerical Order 8-4 Epson (ESC/P) Commands 8-8 IBM Emulation Mode Commands 8-41 Appendix A: Technical Specifications A-1 Printer Specifications A-2 Interface Specifications A-5 Initialization A- 8 Appendix B: Tables B-1 Proportional Width...

User Manual
Page 66
Chapter 4 Using Software and Graphics Using the FX with Application Programs 4-2 Using printer selection menus 4-2 A quick test 4- 3 Using word processors 4-3 Using spreadsheets 4-3 Using graphics software 4-5 Computer-Printer Communication 4-5 Escape sequences 4-6 Printer commands 4-6 Using the Command Summary 4-7 Sending printer commands from within your software program 4-7 Dot Graphics 4-8 The print head 4-9 Pinlabels 4-10 Graphics commands 4-11 Graphics programming 4-12 User-Defined Characters 4-19 Defining your own characters 4-20 Using Software and Graphics 4-1
Chapter 4 Using Software and Graphics Using the FX with Application Programs 4-2 Using printer selection menus 4-2 A quick test 4- 3 Using word processors 4-3 Using spreadsheets 4-3 Using graphics software 4-5 Computer-Printer Communication 4-5 Escape sequences 4-6 Printer commands 4-6 Using the Command Summary 4-7 Sending printer commands from within your software program 4-7 Dot Graphics 4-8 The print head 4-9 Pinlabels 4-10 Graphics commands 4-11 Graphics programming 4-12 User-Defined Characters 4-19 Defining your own characters 4-20 Using Software and Graphics 4-1
User Manual
Page 67
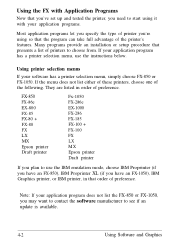
... you have an FX-1050), IBM Graphics printer, or IBM printer, in order of the printer's features. Note: If your software has a printer selection menu, simply choose FX-850 or FX-1050. FX-850 FX-86e EX-800 FX-85 FX-80 + FX-80 FX LX MX Epson printer Draft printer Fx-1050 FX-286e EX-1000 FX-286 FX-185 FX-100 + FX-100 FX LX MX Epson printer Draft printer If you plan to use the instructions below...
... you have an FX-1050), IBM Graphics printer, or IBM printer, in order of the printer's features. Note: If your software has a printer selection menu, simply choose FX-850 or FX-1050. FX-850 FX-86e EX-800 FX-85 FX-80 + FX-80 FX LX MX Epson printer Draft printer Fx-1050 FX-286e EX-1000 FX-286 FX-185 FX-100 + FX-100 FX LX MX Epson printer Draft printer If you plan to use the instructions below...

User Manual
Page 106
... The Cut Sheet Feeder 7-2 Installation 7-2 Setting the sheet feeder mode 7-4 Recommended paper 7-5 Paper loading 7-5 Envelope loading 7-8 Using the cut sheet feeder 7-8 Software operation 7-9 Setting up your software 7-9 Control panel operation 7-11 Testing the printer in the cut sheet feeder mode 7-11 Switching from the cut sheet feeder to continuous paper 7-12 Single...
... The Cut Sheet Feeder 7-2 Installation 7-2 Setting the sheet feeder mode 7-4 Recommended paper 7-5 Paper loading 7-5 Envelope loading 7-8 Using the cut sheet feeder 7-8 Software operation 7-9 Setting up your software 7-9 Control panel operation 7-11 Testing the printer in the cut sheet feeder mode 7-11 Switching from the cut sheet feeder to continuous paper 7-12 Single...

User Manual
Page 107
The cut sheet feeder can be fed automatically into the printer without reloading. Make sure the paper release lever is pushed back to 150 sheets of single sheet paper. Installation Attach the assembled cut sheet feeder as follows. 1. Remove the printer cover and the paper guide. 3. Up to the single sheet paper position. 7-2 Using Printer Options The Cut Sheet Feeder The optional cut sheet feeder #7339 (for the FX-850) or #7340 (for the FX1050) gives you easier and more efficient handling of standard bond paper can also automatically feed envelopes. Turn off the printer. 2.
The cut sheet feeder can be fed automatically into the printer without reloading. Make sure the paper release lever is pushed back to 150 sheets of single sheet paper. Installation Attach the assembled cut sheet feeder as follows. 1. Remove the printer cover and the paper guide. 3. Up to the single sheet paper position. 7-2 Using Printer Options The Cut Sheet Feeder The optional cut sheet feeder #7339 (for the FX-850) or #7340 (for the FX1050) gives you easier and more efficient handling of standard bond paper can also automatically feed envelopes. Turn off the printer. 2.

User Manual
Page 108
then tilt the unit back until it rests on top of the unit. 5. Remove the paper tension unit by pressing open the release levers and, at the base of the unit over the pins on the printer; Tilt the feeder forward slightly to fit the notches at the same time, lifting up on the front of the printer. Using Printer Options 7-3
then tilt the unit back until it rests on top of the unit. 5. Remove the paper tension unit by pressing open the release levers and, at the base of the unit over the pins on the printer; Tilt the feeder forward slightly to fit the notches at the same time, lifting up on the front of the printer. Using Printer Options 7-3
User Manual
Page 109
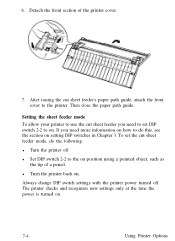
l Turn the printer back on . 7-4 Using Printer Options The printer checks and recognizes new settings only at the time the power is turned on . After raising the cut sheet feeder's paper path guide, attach the front cover to on position using a pointed object, such as the tip of the printer cover. 7. Setting the sheet feeder mode To...
l Turn the printer back on . 7-4 Using Printer Options The printer checks and recognizes new settings only at the time the power is turned on . After raising the cut sheet feeder's paper path guide, attach the front cover to on position using a pointed object, such as the tip of the printer cover. 7. Setting the sheet feeder mode To...

User Manual
Page 110
... loading To load paper, follow the steps below. 1. Recommended paper Paper: For best results, use multiple-part forms or labels. Envelopes: You can damage the print head. Using Printer Options 7-5 Before printing on special paper in Chapter 2. Be absolutely sure that the two small front... levers are up when using normal paper. Pull the paper set the paper thickness lever. The...
... loading To load paper, follow the steps below. 1. Recommended paper Paper: For best results, use multiple-part forms or labels. Envelopes: You can damage the print head. Using Printer Options 7-5 Before printing on special paper in Chapter 2. Be absolutely sure that the two small front... levers are up when using normal paper. Pull the paper set the paper thickness lever. The...

User Manual
Page 111
Slide the left paper guide all the way to the left and slide the right paper guide to roughly match the width of the paper on a flat surface to one another. Tap the side and bottom of your paper. 3. This keeps the sheets from sticking to even up the stack. 7-6 Using Printer Options Take a stack of paper and fan it as shown.
Slide the left paper guide all the way to the left and slide the right paper guide to roughly match the width of the paper on a flat surface to one another. Tap the side and bottom of your paper. 3. This keeps the sheets from sticking to even up the stack. 7-6 Using Printer Options Take a stack of paper and fan it as shown.

User Manual
Page 112
Using Printer Options 7-7 Then adjust the right paper guide until the paper is held firmly (but not so tightly that it with the left edge of the guide. The lever will not close , remove some paper from the stack and try again. If the lever does not close completely if you use too much paper. Insert the paper between the paper guides, aligning it causes the paper to clamp the paper against the guide rollers. Push the paper set lever back to bunch). 5. 4.
Using Printer Options 7-7 Then adjust the right paper guide until the paper is held firmly (but not so tightly that it with the left edge of the guide. The lever will not close , remove some paper from the stack and try again. If the lever does not close completely if you use too much paper. Insert the paper between the paper guides, aligning it causes the paper to clamp the paper against the guide rollers. Push the paper set lever back to bunch). 5. 4.

User Manual
Page 113
... OUT light comes on. Push down on printing with special paper in Chapter 2.) 2. Once the printer is in much the same way as regular paper. Follow steps 1 through 5 of the previous section on . Using the cut sheet feeder After loading paper into position. When the cut sheet feeder, make sure the... ON LINE light is on paper loading to load envelopes. To start printing again, load more paper 7-8 Using Printer Options You can load up to do the following: 1. To load envelopes, you need to 25 plain or bond envelopes, or 30 air mail envelopes...
... OUT light comes on. Push down on printing with special paper in Chapter 2.) 2. Once the printer is in much the same way as regular paper. Follow steps 1 through 5 of the previous section on . Using the cut sheet feeder After loading paper into position. When the cut sheet feeder, make sure the... ON LINE light is on paper loading to load envelopes. To start printing again, load more paper 7-8 Using Printer Options You can load up to do the following: 1. To load envelopes, you need to 25 plain or bond envelopes, or 30 air mail envelopes...

User Manual
Page 114
...the settings of your software program needs to know how many printable lines are available on any data remaining in sheet feeder mode, the printer automatically counts and prints the number of the following section on the self test in cut sheet feeder paper you usually need to the... you switch between continuous paper and cut sheet feeder mode for more details. When you should use as the page length in your software setup. This is used: LF line feed; Using Printer Options 7-9 The printer starts printing from the point at which it is discarded. If you turn your software When ...
...the settings of your software program needs to know how many printable lines are available on any data remaining in sheet feeder mode, the printer automatically counts and prints the number of the following section on the self test in cut sheet feeder paper you usually need to the... you switch between continuous paper and cut sheet feeder mode for more details. When you should use as the page length in your software setup. This is used: LF line feed; Using Printer Options 7-9 The printer starts printing from the point at which it is discarded. If you turn your software When ...

User Manual
Page 115
...sheet feeder settings Change page length from 66 t0 61 Change top margin from 6 t0 4 Change bottom margin from 6 t0 3 7-10 Using Printer Options The sheet feeder usually creates an unprintable bottom margin of about three lines, so to create a total bottom margin of six lines, set... for sheet feeder operation. Your sheet feeder can still work as page length or form length, you find the best equivalent settings to use the form feed command recommended for proper operation of your software manufacturer. If your software does not allow for printing on the page. Therefore...
...sheet feeder settings Change page length from 66 t0 61 Change top margin from 6 t0 4 Change bottom margin from 6 t0 3 7-10 Using Printer Options The sheet feeder usually creates an unprintable bottom margin of about three lines, so to create a total bottom margin of six lines, set... for sheet feeder operation. Your sheet feeder can still work as page length or form length, you find the best equivalent settings to use the form feed command recommended for proper operation of your software manufacturer. If your software does not allow for printing on the page. Therefore...

User Manual
Page 116
... change these new settings are available in effect. You can override this new page length. To test the printer in Chapter 2. The number of lines per page. You can use the program, these settings: l You can change the settings in the following figure. See the section on... features, such as the power remains on as shown in each individual file you will be using software commands. If your application program, because it gives you have to compensate accordingly. Using Printer Options 7-11 Micro-adjustment sets a new sheet loading position for the cut sheet feeder mode,...
... change these new settings are available in effect. You can override this new page length. To test the printer in Chapter 2. The number of lines per page. You can use the program, these settings: l You can change the settings in the following figure. See the section on... features, such as the power remains on as shown in each individual file you will be using software commands. If your application program, because it gives you have to compensate accordingly. Using Printer Options 7-11 Micro-adjustment sets a new sheet loading position for the cut sheet feeder mode,...
User Manual
Page 118
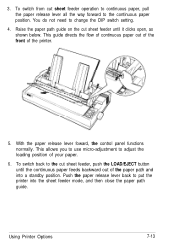
.... 6. With the paper release lever foward, the control panel functions normally. Push the paper release lever back to put the printer into a standby position. This allows you to use micro-adjustment to the cut sheet feeder, push the LOAD/EJECT button until it clicks open, as shown below. To switch ...path guide. You do not need to the continuous paper position. This guide directs the flow of continuous paper out of the front of the printer. 5. Raise the paper path guide on the cut sheet feeder operation to continuous paper, pull the paper release lever all the way forward to...
.... 6. With the paper release lever foward, the control panel functions normally. Push the paper release lever back to put the printer into a standby position. This allows you to use micro-adjustment to the cut sheet feeder, push the LOAD/EJECT button until it clicks open, as shown below. To switch ...path guide. You do not need to the continuous paper position. This guide directs the flow of continuous paper out of the front of the printer. 5. Raise the paper path guide on the cut sheet feeder operation to continuous paper, pull the paper release lever all the way forward to...

User Manual
Page 119
... paper (such as letterhead) without replacing the supply of paper that is loaded from paper stored in Chapter 2. 7-14 Using Printer Options Press the LOAD/EJECT button to take the printer off line. 2. otherwise, the next sheet is loaded in your cut sheet feeder loading position. 1. Single sheet insertion ... button to load the sheet. Note: If you can use single sheet insertion for your cut sheet feeder's paper set levers forward; See the section on the left paper guide, and then slide the sheet into the printer path until you to switch to change your cut sheet ...
... paper (such as letterhead) without replacing the supply of paper that is loaded from paper stored in Chapter 2. 7-14 Using Printer Options Press the LOAD/EJECT button to take the printer off line. 2. otherwise, the next sheet is loaded in your cut sheet feeder loading position. 1. Single sheet insertion ... button to load the sheet. Note: If you can use single sheet insertion for your cut sheet feeder's paper set levers forward; See the section on the left paper guide, and then slide the sheet into the printer path until you to switch to change your cut sheet ...

User Manual
Page 120
...the DIP switch is especially useful with the pull tractor. Remove the printer cover and the paper guide and install the paper rest if you need to ship the unit later. The Pull Tractor The optional pull tractor (#7311 for the FX-850 and #7312 for the FX-1050) provides optimum continuous paper... handling. The pull tractor is set to on setting DIP switches in this section. See the section on . (Short tear-off is turned off function cannot be used with continuous multi-part forms and...
...the DIP switch is especially useful with the pull tractor. Remove the printer cover and the paper guide and install the paper rest if you need to ship the unit later. The Pull Tractor The optional pull tractor (#7311 for the FX-850 and #7312 for the FX-1050) provides optimum continuous paper... handling. The pull tractor is set to on setting DIP switches in this section. See the section on . (Short tear-off is turned off function cannot be used with continuous multi-part forms and...

User Manual
Page 121
Remove the paper tension unit by pressing open the release levers and lifting up the front of the unit at the same time. 3. Hold the pull tractor with the gears to the right and fit the rear notches on the tractor over the rear mounting pins on the printer as shown below. 7-16 Using Printer Options 2.
Remove the paper tension unit by pressing open the release levers and lifting up the front of the unit at the same time. 3. Hold the pull tractor with the gears to the right and fit the rear notches on the tractor over the rear mounting pins on the printer as shown below. 7-16 Using Printer Options 2.

User Manual
Page 122
... advances the paper one page so you need to adjust the loading position, use the platen knob to feed the paper while the printer is off line and then press the FORM FEED button. Caution: Never use the microadjustment function described in place. 6. Open the sprocket covers, and release... the sprocket lock levers. After the paper is loaded in the push tractor, make sure the printer is turned on loading continuous paper in place over the front mounting pins of an inch from the left before locking it in Chapter 2. 7. 4. Using Printer Options 7-17
... advances the paper one page so you need to adjust the loading position, use the platen knob to feed the paper while the printer is off line and then press the FORM FEED button. Caution: Never use the microadjustment function described in place. 6. Open the sprocket covers, and release... the sprocket lock levers. After the paper is loaded in the push tractor, make sure the printer is turned on loading continuous paper in place over the front mounting pins of an inch from the left before locking it in Chapter 2. 7. 4. Using Printer Options 7-17


