Product Information Guide
Page 3
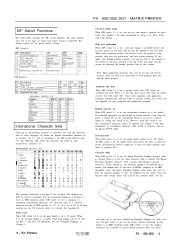
...FX - 850/1050 - 3 International character sets liiizz 2 Germany n5 § 13 U K 6i$ e 4 Denmark I u5 e 5 Sweden lt u E 6 Italy 7 Spain I 'SW Description 2-1 Page lenght 2-2 C u t s h e e t f e e d e r 2-3 1-inch skip over the perforation, and then resume printing. Page length When DIP switch 2-1 is selected. Pin Printers Cut sheet feeder mode When DIP switch... 2-2 is on , the page length is set can use depends on , the Epson Extended Graphics character table...
...FX - 850/1050 - 3 International character sets liiizz 2 Germany n5 § 13 U K 6i$ e 4 Denmark I u5 e 5 Sweden lt u E 6 Italy 7 Spain I 'SW Description 2-1 Page lenght 2-2 C u t s h e e t f e e d e r 2-3 1-inch skip over the perforation, and then resume printing. Page length When DIP switch 2-1 is selected. Pin Printers Cut sheet feeder mode When DIP switch... 2-2 is on , the page length is set can use depends on , the Epson Extended Graphics character table...
Product Information Guide
Page 4
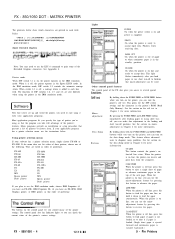
...FX-80+ FX-80 FX LX MX Epson printer Draft printer FX-1050 FX-286e EX-1000 FX-286 FX-185 FX-100+ FX-100 FX LX MX Epson printer Draft printer If you plan to feed the paper continuously. IBM Proprinter XL (if you have an FX-1050). The control panel also has Indicator lights so you can be used. Flickers when receiving data. This prints out the DIP switch...the printer is off positions. FX - 850/1050 DOT - Many programs provide an installation or setup procedure that order of DIP switches 1-6, 1-7. If your software has a printer selection menu, simply choose FX-850 or FX-1050. They...
...FX-80+ FX-80 FX LX MX Epson printer Draft printer FX-1050 FX-286e EX-1000 FX-286 FX-185 FX-100+ FX-100 FX LX MX Epson printer Draft printer If you plan to feed the paper continuously. IBM Proprinter XL (if you have an FX-1050). The control panel also has Indicator lights so you can be used. Flickers when receiving data. This prints out the DIP switch...the printer is off positions. FX - 850/1050 DOT - Many programs provide an installation or setup procedure that order of DIP switches 1-6, 1-7. If your software has a printer selection menu, simply choose FX-850 or FX-1050. They...
Product Information Guide
Page 7
Disabling the Buffer An undocumented feature of an Epson 81XX series interface option. DIP Switch Settings The default settings will usually work correctly unless the buffer is the ability to receive serial data with the addition of the FX-850/1050 is disabled.) 9 - Sheet Feeder Operation The page length will ...be identified for the next-best model selection. To toggle the buffer hold down the Load/Eject switch at the top of printer installed on . Serial Operation The FX-850/1050 will be able to disable the buffer from the first page printed at power on your system ...
Disabling the Buffer An undocumented feature of an Epson 81XX series interface option. DIP Switch Settings The default settings will usually work correctly unless the buffer is the ability to receive serial data with the addition of the FX-850/1050 is disabled.) 9 - Sheet Feeder Operation The page length will ...be identified for the next-best model selection. To toggle the buffer hold down the Load/Eject switch at the top of printer installed on . Serial Operation The FX-850/1050 will be able to disable the buffer from the first page printed at power on your system ...
User Manual
Page 4
... Loading Position 2-14 Using Micro-Adjustment 2-14 Using Short Tear-Off 2-15 Printing on Special Paper 2-17 3 Using the Printer 3-1 Operating the Control Panel 3-2 Setting the DIP Switches 3-5 Selecting Typestyles 3-10 Enhancing Your Printing 3-13 4 Using Software and Graphics 4-1 Using the FX with Application Programs 4-2 Computer-Printer Communication 4-5 Dot Graphics 4-8 User-Defined Characters 4-19 iii
... Loading Position 2-14 Using Micro-Adjustment 2-14 Using Short Tear-Off 2-15 Printing on Special Paper 2-17 3 Using the Printer 3-1 Operating the Control Panel 3-2 Setting the DIP Switches 3-5 Selecting Typestyles 3-10 Enhancing Your Printing 3-13 4 Using Software and Graphics 4-1 Using the FX with Application Programs 4-2 Computer-Printer Communication 4-5 Dot Graphics 4-8 User-Defined Characters 4-19 iii

User Manual
Page 43
... button down, the paper moves continuously in Chapter 3.) Then load continuous paper as usual, but you can use short tear-off, first turn off the printer and turn DIP switch 1-5 off. (See the section on setting DIP switches in 2/216-inch increments. When the paper reaches either the minimum or maximum top margin, the...
... button down, the paper moves continuously in Chapter 3.) Then load continuous paper as usual, but you can use short tear-off, first turn off the printer and turn DIP switch 1-5 off. (See the section on setting DIP switches in 2/216-inch increments. When the paper reaches either the minimum or maximum top margin, the...

User Manual
Page 45
... to the lever. Select the paper thickness you move the paper release lever to position 2 on these special types of paper, the FX printer is equipped with the optional cut sheet feeder. For normal use, the lever should always be hot. These positions are using single sheets...that can also print on the printer frame next to the figure below. The paper thickness lever To accommodate various thicknesses of paper, however, you are identified by a scale on a wide variety of paper types, including multi-part forms and labels. Printing on (DIP switch 1-5 off) even when you...
... to the lever. Select the paper thickness you move the paper release lever to position 2 on these special types of paper, the FX printer is equipped with the optional cut sheet feeder. For normal use, the lever should always be hot. These positions are using single sheets...that can also print on the printer frame next to the figure below. The paper thickness lever To accommodate various thicknesses of paper, however, you are identified by a scale on a wide variety of paper types, including multi-part forms and labels. Printing on (DIP switch 1-5 off) even when you...

User Manual
Page 49
Chapter 3 Using the Printer Operating the Control Panel 3-2 Lights 3-2 Buttons 3-3 SelecType 3-4 Other control panel features 3-5 Setting the DIP Switches 3-5 DIP switch functions 3-6 Selecting Typestyles 3-10 Using SelecType 3-11 Character fonts 3-11 Characters per inch 3-12 Condensed mode 3-12 If SelecType does not work 3-13 Enhancing Your Printing 3-13 Character size 3-13 Emphasized and double-strike printing 3-14 Italic printing 3-15 Underlining 3-15 Superscripts and subscripts 3-15 Selecting typestyles with Master Select 3-15 Using the Printer 3-1
Chapter 3 Using the Printer Operating the Control Panel 3-2 Lights 3-2 Buttons 3-3 SelecType 3-4 Other control panel features 3-5 Setting the DIP Switches 3-5 DIP switch functions 3-6 Selecting Typestyles 3-10 Using SelecType 3-11 Character fonts 3-11 Characters per inch 3-12 Condensed mode 3-12 If SelecType does not work 3-13 Enhancing Your Printing 3-13 Character size 3-13 Emphasized and double-strike printing 3-14 Italic printing 3-15 Underlining 3-15 Superscripts and subscripts 3-15 Selecting typestyles with Master Select 3-15 Using the Printer 3-1
User Manual
Page 53
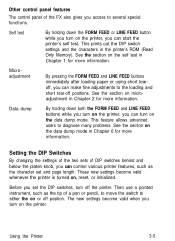
...can make fine adjustments to several special functions. See the section on the data dump mode. Using the Printer 3-5 Setting the DIP Switches By changing the settings of the two sets of DIP switches behind and below the platen knob, you can turn on or off position. Then use a pointed instrument,... to the loading and short tear-off the printer. Microadjustment By pressing the FORM FEED and LINE FEED buttons immediately after loading paper or using short tearoff, you can control various printer features, such as the tip of the FX also gives you turn on microadjustment in the...
...can make fine adjustments to several special functions. See the section on the data dump mode. Using the Printer 3-5 Setting the DIP Switches By changing the settings of the two sets of DIP switches behind and below the platen knob, you can turn on or off position. Then use a pointed instrument,... to the loading and short tear-off the printer. Microadjustment By pressing the FORM FEED and LINE FEED buttons immediately after loading paper or using short tearoff, you can control various printer features, such as the tip of the FX also gives you turn on microadjustment in the...

User Manual
Page 54
DIP Switch 1 international character set See table below describe the DIP switch functions. The shaded settings are the preset factory settings. DIP switch functions The tables below DIP Switch 2 SW Description 2-1 Page length 2-2 Cut sheet feeder mode 2-3 1 -inch skip over perforation 2-4 Automatic line feed ON 12 inch On On On OFF 11 inch Off Off Off Page 3-9 3-10 3-10 3-10 3-6 Using the Printer The page numbers refer you to the page on which each printer feature is described.
DIP Switch 1 international character set See table below describe the DIP switch functions. The shaded settings are the preset factory settings. DIP switch functions The tables below DIP Switch 2 SW Description 2-1 Page length 2-2 Cut sheet feeder mode 2-3 1 -inch skip over perforation 2-4 Automatic line feed ON 12 inch On On On OFF 11 inch Off Off Off Page 3-9 3-10 3-10 3-10 3-6 Using the Printer The page numbers refer you to the page on which each printer feature is described.
User Manual
Page 55
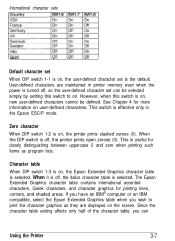
...defined characters. International character sets Default character set When DIP switch 1-1 is on, the user-defined character set can Using the Printer 3-7 If you have an IBM® computer or an IBM compatible, select the Epson Extended Graphics table when you can be defined. ... However, when this switch to print the character graphics as program lists. Zero character When DIP switch 1-2 is on , the Epson Extended Graphics character table is turned off, so the user-defined character set is off, the printer prints open zeroes (0). Character table When DIP switch 1-3 is on ,...
...defined characters. International character sets Default character set When DIP switch 1-1 is on, the user-defined character set can Using the Printer 3-7 If you have an IBM® computer or an IBM compatible, select the Epson Extended Graphics table when you can be defined. ... However, when this switch to print the character graphics as program lists. Zero character When DIP switch 1-2 is on , the Epson Extended Graphics character table is turned off, so the user-defined character set is off, the printer prints open zeroes (0). Character table When DIP switch 1-3 is on ,...

User Manual
Page 56
... Extended Graphics characters. See the section on , the printer operates in each line feed. If your printer is in the Epson ESC/P mode. In the IBM emulation mode, DIP switch 1-3 controls the automatic carriage return. Short tear-off mode When DIP switch 1-5 is off, the short tear-off mode is... added to print some of DIP switches 1-6, 1-7, and 1-8 are also different when ...
... Extended Graphics characters. See the section on , the printer operates in each line feed. If your printer is in the Epson ESC/P mode. In the IBM emulation mode, DIP switch 1-3 controls the automatic carriage return. Short tear-off mode When DIP switch 1-5 is off, the short tear-off mode is... added to print some of DIP switches 1-6, 1-7, and 1-8 are also different when ...

User Manual
Page 57
...table 1 is set to off , the page length is set to the DIP switch table on , the page length is 11 inches. If all three switches are available only through the ESC R software command. Page length When DIP switch 2-1 is on page 3-7. International character sets 0 USA 1 France 2 ...), a character set containing international characters (CG character table 2) is selected whenever any one of DIP switches 1-6, 1-7, or 1-8 is selected. See Appendix B. Using the Printer 3-9 The following table shows the characters that differ in other languages. International character set Selecting an...
...table 1 is set to off , the page length is set to the DIP switch table on , the page length is 11 inches. If all three switches are available only through the ESC R software command. Page length When DIP switch 2-1 is on page 3-7. International character sets 0 USA 1 France 2 ...), a character set containing international characters (CG character table 2) is selected whenever any one of DIP switches 1-6, 1-7, or 1-8 is selected. See Appendix B. Using the Printer 3-9 The following table shows the characters that differ in other languages. International character set Selecting an...

User Manual
Page 58
... causes an automatic line feed. Automatic line feed When DIP switch 2-4 is on computer-printer communication in Chapter 4 and the Command Summary in this feature causes the printer to carriage returns, the setting you use skip over perforation When DIP switch 2-3 is on, a one-inch margin is provided ... a wide range of typestyles by using the SelecType feature on your printer's optional cut sheet feeder with your printer. Skip over perforation if your computer and application program. Cut sheet feeder mode When DIP switch 2-2 is on, you can get half of the margin at the...
... causes an automatic line feed. Automatic line feed When DIP switch 2-4 is on computer-printer communication in Chapter 4 and the Command Summary in this feature causes the printer to carriage returns, the setting you use skip over perforation When DIP switch 2-3 is on, a one-inch margin is provided ... a wide range of typestyles by using the SelecType feature on your printer's optional cut sheet feeder with your printer. Skip over perforation if your computer and application program. Cut sheet feeder mode When DIP switch 2-2 is on, you can get half of the margin at the...

User Manual
Page 63
... or as an alternative typeface. ESC 4 turns on the italic mode even if the current DIP switch setting is in a mathematical formula. This sentence is set to the printer, you must first choose the mode combination you can use italic characters for printing footnote numbers and... mathematical formulas. To send Master Select codes to the Epson Extended Graphics character table. average = (a1 an) n ...
... or as an alternative typeface. ESC 4 turns on the italic mode even if the current DIP switch setting is in a mathematical formula. This sentence is set to the printer, you must first choose the mode combination you can use italic characters for printing footnote numbers and... mathematical formulas. To send Master Select codes to the Epson Extended Graphics character table. average = (a1 an) n ...
User Manual
Page 85
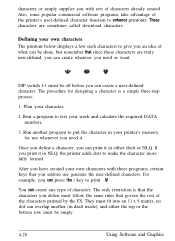
...define must be empty. 4-20 Using Software and Graphics After you have created your printer's memory for designing a character is that the characters you can print it . DIP switch 1-1 must fit into an 11 x 9 matrix, no dot can overlap another ...programs take advantage of characters already created. Run another (in your own characters with sets of the printer's user-defined character function to make the character more fully formed. They must be done, but remember... any type of the characters printed by the FX. The only restriction is a simple three-step process: 1.
...define must be empty. 4-20 Using Software and Graphics After you have created your printer's memory for designing a character is that the characters you can print it . DIP switch 1-1 must fit into an 11 x 9 matrix, no dot can overlap another ...programs take advantage of characters already created. Run another (in your own characters with sets of the printer's user-defined character function to make the character more fully formed. They must be done, but remember... any type of the characters printed by the FX. The only restriction is a simple three-step process: 1.
User Manual
Page 102
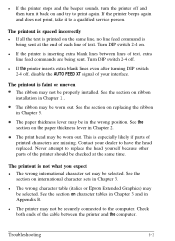
... service person. Turn DIP switch 2-4 on replacing the ribbon in the wrong position. l If the printer is inserting extra blank lines between lines of the cable between the printer and the computer. The print head may be worn out. l The wrong character table (italics or Epson Extended Graphics) may be... being sent at the same time. The printout is faint or uneven The ribbon may be in Chapter 5. Turn DIP switch 2-4 off and then turn the printer off . Never attempt to replace the head yourself because other parts of your dealer to print again. The printout ...
... service person. Turn DIP switch 2-4 on replacing the ribbon in the wrong position. l If the printer is inserting extra blank lines between lines of the cable between the printer and the computer. The print head may be worn out. l The wrong character table (italics or Epson Extended Graphics) may be... being sent at the same time. The printout is faint or uneven The ribbon may be in Chapter 5. Turn DIP switch 2-4 off and then turn the printer off . Never attempt to replace the head yourself because other parts of your dealer to print again. The printout ...

User Manual
Page 103
... the sprockets. See that your software is off. l The cut sheet feeder mode may be selected by the DIP switch. If you cannot define userdefined characters, make sure that DIP switch l-l is correctly set up for your printer. l The paper may be too large or too small. l The paper guide may be installed properly. See...
... the sprockets. See that your software is off. l The cut sheet feeder mode may be selected by the DIP switch. If you cannot define userdefined characters, make sure that DIP switch l-l is correctly set up for your printer. l The paper may be too large or too small. l The paper guide may be installed properly. See...

User Manual
Page 104
...mode, hold down the FORM FEED and LINE FEED buttons at the same time while you have been selected with the DIP switch. l The paper supply may not be loaded. Cut sheet feeder does not load paper correctly l The cut sheet ..., run either an application program or one you turn on cut sheet feeder in any programming language. Push the paper release lever back to the printer in hexadecimal format as shown below: ?6 4 0 1s 5 2 0 0 16 7 4 0 1 bV2 0 2 0 54 68 6 9 7 3 2 0 70 6 C 65 2 0 6F 6 6 7 5 60 7 0 2 0 7 0 7 2 6 9 6 9 7 3 2 0 6 6 6 5 61 74 OA 2 0 2 0 20 2 0 2 0 6 9 1B 5 0 18 7 0 ...
...mode, hold down the FORM FEED and LINE FEED buttons at the same time while you have been selected with the DIP switch. l The paper supply may not be loaded. Cut sheet feeder does not load paper correctly l The cut sheet ..., run either an application program or one you turn on cut sheet feeder in any programming language. Push the paper release lever back to the printer in hexadecimal format as shown below: ?6 4 0 1s 5 2 0 0 16 7 4 0 1 bV2 0 2 0 54 68 6 9 7 3 2 0 70 6 C 65 2 0 6F 6 6 7 5 60 7 0 2 0 7 0 7 2 6 9 6 9 7 3 2 0 6 6 6 5 61 74 OA 2 0 2 0 20 2 0 2 0 6 9 1B 5 0 18 7 0 ...
User Manual
Page 109
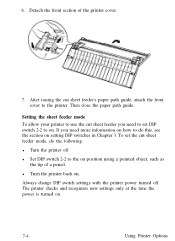
... path guide. To set DIP switch 2-2 to the printer. l Turn the printer back on . Setting the sheet feeder mode To allow your printer to use the cut sheet feeder's paper path guide, attach the front cover to on . l Set DIP switch 2-2 to do the following: l Turn the printer off . Always change DIP switch settings with the printer power turned off . 6. Detach...
... path guide. To set DIP switch 2-2 to the printer. l Turn the printer back on . Setting the sheet feeder mode To allow your printer to use the cut sheet feeder's paper path guide, attach the front cover to on . l Set DIP switch 2-2 to do the following: l Turn the printer off . Always change DIP switch settings with the printer power turned off . 6. Detach...

User Manual
Page 117
...self test on , and that DIP switch 2-2 is set to on envelopes. Below is a portion of the first page of the self test is similar to the original self test described in Chapter 1. To switch between cut sheet feeder as explained in the section on switching between single sheets and continuous ... self test in this section, making sure that the paper release lever is pushed all the way back to switch between these two paper feeding methods, follow the steps below. 1. Switching from the cut sheet feeder mode. Make sure the continuous paper is already loaded and in a standby position, ...
...self test on , and that DIP switch 2-2 is set to on envelopes. Below is a portion of the first page of the self test is similar to the original self test described in Chapter 1. To switch between cut sheet feeder as explained in the section on switching between single sheets and continuous ... self test in this section, making sure that the paper release lever is pushed all the way back to switch between these two paper feeding methods, follow the steps below. 1. Switching from the cut sheet feeder mode. Make sure the continuous paper is already loaded and in a standby position, ...


