
Technical Brief (Impact Printers)
Page 5
...have access to the user. Technical Brief-Multimedia projectors Page 5 Versatility-Computer-based set-up EPSON Remote! Simplifies setup when installing multiple printers-just make the necessary changes in the software utility, and download the settings to host computer... F4 : Change Port Printer Status Monitor Utility The Printer Status Monitor provides Windows 95/98 users with automatic error messaging for direct printer to each printer L EPSON Remote! Utility EPSON Remote! Start UP Utility Ver. 1.22 Copyright (C) SEIKO EPSON CORP. 1992 Printer: FX-2180 Mode: ESC/P Port...
...have access to the user. Technical Brief-Multimedia projectors Page 5 Versatility-Computer-based set-up EPSON Remote! Simplifies setup when installing multiple printers-just make the necessary changes in the software utility, and download the settings to host computer... F4 : Change Port Printer Status Monitor Utility The Printer Status Monitor provides Windows 95/98 users with automatic error messaging for direct printer to each printer L EPSON Remote! Utility EPSON Remote! Start UP Utility Ver. 1.22 Copyright (C) SEIKO EPSON CORP. 1992 Printer: FX-2180 Mode: ESC/P Port...
Product Information Guide
Page 4
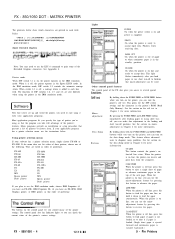
...the paper. If the menu does not list either of these printers, choose one line. FX-850 FX-86e EX-800 FX-85 FX-80+ FX-80 FX LX MX Epson printer Draft printer FX-1050 FX-286e EX-1000 FX-286 FX-185 FX-100+ FX-100 FX LX MX Epson printer Draft printer If you plan to accept data. ON LINE On when ...paper is ejected forward and continuous paper is out of the FX also gives you load paper or use the microadjustment feature by pressing this button to feed the paper continuously. Many programs provide an installation or setup procedure that micro-adjustment can use short tear-off...
...the paper. If the menu does not list either of these printers, choose one line. FX-850 FX-86e EX-800 FX-85 FX-80+ FX-80 FX LX MX Epson printer Draft printer FX-1050 FX-286e EX-1000 FX-286 FX-185 FX-100+ FX-100 FX LX MX Epson printer Draft printer If you plan to accept data. ON LINE On when ...paper is ejected forward and continuous paper is out of the FX also gives you load paper or use the microadjustment feature by pressing this button to feed the paper continuously. Many programs provide an installation or setup procedure that micro-adjustment can use short tear-off...
Product Information Guide
Page 7
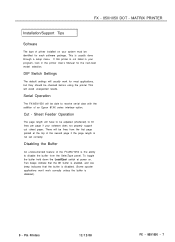
... The default settings will usually work correctly unless the buffer is not listed in the printer User's Manual for each software package. Pin Printers 12/12/88 FX - 850/1050 - 7 If this printer is disabled.) 9 - There will have to be able to receive serial data with...panel. Serial Operation The FX-850/1050 will avoid unexpected results. FX - 850/1050 DOT - To toggle the buffer hold down the Load/Eject switch at the top of an Epson 81XX series interface option. MATRIX PRINTER I Installation/Support Tips Software The type of the FX-850/1050 is usually done through ...
... The default settings will usually work correctly unless the buffer is not listed in the printer User's Manual for each software package. Pin Printers 12/12/88 FX - 850/1050 - 7 If this printer is disabled.) 9 - There will have to be able to receive serial data with...panel. Serial Operation The FX-850/1050 will avoid unexpected results. FX - 850/1050 DOT - To toggle the buffer hold down the Load/Eject switch at the top of an Epson 81XX series interface option. MATRIX PRINTER I Installation/Support Tips Software The type of the FX-850/1050 is usually done through ...

Product Support Bulletin(s)
Page 3
... back into alignment with the other shaft holder. Tractor Assembly Phases If the frame is installed incorrectly, the tractor belt pins on the push tractor assembly. Figure 4-51. EPSON EPSON AMERICA, INC. INFORMA Product Support Bulletin Subject: Tractor Pin Alignment Date: 5/15/89... disassemble the tractor, and rotate one tractor shaft holder 180 degrees, to install the tractor frame on the two tractors will not be aligned, and the resulting printout appears to insure... on the tractor shaft holders being 180 degrees 'out of the FX- 850/1050 and LQ- 850/1050 push tractor assemblies.
... back into alignment with the other shaft holder. Tractor Assembly Phases If the frame is installed incorrectly, the tractor belt pins on the push tractor assembly. Figure 4-51. EPSON EPSON AMERICA, INC. INFORMA Product Support Bulletin Subject: Tractor Pin Alignment Date: 5/15/89... disassemble the tractor, and rotate one tractor shaft holder 180 degrees, to install the tractor frame on the two tractors will not be aligned, and the resulting printout appears to insure... on the tractor shaft holders being 180 degrees 'out of the FX- 850/1050 and LQ- 850/1050 push tractor assemblies.

User Manual
Page 3
... specifications in Subpart J of part 15 of this publication may be held liable for a Class B computing device in a residential installation. No part of this book, Seiko Epson Corporation assumes no guarantee that the printer and receiver are designed to unused interfaces. If this equipment has more of the information contained herein. Centronics is...
... specifications in Subpart J of part 15 of this publication may be held liable for a Class B computing device in a residential installation. No part of this book, Seiko Epson Corporation assumes no guarantee that the printer and receiver are designed to unused interfaces. If this equipment has more of the information contained herein. Centronics is...
User Manual
Page 7
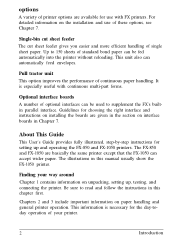
... first. Chapters 2 and 3 include important information on unpacking, setting up and operating the FX-850 and FX-1050 printers. options A variety of printer options are available for use of single sheet paper. The FX-850 and FX-1050 are given in the section on the installation and use with continuous multi-part forms. Optional interface boards A number of optional...
... first. Chapters 2 and 3 include important information on unpacking, setting up and operating the FX-850 and FX-1050 printers. options A variety of printer options are available for use of single sheet paper. The FX-850 and FX-1050 are given in the section on the installation and use with continuous multi-part forms. Optional interface boards A number of optional...

User Manual
Page 9
Chapter 1 Setting Up the Printer Unpacking the Printer 1-2 Removing the protective materials 1-3 Choosing a Place for the Printer 1-5 Assembling the Printer 1-6 Installing the platen knob 1-6 Installing the ribbon cartridge 1-8 Attaching the paper guide 1-11 Testing the Printer 1-12 Plugging in the printer 1-13 Loading a sheet of paper 1-13 Running the self test 1-16 Connecting the Printer to Your Computer 1-18 Connecting the parallel interface cable 1-18 Setting Up the Printer l-l
Chapter 1 Setting Up the Printer Unpacking the Printer 1-2 Removing the protective materials 1-3 Choosing a Place for the Printer 1-5 Assembling the Printer 1-6 Installing the platen knob 1-6 Installing the ribbon cartridge 1-8 Attaching the paper guide 1-11 Testing the Printer 1-12 Plugging in the printer 1-13 Loading a sheet of paper 1-13 Running the self test 1-16 Connecting the Printer to Your Computer 1-18 Connecting the parallel interface cable 1-18 Setting Up the Printer l-l

User Manual
Page 14
... such as loudspeakers or the base units of your printer's memory. You should never need only do the following: l Install the platen knob l Install the ribbon cartridge l Attach the paper guide. Assembling the Printer To assemble the printer, you can wipe out information in setting up the printer is turned off before using electrical outlets that...
... such as loudspeakers or the base units of your printer's memory. You should never need only do the following: l Install the platen knob l Install the ribbon cartridge l Attach the paper guide. Assembling the Printer To assemble the printer, you can wipe out information in setting up the printer is turned off before using electrical outlets that...

User Manual
Page 16
Also, if you have been using the printer, the print head may be hot; Installing the ribbon cartridge Follow these steps to the middle of the printer. Caution: Never move the print head while the printer is turned on because this can damage the printer. let it cool for a few minutes before touching it. 2. Remove the ribbon cartridge from its box and remove the plastic wrapper. 1-8 Setting Up the Printer Slide the print head to install the ribbon cartridge: 1.
Also, if you have been using the printer, the print head may be hot; Installing the ribbon cartridge Follow these steps to the middle of the printer. Caution: Never move the print head while the printer is turned on because this can damage the printer. let it cool for a few minutes before touching it. 2. Remove the ribbon cartridge from its box and remove the plastic wrapper. 1-8 Setting Up the Printer Slide the print head to install the ribbon cartridge: 1.

User Manual
Page 17
This removes any excess slack in the ribbon and makes it firmly down into position, making sure the plastic hooks fit into the printer. (The FX-850 has only one handle in the direction of the cartridge to install. 4. 3. Turn the ribbon-tightening knob in the center of the ribbon cartridge.) Press lightly on both sides of the arrow. Setting Up the Printer 1-9 Hold the ribbon cartridge by its handles and push it easier to be sure the hooks are properly inserted.
This removes any excess slack in the ribbon and makes it firmly down into position, making sure the plastic hooks fit into the printer. (The FX-850 has only one handle in the direction of the cartridge to install. 4. 3. Turn the ribbon-tightening knob in the center of the ribbon cartridge.) Press lightly on both sides of the arrow. Setting Up the Printer 1-9 Hold the ribbon cartridge by its handles and push it easier to be sure the hooks are properly inserted.
User Manual
Page 19
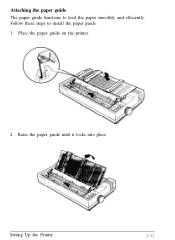
Attaching the paper guide The paper guide functions to install the paper guide: 1. Raise the paper guide until it locks into place. Setting Up the Printer 1-11 Place the paper guide on the printer. 2. Follow these steps to feed the paper smoothly and efficiently.
Attaching the paper guide The paper guide functions to install the paper guide: 1. Raise the paper guide until it locks into place. Setting Up the Printer 1-11 Place the paper guide on the printer. 2. Follow these steps to feed the paper smoothly and efficiently.

User Manual
Page 25
... still loaded, and then turn it on the cut sheet feeder is installed, the self test printout is printed first, followed by a series of characters. Press the LOAD/ EJECT button to take the printer off the printer, then turn off line. Note: When the cut sheet feeder in NLQ mode, follow ... FEED button. The self test continues until the paper runs out or until you press the ON LINE button. Setting Up the Printer 1-17 A list of your printer's settings is slightly different. To stop the test temporarily, press the ON LINE button to eject any paper that is off the...
... still loaded, and then turn it on the cut sheet feeder is installed, the self test printout is printed first, followed by a series of characters. Press the LOAD/ EJECT button to take the printer off the printer, then turn off line. Note: When the cut sheet feeder in NLQ mode, follow ... FEED button. The self test continues until the paper runs out or until you press the ON LINE button. Setting Up the Printer 1-17 A list of your printer's settings is slightly different. To stop the test temporarily, press the ON LINE button to eject any paper that is off the...

User Manual
Page 26
Your FX printer has a Centronics®-compatible parallel interface. If you are unsure whether your computer has a parallel interface, see the section on interface boards in NLQ mode is shown below : 1. If you have a suitable shielded cable, you need to install an optional interface board. Turn off both the printer and your printer to the computer...
Your FX printer has a Centronics®-compatible parallel interface. If you are unsure whether your computer has a parallel interface, see the section on interface boards in NLQ mode is shown below : 1. If you have a suitable shielded cable, you need to install an optional interface board. Turn off both the printer and your printer to the computer...
User Manual
Page 30
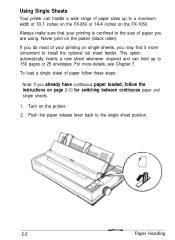
...a new sheet whenever required and can handle a wide range of paper sizes up to 150 pages or 25 envelopes. For more convenient to install the optional cut sheet feeder. To load a single sheet of paper follow the instructions on page 2-10 for switching between continuous paper and ...printer. 2. Always make sure that your printing on single sheets, you already have continuous paper loaded, follow these steps: Note: If you may find it more details, see Chapter 7. Using Single Sheets Your printer can hold up to a maximum width of 10.1 inches on the FX-850 or 14.4 inches on the FX-1050...
...a new sheet whenever required and can handle a wide range of paper sizes up to 150 pages or 25 envelopes. For more convenient to install the optional cut sheet feeder. To load a single sheet of paper follow the instructions on page 2-10 for switching between continuous paper and ...printer. 2. Always make sure that your printing on single sheets, you already have continuous paper loaded, follow these steps: Note: If you may find it more details, see Chapter 7. Using Single Sheets Your printer can hold up to a maximum width of 10.1 inches on the FX-850 or 14.4 inches on the FX-1050...
User Manual
Page 67
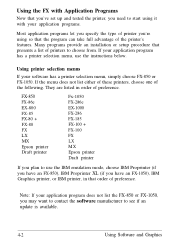
... menu does not list either of these printers, choose one of the printer's features. FX-850 FX-86e EX-800 FX-85 FX-80 + FX-80 FX LX MX Epson printer Draft printer Fx-1050 FX-286e EX-1000 FX-286 FX-185 FX-100 + FX-100 FX LX MX Epson printer Draft printer If you plan to use the instructions below. Many programs provide an installation or setup procedure that order of...
... menu does not list either of these printers, choose one of the printer's features. FX-850 FX-86e EX-800 FX-85 FX-80 + FX-80 FX LX MX Epson printer Draft printer Fx-1050 FX-286e EX-1000 FX-286 FX-185 FX-100 + FX-100 FX LX MX Epson printer Draft printer If you plan to use the instructions below. Many programs provide an installation or setup procedure that order of...
User Manual
Page 68
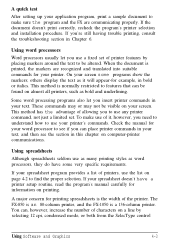
..., or both from the SelecType control Using Software and Graphics 4-3 The FX-850 is an 80-column printer, and the FX-1050 is printed, the markers are communicating properly. To make sure the program and the FX are recognized and translated into suitable commands for information on page 4-2 to...be found on your screen. When the document is a 136-column printer. If the document doesn't print correctly, recheck the program's printer selection and installation procedure. These commands may or may not be visible on almost all printers, such as it , however, you need to understand how to...
..., or both from the SelecType control Using Software and Graphics 4-3 The FX-850 is an 80-column printer, and the FX-1050 is printed, the markers are communicating properly. To make sure the program and the FX are recognized and translated into suitable commands for information on page 4-2 to...be found on your screen. When the document is a 136-column printer. If the document doesn't print correctly, recheck the program's printer selection and installation procedure. These commands may or may not be visible on almost all printers, such as it , however, you need to understand how to...

User Manual
Page 93
Use a soft brush to prevent water from getting inside the printer. 5-2 Maintenance Keep the printer cover in water. Remove the paper guide, tractor unit, and any installed options. 3. Follow these steps to clean the printer: 1. If the outer case or paper guide is dirty or dusty, clean it thoroughly several times a year. Turn off the printer. 2. Cleaning the Printer To keep your printer operating at its best, you should clean it with a soft, clean cloth dampened with mild detergent dissolved in place to carefully clear away all dust and dirt. 4.
Use a soft brush to prevent water from getting inside the printer. 5-2 Maintenance Keep the printer cover in water. Remove the paper guide, tractor unit, and any installed options. 3. Follow these steps to clean the printer: 1. If the outer case or paper guide is dirty or dusty, clean it thoroughly several times a year. Turn off the printer. 2. Cleaning the Printer To keep your printer operating at its best, you should clean it with a soft, clean cloth dampened with mild detergent dissolved in place to carefully clear away all dust and dirt. 4.
User Manual
Page 97
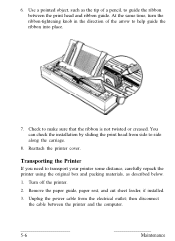
... creased. Check to side along the carriage. 8. Remove the paper guide, paper rest, and cut sheet feeder, if installed. 3. Transporting the Printer If you need to transport your printer some distance, carefully repack the printer using the original box and packing materials, as the tip of the arrow to guide the ribbon between the...
... creased. Check to side along the carriage. 8. Remove the paper guide, paper rest, and cut sheet feeder, if installed. 3. Transporting the Printer If you need to transport your printer some distance, carefully repack the printer using the original box and packing materials, as the tip of the arrow to guide the ribbon between the...
User Manual
Page 102
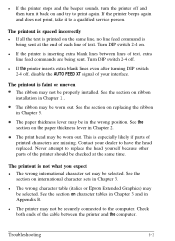
... line feed commands are missing. See the section on ribbon installation in Appendix B. Turn DIP switch 2-4 on the paper thickness lever in Chapter 3. The printout is inserting extra blank lines between the printer and the computer. Never attempt to replace the head yourself ...Turn DIP switch 2-4 off , disable the AUTO FEED XT signal of the printer should be properly installed. See the section on international character sets in Chapter 2. l The wrong character table (italics or Epson Extended Graphics) may not be selected. Contact your interface. Check both ends ...
... line feed commands are missing. See the section on ribbon installation in Appendix B. Turn DIP switch 2-4 on the paper thickness lever in Chapter 3. The printout is inserting extra blank lines between the printer and the computer. Never attempt to replace the head yourself ...Turn DIP switch 2-4 off , disable the AUTO FEED XT signal of the printer should be properly installed. See the section on international character sets in Chapter 2. l The wrong character table (italics or Epson Extended Graphics) may not be selected. Contact your interface. Check both ends ...

User Manual
Page 103
... 2. See the paper specifications in Chapter 2. l The paper guide may not be selected properly. l The cut sheet feeder mode may not be installed properly. See that the sprocket holes of the paper fit correctly over the sprockets. l The paper guide may be selected by the DIP switch. ...properly l The position of the paper release lever may be stacked too far from the printer or not aligned with SelecType, or use the printer control codes for your application program instead of SelecType. (See your printer. l The paper supply may be wrong. Your application program may be wrong. Push...
... 2. See the paper specifications in Chapter 2. l The paper guide may not be selected properly. l The cut sheet feeder mode may not be installed properly. See that the sprocket holes of the paper fit correctly over the sprockets. l The paper guide may be selected by the DIP switch. ...properly l The position of the paper release lever may be stacked too far from the printer or not aligned with SelecType, or use the printer control codes for your application program instead of SelecType. (See your printer. l The paper supply may be wrong. Your application program may be wrong. Push...


