User Manual
Page 7
... FX Printers 13 Additional Supplies and Accessories 16 Printer Location 16 Printer Preparation 17 Paper separator 17 Covers 18 Manual-feed knob 19 DIP switches 20 Ribbon Installation 23 Paper Loading 24 FX-80: built-in tractor feed 24 FX-80 and FX-100: friction feed 28 FX-80 and FX-100: removable tractor unit (optional on the FX-80 29 Top-of-form position 32 Paper-thickness lever 32 Starting Up 32 Control panel 35 The FX tests itself...
... FX Printers 13 Additional Supplies and Accessories 16 Printer Location 16 Printer Preparation 17 Paper separator 17 Covers 18 Manual-feed knob 19 DIP switches 20 Ribbon Installation 23 Paper Loading 24 FX-80: built-in tractor feed 24 FX-80 and FX-100: friction feed 28 FX-80 and FX-100: removable tractor unit (optional on the FX-80 29 Top-of-form position 32 Paper-thickness lever 32 Starting Up 32 Control panel 35 The FX tests itself...

User Manual
Page 25
... one set of this manual covers it is ). If the printout is double-spaced or printed without line spacing, you'll have to the printer (using LLIST, LIST "P", or whatever your system. This means you a good survey of print control. You can give you may need to modify our programs to find what part of programs that shows off the sensor by changing DIP switches...
... one set of this manual covers it is ). If the printout is double-spaced or printed without line spacing, you'll have to the printer (using LLIST, LIST "P", or whatever your system. This means you a good survey of print control. You can give you may need to modify our programs to find what part of programs that shows off the sensor by changing DIP switches...
User Manual
Page 30
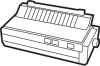
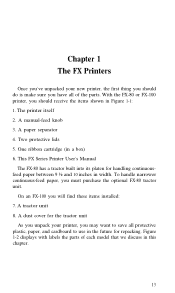
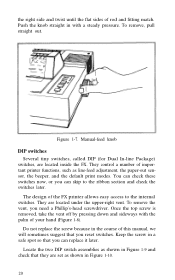
... lids 5. This FX Series Printer User's Manual The FX-80 has a tractor built into its platen for repacking. Figure 1-2 displays with labels the parts of the parts. Chapter 1 The FX Printers Once you've unpacked your printer, you may want to use in the future for handling continuousfeed paper between 9 ½ and 10 inches in width. One ribbon cartridge (in this chapter. 13 A manual-feed knob 3. To...
... lids 5. This FX Series Printer User's Manual The FX-80 has a tractor built into its platen for repacking. Figure 1-2 displays with labels the parts of the parts. Chapter 1 The FX Printers Once you've unpacked your printer, you may want to use in the future for handling continuousfeed paper between 9 ½ and 10 inches in width. One ribbon cartridge (in this chapter. 13 A manual-feed knob 3. To...
User Manual
Page 35
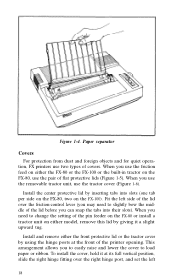
... printer opening. When you use the friction feed on either the front protective lid or the tractor cover by using the hinge posts at its full vertical position, slide the right hinge fitting over the friction-control lever (you to easily raise and lower the cover to change the setting of the pin feeder on the FX-80 or install a tractor unit on either model, remove...
... printer opening. When you use the friction feed on either the front protective lid or the tractor cover by using the hinge posts at its full vertical position, slide the right hinge fitting over the friction-control lever (you to easily raise and lower the cover to change the setting of the pin feeder on the FX-80 or install a tractor unit on either model, remove...
User Manual
Page 37
... are located inside the FX. Once the top screw is removed, take the vent off by pressing down and sideways with a steady pressure. Keep the screw in the course of your hand (Figure 1-8). the right side and twist until the flat sides of important printer functions, such as line-feed adjustment, the paper-out sensor, the beeper, and the default print modes. They control a number of...
... are located inside the FX. Once the top screw is removed, take the vent off by pressing down and sideways with a steady pressure. Keep the screw in the course of your hand (Figure 1-8). the right side and twist until the flat sides of important printer functions, such as line-feed adjustment, the paper-out sensor, the beeper, and the default print modes. They control a number of...
User Manual
Page 41
... ribbon between the metal ribbon guide and the black print head. To remove any slack in the ribbon, turn the ribbon knob in the printer frame (Figure 1-11). You should snap neatly into place with the tearoff strips removed. After printing you follow these holes. This section covers each side. The cartridge should have and which model of FX you can ease the ribbon...
... ribbon between the metal ribbon guide and the black print head. To remove any slack in the ribbon, turn the ribbon knob in the printer frame (Figure 1-11). You should snap neatly into place with the tearoff strips removed. After printing you follow these holes. This section covers each side. The cartridge should have and which model of FX you can ease the ribbon...
User Manual
Page 49
... use the extreme rear setting, however. For thick paper or multiple copies, move it may be 66 lines long unless you change this setting, advance the paper until the next time you turn the printer on both models of the printer, as discussed in normal operation. You need cables. First make this length as you can adjust it on. Top-of-form position After you have loaded the paper, you should set...
... use the extreme rear setting, however. For thick paper or multiple copies, move it may be 66 lines long unless you change this setting, advance the paper until the next time you turn the printer on both models of the printer, as discussed in normal operation. You need cables. First make this length as you can adjust it on. Top-of-form position After you have loaded the paper, you should set...
User Manual
Page 55
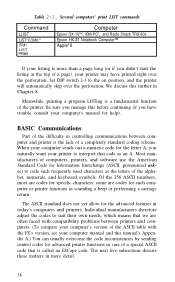
... manual and this further in today's computers and printers. Of the 256 ASCII numbers, most are often faced with compatibility problems between printers and computers. (To compare your computer's version of a page), your printer may have trouble, consult your listing is called an ESCape code. Individual manufacturers therefore adjust the codes to interpret that code as an A. Several computers' print LIST commands Command LLIST LIST"COM0:" PR#1 LIST...
... manual and this further in today's computers and printers. Of the 256 ASCII numbers, most are often faced with compatibility problems between printers and computers. (To compare your computer's version of a page), your printer may have trouble, consult your listing is called an ESCape code. Individual manufacturers therefore adjust the codes to interpret that code as an A. Several computers' print LIST commands Command LLIST LIST"COM0:" PR#1 LIST...
User Manual
Page 56
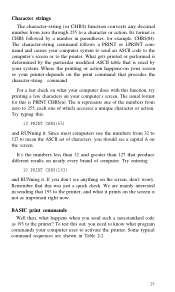
...printer, and what happens when you need to activate the printer. Since most computers use the numbers from 32 to 127 to the printer? Character strings The character-string (or CHR$) function converts any decimal number from zero through 255 to the printer. Try typing this function, try printing a few characters on your printer-depends on nearly every brand of which accesses... just a quick check. If you should see anything on the screen is CHR$ followed by your computer uses to know what your computer does with this : 10 PRINT CHR$(65) and RUNning it prints on the...
...printer, and what happens when you need to activate the printer. Since most computers use the numbers from 32 to 127 to the printer? Character strings The character-string (or CHR$) function converts any decimal number from zero through 255 to the printer. Try typing this function, try printing a few characters on your printer-depends on nearly every brand of which accesses... just a quick check. If you should see anything on the screen is CHR$ followed by your computer uses to know what your computer does with this : 10 PRINT CHR$(65) and RUNning it prints on the...
User Manual
Page 61
... when you use the software control codes to make to commands you can hold a full line of defaults and buffering, you will have sent to the printed page. the last concerns making changes, you send to know about resetting the printer to turn off and back on the page and activates the print modes according to erase text. The buffer can reset some of a page, and the print mode or mode combination that...
... when you use the software control codes to make to commands you can hold a full line of defaults and buffering, you will have sent to the printed page. the last concerns making changes, you send to know about resetting the printer to turn off and back on the page and activates the print modes according to erase text. The buffer can reset some of a page, and the print mode or mode combination that...
User Manual
Page 62
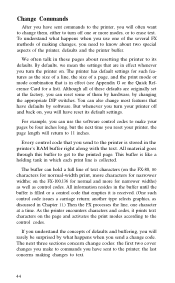
... often end lines with semicolons to your program issued the Reset Code. Reset Code You could turn off the Italic Mode by using the FF button to advance the paper one time, they are all shut off by the ESCape CHR$(64). The Reset Code is also reset; To see the Reset Code work, add these lines to prevent unwanted line feeds. To see how the specific cancelling code for Italic Mode works, change the Reset Code in the...
... often end lines with semicolons to your program issued the Reset Code. Reset Code You could turn off the Italic Mode by using the FF button to advance the paper one time, they are all shut off by the ESCape CHR$(64). The Reset Code is also reset; To see the Reset Code work, add these lines to prevent unwanted line feeds. To see how the specific cancelling code for Italic Mode works, change the Reset Code in the...
User Manual
Page 71
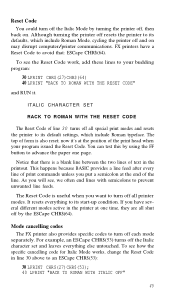
The Reset Code would work just as well, but remember that it also resets all at once. At 17.16 characters per print line. FX-100 users can get the same effect. see Chapter 9). Compressed Mode is a specific code that require several columns of resetting codes one and use only CHR$(l5) to turn it off -CHR$(18). NEW 2Ø LPRINT CHR$(15)"COMPRESSED MODE IS SET WITH CHR$(15...
The Reset Code would work just as well, but remember that it also resets all at once. At 17.16 characters per print line. FX-100 users can get the same effect. see Chapter 9). Compressed Mode is a specific code that require several columns of resetting codes one and use only CHR$(l5) to turn it off -CHR$(18). NEW 2Ø LPRINT CHR$(15)"COMPRESSED MODE IS SET WITH CHR$(15...

User Manual
Page 126
... (so that your printer. Set a new top of each page. Single-Sheet Adjustment For instructions on loading single sheets of paper into the friction feeder, refer back to become a default feature on position. Turn the printer off with ESCape "C". Then delete line 10 and put in Chapter 1 and change DIP switch 2-3 to half an inch below the perforation. To get equal amounts of blank space on . LINE";X Except for...
... (so that your printer. Set a new top of each page. Single-Sheet Adjustment For instructions on loading single sheets of paper into the friction feeder, refer back to become a default feature on position. Turn the printer off with ESCape "C". Then delete line 10 and put in Chapter 1 and change DIP switch 2-3 to half an inch below the perforation. To get equal amounts of blank space on . LINE";X Except for...

User Manual
Page 127
... 110 You can disable the sensor temporarily by using a software code: ESCape "8". Load in a new sheet of paper and change the length of each page to print on this works by setting DIP switch 1-3 on ), load a single sheet of 12-dot line spacing long. Some systems, however, ignore both the ESCape "8" code and the setting of DIP switch 1-3. (See Appendix F.) You'll want to use single-sheet paper on your FX printer and run of...
... 110 You can disable the sensor temporarily by using a software code: ESCape "8". Load in a new sheet of paper and change the length of each page to print on this works by setting DIP switch 1-3 on ), load a single sheet of 12-dot line spacing long. Some systems, however, ignore both the ESCape "8" code and the setting of DIP switch 1-3. (See Appendix F.) You'll want to use single-sheet paper on your FX printer and run of...
User Manual
Page 130
... can make changes to any of these. The printer ignores all invalid settings, such as those greater than the current page width. Chapter 9 Margins and Tabs At power-up, your FX contains specific default settings for margins and for the FX-100. On the FX-100 the ranges are the ground rules. Use CHR$(l08) in effect until you ever need to 229 for Compressed Mode. New margin settings...
... can make changes to any of these. The printer ignores all invalid settings, such as those greater than the current page width. Chapter 9 Margins and Tabs At power-up, your FX contains specific default settings for margins and for the FX-100. On the FX-100 the ranges are the ground rules. Use CHR$(l08) in effect until you ever need to 229 for Compressed Mode. New margin settings...

User Manual
Page 156
... 0 and 7 (0 and 6 for 7-bit systems). To exercise the pins in a pattern (a slash) that shows off their placement, enter: NEW 40 LPRINT CHR$(27)"K"CHR$(7)CHR$(0); 80 FOR X=0 TO 6 ll0 LPRINT CHR$(2^X); 120 NEXT X When X equals 0,2^X is 1-so the bottom graphics...FX stores data in this program. This pattern continues right up through X equals 6, which fires the seventh pin. Sure, just reverse the order of this case, 100. Here's how it expects-in its print buffer until it receives as many numbers as it works. Can you can be used. Notice that are limited to change the direction of line...
... 0 and 7 (0 and 6 for 7-bit systems). To exercise the pins in a pattern (a slash) that shows off their placement, enter: NEW 40 LPRINT CHR$(27)"K"CHR$(7)CHR$(0); 80 FOR X=0 TO 6 ll0 LPRINT CHR$(2^X); 120 NEXT X When X equals 0,2^X is 1-so the bottom graphics...FX stores data in this program. This pattern continues right up through X equals 6, which fires the seventh pin. Sure, just reverse the order of this case, 100. Here's how it expects-in its print buffer until it receives as many numbers as it works. Can you can be used. Notice that are limited to change the direction of line...

User Manual
Page 168
... vertically, which makes circles look round Other CRT none 90 dots per inch; 8 screens 6 720 dots per 8" line; 1224 dots per inch; Epson none Matches the screen 8 QX-10 density of the "*" command that allowed you had used the "K" command instead. It was your use the reassigning code to -one row. The printer does not print consecutive dots...
... vertically, which makes circles look round Other CRT none 90 dots per inch; 8 screens 6 720 dots per 8" line; 1224 dots per inch; Epson none Matches the screen 8 QX-10 density of the "*" command that allowed you had used the "K" command instead. It was your use the reassigning code to -one row. The printer does not print consecutive dots...
User Manual
Page 227
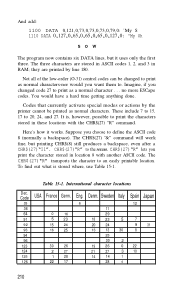
...changed code 27 to an easily printable location. Codes that currently activate special modes or actions by line 180. CHR$(27)"R" lets you choose to define the ASCII code 8 (normally a backspace). Not all of the low-order (O-31) control codes can be printed as normal characters-nor would have a hard time getting anything done. It is stored where, use...210 The three characters are printed by the printer cannot be changed to print as normal characters. These include 7 to 15, 17 to the rescue. And add: 1100 DATA 0,121,0,73,0,73,0,73,0,79,0: 'My S 1110 DATA 0,127,0,65,0,65,0,65...
...changed code 27 to an easily printable location. Codes that currently activate special modes or actions by line 180. CHR$(27)"R" lets you choose to define the ASCII code 8 (normally a backspace). Not all of the low-order (O-31) control codes can be printed as normal characters-nor would have a hard time getting anything done. It is stored where, use...210 The three characters are printed by the printer cannot be changed to print as normal characters. These include 7 to 15, 17 to the rescue. And add: 1100 DATA 0,121,0,73,0,73,0,73,0,79,0: 'My S 1110 DATA 0,127,0,65,0,65,0,65...
User Manual
Page 228
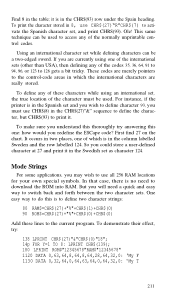
... To make sure you must be a two-edged sword. So you could store a user-defined character at 27 and print it in the Swedish set and you will need to the current program. For instance, if the printer is in 8, use all 256 RAM locations for your own special symbols. In that case, there is no need a quick and easy...
... To make sure you must be a two-edged sword. So you could store a user-defined character at 27 and print it in the Swedish set and you will need to the current program. For instance, if the printer is in 8, use all 256 RAM locations for your own special symbols. In that case, there is no need a quick and easy...
User Manual
Page 258
... also specific modes and functions Control panel, 35 Conventions used in dot graphics, 131-132 patterns for , 329 Epson computers. Density. ESCape "I-I -K-20; ESCape "F" turns it on; See I " turns it on ; See Printer driver Dumping, hex. See Hex dumping E Elite Mode, 52-53 ESCape "M" turns it off . QX-10 241 Control codes, 41-42 Hex dumping and. See Arrays Dimensions of printer, 329 DIP switches, 20...
... also specific modes and functions Control panel, 35 Conventions used in dot graphics, 131-132 patterns for , 329 Epson computers. Density. ESCape "I-I -K-20; ESCape "F" turns it on; See I " turns it on ; See Printer driver Dumping, hex. See Hex dumping E Elite Mode, 52-53 ESCape "M" turns it off . QX-10 241 Control codes, 41-42 Hex dumping and. See Arrays Dimensions of printer, 329 DIP switches, 20...


