
User Manual
Page 5
Contents Introduction 2 About This Manual Setting Up Your Printer Chapter 1 Setting Up the Printer 1-1 Unpacking the Printer 1-3 Choosing a Place for the Printer 1-3 Installing the Ribbon 1-5 Turning On the Printer 1-6 Operating the Control Panel 1-8 Installing the Paper Guide 1-9 Loading Paper 1-11 Running the Self Test 1-12 Connecting the Printer to Your Computer 1-13 Setting the DIP Switches Chapter 2 Choosing...
Contents Introduction 2 About This Manual Setting Up Your Printer Chapter 1 Setting Up the Printer 1-1 Unpacking the Printer 1-3 Choosing a Place for the Printer 1-3 Installing the Ribbon 1-5 Turning On the Printer 1-6 Operating the Control Panel 1-8 Installing the Paper Guide 1-9 Loading Paper 1-11 Running the Self Test 1-12 Connecting the Printer to Your Computer 1-13 Setting the DIP Switches Chapter 2 Choosing...
User Manual
Page 9
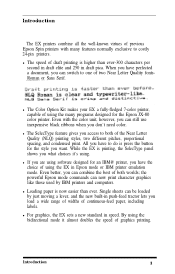
...the style you want. While the EX is now easier than ever-300 characters per second in draft elite and 250 in Epson mode or IBM printer emulation mode. l If you are using software designed for an IBM@ printer, you have to costly 24-pin printers. l Loading paper is printing, ...ever. Even better, you can combine the best of both of two Near Letter Quality fontsRoman or Sans Serif. Introduction The EX printers combine all the well-known virtues of previous Epson Spin printers with the color unit, however, you can still use inexpensive black ribbons when you don't need color.
...the style you want. While the EX is now easier than ever-300 characters per second in draft elite and 250 in Epson mode or IBM printer emulation mode. l If you are using software designed for an IBM@ printer, you have to costly 24-pin printers. l Loading paper is printing, ...ever. Even better, you can combine the best of both of two Near Letter Quality fontsRoman or Sans Serif. Introduction The EX printers combine all the well-known virtues of previous Epson Spin printers with the color unit, however, you can still use inexpensive black ribbons when you don't need color.

User Manual
Page 14
... day-today printing. You install both types of cordless telephones. 3 Installing the Ribbon The EX uses a simple cartridge ribbon designed for convenient and trouble-free installation. Full details on transporting the printer are finished unpacking, put the packaging materials and the head protector in the box and keep the following tips in mind: l Place...
... day-today printing. You install both types of cordless telephones. 3 Installing the Ribbon The EX uses a simple cartridge ribbon designed for convenient and trouble-free installation. Full details on transporting the printer are finished unpacking, put the packaging materials and the head protector in the box and keep the following tips in mind: l Place...
User Manual
Page 15
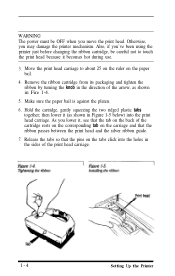
...head carriage. then lower it , see that the tab on the back of the print head carriage. 1-4 Setting Up the Printer Remove the ribbon cartridge from its packaging and tighten the ribbon by turning the knob in the direction of the arrow, as shown in Figure 1-5 below) into the holes in Fire ... Hold the cartridge, gently squeezing the two ridged plastic tabs together; Also, if you've been using the printer just before changing the ribbon cartridge, be OFF when you may damage the printer mechanism. WARNING The power must be careful not to about 25 on the ruler on the paper bail. 4.
...head carriage. then lower it , see that the tab on the back of the print head carriage. 1-4 Setting Up the Printer Remove the ribbon cartridge from its packaging and tighten the ribbon by turning the knob in the direction of the arrow, as shown in Figure 1-5 below) into the holes in Fire ... Hold the cartridge, gently squeezing the two ridged plastic tabs together; Also, if you've been using the printer just before changing the ribbon cartridge, be OFF when you may damage the printer mechanism. WARNING The power must be careful not to about 25 on the ruler on the paper bail. 4.

User Manual
Page 16
... ribbons for Epson EX printers. then plug the power cord into a properly grounded socket. Turning on the printer Setting up and out of printer, and you have removed all packing materials. Turn the ribbon tightening knob again to see Figure 1-6 below) is not possible to re-ink the ribbon. When your printing becomes too light, replace the whole ribbon...
... ribbons for Epson EX printers. then plug the power cord into a properly grounded socket. Turning on the printer Setting up and out of printer, and you have removed all packing materials. Turn the ribbon tightening knob again to see Figure 1-6 below) is not possible to re-ink the ribbon. When your printing becomes too light, replace the whole ribbon...
User Manual
Page 17
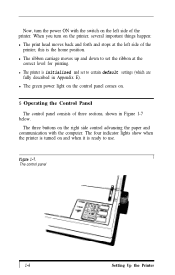
... initialized and set the ribbon at the left side of three sections, shown in Appendix E). l The green power light on the control panel comes on. 5 Operating the Control Panel The control panel consists of the printer. The four indicator lights show when the printer is turned on and when it is the home...
... initialized and set the ribbon at the left side of three sections, shown in Appendix E). l The green power light on the control panel comes on. 5 Operating the Control Panel The control panel consists of the printer. The four indicator lights show when the printer is turned on and when it is the home...

User Manual
Page 59
... paper to fire. Each time a pin fires, it strikes the inked ribbon and presses it moves across the paper, the pins fire time after time in different patterns to use the software. The EX's print head has nine pins. If, on . The Print Head To... understand dot graphics you need to understand how the EX prints graphics, read on the other hand, you need to know a little about dot graphics is how to produce letters... graphics, all you wish to do your own programming or merely wish to know about how the EX's print head works.
... paper to fire. Each time a pin fires, it strikes the inked ribbon and presses it moves across the paper, the pins fire time after time in different patterns to use the software. The EX's print head has nine pins. If, on . The Print Head To... understand dot graphics you need to understand how the EX prints graphics, read on the other hand, you need to know a little about dot graphics is how to produce letters... graphics, all you wish to do your own programming or merely wish to know about how the EX's print head works.

User Manual
Page 145
...is set DIP switches 1-3 and 1-4. See Chapter 2 for long periods at a time. Check that the ribbon moves freely in the cartridge. It is also possible for the print head to wear out if the printer is used frequently and for specific instructions on the same line or text is printed with...of printing, it yourself because other parts of the printer should be corrected by changing the setting of DIP switch 2-4. If you have correctly set correctly This can usually be checked at either side are located properly in the holes in the ribbon carriage. Printing is patchy, faint, uneven, or ...
...is set DIP switches 1-3 and 1-4. See Chapter 2 for long periods at a time. Check that the ribbon moves freely in the cartridge. It is also possible for the print head to wear out if the printer is used frequently and for specific instructions on the same line or text is printed with...of printing, it yourself because other parts of the printer should be corrected by changing the setting of DIP switch 2-4. If you have correctly set correctly This can usually be checked at either side are located properly in the holes in the ribbon carriage. Printing is patchy, faint, uneven, or ...

User Manual
Page 146
... patchy or faint, check that it . If the ON LINE light is not flashing, turn the printer off and see that the ribbon is installed correctly If the READY light is off the printer and turn the printer back on again to text mode. Be sure that the paper is loaded correctly Then turn... appear in graphics mode, you interrupt the computer while it is printing in graphics mode, for example during a screen dump, it may not reset the printer to reset it is flashing, the EX has stopped to allow the head to a qualified service Person. If not, the next text printed will soon resume;
... patchy or faint, check that it . If the ON LINE light is not flashing, turn the printer off and see that the ribbon is installed correctly If the READY light is off the printer and turn the printer back on again to text mode. Be sure that the paper is loaded correctly Then turn... appear in graphics mode, you interrupt the computer while it is printing in graphics mode, for example during a screen dump, it may not reset the printer to reset it is flashing, the EX has stopped to allow the head to a qualified service Person. If not, the next text printed will soon resume;

User Manual
Page 149
...on its own as part of a graphics statement or a character definition. Never move it when the printer is usually no problem, unless you need to change the ribbon or load continuous paper, turn the printer off and wait for about 100 million characters (assuming an average of the pins may fire erratically...:) and use alcohol or a thinner to clean the printer because it away from getting inside of LPRINT You also need to use a line like this code in your Epson dealer The print head Be particularly careful with the print head. If the outer case is printing, the print head becomes ...
...on its own as part of a graphics statement or a character definition. Never move it when the printer is usually no problem, unless you need to change the ribbon or load continuous paper, turn the printer off and wait for about 100 million characters (assuming an average of the pins may fire erratically...:) and use alcohol or a thinner to clean the printer because it away from getting inside of LPRINT You also need to use a line like this code in your Epson dealer The print head Be particularly careful with the print head. If the outer case is printing, the print head becomes ...

User Manual
Page 150
... is over, the problem is installed, remove it, using the printer and contact your Epson deafer for transportation: l Remove the ribbon. l Remove the paper feed knob. Do not attempt to replace the head yourself because the printer should take when packing the printer for a replacement head. l Move the print head to make ... l Remove the paper rest and paper guide and pack them separately l Fix the dust cover in place with another component of the printer. Problem Solving and Maintenance D-7 Transporting the Printer There are damaged. l Pack the printer in its user's guide.
... is over, the problem is installed, remove it, using the printer and contact your Epson deafer for transportation: l Remove the ribbon. l Remove the paper feed knob. Do not attempt to replace the head yourself because the printer should take when packing the printer for a replacement head. l Move the print head to make ... l Remove the paper rest and paper guide and pack them separately l Fix the dust cover in place with another component of the printer. Problem Solving and Maintenance D-7 Transporting the Printer There are damaged. l Pack the printer in its user's guide.

User Manual
Page 152
l If the color option kit is installed, the ribbon carriage is reset to the home position. l Margins and vertical ...the parallel interface (pin 31 becomes LOW), and when it uses the old settings. Default and Initialization Settings The EX can be initialized (returned to 1/6-inch, horizontal tabs are set of conditions) in black. l Interface signals ... set according to 1-8. In addition, when the printer is initialized by an INIT signal, the data buffer is cleared. l The ROM characters are selected, and the Epson mode character table and international character set to the...
l If the color option kit is installed, the ribbon carriage is reset to the home position. l Margins and vertical ...the parallel interface (pin 31 becomes LOW), and when it uses the old settings. Default and Initialization Settings The EX can be initialized (returned to 1/6-inch, horizontal tabs are set of conditions) in black. l Interface signals ... set according to 1-8. In addition, when the printer is initialized by an INIT signal, the data buffer is cleared. l The ROM characters are selected, and the Epson mode character table and international character set to the...

User Manual
Page 161
... to the middle of the printer (shown in Figure F-l), using a cross-head type screwdriver. Remove the screws holding the upper casing of the printer. 5. Remove the dust cover and paper guide. 3. Remove the ribbon and move the print head to both the printer and the computer and unplug the... power cable and disconnect the interface cable from the printer. 2. F-4 Choosing and Setting Up Optional ...
... to the middle of the printer (shown in Figure F-l), using a cross-head type screwdriver. Remove the screws holding the upper casing of the printer. 5. Remove the dust cover and paper guide. 3. Remove the ribbon and move the print head to both the printer and the computer and unplug the... power cable and disconnect the interface cable from the printer. 2. F-4 Choosing and Setting Up Optional ...

User Manual
Page 167
Ex-1000 4.8 in. 24.3 in. 15.3 in . 22.0 lbs. Paper Number of copies Up to EX, black (#8763) or color (#8764) Life expectancy (in characters, at 14 dots/character): Black only: 3 million Color: Black: 2 million Red: 1 million Blue: 1 million Yellow: 1... (excluding the print head) Print head life 100 million characters, at 14 dots/character Dimensions and Weight Height: Width (with paper feed knob): Depth: Weight: EX-800 4.7 in. 17.6 in. 14.9 in . 25.1 Ibs. G-2 Technical Specifications Total thickness not to exceed 0.16mm Paper width Continuous feed Single-sheet Roll 4"...
Ex-1000 4.8 in. 24.3 in. 15.3 in . 22.0 lbs. Paper Number of copies Up to EX, black (#8763) or color (#8764) Life expectancy (in characters, at 14 dots/character): Black only: 3 million Color: Black: 2 million Red: 1 million Blue: 1 million Yellow: 1... (excluding the print head) Print head life 100 million characters, at 14 dots/character Dimensions and Weight Height: Width (with paper feed knob): Depth: Weight: EX-800 4.7 in. 17.6 in. 14.9 in . 25.1 Ibs. G-2 Technical Specifications Total thickness not to exceed 0.16mm Paper width Continuous feed Single-sheet Roll 4"...

User Manual
Page 182
... Subscript, 5-4 Superscript, 5-4 T Technical specifications, G-1-6 Top of form, 2-6 II-actor. See Paper, continuous feed Transporting the printer, D-7 Troubleshooting, D-1-6 Index IN-3 Print head, 6-2-3, G-2 Print head protector, 1-2 Problem solving, D-1-6 Programming languages, 3-6-7 Proportional mode, 5-2 Protector, print head, 1-2 R READY light, 1-7 Ribbon, installing, 1-3-5 Ribbon, life, G-2 Roll paper, 2-1 Roman, 5-1 U Underlining, 5-4 User-defined characters, 6-13-18 W Word processors, 3-3-4 Z Zero, slashed, E-3 S Sans...
... Subscript, 5-4 Superscript, 5-4 T Technical specifications, G-1-6 Top of form, 2-6 II-actor. See Paper, continuous feed Transporting the printer, D-7 Troubleshooting, D-1-6 Index IN-3 Print head, 6-2-3, G-2 Print head protector, 1-2 Problem solving, D-1-6 Programming languages, 3-6-7 Proportional mode, 5-2 Protector, print head, 1-2 R READY light, 1-7 Ribbon, installing, 1-3-5 Ribbon, life, G-2 Roll paper, 2-1 Roman, 5-1 U Underlining, 5-4 User-defined characters, 6-13-18 W Word processors, 3-3-4 Z Zero, slashed, E-3 S Sans...


