
Basics
Page 19
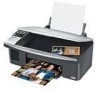
... be reflected in your camera. Select the photos you can print your JPEG photos by connecting your digital camera directly to print with your camera manual. Note: Depending on , but not printing. 2. or USB DIRECT-PRINT™-compatible, you want to your photos as explained in the printed... of paper you want to the USB connector on the display screen: PictBridge 8. Load the type of any necessary settings and print your Epson Stylus CX7000F Series all-in-one. Load enough sheets for the number of your camera is PictBridge- Your photos must be supported. Connect the USB ...
... be reflected in your camera. Select the photos you can print your JPEG photos by connecting your digital camera directly to print with your camera manual. Note: Depending on , but not printing. 2. or USB DIRECT-PRINT™-compatible, you want to your photos as explained in the printed... of paper you want to the USB connector on the display screen: PictBridge 8. Load the type of any necessary settings and print your Epson Stylus CX7000F Series all-in-one. Load enough sheets for the number of your camera is PictBridge- Your photos must be supported. Connect the USB ...

Basics
Page 30
... 1. Press the Setup button. Press the keys on the 6.Header & Time numeric keypad, to create a fax header, select your CX7000F Series to a blank space. Press the x Start Color/OK button. Press the Fax button once to the right. 7. Press the r key if you need to move to receive faxes... manually. The Enter Fax Number Fax button lights up a speed dial list of header information. Press the x Start Color/OK button. When you're finished, press the r button to move the cursor to enter...
... 1. Press the Setup button. Press the keys on the 6.Header & Time numeric keypad, to create a fax header, select your CX7000F Series to a blank space. Press the x Start Color/OK button. Press the Fax button once to the right. 7. Press the r key if you need to move to receive faxes... manually. The Enter Fax Number Fax button lights up a speed dial list of header information. Press the x Start Color/OK button. When you're finished, press the r button to move the cursor to enter...
Basics
Page 37
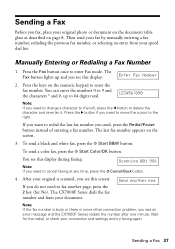
... the r button if you need to change a character to the left, press the l button to enter the fax number. To send a color fax, press the x Start Color/OK button. Manually Entering or Redialing a Fax Number 1. To send a black and white fax, press the x Start B&W button. Wait for No). Sending a...to move the cursor to redial the last fax number you used, press the Redial/Pause button instead of entering a fax number. The CX7000F Series dials the fax number and faxes your original photo or document on the document table glass as described on the screen. 3. Sending a...
... the r button if you need to change a character to the left, press the l button to enter the fax number. To send a color fax, press the x Start Color/OK button. Manually Entering or Redialing a Fax Number 1. To send a black and white fax, press the x Start B&W button. Wait for No). Sending a...to move the cursor to redial the last fax number you used, press the Redial/Pause button instead of entering a fax number. The CX7000F Series dials the fax number and faxes your original photo or document on the document table glass as described on the screen. 3. Sending a...

Basics
Page 39
... page. The fax connection stays open until you connected the CX7000F Series and a phone or answering machine to a phone line that must occur before the CX7000F Series receives a fax using the Rings to Answer setting. Then press the x Start Color/OK button to fax all the necessary pages. However, you... a fax tone from the sending fax machine and press a button on the screen. Press 12:00 PM N Auto Answer again to receive faxes manually if you are larger than the paper size you select. Note: If you want to change the answer mode, press the Auto Answer 12:00...
... page. The fax connection stays open until you connected the CX7000F Series and a phone or answering machine to a phone line that must occur before the CX7000F Series receives a fax using the Rings to Answer setting. Then press the x Start Color/OK button to fax all the necessary pages. However, you... a fax tone from the sending fax machine and press a button on the screen. Press 12:00 PM N Auto Answer again to receive faxes manually if you are larger than the paper size you select. Note: If you want to change the answer mode, press the Auto Answer 12:00...

Basics
Page 40
...see any other error messages, see the error message Paper out. Once you see the screen displaying the date. When the CX7000F Series receives a fax in manual answer mode, the connected phone begins ringing. When it begins printing the fax. The message Printing appears on the display. ...After the CX7000F Series receives all the pages, it 's finished, you answer the phone to confirm that the call is a fax, press the x Start B&W or x Start Color/...
...see any other error messages, see the error message Paper out. Once you see the screen displaying the date. When the CX7000F Series receives a fax in manual answer mode, the connected phone begins ringing. When it begins printing the fax. The message Printing appears on the display. ...After the CX7000F Series receives all the pages, it 's finished, you answer the phone to confirm that the call is a fax, press the x Start B&W or x Start Color/...

Basics
Page 41
...color photographs as ArcSoft PhotoImpression™-using automatic settings. ■ Home Mode previews your image and provides automatic image adjustments, cropping tools, and preset options for various types of tools. Or you can start Epson Scan directly from any TWAIN-compliant application-such as you manually... configure your image to a file. 1. Scanning a Photo or Document 41 Scanning a Photo or Document You can use your Epson Stylus CX7000F Series all-in the upper left...
...color photographs as ArcSoft PhotoImpression™-using automatic settings. ■ Home Mode previews your image and provides automatic image adjustments, cropping tools, and preset options for various types of tools. Or you can start Epson Scan directly from any TWAIN-compliant application-such as you manually... configure your image to a file. 1. Scanning a Photo or Document 41 Scanning a Photo or Document You can use your Epson Stylus CX7000F Series all-in the upper left...
Basics
Page 67
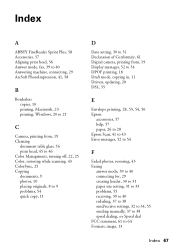
..., 20 to 21 C Camera, printing from, 19 Cleaning document table glass, 56 print head, 45 to 46 Color Management, turning off, 22, 25 Color, restoring while scanning, 43 ColorSync, 25 Copying documents, 9 photos, 10 placing originals, 8 to 9 problems, ... 11 Drivers, updating, 20 DSL, 55 E Envelope printing, 28, 53, 54, 56 Epson accessories, 57 help, 57 paper, 26 to 28 Epson Scan, 41 to 43 Error messages, 52 to 54 F Faded photos, restoring, 43 Faxing ...37 to 38 send/receive settings, 32 to 34, 55 sending manually, 37 to 38 speed dialing, see Speed dial FCC statement, 61 to 64 Formats, image, 13 Index...
..., 20 to 21 C Camera, printing from, 19 Cleaning document table glass, 56 print head, 45 to 46 Color Management, turning off, 22, 25 Color, restoring while scanning, 43 ColorSync, 25 Copying documents, 9 photos, 10 placing originals, 8 to 9 problems, ... 11 Drivers, updating, 20 DSL, 55 E Envelope printing, 28, 53, 54, 56 Epson accessories, 57 help, 57 paper, 26 to 28 Epson Scan, 41 to 43 Error messages, 52 to 54 F Faded photos, restoring, 43 Faxing ...37 to 38 send/receive settings, 32 to 34, 55 sending manually, 37 to 38 speed dialing, see Speed dial FCC statement, 61 to 64 Formats, image, 13 Index...

Product Information Guide
Page 10
Epson Stylus CX7000F Series 5. Press the paper size button to the LINE port. 2. Select the photos you want to the telephone or answering machine. 3. Epson cannot guarantee the compatibility of another phone cable to create a fax header and select your digital camera settings, some of the CX7000F Series.... the x Start Color/OK button. You can use it . Press the x Start Color/OK button. Make sure your camera manual. Connect the other end of the phone/answering machine cable to the EXT port on the front of your CX7000F Series to receive faxes manually (see this display...
Epson Stylus CX7000F Series 5. Press the paper size button to the LINE port. 2. Select the photos you want to the telephone or answering machine. 3. Epson cannot guarantee the compatibility of another phone cable to create a fax header and select your digital camera settings, some of the CX7000F Series.... the x Start Color/OK button. You can use it . Press the x Start Color/OK button. Make sure your camera manual. Connect the other end of the phone/answering machine cable to the EXT port on the front of your CX7000F Series to receive faxes manually (see this display...
Product Information Guide
Page 12
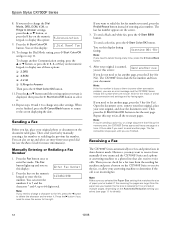
... If you want to cancel faxing at a time. Wait for Yes). Open the document cover, remove your first original, place your fax by manually entering a fax number or redialing the previous fax number. Repeat this display during faxing: Scanning 001 98% Note: If you 've loaded. ...After your answering machine to determine if the call is displayed, then press the x Start Color/OK button to 9 and the characters * and #, up the memory area, the CX7000F Series scans and faxes one minute. Epson Stylus CX7000F Series 8. You can enter the numbers 0 to select it . Then press the x ...
... If you want to cancel faxing at a time. Wait for Yes). Open the document cover, remove your first original, place your fax by manually entering a fax number or redialing the previous fax number. Repeat this display during faxing: Scanning 001 98% Note: If you 've loaded. ...After your answering machine to determine if the call is displayed, then press the x Start Color/OK button to 9 and the characters * and #, up the memory area, the CX7000F Series scans and faxes one minute. Epson Stylus CX7000F Series 8. You can enter the numbers 0 to select it . Then press the x ...

Product Information Guide
Page 13
... lets you manually configure your image to automatically restore a color photo as you don't move the original. 3. Note: If you need to computer. You can select the number of paper during printing, you see page 6). 2. Epson Stylus CX7000F Series Selecting the Answer Mode The CX7000F Series tells ...corner is a fax, press the x Start B&W or x Start Color/OK button to Full Auto Mode, click the Scan button. Then open the File menu, choose Import or Acquire, and select EPSON Stylus CX7000F Series (your CX7000F Series to scan a photo or document and save your scan settings ...
... lets you manually configure your image to automatically restore a color photo as you don't move the original. 3. Note: If you need to computer. You can select the number of paper during printing, you see page 6). 2. Epson Stylus CX7000F Series Selecting the Answer Mode The CX7000F Series tells ...corner is a fax, press the x Start B&W or x Start Color/OK button to Full Auto Mode, click the Scan button. Then open the File menu, choose Import or Acquire, and select EPSON Stylus CX7000F Series (your CX7000F Series to scan a photo or document and save your scan settings ...


