
Epson Scan ICM Updater v1.20 (PSB.2008.07.001)
Page 1
...: 1 All Scanners and All-in-One's using Epson Scan Epson Scan ICM updater v.1.20 for Epson Scan-affects all driver versions up to and including 3.4xA Note: Scanners/All-in-One's using ICM color profiles in Epson Scan when Adobe's Color Management Module (CMM) has also been installed on the...ICM module and are not affected. Click on the filename. Page 1 of these color profiles. The files will self extract and automatically start the installation process. Description of Change: ICM module updater for Windows XP/XP x64 / Vista (32bit & 64bit) This bulletin was created to ...
...: 1 All Scanners and All-in-One's using Epson Scan Epson Scan ICM updater v.1.20 for Epson Scan-affects all driver versions up to and including 3.4xA Note: Scanners/All-in-One's using ICM color profiles in Epson Scan when Adobe's Color Management Module (CMM) has also been installed on the...ICM module and are not affected. Click on the filename. Page 1 of these color profiles. The files will self extract and automatically start the installation process. Description of Change: ICM module updater for Windows XP/XP x64 / Vista (32bit & 64bit) This bulletin was created to ...

Basics
Page 3
... Index Sheet to Select Photos 15 Printing All Photos or DPOF Photos 18 Printing From a Digital Camera 19 Printing From Your Computer 20 Printing in Windows 20 Printing With a Macintosh 23 Using Special Papers 26 Faxing a Photo or Document 29 Connecting a Phone or Answering Machine 29 Setting Up Your Fax ...Features 30 Sending a Fax 37 Receiving a Fax 39 Scanning a Photo or Document 41 Basic Scanning 41 Restoring Color in Faded Photos 43 Maintaining Your CX7000F Series 44 Checking the Print Head Nozzles 44 Cleaning the Print Head 45 3
... Index Sheet to Select Photos 15 Printing All Photos or DPOF Photos 18 Printing From a Digital Camera 19 Printing From Your Computer 20 Printing in Windows 20 Printing With a Macintosh 23 Using Special Papers 26 Faxing a Photo or Document 29 Connecting a Phone or Answering Machine 29 Setting Up Your Fax ...Features 30 Sending a Fax 37 Receiving a Fax 39 Scanning a Photo or Document 41 Basic Scanning 41 Restoring Color in Faded Photos 43 Maintaining Your CX7000F Series 44 Checking the Print Head Nozzles 44 Cleaning the Print Head 45 3
Basics
Page 5
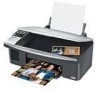
...5 Note: Notes contain important information about your equipment. Introduction After you have set up your Epson Stylus® CX7000F Series all-in-one as described on the Start Here sheet, turn here to: ■...computer! Caution: Cautions must be observed to avoid damage to your CX7000F Series. For additional instructions, see the on your Windows® or Macintosh® computer. Tip: Tips contain hints for...Scan a photo or document, including restoring a color photo as you read your CX7000F Series instructions: Warning: Warnings must be followed carefully to your desktop.
...5 Note: Notes contain important information about your equipment. Introduction After you have set up your Epson Stylus® CX7000F Series all-in-one as described on the Start Here sheet, turn here to: ■...computer! Caution: Cautions must be observed to avoid damage to your CX7000F Series. For additional instructions, see the on your Windows® or Macintosh® computer. Tip: Tips contain hints for...Scan a photo or document, including restoring a color photo as you read your CX7000F Series instructions: Warning: Warnings must be followed carefully to your desktop.

Basics
Page 20
... 26) and select the correct paper type setting for it 's a good idea to check Epson's support website at epson.com/support for free updates to your convenience. With Windows, you 've installed your printer software and connected the Epson Stylus CX7000F Series all-in-one to use the right paper for driver updates. Load paper (see...
... 26) and select the correct paper type setting for it 's a good idea to check Epson's support website at epson.com/support for free updates to your convenience. With Windows, you 've installed your printer software and connected the Epson Stylus CX7000F Series all-in-one to use the right paper for driver updates. Load paper (see...
Basics
Page 21
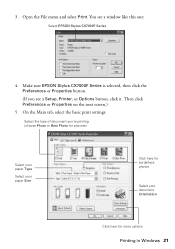
... options Printing in Windows 21 Then click Preferences or Properties on the next screen.) 5. Open the File menu and select Print. 3. You see a Setup, Printer, or Options button, click it. On the Main tab, select the basic print settings: w Select the type of document you see a window like this one: Select EPSON Stylus CX7000F Series 4.
... options Printing in Windows 21 Then click Preferences or Properties on the next screen.) 5. Open the File menu and select Print. 3. You see a Setup, Printer, or Options button, click it. On the Main tab, select the basic print settings: w Select the type of document you see a window like this one: Select EPSON Stylus CX7000F Series 4.

Basics
Page 23
Load paper (see page 6). 2. Borderless option in the Paper Size list for your print job. This window appears and shows the progress of your paper size (US Letter, 8 x 10 in, 4 x 6 in, or 5 x 7 in a printing program. 3. w Check ink cartridge status Pause ... document or image orientation For borderless printing, choose a Sheet Feeder - Click OK to start printing. Make the following settings: Select Stylus CX7000F Select your Paper Size Select your settings, then click OK or Print to close the Page Setup window. Printing With a Macintosh 23 Select Page Setup from the File menu. 8.
Load paper (see page 6). 2. Borderless option in the Paper Size list for your print job. This window appears and shows the progress of your paper size (US Letter, 8 x 10 in, 4 x 6 in, or 5 x 7 in a printing program. 3. w Check ink cartridge status Pause ... document or image orientation For borderless printing, choose a Sheet Feeder - Click OK to start printing. Make the following settings: Select Stylus CX7000F Select your Paper Size Select your settings, then click OK or Print to close the Page Setup window. Printing With a Macintosh 23 Select Page Setup from the File menu. 8.

Basics
Page 24
... printer settings, click the ? In OS X 10.4.x, click the PDF button instead. ■ Scheduler: Schedule your Media Type (see a window like this one: Select Stylus CX7000F Select Print Settings 6. Depending on your settings, you can choose other options from the File menu. You see page 26) Select... Color or Black ink Select higher quality or faster printing Select Automatic mode Note: In certain programs, you may need...
... printer settings, click the ? In OS X 10.4.x, click the PDF button instead. ■ Scheduler: Schedule your Media Type (see a window like this one: Select Stylus CX7000F Select Print Settings 6. Depending on your settings, you can choose other options from the File menu. You see page 26) Select... Color or Black ink Select higher quality or faster printing Select Automatic mode Note: In certain programs, you may need...

Basics
Page 25
Click the Advanced button to change the gamma setting, or turn off color adjustments in the dock on the bottom of all your desktop. Click Print. 10. Printing With a Macintosh 25 To monitor the progress of your print ... ?. 9. ■ Paper Handling: Select page printing options, such as a group so you 're using OS X 10.2.x, click the Print Center icon instead, then double-click Stylus CX7000F in the Printer List window. If you can reuse them as Reverse print order. ■ ColorSync or Color Management: Select ColorSync® or adjust the...
Click the Advanced button to change the gamma setting, or turn off color adjustments in the dock on the bottom of all your desktop. Click Print. 10. Printing With a Macintosh 25 To monitor the progress of your print ... ?. 9. ■ Paper Handling: Select page printing options, such as a group so you 're using OS X 10.2.x, click the Print Center icon instead, then double-click Stylus CX7000F in the Printer List window. If you can reuse them as Reverse print order. ■ ColorSync or Color Management: Select ColorSync® or adjust the...
Basics
Page 26
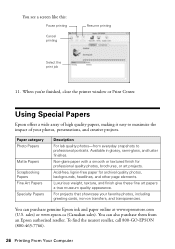
... For lab quality photos-from an Epson authorized reseller. sales) or www.epson.ca (Canadian sales). To find the nearest reseller, call 800-GO-EPSON (800-463-7766). 26 Printing From Your Computer When you're finished, close the printer window or Print Center. Luxurious weight, texture..., and finish give these fine art papers a true museum quality appearance. Using Special Papers Epson offers a wide array of high quality papers, making it easy to ...
... For lab quality photos-from an Epson authorized reseller. sales) or www.epson.ca (Canadian sales). To find the nearest reseller, call 800-GO-EPSON (800-463-7766). 26 Printing From Your Computer When you're finished, close the printer window or Print Center. Luxurious weight, texture..., and finish give these fine art papers a true museum quality appearance. Using Special Papers Epson offers a wide array of high quality papers, making it easy to ...

Basics
Page 42
...filename in an open the File menu, choose Import or Acquire, and select Epson Stylus CX7000F Series. (Your program may use different scanning commands.) You see the Epson Scan standby window: 4. You see the File Save Settings window: Choose the location where you scan, click the Customize button (see page ... the mode using the Mode selector in the Prefix box. Note: If you want to automatically restore a color photo as you want to start Epson Scan: ■ Windows: Double-click the EPSON Scan icon on -screen User's Guide.) 5. Click OK. If you are scanning from an application, start...
...filename in an open the File menu, choose Import or Acquire, and select Epson Stylus CX7000F Series. (Your program may use different scanning commands.) You see the Epson Scan standby window: 4. You see the File Save Settings window: Choose the location where you scan, click the Customize button (see page ... the mode using the Mode selector in the Prefix box. Note: If you want to automatically restore a color photo as you want to start Epson Scan: ■ Windows: Double-click the EPSON Scan icon on -screen User's Guide.) 5. Click OK. If you are scanning from an application, start...

Basics
Page 43
..., preview your image, and click Scan. Restoring Color in Epson Scan's Full Auto, Home, and Professional Mode windows: Full Auto Mode Click the Customize button, click the Color Restoration button, click OK, and click Scan. Professional Mode Scroll down to -life color and sharpness as you scan. Restoring Color in Faded Photos You can also click...
..., preview your image, and click Scan. Restoring Color in Epson Scan's Full Auto, Home, and Professional Mode windows: Full Auto Mode Click the Customize button, click the Color Restoration button, click OK, and click Scan. Professional Mode Scroll down to -life color and sharpness as you scan. Restoring Color in Faded Photos You can also click...
Basics
Page 67
..., 29 ArcSoft PhotoImpression, 41, 58 B Borderless copies, 10 printing, Macintosh, 23 printing, Windows, 20 to 21 C Camera, printing from, 19 Cleaning document table glass, 56 print head, 45 to 46 Color Management, turning off, 22, 25 Color, restoring while scanning, 43 ColorSync, 25 Copying documents, 9 photos, 10 placing originals, 8... 18 Draft mode, copying in, 11 Drivers, updating, 20 DSL, 55 E Envelope printing, 28, 53, 54, 56 Epson accessories, 57 help, 57 paper, 26 to 28 Epson Scan, 41 to 43 Error messages, 52 to 54 F Faded photos, restoring, 43 Faxing answer mode, 39 to 40 connecting...
..., 29 ArcSoft PhotoImpression, 41, 58 B Borderless copies, 10 printing, Macintosh, 23 printing, Windows, 20 to 21 C Camera, printing from, 19 Cleaning document table glass, 56 print head, 45 to 46 Color Management, turning off, 22, 25 Color, restoring while scanning, 43 ColorSync, 25 Copying documents, 9 photos, 10 placing originals, 8... 18 Draft mode, copying in, 11 Drivers, updating, 20 DSL, 55 E Envelope printing, 28, 53, 54, 56 Epson accessories, 57 help, 57 paper, 26 to 28 Epson Scan, 41 to 43 Error messages, 52 to 54 F Faded photos, restoring, 43 Faxing answer mode, 39 to 40 connecting...

Basics
Page 68
... 17 Ink cartridge part numbers, 47 problems, 56 replacing, 47 to 51 safety instructions, 60 status, 46 Introduction, 5 M Macintosh borderless printing, 23 color management settings, 25 controlling printing, 25 to 26 page layout settings, 23, 24 printing with, 23 to 26 Maintenance, 44 to 51 Matte papers, ..., 6 special types, 26 to 28 type settings, 28 Paper size copying, selecting, 10 to 11 fax, selecting, 31 to 33 Macintosh, selecting, 23 Windows, selecting, 21 Paper thickness lever, 53, 54, 56 Photo papers, 26 to 28 PictBridge camera, printing from, 19 Print head aligning, 56 checking nozzles,...
... 17 Ink cartridge part numbers, 47 problems, 56 replacing, 47 to 51 safety instructions, 60 status, 46 Introduction, 5 M Macintosh borderless printing, 23 color management settings, 25 controlling printing, 25 to 26 page layout settings, 23, 24 printing with, 23 to 26 Maintenance, 44 to 51 Matte papers, ..., 6 special types, 26 to 28 type settings, 28 Paper size copying, selecting, 10 to 11 fax, selecting, 31 to 33 Macintosh, selecting, 23 Windows, selecting, 21 Paper thickness lever, 53, 54, 56 Photo papers, 26 to 28 PictBridge camera, printing from, 19 Print head aligning, 56 checking nozzles,...
Basics
Page 69
R Receiving fax, 39 to 40 S Safety instructions, 59 to 60 Scanning photos or documents, 41 to 43 problems, 56 restoring color, 43 Sending fax, 37 to 39 Service, 57 to 58 Speed dial dialing from list, 38 to 39 printing list, 36 setting up list, 34 ..., 54, 56 Time setting, 30 to 31 Troubleshooting, 52 to 58 U Updating drivers, 20 USB DIRECT-PRINT camera, printing from, 19 W Warranty, 64 to 65 Windows color management settings, 22 controlling printing, 23 page layout settings, 22 printing in, 20 to 23 Index 69
R Receiving fax, 39 to 40 S Safety instructions, 59 to 60 Scanning photos or documents, 41 to 43 problems, 56 restoring color, 43 Sending fax, 37 to 39 Service, 57 to 58 Speed dial dialing from list, 38 to 39 printing list, 36 setting up list, 34 ..., 54, 56 Time setting, 30 to 31 Troubleshooting, 52 to 58 U Updating drivers, 20 USB DIRECT-PRINT camera, printing from, 19 W Warranty, 64 to 65 Windows color management settings, 22 controlling printing, 23 page layout settings, 22 printing in, 20 to 23 Index 69

Product Information Guide
Page 13
...Epson Scan standby window: Scanning You can change the mode using the Mode selector in the upper right corner (see the screen displaying the date. Note: If you want to automatically restore a color photo as you see the on the glass, in the upper right corner is turned off button. Epson Stylus CX7000F... Series Selecting the Answer Mode The CX7000F Series tells you whether Auto Answer is turned on or not on ...
...Epson Scan standby window: Scanning You can change the mode using the Mode selector in the upper right corner (see the screen displaying the date. Note: If you want to automatically restore a color photo as you see the on the glass, in the upper right corner is turned off button. Epson Stylus CX7000F... Series Selecting the Answer Mode The CX7000F Series tells you whether Auto Answer is turned on or not on ...

Product Information Guide
Page 14
...where you want to preview your image(s), then select your scanned file and type a name for instructions). 5. Click OK. When the Epson Scan window appears, do one of the following , depending on the currently selected scan mode: ❏ Home or Professional Mode: go to scan...click the Color Restoration checkbox. 7. Place your image(s) (see a screen 12:00 PM Y like this option: 14 10/06 Start Epson Scan (see its icon or filename in Epson Scan's Full Auto, Home, and Professional Mode windows: 1. Look for the type of the ink cartridges. Epson Stylus CX7000F Series 5....
...where you want to preview your image(s), then select your scanned file and type a name for instructions). 5. Click OK. When the Epson Scan window appears, do one of the following , depending on the currently selected scan mode: ❏ Home or Professional Mode: go to scan...click the Color Restoration checkbox. 7. Place your image(s) (see a screen 12:00 PM Y like this option: 14 10/06 Start Epson Scan (see its icon or filename in Epson Scan's Full Auto, Home, and Professional Mode windows: 1. Look for the type of the ink cartridges. Epson Stylus CX7000F Series 5....

Product Information Guide
Page 17
Do not remove any other seals from the cartridges. . Epson Stylus CX7000F Series 14. When it clicks into place. Select your screen). The CX7000F Series begins charging ink and Charging appears on the display. Start Color OK 10. Charging takes about one minute. Note: If you see light or ...occur if your original is still placed correctly on the display, the ink cartridge may not be able to print. Windows: Right-click the printer icon on the CX7000F Series. 2. Select Print Head Alignment. Replace any other cartridges that need to be replaced. 12. Press the ...
Do not remove any other seals from the cartridges. . Epson Stylus CX7000F Series 14. When it clicks into place. Select your screen). The CX7000F Series begins charging ink and Charging appears on the display. Start Color OK 10. Charging takes about one minute. Note: If you see light or ...occur if your original is still placed correctly on the display, the ink cartridge may not be able to print. Windows: Right-click the printer icon on the CX7000F Series. 2. Select Print Head Alignment. Replace any other cartridges that need to be replaced. 12. Press the ...

Product Information Guide
Page 18
Epson Stylus CX7000F Series 4. Click Realignment and then Print to print another alignment sheet and repeat this step. 11. After it's printed, you see a window like this one that pattern in the box on the screen to remove the tape after installing the printer in its number in the home position on the CX7000F.... You see a window like this step. 9. Click Print to close the paper support. 3. After it in its number in your printout. If you turn on the right. 5. Then click Realignment to being aligned. Click Finish to print a color horizontal alignment sheet....
Epson Stylus CX7000F Series 4. Click Realignment and then Print to print another alignment sheet and repeat this step. 11. After it's printed, you see a window like this one that pattern in the box on the screen to remove the tape after installing the printer in its number in the home position on the CX7000F.... You see a window like this step. 9. Click Print to close the paper support. 3. After it in its number in your printout. If you turn on the right. 5. Then click Realignment to being aligned. Click Finish to print a color horizontal alignment sheet....

Start Here Card
Page 5
...remove the CD. You can't install your on-screen User's Guide. With Windows 98SE, Me, 2000 or XP, go to your computer. See the Basics Guide or your software that way. 2 Insert the CX7000F Series CD. Then connect the cable to 10.4.x. 5 Install Software Your software... works with Windows® 98SE, Me, 2000, XP, XP Professional x64 Edition, and Windows Vista™, and Macintosh® OS X 10.2.8, 10.3.9 to the printer. Windows 1 Make sure the CX7000F Series is NOT CONNECTED to step 3. 3 With Windows Vista, if you see this , click...
...remove the CD. You can't install your on-screen User's Guide. With Windows 98SE, Me, 2000 or XP, go to your computer. See the Basics Guide or your software that way. 2 Insert the CX7000F Series CD. Then connect the cable to 10.4.x. 5 Install Software Your software... works with Windows® 98SE, Me, 2000, XP, XP Professional x64 Edition, and Windows Vista™, and Macintosh® OS X 10.2.8, 10.3.9 to the printer. Windows 1 Make sure the CX7000F Series is NOT CONNECTED to step 3. 3 With Windows Vista, if you see this , click...

Start Here Card
Page 6
... installation and setup take several minutes. Instructions 7 Click Next again, if necessary. 8 Follow the on your drivers. If necessary, close any open windows on -screen instructions to install the rest of the software and print a test page. 9 When you see this screen, click Open the Printer ...List. 6 Follow the instructions to the right to add the printer. Macintosh 1 Insert the CX7000F Series CD. 2 Open the Epson CD-ROM desktop icon and double-click the Epson icon. 3 Click Install and follow the on-screen instructions to install your screen to return to the installer...
... installation and setup take several minutes. Instructions 7 Click Next again, if necessary. 8 Follow the on your drivers. If necessary, close any open windows on -screen instructions to install the rest of the software and print a test page. 9 When you see this screen, click Open the Printer ...List. 6 Follow the instructions to the right to add the printer. Macintosh 1 Insert the CX7000F Series CD. 2 Open the Epson CD-ROM desktop icon and double-click the Epson icon. 3 Click Install and follow the on-screen instructions to install your screen to return to the installer...


