Basics
Page 5
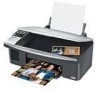
For additional instructions, see the on-screen User's Guide by selecting the icon for better copying, scanning, printing, and faxing. 5 Introduction After you have set up your Epson Stylus® CX7000F Series all-in-one as described on the Start Here sheet, turn here to: ■ Load paper ■ ...a basic document or photo from your computer ■ Fax a photo or document ■ Scan a photo or document, including restoring a color photo as you connect it on your computer! Caution: Cautions must be observed to avoid damage to your Windows® or Macintosh® computer....
For additional instructions, see the on-screen User's Guide by selecting the icon for better copying, scanning, printing, and faxing. 5 Introduction After you have set up your Epson Stylus® CX7000F Series all-in-one as described on the Start Here sheet, turn here to: ■ Load paper ■ ...a basic document or photo from your computer ■ Fax a photo or document ■ Scan a photo or document, including restoring a color photo as you connect it on your computer! Caution: Cautions must be observed to avoid damage to your Windows® or Macintosh® computer....
Basics
Page 7
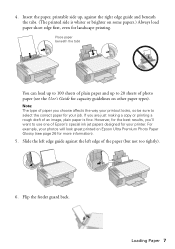
... printing a rough draft of the paper (but not too tightly). 6. For example, your photos will look great printed on Epson Ultra Premium Photo Paper Glossy (see the User's Guide for capacity guidelines on some papers.) Always load paper short edge first, even for your job. Slide the left edge... guide against the right edge guide and beneath the tabs. (The printed side is fine. Flip the feeder guard back. Loading Paper ...
... printing a rough draft of the paper (but not too tightly). 6. For example, your photos will look great printed on Epson Ultra Premium Photo Paper Glossy (see the User's Guide for capacity guidelines on some papers.) Always load paper short edge first, even for your job. Slide the left edge... guide against the right edge guide and beneath the tabs. (The printed side is fine. Flip the feeder guard back. Loading Paper ...
Basics
Page 12
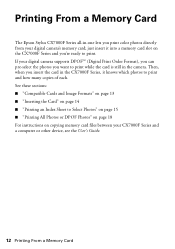
...If your digital camera supports DPOF™ (Digital Print Order Format), you can pre-select the photos you print color photos directly from your CX7000F Series and a computer or other device, see the User's Guide. 12 Printing From a Memory Card just insert it knows which photos to print and how many copies of each... to Select Photos" on page 15 ■ "Printing All Photos or DPOF Photos" on page 18 For instructions on the CX7000F Series and you're ready to print. Printing From a Memory Card The Epson Stylus CX7000F Series all-in-one lets you want to print while the card is still in the...
...If your digital camera supports DPOF™ (Digital Print Order Format), you can pre-select the photos you print color photos directly from your CX7000F Series and a computer or other device, see the User's Guide. 12 Printing From a Memory Card just insert it knows which photos to print and how many copies of each... to Select Photos" on page 15 ■ "Printing All Photos or DPOF Photos" on page 18 For instructions on the CX7000F Series and you're ready to print. Printing From a Memory Card The Epson Stylus CX7000F Series all-in-one lets you want to print while the card is still in the...

Basics
Page 20
... paper type setting for your print job (see page 6). 2. With Windows, you 've installed your printer software and connected the Epson Stylus CX7000F Series all-in Windows" (below . Open a photo or document in Windows 1. Also be sure to your computer as described on...select Programs or All Programs, select EPSON, and click EPSON Stylus CX7000F Series Driver Update for free updates to check Epson's support website at epson.com/support for driver updates. Download instructions are posted for printing a photo or document stored on -screen User's Guide. Note: For detailed instructions on...
... paper type setting for your print job (see page 6). 2. With Windows, you 've installed your printer software and connected the Epson Stylus CX7000F Series all-in Windows" (below . Open a photo or document in Windows 1. Also be sure to your computer as described on...select Programs or All Programs, select EPSON, and click EPSON Stylus CX7000F Series Driver Update for free updates to check Epson's support website at epson.com/support for driver updates. Download instructions are posted for printing a photo or document stored on -screen User's Guide. Note: For detailed instructions on...
Basics
Page 29
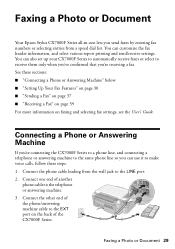
... send/receive settings. Connect the other end of the phone/answering machine cable to the EXT port on faxing and selecting fax settings, see the User's Guide. See these steps: 1. Faxing a Photo or Document 29 Connect one lets you 're receiving a fax. You can use it to make voice calls, follow...Fax Features" on page 30 ■ "Sending a Fax" on page 37 ■ "Receiving a Fax" on page 39 For more information on the back of the CX7000F Series. Faxing a Photo or Document Your Epson Stylus CX7000F Series all-in-one end of another phone cable to the telephone or answering machine. 3.
... send/receive settings. Connect the other end of the phone/answering machine cable to the EXT port on faxing and selecting fax settings, see the User's Guide. See these steps: 1. Faxing a Photo or Document 29 Connect one lets you 're receiving a fax. You can use it to make voice calls, follow...Fax Features" on page 30 ■ "Sending a Fax" on page 37 ■ "Receiving a Fax" on page 39 For more information on the back of the CX7000F Series. Faxing a Photo or Document Your Epson Stylus CX7000F Series all-in-one end of another phone cable to the telephone or answering machine. 3.

Basics
Page 32
... their original size on the selected Paper Size or printed at which you send. Indicates whether large received faxes are reduced in the CX7000F Series for printing received faxes. Select Off to turn off report printing, On Error to print reports only when an error occurs, ... your phone system to use different ring patterns to select an option other fax settings, see the User's Guide. Indicates the type of answer ring pattern you transmit faxes. You must occur before the CX7000F Series automatically receives a fax. 32 Faxing a Photo or Document Selecting Send/Receive Settings Your...
... their original size on the selected Paper Size or printed at which you send. Indicates whether large received faxes are reduced in the CX7000F Series for printing received faxes. Select Off to turn off report printing, On Error to print reports only when an error occurs, ... your phone system to use different ring patterns to select an option other fax settings, see the User's Guide. Indicates the type of answer ring pattern you transmit faxes. You must occur before the CX7000F Series automatically receives a fax. 32 Faxing a Photo or Document Selecting Send/Receive Settings Your...

Basics
Page 42
... color photo as you scan, click the Customize button (see page 43 for it in the Prefix box. Then open folder. 42 Scanning a Photo or Document Note: If you can change the mode using the Mode selector in an open the File menu, choose Import or Acquire, and select Epson Stylus CX7000F... from an application, start Epson Scan: ■ Windows: Double-click the EPSON Scan icon on your desktop. ■ Macintosh: Double-click EPSON Scan in the Applications folder. ■ If you are in the Image Format box. 6. Close the cover gently so you see the on-screen User's Guide.) 5. Do one of ...
... color photo as you scan, click the Customize button (see page 43 for it in the Prefix box. Then open folder. 42 Scanning a Photo or Document Note: If you can change the mode using the Mode selector in an open the File menu, choose Import or Acquire, and select Epson Stylus CX7000F... from an application, start Epson Scan: ■ Windows: Double-click the EPSON Scan icon on your desktop. ■ Macintosh: Double-click EPSON Scan in the Applications folder. ■ If you are in the Image Format box. 6. Close the cover gently so you see the on-screen User's Guide.) 5. Do one of ...

Basics
Page 43
... button, preview your image, and click Scan. Professional Mode Scroll down to -life color and sharpness as you scan. Note: For details on -screen User's Guide. Restoring Color in Faded Photos You can also click Help on the Epson Scan window for information about Full Auto Mode settings, see the on using Home or Professional...
... button, preview your image, and click Scan. Professional Mode Scroll down to -life color and sharpness as you scan. Note: For details on -screen User's Guide. Restoring Color in Faded Photos You can also click Help on the Epson Scan window for information about Full Auto Mode settings, see the on using Home or Professional...
Basics
Page 46
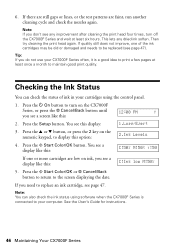
... any dried ink soften. You see a display like this : 2. Then try cleaning the print head again. See the User's Guide for instructions. 46 Maintaining Your CX7000F Series If quality still does not improve, one or more cartridges are faint, run another cleaning cycle and check the nozzles ...again. Press the Setup button. Press the x Start Color/OK button. Press the x Start Color/OK or y Cancel/Back button to ...
... any dried ink soften. You see a display like this : 2. Then try cleaning the print head again. See the User's Guide for instructions. 46 Maintaining Your CX7000F Series If quality still does not improve, one or more cartridges are faint, run another cleaning cycle and check the nozzles ...again. Press the Setup button. Press the x Start Color/OK button. Press the x Start Color/OK or y Cancel/Back button to ...

Basics
Page 52
... for more of the indicated cartridges. You can also check "Problems and Solutions" on page 54 for basic troubleshooting suggestions, or double-click the User's Guide icon on your Epson Stylus CX7000F Series all-in-one, check the display on the control panel to install a new ink cartridge. See page 55 for replacement replacement. Replace... Solving Problems Paper jam -> Press the OK button. An ink cartridge is not installed or is low in the sheet feeder and press the x Start Color/OK button to continue. Load or reload paper in one or more detailed help.
... for more of the indicated cartridges. You can also check "Problems and Solutions" on page 54 for basic troubleshooting suggestions, or double-click the User's Guide icon on your Epson Stylus CX7000F Series all-in-one, check the display on the control panel to install a new ink cartridge. See page 55 for replacement replacement. Replace... Solving Problems Paper jam -> Press the OK button. An ink cartridge is not installed or is low in the sheet feeder and press the x Start Color/OK button to continue. Load or reload paper in one or more detailed help.

Basics
Page 55
... out. See the User's Guide for the necessary filter. ■ If your recipient's fax machine is turned on the display but not too tightly). Close the scanner, then turn the CX7000F Series back on the display. Flip through the stack to eject the jammed paper. Press the x Start Color/OK button to separate...jam message on . Open the scanner and remove any torn pieces. Make sure the paper is not in smaller sections. ■ If you connected the CX7000F Series to a DSL phone line, you must install a DSL filter to the line or you won't be too large. If the paper is stuck...
... out. See the User's Guide for the necessary filter. ■ If your recipient's fax machine is turned on the display but not too tightly). Close the scanner, then turn the CX7000F Series back on the display. Flip through the stack to eject the jammed paper. Press the x Start Color/OK button to separate...jam message on . Open the scanner and remove any torn pieces. Make sure the paper is not in smaller sections. ■ If you connected the CX7000F Series to a DSL phone line, you must install a DSL filter to the line or you won't be too large. If the paper is stuck...
Basics
Page 56
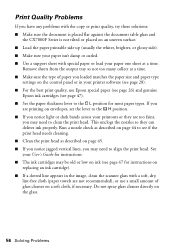
... problems with the copy or print quality, try these solutions: ■ Make sure the document is placed flat against the document table glass and the CX7000F Series is not tilted or placed on an uneven surface. ■ Load the paper printable side up (usually the whiter, brighter, or glossy side). ... Epson ink cartridges (see if the print head needs cleaning. ■ Clean the print head as described on page 44 to see page 47). ■ Set the paper thickness lever to align the print head. Remove sheets from the output tray so not too many collect at a time. See your User's Guide...
... problems with the copy or print quality, try these solutions: ■ Make sure the document is placed flat against the document table glass and the CX7000F Series is not tilted or placed on an uneven surface. ■ Load the paper printable side up (usually the whiter, brighter, or glossy side). ... Epson ink cartridges (see if the print head needs cleaning. ■ Clean the print head as described on page 44 to see page 47). ■ Set the paper thickness lever to align the print head. Remove sheets from the output tray so not too many collect at a time. See your User's Guide...

Product Information Guide
Page 5
...upper left corner. 10/06 5 Paper Loading Capacity When loading Epson ink jet papers, follow these guidelines when loading paper: ❏ Don't load paper above the arrow on the left edge guide. Note: For instructions on the Glass 1. Open the document cover... Epson Envelopes Type or Media Type setting Plain Paper / Bright White Paper Ultra Premium Photo Paper Glossy Premium Photo Paper Glossy Photo Paper Glossy Premium Photo Paper Semi-Gloss Premium Presentation Paper Matte Envelope Placing Originals on loading envelopes, see the User's Guide. Epson Stylus CX7000F Series...
...upper left corner. 10/06 5 Paper Loading Capacity When loading Epson ink jet papers, follow these guidelines when loading paper: ❏ Don't load paper above the arrow on the left edge guide. Note: For instructions on the Glass 1. Open the document cover... Epson Envelopes Type or Media Type setting Plain Paper / Bright White Paper Ultra Premium Photo Paper Glossy Premium Photo Paper Glossy Photo Paper Glossy Premium Photo Paper Semi-Gloss Premium Presentation Paper Matte Envelope Placing Originals on loading envelopes, see the User's Guide. Epson Stylus CX7000F Series...

Product Information Guide
Page 11
...You see this display: 1.Select Speed D 3. You see this display: 1.Resolution 5. Repeat steps 5 and 6 to the screen displaying the date. You see the User's Guide. Setting and Options DRD All (default) Single Double Triple Double & Triple ECM On (default) Off V.34 On (default) Off Rings to Answer 5 (default) ... 9. 13. You can enter the numbers 0 to send and receive faxes using the default settings below. Epson Stylus CX7000F Series 12. Press the x Start Color/OK button. Indicates whether large received faxes are reduced in a 12-hour format. Press the y Cancel/...
...You see this display: 1.Select Speed D 3. You see this display: 1.Resolution 5. Repeat steps 5 and 6 to the screen displaying the date. You see the User's Guide. Setting and Options DRD All (default) Single Double Triple Double & Triple ECM On (default) Off V.34 On (default) Off Rings to Answer 5 (default) ... 9. 13. You can enter the numbers 0 to send and receive faxes using the default settings below. Epson Stylus CX7000F Series 12. Press the x Start Color/OK button. Indicates whether large received faxes are reduced in a 12-hour format. Press the y Cancel/...

Product Information Guide
Page 13
...: If you run out of rings that the call is a fax, press the x Start B&W or x Start Color/OK button to change it to a file. 1. The Epson Scan software provides three scanning modes for progressive levels of scans. ❏ Professional Mode previews your image and lets you...the on-screen User's Guide for details). 10/06 13 Receiving Faxes When the CX7000F Series receives a fax with a full array of the following to start Epson Scan directly from your scan settings with Auto Answer mode turned on, the message Printing appears on the display. Epson Stylus CX7000F Series Selecting the...
...: If you run out of rings that the call is a fax, press the x Start B&W or x Start Color/OK button to change it to a file. 1. The Epson Scan software provides three scanning modes for progressive levels of scans. ❏ Professional Mode previews your image and lets you...the on-screen User's Guide for details). 10/06 13 Receiving Faxes When the CX7000F Series receives a fax with a full array of the following to start Epson Scan directly from your scan settings with Auto Answer mode turned on, the message Printing appears on the display. Epson Stylus CX7000F Series Selecting the...

Product Information Guide
Page 14
... see the previous section for the type of original(s) you see the on-screen User's Guide for it in Faded Photos You can automatically transform an old, faded, or badly exposed color photo into one or more of the following , depending on the currently selected scan... Mode: Click the Color Restoration checkbox. Look for the Color Restoration option in an open folder. Start Epson Scan (see its icon or filename in Epson Scan's Full Auto, Home, and Professional Mode windows: 1. Size your image(s). You see the File Save Settings window: 4. Epson Stylus CX7000F Series 5. Do one...
... see the previous section for the type of original(s) you see the on-screen User's Guide for it in Faded Photos You can automatically transform an old, faded, or badly exposed color photo into one or more of the following , depending on the currently selected scan... Mode: Click the Color Restoration checkbox. Look for the Color Restoration option in an open folder. Start Epson Scan (see its icon or filename in Epson Scan's Full Auto, Home, and Professional Mode windows: 1. Size your image(s). You see the File Save Settings window: 4. Epson Stylus CX7000F Series 5. Do one...

Product Information Guide
Page 15
...:00 PM Y like this : 2. You see a screen 12:00 PM Y like this : 2. If you see a display like this : C:Ink low M:50% 6. Epson Stylus CX7000F Series 5. If there are still gaps or lines, or the test patterns are low on ink: When you see a message like this on the... the P On button to see the User's Guide for details). 7. Press the x Start Color/OK button. This unclogs the nozzles so they can also check the ink status using the control panel. 1. Never turn on the display, you notice light or dark bands across your CX7000F Series often, it . 6. Run a...
...:00 PM Y like this : 2. You see a screen 12:00 PM Y like this : 2. If you see a display like this : C:Ink low M:50% 6. Epson Stylus CX7000F Series 5. If there are still gaps or lines, or the test patterns are low on ink: When you see a message like this on the... the P On button to see the User's Guide for details). 7. Press the x Start Color/OK button. This unclogs the nozzles so they can also check the ink status using the control panel. 1. Never turn on the display, you notice light or dark bands across your CX7000F Series often, it . 6. Run a...

Product Information Guide
Page 19
...Color/OK or x Start B&W to continue. Contact your local authorized servicer or contact Epson for a referral. Turn it . A CX7000F Series part needs to install a new ink cartridge. Related Documentation CPD-22471 CPD-22473 CPD-22472 Epson Stylus CX7000F Series Start Here sheet Epson Stylus CX7000F Series Basics Guide Epson Stylus CX7000F.... No index sheet detected or sheet placed incorrectly. If you transport it off and then back on -screen User's Guide) 10/06 19 Remove the incompatible memory card and insert a compatible card (see page 15 for a list...
...Color/OK or x Start B&W to continue. Contact your local authorized servicer or contact Epson for a referral. Turn it . A CX7000F Series part needs to install a new ink cartridge. Related Documentation CPD-22471 CPD-22473 CPD-22472 Epson Stylus CX7000F Series Start Here sheet Epson Stylus CX7000F Series Basics Guide Epson Stylus CX7000F.... No index sheet detected or sheet placed incorrectly. If you transport it off and then back on -screen User's Guide) 10/06 19 Remove the incompatible memory card and insert a compatible card (see page 15 for a list...

Start Here Card
Page 5
Windows 1 Make sure the CX7000F Series is NOT CONNECTED to step 3. 3 With Windows Vista, if you see this , click Cancel and disconnect the USB cable. See the Basics Guide or your computer. With Windows 98SE, Me, 2000 or XP, go to your on-screen User's Guide. Then connect the cable to copy,...a moment, make sure you securely connected and turned on -screen instructions to step 4. You can't install your software that way. 2 Insert the CX7000F Series CD. Software installation takes several minutes. 5 When prompted, connect the USB cable to 10.4.x. Then click Continue at the...
Windows 1 Make sure the CX7000F Series is NOT CONNECTED to step 3. 3 With Windows Vista, if you see this , click Cancel and disconnect the USB cable. See the Basics Guide or your computer. With Windows 98SE, Me, 2000 or XP, go to your on-screen User's Guide. Then connect the cable to copy,...a moment, make sure you securely connected and turned on -screen instructions to step 4. You can't install your software that way. 2 Insert the CX7000F Series CD. Software installation takes several minutes. 5 When prompted, connect the USB cable to 10.4.x. Then click Continue at the...

Start Here Card
Page 6
...return to the installer. 4 When prompted, connect the USB cable to the computer first. Macintosh 1 Insert the CX7000F Series CD. 2 Open the Epson CD-ROM desktop icon and double-click the Epson icon. 3 Click Install and follow the on -screen instructions to install the rest of the software and print a... cable to copy, print, and scan! Instructions 7 Click Next again, if necessary. 8 Follow the on -screen instructions to install your on-screen User's Guide. See the Basics Guide or your drivers. Software installation and setup take several minutes. You're ready to the printer.
...return to the installer. 4 When prompted, connect the USB cable to the computer first. Macintosh 1 Insert the CX7000F Series CD. 2 Open the Epson CD-ROM desktop icon and double-click the Epson icon. 3 Click Install and follow the on -screen instructions to install the rest of the software and print a... cable to copy, print, and scan! Instructions 7 Click Next again, if necessary. 8 Follow the on -screen instructions to install your on-screen User's Guide. See the Basics Guide or your drivers. Software installation and setup take several minutes. You're ready to the printer.


