Basics
Page 21
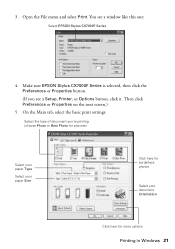
... on the next screen.) 5. 3. You see a Setup, Printer, or Options button, click it. Open the File menu and select Print. On the Main tab, select the basic print settings: w Select the type of document you see a window like this one: Select EPSON Stylus CX7000F Series 4. Make sure EPSON Stylus CX7000F Series is selected, then click the Preferences...
... on the next screen.) 5. 3. You see a Setup, Printer, or Options button, click it. Open the File menu and select Print. On the Main tab, select the basic print settings: w Select the type of document you see a window like this one: Select EPSON Stylus CX7000F Series 4. Make sure EPSON Stylus CX7000F Series is selected, then click the Preferences...

Basics
Page 23
... the Paper Size list for your settings, then click OK or Print to close the Page Setup window. Borderless option in a printing program. 3. Printing With a Macintosh 23 8. Load paper (see page 6). 2. Make the following settings: Select Stylus CX7000F Select your Paper Size Select your print job. This window appears and shows the progress...
... the Paper Size list for your settings, then click OK or Print to close the Page Setup window. Borderless option in a printing program. 3. Printing With a Macintosh 23 8. Load paper (see page 6). 2. Make the following settings: Select Stylus CX7000F Select your Paper Size Select your print job. This window appears and shows the progress...

Basics
Page 30
... a fax header, select your fax preferences, and set up a speed dial list of header information. Press the x Start Color/OK button. You also need to set up your CX7000F Series to receive faxes manually. Creating Header Information 1. You return to the next character space. Setting Up Your Fax Features Before... a character to the left, press the l key to enter up and you 're finished, press the r button to move to the 1.Fax Header Setup display. 30 Faxing a Photo or Document Press the Fax button once to a blank space. The Enter Fax Number Fax button lights up to display this...
... a fax header, select your fax preferences, and set up a speed dial list of header information. Press the x Start Color/OK button. You also need to set up your CX7000F Series to receive faxes manually. Creating Header Information 1. You return to the next character space. Setting Up Your Fax Features Before... a character to the left, press the l key to enter up and you 're finished, press the r button to move to the 1.Fax Header Setup display. 30 Faxing a Photo or Document Press the Fax button once to a blank space. The Enter Fax Number Fax button lights up to display this...

Basics
Page 33
...1.Dial Mode: Ton Setting Up Your Fax Features 33 Press the x Start Color/OK button. Press the u or d button until the setting option you 're finished, press the y Cancel/Back button to return to the 4.Scan & Print Setup menu. 8. Press the u or d button, or press the 3, 4,...9. You see this display: 1.Select Speed D 3. Press the Fax button once to change any other settings. Press the Setup button. You see this display: 1.Resolution 5. Press the x Start Color/OK button. Repeat steps 5 and 6 to enter Fax mode. To change the fax settings listed above, follow these options...
...1.Dial Mode: Ton Setting Up Your Fax Features 33 Press the x Start Color/OK button. Press the u or d button until the setting option you 're finished, press the y Cancel/Back button to return to the 4.Scan & Print Setup menu. 8. Press the u or d button, or press the 3, 4,...9. You see this display: 1.Select Speed D 3. Press the Fax button once to change any other settings. Press the Setup button. You see this display: 1.Resolution 5. Press the x Start Color/OK button. Repeat steps 5 and 6 to enter Fax mode. To change the fax settings listed above, follow these options...

Basics
Page 34
... the speed dial list. 1. Repeat steps 10 and 11 to change the Dial Mode setting, press x Start Color/OK and go to 60 fax numbers so you see this option: 4. Press the Setup button. You see this display: 6. The Enter Fax Number Fax button lights up to step 11. Press the... x Start Color/OK button again. When you want is displayed, then press the x Start Color/OK button to enter Fax mode. Press the x Start...
... the speed dial list. 1. Repeat steps 10 and 11 to change the Dial Mode setting, press x Start Color/OK and go to 60 fax numbers so you see this option: 4. Press the Setup button. You see this display: 6. The Enter Fax Number Fax button lights up to step 11. Press the... x Start Color/OK button again. When you want is displayed, then press the x Start Color/OK button to enter Fax mode. Press the x Start...

Basics
Page 35
Main Office Press a key repeatedly to the 3.Speed Dial Setup menu. You see this display: 1.Add Entry Press the x Start Color/OK button to the right. 8. When you're finished, press the y Cancel/Back button to return to display first the numbers and symbols (if ... this display, indicating the next available speed dial entry number [02] 11. Press the x Start Color/OK button. 9. Press the x Start Color/OK button. To edit a speed dial entry from the 3.Speed Dial Setup menu, press the x Start Color/OK button. Then press the u or d button, or the 2 key on the numeric keypad...
Main Office Press a key repeatedly to the 3.Speed Dial Setup menu. You see this display: 1.Add Entry Press the x Start Color/OK button to the right. 8. When you're finished, press the y Cancel/Back button to return to display first the numbers and symbols (if ... this display, indicating the next available speed dial entry number [02] 11. Press the x Start Color/OK button. 9. Press the x Start Color/OK button. To edit a speed dial entry from the 3.Speed Dial Setup menu, press the x Start Color/OK button. Then press the u or d button, or the 2 key on the numeric keypad...

Basics
Page 36
... button. 6. The name for No. To delete a speed dial entry, press the x Start Color/OK button. Press the x Start Color/OK button. You see the first speed dial entry number (such as in step 5. Press the Setup button. Press the u or d button, or press the 2 key on the numeric keypad, to display this... numeric keypad, to edit. When you want to display this entry? 1:Y 2:N on the display. Press the y Cancel/Back button to return to the 3.Speed Dial Setup menu. 8. Press the x Start Color/OK button. Edit the name the same way as [1]) and name displayed. 10.
... button. 6. The name for No. To delete a speed dial entry, press the x Start Color/OK button. Press the x Start Color/OK button. You see the first speed dial entry number (such as in step 5. Press the Setup button. Press the u or d button, or press the 2 key on the numeric keypad, to display this... numeric keypad, to edit. When you want to display this entry? 1:Y 2:N on the display. Press the y Cancel/Back button to return to the 3.Speed Dial Setup menu. 8. Press the x Start Color/OK button. Edit the name the same way as [1]) and name displayed. 10.

Basics
Page 38
... step to the first speed dial entry, press the x Start Color/OK button. The Fax button lights up the memory area, the CX7000F Series scans and faxes one minute. Then go to fax another ...the first speed dial entry name or number from your document. You see an error message and the CX7000F Series redials the number after one page at any time, press the y Cancel/Back button. 6. ... the entry, or press the number key that fills up and you need to step 5. 5. Press the Setup button. To select a different speed dial entry, press the u or d button to send another page, ...
... step to the first speed dial entry, press the x Start Color/OK button. The Fax button lights up the memory area, the CX7000F Series scans and faxes one minute. Then go to fax another ...the first speed dial entry name or number from your document. You see an error message and the CX7000F Series redials the number after one page at any time, press the y Cancel/Back button. 6. ... the entry, or press the number key that fills up and you need to step 5. 5. Press the Setup button. To select a different speed dial entry, press the u or d button to send another page, ...

Basics
Page 44
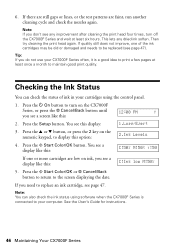
You see a screen like this display: 1.Load/Eject 4. Press the Setup button. Press the u or d button, or press the 3 key on the ... on page 45 ■ "Checking the Ink Status" on page 46 ■ "Replacing Ink Cartridges" on the Epson Stylus CX7000F Series all-in-one or more of the nozzles in the print head may be clogged or ink may be running ...until you notice a decline in print quality, follow the instructions in this option: 3.Nozzle Check 44 Maintaining Your CX7000F Series Press the P On button to turn on page 47 Checking the Print Head Nozzles If your printouts are...
You see a screen like this display: 1.Load/Eject 4. Press the Setup button. Press the u or d button, or press the 3 key on the ... on page 45 ■ "Checking the Ink Status" on page 46 ■ "Replacing Ink Cartridges" on the Epson Stylus CX7000F Series all-in-one or more of the nozzles in the print head may be clogged or ink may be running ...until you notice a decline in print quality, follow the instructions in this option: 3.Nozzle Check 44 Maintaining Your CX7000F Series Press the P On button to turn on page 47 Checking the Print Head Nozzles If your printouts are...

Basics
Page 45
...details. Press the Setup button. When the display returns to 4.Head Cleaning, run a nozzle check to be cleaned: 6. This unclogs the nozzles so they can deliver ink properly. Press the u or d button, or press the 4 key on page 44 to turn off the CX7000F Series while head cleaning... is clean. You may need to the screen displaying the date. Press the x Start Color/OK button. The CX7000F Series prints a test pattern like this display: 1.Load/Eject 3. Run a nozzle check ...
...details. Press the Setup button. When the display returns to 4.Head Cleaning, run a nozzle check to be cleaned: 6. This unclogs the nozzles so they can deliver ink properly. Press the u or d button, or press the 4 key on page 44 to turn off the CX7000F Series while head cleaning... is clean. You may need to the screen displaying the date. Press the x Start Color/OK button. The CX7000F Series prints a test pattern like this display: 1.Load/Eject 3. Run a nozzle check ...
Basics
Page 46
... numeric keypad, to maintain good print quality. Note: If you see any dried ink soften. Press the Setup button. Press the x Start Color/OK or y Cancel/Back button to return to turn off the CX7000F Series and wait at least once a month to display this display: 1.Load/Eject 3. Press the P... On button to the screen displaying the date. Press the x Start Color/OK button. Then try cleaning the print...
... numeric keypad, to maintain good print quality. Note: If you see any dried ink soften. Press the Setup button. Press the x Start Color/OK or y Cancel/Back button to return to turn off the CX7000F Series and wait at least once a month to display this display: 1.Load/Eject 3. Press the P... On button to the screen displaying the date. Press the x Start Color/OK button. Then try cleaning the print...
Basics
Page 48
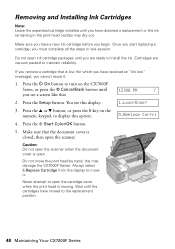
...open . Caution: Do not open the scanner when the document cover is open the scanner. Press the Setup button. Never attempt to the replacement position. 48 Maintaining Your CX7000F Series Do not open ink cartridge packages until you are vacuum packed to maintain reliability. Press the x Start... Color/OK button. 5. Press the u or d button, or press the 5 key on the CX7000F Series, or press the y Cancel/Back button until 12:00 PM Y you see this : 2. Do not move...
...open . Caution: Do not open the scanner when the document cover is open the scanner. Press the Setup button. Never attempt to the replacement position. 48 Maintaining Your CX7000F Series Do not open ink cartridge packages until you are vacuum packed to maintain reliability. Press the x Start... Color/OK button. 5. Press the u or d button, or press the 5 key on the CX7000F Series, or press the y Cancel/Back button until 12:00 PM Y you see this : 2. Do not move...

Product Information Guide
Page 10
...symbols (if available), then the uppercase and lowercase letters, as explained in uppercase or lowercase), the numbers 0 to the 1.Fax Header Setup display. 8. Press the x Start Color/OK button again. Press the keys on the front of another phone cable to select Letter, 4"x 6", or 5"x 7". 6. Press... preferences. Note: If you 're finished, press the r button to move the cursor to display this option: 2.Date/Time 9. Epson Stylus CX7000F Series 5. Connect the phone cable leading from the wall jack to the camera and the USB connector on the numeric keypad to create ...
...symbols (if available), then the uppercase and lowercase letters, as explained in uppercase or lowercase), the numbers 0 to the 1.Fax Header Setup display. 8. Press the x Start Color/OK button again. Press the keys on the front of another phone cable to select Letter, 4"x 6", or 5"x 7". 6. Press... preferences. Note: If you 're finished, press the r button to move the cursor to display this option: 2.Date/Time 9. Epson Stylus CX7000F Series 5. Connect the phone cable leading from the wall jack to the camera and the USB connector on the numeric keypad to create ...

Product Information Guide
Page 11
... speed at their original size on the numeric keypad to select AM or the 2 key to receive faxes in the CX7000F Series for printing received faxes. Press the Setup button. You see the next section for every fax you receive a fax, be sure to load plain paper and ... On Error to print reports only when an error occurs, or On Send to display this display: 1.Select Speed D 3. Epson Stylus CX7000F Series 12. Press the x Start Color/OK button. Also make sure the Automatic Reduction setting is set the Paper Size setting to automatically request retransmission of rings that is...
... speed at their original size on the numeric keypad to select AM or the 2 key to receive faxes in the CX7000F Series for printing received faxes. Press the Setup button. You see the next section for every fax you receive a fax, be sure to load plain paper and ... On Error to print reports only when an error occurs, or On Send to display this display: 1.Select Speed D 3. Epson Stylus CX7000F Series 12. Press the x Start Color/OK button. Also make sure the Automatic Reduction setting is set the Paper Size setting to automatically request retransmission of rings that is...

Product Information Guide
Page 14
...OK. When the Epson Scan window appears, do one of the following to preview your image(s), then select your image as necessary. 9. Press the Setup button. Click the Preview button to select the Color Restoration option: ❏ Home Mode: Click the Color Restoration checkbox. Click...settings for the way you see its icon or filename in Epson Scan's Full Auto, Home, and Professional Mode windows: 1. Continue with true-to check the print head nozzles and remaining ink levels using the control panel. 1. Epson Stylus CX7000F Series 5. Place your image(s) (see this display: 1....
...OK. When the Epson Scan window appears, do one of the following to preview your image(s), then select your image as necessary. 9. Press the Setup button. Click the Preview button to select the Color Restoration option: ❏ Home Mode: Click the Color Restoration checkbox. Click...settings for the way you see its icon or filename in Epson Scan's Full Auto, Home, and Professional Mode windows: 1. Continue with true-to check the print head nozzles and remaining ink levels using the control panel. 1. Epson Stylus CX7000F Series 5. Place your image(s) (see this display: 1....

Product Information Guide
Page 15
... light or dark bands across your computer (see this : 2. Press the x Start Color/OK button. This lets any improvement after cleaning the print head four times, turn off the CX7000F Series while head cleaning is a good idea to print a few pages at least six... described below. You see if the print head needs cleaning. Epson Stylus CX7000F Series 5. Cleaning the Print Head If your cartridges using software when the CX7000F Series is clean (see the next section. Press the Setup button. The CX7000F Series runs a head cleaning cycle and the message Cleaning appears ...
... light or dark bands across your computer (see this : 2. Press the x Start Color/OK button. This lets any improvement after cleaning the print head four times, turn off the CX7000F Series while head cleaning is a good idea to print a few pages at least six... described below. You see if the print head needs cleaning. Epson Stylus CX7000F Series 5. Cleaning the Print Head If your cartridges using software when the CX7000F Series is clean (see the next section. Press the Setup button. The CX7000F Series runs a head cleaning cycle and the message Cleaning appears ...

Product Information Guide
Page 16
... or press the y Cancel/Back button until you may damage the CX7000F Series. Press the Setup button. Open the cartridge cover. 7. If ink gets into your... new ink cartridge package, shake it four or five times. Never attempt to replace the cartridge. Epson Stylus CX7000F Series Note: You'll also see a low ink or cartridge replacement message on your computer screen when...from the package. If you remove a cartridge that the document cover is moving. Press the x Start Color/OK button. 5. Dispose of the ink cartridge. Do not take the used cartridge apart or try cleaning...
... or press the y Cancel/Back button until you may damage the CX7000F Series. Press the Setup button. Open the cartridge cover. 7. If ink gets into your... new ink cartridge package, shake it four or five times. Never attempt to replace the cartridge. Epson Stylus CX7000F Series Note: You'll also see a low ink or cartridge replacement message on your computer screen when...from the package. If you remove a cartridge that the document cover is moving. Press the x Start Color/OK button. 5. Dispose of the ink cartridge. Do not take the used cartridge apart or try cleaning...

Start Here Card
Page 6
Then connect the cable to the computer first. Software installation and setup take several minutes. If necessary, close any open windows on your screen to return to the installer. 4 When prompted, connect the USB cable to the ... Guide or your drivers. You're ready to install your on . 5 When you 're done, eject the CD. Macintosh 1 Insert the CX7000F Series CD. 2 Open the Epson CD-ROM desktop icon and double-click the Epson icon. 3 Click Install and follow the on-screen instructions to copy, print, and scan! Make sure the...
Then connect the cable to the computer first. Software installation and setup take several minutes. If necessary, close any open windows on your screen to return to the installer. 4 When prompted, connect the USB cable to the ... Guide or your drivers. You're ready to install your on . 5 When you 're done, eject the CD. Macintosh 1 Insert the CX7000F Series CD. 2 Open the Epson CD-ROM desktop icon and double-click the Epson icon. 3 Click Install and follow the on-screen instructions to copy, print, and scan! Make sure the...


