
Basics
Page 32
... the selected Paper Size or printed at which you've connected the CX7000F Series. Select Off to turn off report printing, On Error to print reports only when an error occurs, or On Send to which you transmit faxes. Indicates whether you use Error Correction Mode to automatically request retransmission of answer ring pattern you...
... the selected Paper Size or printed at which you've connected the CX7000F Series. Select Off to turn off report printing, On Error to print reports only when an error occurs, or On Send to which you transmit faxes. Indicates whether you use Error Correction Mode to automatically request retransmission of answer ring pattern you...
Basics
Page 37
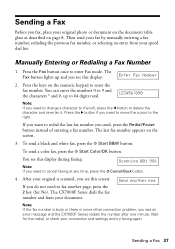
... see this display: Enter Fax Number 2. You see an error message and the CX7000F Series redials the number after one minute. Send another page, press the 2 key (for the redial, or check your connection and settings and try faxing again. Manually Entering or Redialing a Fax Number 1. To send a color fax, press the x Start Color/OK button. Press the...
... see this display: Enter Fax Number 2. You see an error message and the CX7000F Series redials the number after one minute. Send another page, press the 2 key (for the redial, or check your connection and settings and try faxing again. Manually Entering or Redialing a Fax Number 1. To send a color fax, press the x Start Color/OK button. Press the...

Basics
Page 38
... until you see an error message and the CX7000F Series redials the number after one page at any time, press the y Cancel/Back button. 6. To send a black and white fax, press the x Start B&W button. Press the Fax button once to fax the next page. Then press the x Start Color/OK button to enter Fax mode. To select...
... until you see an error message and the CX7000F Series redials the number after one page at any time, press the y Cancel/Back button. 6. To send a black and white fax, press the x Start B&W button. Press the Fax button once to fax the next page. Then press the x Start Color/OK button to enter Fax mode. To select...

Basics
Page 40
... Start B&W or x Start Color/OK button to receive the fax. When the CX7000F Series receives a fax in manual answer mode, the connected phone begins ringing. Note: If you run out of paper during printing, you see any other error messages, see page 52. 40 Faxing a Photo or Document If you...Printing appears on the display. Once you see the error message Paper out. Load more paper and press the x Start Color/OK button so printing can continue. When it begins printing the fax. Receiving Faxes When the CX7000F Series receives a fax with Auto Answer mode turned on, the message Printing ...
... Start B&W or x Start Color/OK button to receive the fax. When the CX7000F Series receives a fax in manual answer mode, the connected phone begins ringing. Note: If you run out of paper during printing, you see any other error messages, see page 52. 40 Faxing a Photo or Document If you...Printing appears on the display. Once you see the error message Paper out. Load more paper and press the x Start Color/OK button so printing can continue. When it begins printing the fax. Receiving Faxes When the CX7000F Series receives a fax with Auto Answer mode turned on, the message Printing ...

Basics
Page 53
...the m L position. An index sheet was not recognized because it correctly, and try again. Memory card data does not match index sheet. Fax not sent. Error Messages 53 No memory card A memory card is inserted that is set the lever to the ^ H position. Replace the card or index ... glass (see page 37), but press the x Start B&W button. The paper thickness lever is not supported by the CX7000F Series. If you are detected on envelopes, press x Start Color/OK or x Start B&W to begin. See page 13 for details. No index sheet detected or sheet placed incorrectly. ...
...the m L position. An index sheet was not recognized because it correctly, and try again. Memory card data does not match index sheet. Fax not sent. Error Messages 53 No memory card A memory card is inserted that is set the lever to the ^ H position. Replace the card or index ... glass (see page 37), but press the x Start B&W button. The paper thickness lever is not supported by the CX7000F Series. If you are detected on envelopes, press x Start Color/OK or x Start B&W to begin. See page 13 for details. No index sheet detected or sheet placed incorrectly. ...

Basics
Page 55
...phone cable is connected correctly and verify that your phone line has static or other noise problems, turn it off the ECM (Error Correction Mode) setting and try faxing again. Flip through the stack to clear the jam: 1. Follow these steps to separate the sheets a little. If the... jammed paper. Faxing Problems ■ If you have problems receiving a fax, make sure paper is loaded, the phone cable is connected correctly, and the phone line works. Press the x Start Color/OK button to fax. this can damage the sheet feeder. Close the scanner, then turn the CX7000F Series back on...
...phone cable is connected correctly and verify that your phone line has static or other noise problems, turn it off the ECM (Error Correction Mode) setting and try faxing again. Flip through the stack to clear the jam: 1. Follow these steps to separate the sheets a little. If the... jammed paper. Faxing Problems ■ If you have problems receiving a fax, make sure paper is loaded, the phone cable is connected correctly, and the phone line works. Press the x Start Color/OK button to fax. this can damage the sheet feeder. Close the scanner, then turn the CX7000F Series back on...
Basics
Page 67
...56 Answer mode, fax, 39 to 40 Answering machine, connecting, 29 ArcSoft PhotoImpression, 41, 58 B Borderless copies, 10 printing, Macintosh, 23 printing, Windows, 20 to 21 C Camera, printing from, 19 Cleaning document table glass, 56 print head, 45 to 46 Color Management, turning off, 22, 25 Color, restoring while scanning...11 Drivers, updating, 20 DSL, 55 E Envelope printing, 28, 53, 54, 56 Epson accessories, 57 help, 57 paper, 26 to 28 Epson Scan, 41 to 43 Error messages, 52 to 54 F Faded photos, restoring, 43 Faxing answer mode, 39 to 40 connecting for, 29 creating header, 30 to 31 paper size...
...56 Answer mode, fax, 39 to 40 Answering machine, connecting, 29 ArcSoft PhotoImpression, 41, 58 B Borderless copies, 10 printing, Macintosh, 23 printing, Windows, 20 to 21 C Camera, printing from, 19 Cleaning document table glass, 56 print head, 45 to 46 Color Management, turning off, 22, 25 Color, restoring while scanning...11 Drivers, updating, 20 DSL, 55 E Envelope printing, 28, 53, 54, 56 Epson accessories, 57 help, 57 paper, 26 to 28 Epson Scan, 41 to 43 Error messages, 52 to 54 F Faded photos, restoring, 43 Faxing answer mode, 39 to 40 connecting for, 29 creating header, 30 to 31 paper size...

Basics
Page 68
...fax, 30 to 31 Help, 57 to 58 I Image formats, 13 Image quality problems, 56 Index sheet printing, 15 to 16 selecting/scanning photos from, 16 to 17 Ink cartridge part numbers, 47 problems, 56 replacing, 47 to 51 safety instructions, 60 status, 46 Introduction, 5 M Macintosh borderless printing, 23 color... special types, 26 to 28 type settings, 28 Paper size copying, selecting, 10 to 11 fax, selecting, 31 to 33 Macintosh, selecting, 23 Windows, selecting, 21 Paper thickness lever, 53... copying/printing, 54 error messages, 52 to 54 faxing, 55 help, 57 to 58 paper feeding, 55 print quality, 56...
...fax, 30 to 31 Help, 57 to 58 I Image formats, 13 Image quality problems, 56 Index sheet printing, 15 to 16 selecting/scanning photos from, 16 to 17 Ink cartridge part numbers, 47 problems, 56 replacing, 47 to 51 safety instructions, 60 status, 46 Introduction, 5 M Macintosh borderless printing, 23 color... special types, 26 to 28 type settings, 28 Paper size copying, selecting, 10 to 11 fax, selecting, 31 to 33 Macintosh, selecting, 23 Windows, selecting, 21 Paper thickness lever, 53... copying/printing, 54 error messages, 52 to 54 faxing, 55 help, 57 to 58 paper feeding, 55 print quality, 56...

Product Information Guide
Page 11
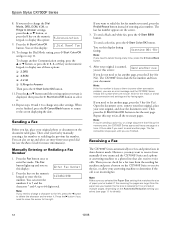
...Resolution 5. Press the y Cancel/Back button until the setting option you want to print your phone system to use Error Correction Mode to select an option other settings. Epson Stylus CX7000F Series 12. Press the keys on the numeric keypad to select AM or the 2 key to the screen displaying ...the date. If you return to select PM. 15. Press the x Start Color/OK button. Selecting the Paper Size Before you receive a fax, be sure ...
...Resolution 5. Press the y Cancel/Back button until the setting option you want to print your phone system to use Error Correction Mode to select an option other settings. Epson Stylus CX7000F Series 12. Press the keys on the numeric keypad to select AM or the 2 key to the screen displaying ...the date. If you return to select PM. 15. Press the x Start Color/OK button. Selecting the Paper Size Before you receive a fax, be sure ...
Product Information Guide
Page 12
...the numeric keypad, to change another page. The last fax number appears on the Automatic Reduction setting you fax, place your speed dial list (see this option: 5.Communication 9. To send a color fax, press the x Start Color/OK button. After your answering machine to a phone ... faxing at a time. If the incoming fax pages are finished. Sending a Fax Before you select (see an error message and the CX7000F Series redials the number after one of these options: ❏ 2.DRD ❏ 3.ECM ❏ 4.V.34 ❏ 5.Rings to 64 digits total. Epson Stylus CX7000F ...
...the numeric keypad, to change another page. The last fax number appears on the Automatic Reduction setting you fax, place your speed dial list (see this option: 5.Communication 9. To send a color fax, press the x Start Color/OK button. After your answering machine to a phone ... faxing at a time. If the incoming fax pages are finished. Sending a Fax Before you select (see an error message and the CX7000F Series redials the number after one of these options: ❏ 2.DRD ❏ 3.ECM ❏ 4.V.34 ❏ 5.Rings to 64 digits total. Epson Stylus CX7000F ...

Product Information Guide
Page 13
...CX7000F Series receives a fax in the upper right corner is a fax, press the x Start B&W or x Start Color/OK button to a file. 1. When it to computer. You see the Epson Scan standby window: Scanning You can even automatically restore faded color... To change it begins printing the fax. Scanning Directly From Epson Scan You can remove the document cover (see the error message Paper out. If you see ... answer mode, the connected phone begins ringing. Epson Stylus CX7000F Series Selecting the Answer Mode The CX7000F Series tells you manually configure your scan settings ...
...CX7000F Series receives a fax in the upper right corner is a fax, press the x Start B&W or x Start Color/OK button to a file. 1. When it to computer. You see the Epson Scan standby window: Scanning You can even automatically restore faded color... To change it begins printing the fax. Scanning Directly From Epson Scan You can remove the document cover (see the error message Paper out. If you see ... answer mode, the connected phone begins ringing. Epson Stylus CX7000F Series Selecting the Answer Mode The CX7000F Series tells you manually configure your scan settings ...

Product Information Guide
Page 19
... low -> Press the OK button to a fax machine that is not supported by hand. Press the x Start Color/OK button. Paper thickness lever is not positioned correctly. A CX7000F Series part needs to continue (see page 15 for details). Printer error -> or Scanner error -> See your documentation for replacement instructions). Epson Stylus CX7000F Series 6. Remove the incompatible memory card...
... low -> Press the OK button to a fax machine that is not supported by hand. Press the x Start Color/OK button. Paper thickness lever is not positioned correctly. A CX7000F Series part needs to continue (see page 15 for details). Printer error -> or Scanner error -> See your documentation for replacement instructions). Epson Stylus CX7000F Series 6. Remove the incompatible memory card...

