
Product Information Guide
Page 4
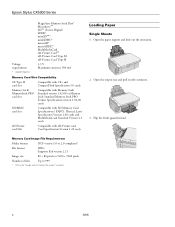
... Physical Layer Specification Version 2.00 cards and MultiMediaCard Standard Version 4.1 cards xD-Picture card Slot Compatible with SD Memory Card Specifications / PART1. Epson Stylus CX5000 Series Voltage requirements * Adapter required MagicGate Memory Stick Duo* Microdrive™ SD™ (Secure Digital) SDHC miniSD™* miniSDHC* microSD* ...-Picture Card™ xD-Picture Card Type M xD-Picture Card Type H 3.3 V Maximum current is the "Design rule for Camera File system" standard 4 6/06 Open the paper support and slide out the extensions. 2. Flip the feeder guard forward.
... Physical Layer Specification Version 2.00 cards and MultiMediaCard Standard Version 4.1 cards xD-Picture card Slot Compatible with SD Memory Card Specifications / PART1. Epson Stylus CX5000 Series Voltage requirements * Adapter required MagicGate Memory Stick Duo* Microdrive™ SD™ (Secure Digital) SDHC miniSD™* miniSDHC* microSD* ...-Picture Card™ xD-Picture Card Type M xD-Picture Card Type H 3.3 V Maximum current is the "Design rule for Camera File system" standard 4 6/06 Open the paper support and slide out the extensions. 2. Flip the feeder guard forward.

Product Information Guide
Page 9
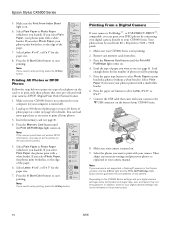
Epson Stylus CX5000 Series 4. Make sure your CX5000 Series is not connected to change your selections. Selecting Photos on the index sheet, fill in one or more sheets, press the y Stop button. The On light flashes, and the CX5000...see page 4 for details). you want to be able to your computer (or your camera using DPOF (see the next section) ❏ Print all the pictures on the upper...and print. Caution: Do not remove the card or turn off ). 2. Press the x Start Color button. Once you have printed the index sheet, use a dark pen or pencil to indicate ...
Epson Stylus CX5000 Series 4. Make sure your CX5000 Series is not connected to change your selections. Selecting Photos on the index sheet, fill in one or more sheets, press the y Stop button. The On light flashes, and the CX5000...see page 4 for details). you want to be able to your computer (or your camera using DPOF (see the next section) ❏ Print all the pictures on the upper...and print. Caution: Do not remove the card or turn off ). 2. Press the x Start Color button. Once you have printed the index sheet, use a dark pen or pencil to indicate ...
Product Information Guide
Page 10
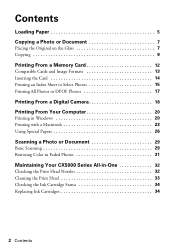
...Color button to 20 sheets of photos you'll be reflected in the printed output. 10 6/06 Load up to 100 sheets of plain paper or up to start printing. Select Plain Paper if you loaded). In addition, some combinations of your photos printed with your camera manual. Epson Stylus CX5000... Series 5. Make sure the Print From Index Sheet light is turned on the front of paper type, size, and layout may not be printing. 5. Select Letter, 4"x 6", or 5"x 7" for the paper size. 7. Make sure your CX5000 Series is not ...
...Color button to 20 sheets of photos you'll be reflected in the printed output. 10 6/06 Load up to 100 sheets of plain paper or up to start printing. Select Plain Paper if you loaded). In addition, some combinations of your photos printed with your camera manual. Epson Stylus CX5000... Series 5. Make sure the Print From Index Sheet light is turned on the front of paper type, size, and layout may not be printing. 5. Select Letter, 4"x 6", or 5"x 7" for the paper size. 7. Make sure your CX5000 Series is not ...
Quick Reference Guide
Page 2
...Formats 13 Inserting the Card 14 Printing an Index Sheet to Select Photos 15 Printing All Photos or DPOF Photos 17 Printing From a Digital Camera 18 Printing From Your Computer 20 Printing in Windows 20 Printing with a Macintosh 23 Using Special Papers 26 Scanning a Photo or Document 29... Basic Scanning 29 Restoring Color in Faded Photos 31 Maintaining Your CX5000 Series All-in-One 32 Checking the Print Head Nozzles 32 Cleaning the Print Head 33 Checking the Ink Cartridge Status ...
...Formats 13 Inserting the Card 14 Printing an Index Sheet to Select Photos 15 Printing All Photos or DPOF Photos 17 Printing From a Digital Camera 18 Printing From Your Computer 20 Printing in Windows 20 Printing with a Macintosh 23 Using Special Papers 26 Scanning a Photo or Document 29... Basic Scanning 29 Restoring Color in Faded Photos 31 Maintaining Your CX5000 Series All-in-One 32 Checking the Print Head Nozzles 32 Cleaning the Print Head 33 Checking the Ink Cartridge Status ...
Quick Reference Guide
Page 4
... photos stored on a memory card ■ Print photos directly from your camera ■ Get the basic steps for printing from your computer ■ Scan a document or photo, including restoring a color photo as you read your CX5000 Series instructions: Warning: Warnings must be followed carefully to avoid bodily injury....the on-screen User's Guide by selecting the icon for better copying, scanning, and printing. 4 Introduction After you have set up your Epson Stylus® CX5000 Series all-in-one as described on the Start Here sheet, turn here to: ■ Load paper ■ Make a quick copy ...
... photos stored on a memory card ■ Print photos directly from your camera ■ Get the basic steps for printing from your computer ■ Scan a document or photo, including restoring a color photo as you read your CX5000 Series instructions: Warning: Warnings must be followed carefully to avoid bodily injury....the on-screen User's Guide by selecting the icon for better copying, scanning, and printing. 4 Introduction After you have set up your Epson Stylus® CX5000 Series all-in-one as described on the Start Here sheet, turn here to: ■ Load paper ■ Make a quick copy ...

Quick Reference Guide
Page 12
Printing From a Memory Card The Epson Stylus CX5000 Series all-in the camera. Then, when you insert the card in the CX5000 Series, it into a memory card slot on the CX5000 Series and you're ready to print while the card is still in -one lets you want to print. See these sections: &#...and Image Formats" (see the User's Guide. 12 Printing From a Memory Card If your digital camera supports DPOF (Digital Print Order Format), you can pre-select the photos you print color photos directly from your CX5000 Series and a computer or other device, see below) ■ "Inserting the Card" on ...
Printing From a Memory Card The Epson Stylus CX5000 Series all-in the camera. Then, when you insert the card in the CX5000 Series, it into a memory card slot on the CX5000 Series and you're ready to print while the card is still in -one lets you want to print. See these sections: &#...and Image Formats" (see the User's Guide. 12 Printing From a Memory Card If your digital camera supports DPOF (Digital Print Order Format), you can pre-select the photos you print color photos directly from your CX5000 Series and a computer or other device, see below) ■ "Inserting the Card" on ...

Quick Reference Guide
Page 13
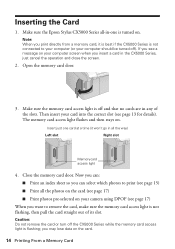
...Image Formats You can use the following types of cards with your Epson Stylus CX5000 Series all-in-one: Right slot Memory card access light Left ... Stick Duo* xD-Picture Card xD-Picture Card Type H xD-Picture Card Type M * Adapter required The CX5000 Series supports image files that meet the following requirements: Media format File format Image size Number of files DCF...pixels Up to 999 * DCF is the "Design rule for Camera File system" standard Note: You can print only in black and white. you cannot print in color when printing directly from a memory card; Compatible Cards and Image...
...Image Formats You can use the following types of cards with your Epson Stylus CX5000 Series all-in-one: Right slot Memory card access light Left ... Stick Duo* xD-Picture Card xD-Picture Card Type H xD-Picture Card Type M * Adapter required The CX5000 Series supports image files that meet the following requirements: Media format File format Image size Number of files DCF...pixels Up to 999 * DCF is the "Design rule for Camera File system" standard Note: You can print only in black and white. you cannot print in color when printing directly from a memory card; Compatible Cards and Image...
Quick Reference Guide
Page 14
Make sure the Epson Stylus CX5000 Series all-in the CX5000 Series, just cancel the operation and close the screen. 2. If you see page 17) When you may lose data on . Then insert your camera using DPOF (see a message on . The memory card access light flashes and then stays on the card. 14 Printing ...From a Memory Card Note: When you insert a card in -one card at a time (it is best if the CX5000 Series is flashing; Open the ...
Make sure the Epson Stylus CX5000 Series all-in the CX5000 Series, just cancel the operation and close the screen. 2. If you see page 17) When you may lose data on . Then insert your camera using DPOF (see a message on . The memory card access light flashes and then stays on the card. 14 Printing ...From a Memory Card Note: When you insert a card in -one card at a time (it is best if the CX5000 Series is flashing; Open the ...

Quick Reference Guide
Page 17
...size. 8. Printing All Photos or DPOF Photos 17 If you select Photo Paper, your photos. 3. Press the x Start Color button to your computer (or your Epson Stylus CX5000 Series all-in-one copy of the paper. 7. Make sure your computer is not connected to start printing. Select Plain Paper... or Photo Paper (whichever you loaded). If you select Plain Paper, your camera's DPOF (Digital Print Order Format) feature....
...size. 8. Printing All Photos or DPOF Photos 17 If you select Photo Paper, your photos. 3. Press the x Start Color button to your computer (or your Epson Stylus CX5000 Series all-in-one copy of the paper. 7. Make sure your computer is not connected to start printing. Select Plain Paper... or Photo Paper (whichever you loaded). If you select Plain Paper, your camera's DPOF (Digital Print Order Format) feature....

Quick Reference Guide
Page 18
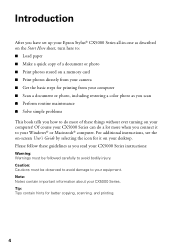
... printing. 2. Load enough sheets for the number of paper you can print your JPEG photos by connecting your digital camera directly to your photos printed with your camera to the camera and to the USB connector on . 4. Press the paper size button to print borderless photos (without a white ... the paper type button to select Photo Paper to select Letter, 4"x6", or 5"x7". 7. or USB DIRECT-PRINT™-compatible, you want your Epson Stylus CX5000 Series all-in-one. Remove any memory cards from 80 × 80 pixels to use (see page 5). Connect the USB cable that came with ...
... printing. 2. Load enough sheets for the number of paper you can print your JPEG photos by connecting your digital camera directly to your photos printed with your camera to the camera and to the USB connector on . 4. Press the paper size button to print borderless photos (without a white ... the paper type button to select Photo Paper to select Letter, 4"x6", or 5"x7". 7. or USB DIRECT-PRINT™-compatible, you want your Epson Stylus CX5000 Series all-in-one. Remove any memory cards from 80 × 80 pixels to use (see page 5). Connect the USB cable that came with ...
Quick Reference Guide
Page 19
Note: If your camera manual. Then adjust any camera. Epson cannot guarantee the compatibility of paper type, size, and layout may not be supported. Depending on the CX5000 Series settings and your digital camera settings, some of your camera. In addition, some combinations of any necessary settings and print your photo as explained in your camera is not...
Note: If your camera manual. Then adjust any camera. Epson cannot guarantee the compatibility of paper type, size, and layout may not be supported. Depending on the CX5000 Series settings and your digital camera settings, some of your camera. In addition, some combinations of any necessary settings and print your photo as explained in your camera is not...


