Product Information Guide
Page 3
Epson Stylus CX4200 Series/Epson Stylus CX4800 Series Scanning Scanner type Photoelectric device Effective pixels Document size Scanning resolution Output resolution Scanning speed Image data Interface Light source Flatbed color CIS 10,200 × 14,040 pixels at 1200 dpi 216 × 297 mm (8.5 × 11.7 inches) A4 or US letter size 1200 dpi (main scan) 2400 dpi with Micro Step...
Epson Stylus CX4200 Series/Epson Stylus CX4800 Series Scanning Scanner type Photoelectric device Effective pixels Document size Scanning resolution Output resolution Scanning speed Image data Interface Light source Flatbed color CIS 10,200 × 14,040 pixels at 1200 dpi 216 × 297 mm (8.5 × 11.7 inches) A4 or US letter size 1200 dpi (main scan) 2400 dpi with Micro Step...
Product Information Guide
Page 7
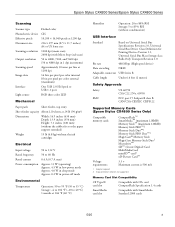
... a Document 1. Caution: Do not use excessive force on the document cover, and do not press the glass with too much force. 1. Epson Stylus CX4200 Series/Epson Stylus CX4800 Series Placing Originals for Copying or Scanning Caution: Do not place heavy objects on the document table glass and do not twist it straight up to close the...
... a Document 1. Caution: Do not use excessive force on the document cover, and do not press the glass with too much force. 1. Epson Stylus CX4200 Series/Epson Stylus CX4800 Series Placing Originals for Copying or Scanning Caution: Do not place heavy objects on the document table glass and do not twist it straight up to close the...
Product Information Guide
Page 10
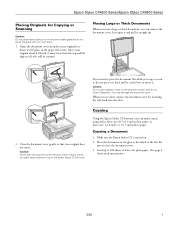
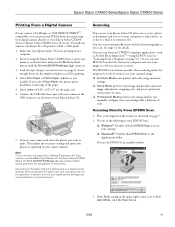
...sheets of photo paper at a time (see page 9). 2. once it has been scanned you loaded). Select Plain Paper or Photo Paper (whichever you will be able to start printing. Press the x Start Color button to change your selected photos. 5. You can load more paper later as ...carefully; If you loaded). Press the x Start Color button to the edge of the paper. 7. Note: If you are done printing, remove the memory card by pulling it straight out of its slot. 10 5/05 Epson Stylus CX4200 Series/Epson Stylus CX4800 Series For multiple index sheets, the pages containing the...
...sheets of photo paper at a time (see page 9). 2. once it has been scanned you loaded). Select Plain Paper or Photo Paper (whichever you will be able to start printing. Press the x Start Color button to change your selected photos. 5. You can load more paper later as ...carefully; If you loaded). Press the x Start Color button to the edge of the paper. 7. Note: If you are done printing, remove the memory card by pulling it straight out of its slot. 10 5/05 Epson Stylus CX4200 Series/Epson Stylus CX4800 Series For multiple index sheets, the pages containing the...
Product Information Guide
Page 11
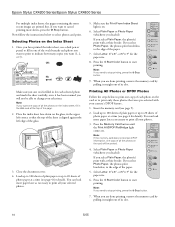
... section). Scanning Directly From EPSON Scan 1. In addition, some combinations of photos you want to your photos as ArcSoft PhotoImpression™-using the Epson Stylus CX4800 Series, remove any memory cards from any necessary settings and print your Epson Stylus CX4200 Series or Epson Stylus CX4800 Series all...Select Plain Paper or Photo Paper (whichever you can even automatically restore faded color photographs as described on your desktop. ❏ Macintosh®: Double-click EPSON Scan in your image to print. Then adjust any TWAIN-compliant application-such as ...
... section). Scanning Directly From EPSON Scan 1. In addition, some combinations of photos you want to your photos as ArcSoft PhotoImpression™-using the Epson Stylus CX4800 Series, remove any memory cards from any necessary settings and print your Epson Stylus CX4200 Series or Epson Stylus CX4800 Series all...Select Plain Paper or Photo Paper (whichever you can even automatically restore faded color photographs as described on your desktop. ❏ Macintosh®: Double-click EPSON Scan in your image to print. Then adjust any TWAIN-compliant application-such as ...
Product Information Guide
Page 12
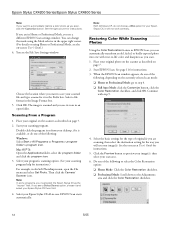
...the Color Restoration checkbox. 12 5/05 Do one with step 9. 4. You see a different EPSON Scan settings window. Scanning From a Program 1. EPSON Scan starts automatically. Place your original photo on the scanner as described on -screen User's Guide.) 4. Start EPSON Scan....Epson Stylus CX there first. 4. Epson Stylus CX4200 Series/Epson Stylus CX4800 Series Note: If you want to save your scanned file and type a name for it will use your image(s). Start your scan area. 6. Select your program's scanning option. (See your scanning program help for your Epson Stylus...
...the Color Restoration checkbox. 12 5/05 Do one with step 9. 4. You see a different EPSON Scan settings window. Scanning From a Program 1. EPSON Scan starts automatically. Place your original photo on the scanner as described on -screen User's Guide.) 4. Start EPSON Scan....Epson Stylus CX there first. 4. Epson Stylus CX4200 Series/Epson Stylus CX4800 Series Note: If you want to save your scanned file and type a name for it will use your image(s). Start your scan area. 6. Select your program's scanning option. (See your scanning program help for your Epson Stylus...
Product Information Guide
Page 13
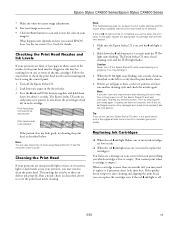
... the P On light stops flashing, run another cleaning cycle and check the nozzles again. Tip: If you need to scan and restore the color in your printout, you may need to replace it only if quality declines and the nozzle check indicates that the print ...Epson Stylus CX4800 Series 7. What happens next depends on and the B ink light is off the Epson Stylus CX. 2. Press the B ink and P On buttons together and hold them , some of ink left ) to verify that the print head needs to check the print head nozzles and remaining ink levels using Status Monitor 3; Click the Scan...
... the P On light stops flashing, run another cleaning cycle and check the nozzles again. Tip: If you need to scan and restore the color in your printout, you may need to replace it only if quality declines and the nozzle check indicates that the print ...Epson Stylus CX4800 Series 7. What happens next depends on and the B ink light is off the Epson Stylus CX. 2. Press the B ink and P On buttons together and hold them , some of ink left ) to verify that the print head needs to check the print head nozzles and remaining ink levels using Status Monitor 3; Click the Scan...
Quick Reference Guide
Page 1
Epson Stylus® CX4200 Series/CX4800 Series Quick Guide Basic Copying, Printing, and Scanning Maintaining Your Epson Stylus CX All-in-One Solving Problems
Epson Stylus® CX4200 Series/CX4800 Series Quick Guide Basic Copying, Printing, and Scanning Maintaining Your Epson Stylus CX All-in-One Solving Problems
Quick Reference Guide
Page 2
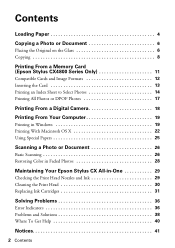
...Loading Paper 4 Copying a Photo or Document 6 Placing the Original on the Glass 6 Copying 8 Printing From a Memory Card (Epson Stylus CX4800 Series Only 11 Compatible Cards and Image Formats 12 Inserting the Card 13 Printing an Index Sheet to Select Photos 14 Printing All Photos... From Your Computer 19 Printing in Windows 19 Printing With Macintosh OS X 22 Using Special Papers 25 Scanning a Photo or Document 26 Basic Scanning 26 Restoring Color in Faded Photos 28 Maintaining Your Epson Stylus CX All-in-One 29 Checking the Print Head Nozzles and Ink 29 Cleaning the Print Head 30...
...Loading Paper 4 Copying a Photo or Document 6 Placing the Original on the Glass 6 Copying 8 Printing From a Memory Card (Epson Stylus CX4800 Series Only 11 Compatible Cards and Image Formats 12 Inserting the Card 13 Printing an Index Sheet to Select Photos 14 Printing All Photos... From Your Computer 19 Printing in Windows 19 Printing With Macintosh OS X 22 Using Special Papers 25 Scanning a Photo or Document 26 Basic Scanning 26 Restoring Color in Faded Photos 28 Maintaining Your Epson Stylus CX All-in-One 29 Checking the Print Head Nozzles and Ink 29 Cleaning the Print Head 30...
Quick Reference Guide
Page 3
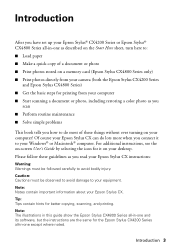
... a memory card (Epson Stylus CX4800 Series only) ■ Print photos directly from your camera (both the Epson Stylus CX4200 Series and Epson Stylus CX4800 Series) ■ Get the basic steps for better copying, scanning, and printing. Tip: Tips contain hints for printing from your computer ■ Start scanning a document or photo, including restoring a color photo as you read your Epson Stylus CX instructions...
... a memory card (Epson Stylus CX4800 Series only) ■ Print photos directly from your camera (both the Epson Stylus CX4200 Series and Epson Stylus CX4800 Series) ■ Get the basic steps for better copying, scanning, and printing. Tip: Tips contain hints for printing from your computer ■ Start scanning a document or photo, including restoring a color photo as you read your Epson Stylus CX instructions...
Quick Reference Guide
Page 14
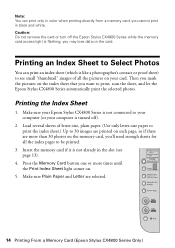
you want to print, scan the sheet, and let the Epson Stylus CX4800 Series automatically print the selected photos. Printing the Index Sheet 1. Make sure Plain Paper and Letter are more times until the Print Index Sheet light ... Select Photos You can print only in color when printing directly from a memory card; Load several sheets of all the index pages to see page 13). 4. Press the Memory Card button one or more than 30 photos on your computer is turned off the Epson Stylus CX4800 Series while the memory card access light...
you want to print, scan the sheet, and let the Epson Stylus CX4800 Series automatically print the selected photos. Printing the Index Sheet 1. Make sure Plain Paper and Letter are more times until the Print Index Sheet light ... Select Photos You can print only in color when printing directly from a memory card; Load several sheets of all the index pages to see page 13). 4. Press the Memory Card button one or more than 30 photos on your computer is turned off the Epson Stylus CX4800 Series while the memory card access light...
Quick Reference Guide
Page 15
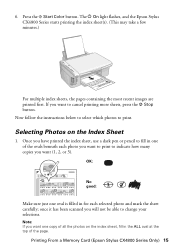
Press the x Start Color button. Now follow the instructions below to select which photos to change your selections. once it has been scanned you will not be able to print. Note: If you want (1, 2, or 3). The P On light flashes, and the Epson Stylus CX4800 Series starts printing the index sheet(s). (This may take...recent images are printed first. If you want one copy of all the photos on the Index Sheet 1. Printing From a Memory Card (Epson Stylus CX4800 Series Only) 15 Selecting Photos on the index sheet, fill in one oval is filled in for each photo you want to print ...
Press the x Start Color button. Now follow the instructions below to select which photos to change your selections. once it has been scanned you will not be able to print. Note: If you want (1, 2, or 3). The P On light flashes, and the Epson Stylus CX4800 Series starts printing the index sheet(s). (This may take...recent images are printed first. If you want one copy of all the photos on the Index Sheet 1. Printing From a Memory Card (Epson Stylus CX4800 Series Only) 15 Selecting Photos on the index sheet, fill in one oval is filled in for each photo you want to print ...
Quick Reference Guide
Page 26
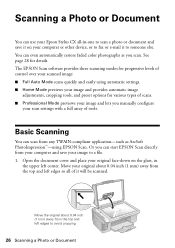
... and lets you manually configure your scan settings with a full array of tools. Open the document cover and place your original face-down on your computer or other device, or to fax or e-mail it will be scanned. Or you scan. Scanning a Photo or Document You can use your Epson Stylus CX all of it to...
... and lets you manually configure your scan settings with a full array of tools. Open the document cover and place your original face-down on your computer or other device, or to fax or e-mail it will be scanned. Or you scan. Scanning a Photo or Document You can use your Epson Stylus CX all of it to...
Quick Reference Guide
Page 27
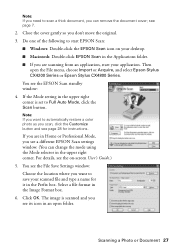
... the File menu, choose Import or Acquire, and select Epson Stylus CX4200 Series or Epson Stylus CX4800 Series. The image is set to start your application. You see the File Save Settings window: Choose the location where you want to automatically restore a color photo as you scan, click the Customize button and see page 28 for it...
... the File menu, choose Import or Acquire, and select Epson Stylus CX4200 Series or Epson Stylus CX4800 Series. The image is set to start your application. You see the File Save Settings window: Choose the location where you want to automatically restore a color photo as you scan, click the Customize button and see page 28 for it...
Quick Reference Guide
Page 41
...not block or cover openings in the Epson Stylus CX case or insert objects through the slots. ■ Do not place the Epson Stylus CX near a wall outlet where the plug can be easily unplugged. Notices 41 Use of the Epson Stylus CX is copying, printing, or scanning. ■ Do not spill liquid... on a flat, stable surface that are subject to rapid changes in your Epson Stylus CX all devices plugged into the extension cord does not exceed the...
...not block or cover openings in the Epson Stylus CX case or insert objects through the slots. ■ Do not place the Epson Stylus CX near a wall outlet where the plug can be easily unplugged. Notices 41 Use of the Epson Stylus CX is copying, printing, or scanning. ■ Do not spill liquid... on a flat, stable surface that are subject to rapid changes in your Epson Stylus CX all devices plugged into the extension cord does not exceed the...


