Product Information Guide
Page 8
...and press the x Start Color or x Start B&W button to 9 copies at a time this way. Load up to resume. it is being printed; This tells the Epson Stylus CX to print up to 100) you want to copy in the Copy window. Press the paper type ...x Start Color or x Start B&W button. Copying a Photo 1. Press the paper size button to select Letter. 7. The light indicates which type is reduced, but the copy prints faster. 1. If you need to stop copying at any time, just press the y Stop button. Epson Stylus CX4200 Series/Epson Stylus CX4800 Series 4....
...and press the x Start Color or x Start B&W button to 9 copies at a time this way. Load up to resume. it is being printed; This tells the Epson Stylus CX to print up to 100) you want to copy in the Copy window. Press the paper type ...x Start Color or x Start B&W button. Copying a Photo 1. Press the paper size button to select Letter. 7. The light indicates which type is reduced, but the copy prints faster. 1. If you need to stop copying at any time, just press the y Stop button. Epson Stylus CX4200 Series/Epson Stylus CX4800 Series 4....
Product Information Guide
Page 11
... until the Print All/DPOF/PictBridge light comes on your Epson Stylus CX4200 Series or Epson Stylus CX4800 Series all -in the upper right corner is PictBridge- You can even automatically restore faded color photographs as explained in the Copy window, and the b Error light flashes. (On the Epson Stylus CX4800 Series, the Print All/DPOF/PictBridge light also flashes...
... until the Print All/DPOF/PictBridge light comes on your Epson Stylus CX4200 Series or Epson Stylus CX4800 Series all -in the upper right corner is PictBridge- You can even automatically restore faded color photographs as explained in the Copy window, and the b Error light flashes. (On the Epson Stylus CX4800 Series, the Print All/DPOF/PictBridge light also flashes...
Product Information Guide
Page 12
... the Applications folder, select the program folder, and click the program icon. 3. Restoring Color While Scanning Photos Using the Color Restoration feature in the Image Format box. 5. Epson Stylus CX4200 Series/Epson Stylus CX4800 Series Note: If you want to save your scanned file and type a name for... to preview your image(s), then select your scan area. 6. When the EPSON Scan window appears, do not choose a WIA option for instructions. 5. Select a file format in EPSON Scan, you must select the Epson Stylus CX as described on -screen User's Guide for your scanning program. Note...
... the Applications folder, select the program folder, and click the program icon. 3. Restoring Color While Scanning Photos Using the Color Restoration feature in the Image Format box. 5. Epson Stylus CX4200 Series/Epson Stylus CX4800 Series Note: If you want to save your scanned file and type a name for... to preview your image(s), then select your scan area. 6. When the EPSON Scan window appears, do not choose a WIA option for instructions. 5. Select a file format in EPSON Scan, you must select the Epson Stylus CX as described on -screen User's Guide for your scanning program. Note...
Product Information Guide
Page 14
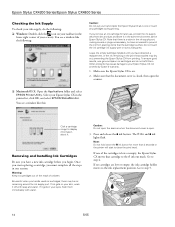
...when the document cover is low or empty, the Epson Stylus CX moves that the cartridge touches. If no cartridges are low or empty, the ink cartridge holder moves to the _ ink out mark. Epson Stylus CX4200 Series/Epson Stylus CX4800 Series Checking the Ink Supply To check your ink... supply, do not refill them immediately with soap and water. You see a window like the following : ❏ Windows: Double-click the icon on . 2. Other products ...
...when the document cover is low or empty, the Epson Stylus CX moves that the cartridge touches. If no cartridges are low or empty, the ink cartridge holder moves to the _ ink out mark. Epson Stylus CX4200 Series/Epson Stylus CX4800 Series Checking the Ink Supply To check your ink... supply, do not refill them immediately with soap and water. You see a window like the following : ❏ Windows: Double-click the icon on . 2. Other products ...

Product Information Guide
Page 16
... the screen and click Next. Enter the number for that 's closest to print another alignment sheet and repeat this one . 2. Epson Stylus CX4200 Series/Epson Stylus CX4800 Series 11. Windows: Right-click the printer icon on your screen). Select Print Head Alignment. Follow the instructions on ink or you see a pattern ... list, click OK, and select Print Head Alignment. 4. Press the B ink button. Caution: Never turn off the Epson Stylus CX while the P On light is flashing or you see a window like this step. 6. For each set, if you need to clean the print head. 1. If you may need ...
... the screen and click Next. Enter the number for that 's closest to print another alignment sheet and repeat this one . 2. Epson Stylus CX4200 Series/Epson Stylus CX4800 Series 11. Windows: Right-click the printer icon on your screen). Select Print Head Alignment. Follow the instructions on ink or you see a pattern ... list, click OK, and select Print Head Alignment. 4. Press the B ink button. Caution: Never turn off the Epson Stylus CX while the P On light is flashing or you see a window like this step. 6. For each set, if you need to clean the print head. 1. If you may need ...
Product Information Guide
Page 17
... the Epson Stylus CX in the Epson Stylus CX, and turn it 's printed, you see a window like this one that came with tape. 9. After it on -screen User's Guide; Epson Stylus CX4200 Series/Epson Stylus CX4800 Series If you can 't find an aligned pattern, choose the one of a similar size. 1. Secure the ink cartridge holder (print head) to print a color horizontal...
... the Epson Stylus CX in the Epson Stylus CX, and turn it 's printed, you see a window like this one that came with tape. 9. After it on -screen User's Guide; Epson Stylus CX4200 Series/Epson Stylus CX4800 Series If you can 't find an aligned pattern, choose the one of a similar size. 1. Secure the ink cartridge holder (print head) to print a color horizontal...
Quick Reference Guide
Page 2
...Loading Paper 4 Copying a Photo or Document 6 Placing the Original on the Glass 6 Copying 8 Printing From a Memory Card (Epson Stylus CX4800 Series Only 11 Compatible Cards and Image Formats 12 Inserting the Card 13 Printing an Index Sheet to Select Photos 14 Printing All ...From a Digital Camera 18 Printing From Your Computer 19 Printing in Windows 19 Printing With Macintosh OS X 22 Using Special Papers 25 Scanning a Photo or Document 26 Basic Scanning 26 Restoring Color in Faded Photos 28 Maintaining Your Epson Stylus CX All-in-One 29 Checking the Print Head Nozzles and Ink...
...Loading Paper 4 Copying a Photo or Document 6 Placing the Original on the Glass 6 Copying 8 Printing From a Memory Card (Epson Stylus CX4800 Series Only 11 Compatible Cards and Image Formats 12 Inserting the Card 13 Printing an Index Sheet to Select Photos 14 Printing All ...From a Digital Camera 18 Printing From Your Computer 19 Printing in Windows 19 Printing With Macintosh OS X 22 Using Special Papers 25 Scanning a Photo or Document 26 Basic Scanning 26 Restoring Color in Faded Photos 28 Maintaining Your Epson Stylus CX All-in-One 29 Checking the Print Head Nozzles and Ink...
Quick Reference Guide
Page 3
...computer ■ Start scanning a document or photo, including restoring a color photo as you read your Epson Stylus CX instructions: Warning: Warnings must be followed carefully to your Windows® or Macintosh® computer. Note: Notes contain important information...Epson Stylus CX4800 Series only) ■ Print photos directly from your camera (both the Epson Stylus CX4200 Series and Epson Stylus CX4800 Series) ■ Get the basic steps for better copying, scanning, and printing. Introduction After you have set up your Epson Stylus® CX4200 Series or Epson Stylus® CX4800...
...computer ■ Start scanning a document or photo, including restoring a color photo as you read your Epson Stylus CX instructions: Warning: Warnings must be followed carefully to your Windows® or Macintosh® computer. Note: Notes contain important information...Epson Stylus CX4800 Series only) ■ Print photos directly from your camera (both the Epson Stylus CX4200 Series and Epson Stylus CX4800 Series) ■ Get the basic steps for better copying, scanning, and printing. Introduction After you have set up your Epson Stylus® CX4200 Series or Epson Stylus® CX4800...
Quick Reference Guide
Page 8
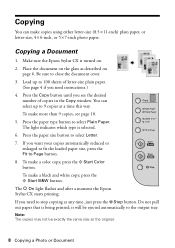
... make a black and white copy, press the x Start B&W button. To make a color copy, press the x Start Color button. Press the paper size button to the output tray. The P On light flashes and after a moment the Epson Stylus CX starts printing. Make sure the Epson Stylus CX is turned on the glass as the original. 8 Copying a Photo... you see page 10. 5. Press the Copy button until you need instructions.) 4. Copying You can select up to 100 sheets of copies in the Copy window.
... make a black and white copy, press the x Start B&W button. To make a color copy, press the x Start Color button. Press the paper size button to the output tray. The P On light flashes and after a moment the Epson Stylus CX starts printing. Make sure the Epson Stylus CX is turned on the glass as the original. 8 Copying a Photo... you see page 10. 5. Press the Copy button until you need instructions.) 4. Copying You can select up to 100 sheets of copies in the Copy window.
Quick Reference Guide
Page 9
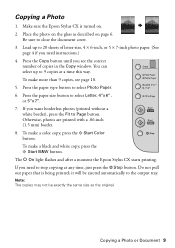
...7". 7. Press the Copy button until you need instructions.) 4. Press the paper type button to close the document cover. 3. To make a color copy, press the x Start Color button. it will be exactly the same size as described on page 6. Be sure to select Photo Paper. 6. To make a black and ... are printed with a .06-inch (1.5 mm) border. 8. You can select up to 20 sheets of copies in the Copy window. The P On light flashes and after a moment the Epson Stylus CX starts printing. Copying a Photo 1. Place the photo on . 2. To make more than 9 copies, see the correct number...
...7". 7. Press the Copy button until you need instructions.) 4. Press the paper type button to close the document cover. 3. To make a color copy, press the x Start Color button. it will be exactly the same size as described on page 6. Be sure to select Photo Paper. 6. To make a black and ... are printed with a .06-inch (1.5 mm) border. 8. You can select up to 20 sheets of copies in the Copy window. The P On light flashes and after a moment the Epson Stylus CX starts printing. Copying a Photo 1. Place the photo on . 2. To make more than 9 copies, see the correct number...
Quick Reference Guide
Page 10
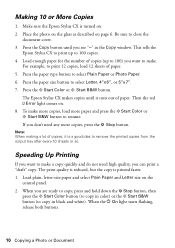
Be sure to 100 copies. 4. This tells the Epson Stylus CX to print up to copy in the Copy window. For example, to select Plain Paper or Photo Paper. 6. The print quality is reduced, but the copy is a good idea to make. Load plain, letter-... the document cover. 3. Place the photo on the glass as described on the control panel. 2. Press the paper size button to resume. Press the x Start Color or x Start B&W button. The Epson Stylus CX makes copies until you are ready to copy, press and hold down the y Stop button, then press the x Start...
Be sure to 100 copies. 4. This tells the Epson Stylus CX to print up to copy in the Copy window. For example, to select Plain Paper or Photo Paper. 6. The print quality is reduced, but the copy is a good idea to make. Load plain, letter-... the document cover. 3. Place the photo on the glass as described on the control panel. 2. Press the paper size button to resume. Press the x Start Color or x Start B&W button. The Epson Stylus CX makes copies until you are ready to copy, press and hold down the y Stop button, then press the x Start...
Quick Reference Guide
Page 18
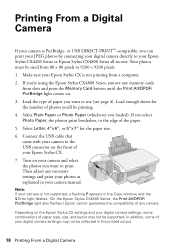
... a Digital Camera If you want to 9200 × 9200 pixels. 1. Note: If your Epson Stylus CX4200 Series or Epson Stylus CX4800 Series all-in the Copy window, and the b Error light flashes. (On the Epson Stylus CX4800 Series, the Print All/DPOF/ PictBridge light also flashes.) Epson cannot guarantee the compatibility of paper type, size, and layout may not be...
... a Digital Camera If you want to 9200 × 9200 pixels. 1. Note: If your Epson Stylus CX4200 Series or Epson Stylus CX4800 Series all-in the Copy window, and the b Error light flashes. (On the Epson Stylus CX4800 Series, the Print All/DPOF/ PictBridge light also flashes.) Epson cannot guarantee the compatibility of paper type, size, and layout may not be...
Quick Reference Guide
Page 19
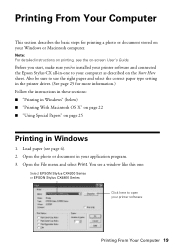
...) ■ "Printing With Macintosh OS X" on page 22 ■ "Using Special Papers" on page 25 Printing in Windows 1. Before you start, make sure you've installed your printer software and connected the Epson Stylus CX all-in your computer as described on -screen User's Guide. Open the File menu and select Print. Note...: For detailed instructions on printing, see the on the Start Here sheet. Open the photo or document in -one : Select EPSON Stylus CX4200 Series or EPSON Stylus CX4800 Series Click here to your application program. 3. You see page 4). 2.
...) ■ "Printing With Macintosh OS X" on page 22 ■ "Using Special Papers" on page 25 Printing in Windows 1. Before you start, make sure you've installed your printer software and connected the Epson Stylus CX all-in your computer as described on -screen User's Guide. Open the File menu and select Print. Note...: For detailed instructions on printing, see the on the Start Here sheet. Open the photo or document in -one : Select EPSON Stylus CX4200 Series or EPSON Stylus CX4800 Series Click here to your application program. 3. You see page 4). 2.
Quick Reference Guide
Page 22
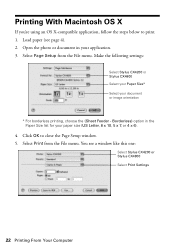
Load paper (see a window like this one: Select Stylus CX4200 or Stylus CX4800 Select Print Settings 22 Printing From Your Computer You see page 4). 2. Borderless) option in your application. 3. Click OK to print. 1. Select Print from the File menu. Select Page Setup from the File menu. Make the following settings: Select Stylus CX4200 or Stylus CX4800 Select your...
Load paper (see a window like this one: Select Stylus CX4200 or Stylus CX4800 Select Print Settings 22 Printing From Your Computer You see page 4). 2. Borderless) option in your application. 3. Click OK to print. 1. Select Print from the File menu. Select Page Setup from the File menu. Make the following settings: Select Stylus CX4200 or Stylus CX4800 Select your...

Quick Reference Guide
Page 24
...the progress of your print job, click the printer icon when it appears in the Printer List window. When you can reuse them as a group so you 're finished, close the printer window or Print Center. 24 Printing From Your Computer Select Print Quality and other options as necessary Note... the bottom of your desktop. Click Print. 10. If you're using OS X 10.2.x, click the Print Center icon instead, then double-click Stylus CX4200 or Stylus CX4800 in the dock on saving them later, click ?. 9. Click the Advanced button to change additional settings. 8. You see a screen like this: ...
...the progress of your print job, click the printer icon when it appears in the Printer List window. When you can reuse them as a group so you 're finished, close the printer window or Print Center. 24 Printing From Your Computer Select Print Quality and other options as necessary Note... the bottom of your desktop. Click Print. 10. If you're using OS X 10.2.x, click the Print Center icon instead, then double-click Stylus CX4200 or Stylus CX4800 in the dock on saving them later, click ?. 9. Click the Advanced button to change additional settings. 8. You see a screen like this: ...
Quick Reference Guide
Page 27
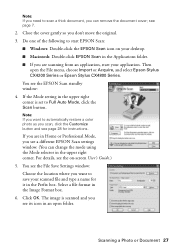
... are in Home or Professional Mode, you see its icon in an open the File menu, choose Import or Acquire, and select Epson Stylus CX4200 Series or Epson Stylus CX4800 Series. The image is set to Full Auto Mode, click the Scan button. Click OK. Note: If you need to save ...your scanned file and type a name for instructions. Then open folder. Do one of the following to automatically restore a color photo as you see a different EPSON Scan settings window....
... are in Home or Professional Mode, you see its icon in an open the File menu, choose Import or Acquire, and select Epson Stylus CX4200 Series or Epson Stylus CX4800 Series. The image is set to Full Auto Mode, click the Scan button. Click OK. Note: If you need to save ...your scanned file and type a name for instructions. Then open folder. Do one of the following to automatically restore a color photo as you see a different EPSON Scan settings window....
Quick Reference Guide
Page 36
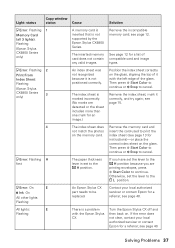
...or double-click the User's Guide icon on page 40 Error Indicators Light: status Copy window status Cause Solution P On: Flashing - continue or y Stop to sheet feeder. ...Solving Problems If you have Remove and reload the paper. been fed into the Then press x Start Color to cancel. See page 38. See "Replacing Ink Cartridges" on page 31. 36 Solving Problems b...(below) ■ "Problems and Solutions" on page 38 ■ "Where To Get Help" on your Epson Stylus CX all-inone, check the lights on ink. An ink cartridge is loaded in the sheet feeder. See page 4....
...or double-click the User's Guide icon on page 40 Error Indicators Light: status Copy window status Cause Solution P On: Flashing - continue or y Stop to sheet feeder. ...Solving Problems If you have Remove and reload the paper. been fed into the Then press x Start Color to cancel. See page 38. See "Replacing Ink Cartridges" on page 31. 36 Solving Problems b...(below) ■ "Problems and Solutions" on page 38 ■ "Where To Get Help" on your Epson Stylus CX all-inone, check the lights on ink. An ink cartridge is loaded in the sheet feeder. See page 4....
Quick Reference Guide
Page 37
..., press x Start Color to the m L position. Then press x Start Color to continue or y Stop to cancel. b Error: Flashing H fast The paper thickness lever is not supported by the Epson Stylus CX4800 Series. b Error: On E B Ink: On All other lights: Flashing An Epson Stylus CX part needs to... not contain any valid images. Otherwise, set the lever to continue. Light: status Copy window status Cause Solution b Error: Flashing 1 Memory Card (all 3 lights): Flashing (Epson Stylus CX4800 Series only) A memory card is inserted that is set to be replaced. Remove the ...
..., press x Start Color to the m L position. Then press x Start Color to continue or y Stop to cancel. b Error: Flashing H fast The paper thickness lever is not supported by the Epson Stylus CX4800 Series. b Error: On E B Ink: On All other lights: Flashing An Epson Stylus CX part needs to... not contain any valid images. Otherwise, set the lever to continue. Light: status Copy window status Cause Solution b Error: Flashing 1 Memory Card (all 3 lights): Flashing (Epson Stylus CX4800 Series only) A memory card is inserted that is set to be replaced. Remove the ...
Start Here Card
Page 7
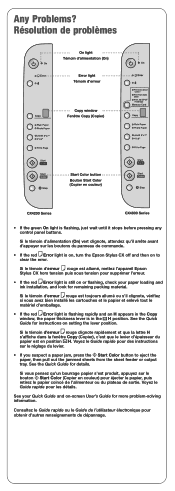
...Epson Stylus CX off and then on or flashing, check your Quick Guide and on setting the lever position. See the Quick Guide for remaining packing material. Résolution de problèmes On light Témoin d'alimentation (On) Error light Témoin d'erreur Copy window Fenêtre Copy (Copier) Start Color... button Bouton Start Color (Copier en couleur) CX4200 Series CX4800 Series • If the green On light is in the Copy window, the paper thickness lever is flashing, just wait ...
...Epson Stylus CX off and then on or flashing, check your Quick Guide and on setting the lever position. See the Quick Guide for remaining packing material. Résolution de problèmes On light Témoin d'alimentation (On) Error light Témoin d'erreur Copy window Fenêtre Copy (Copier) Start Color... button Bouton Start Color (Copier en couleur) CX4200 Series CX4800 Series • If the green On light is in the Copy window, the paper thickness lever is flashing, just wait ...


