
Technical Brief (Impact Printers)
Page 5
... add an optional Ethernet card to have access to host computer connection. Start UP Utility Ver. 1.22 Copyright (C) SEIKO EPSON CORP. 1992 Printer: FX-2180 Mode: ESC/P Port: LPT1 Font : Roman Pitch : 10CPI Print Quality : LQ Character Table : PC...5mm Manual Rear : 14 inch Manual Rear : 8.5mm Help: Select printer Font. This utility program provides printer status, error conditions, and trouble shooting instructions to each printer L EPSON Remote! Simplifies setup when installing multiple printers-just make the necessary changes in the software utility, and download the ...
... add an optional Ethernet card to have access to host computer connection. Start UP Utility Ver. 1.22 Copyright (C) SEIKO EPSON CORP. 1992 Printer: FX-2180 Mode: ESC/P Port: LPT1 Font : Roman Pitch : 10CPI Print Quality : LQ Character Table : PC...5mm Manual Rear : 14 inch Manual Rear : 8.5mm Help: Select printer Font. This utility program provides printer status, error conditions, and trouble shooting instructions to each printer L EPSON Remote! Simplifies setup when installing multiple printers-just make the necessary changes in the software utility, and download the ...

Product Information Guide
Page 5
...for each carriage return (CR) code is accompanied by the Auto interface wait time). Page length This option is available only when you install an optional tractor and use continuous paper with the tractor. As you want to show you want to 8.5, 11, 12, or ... printed in the paper feeder. 2. Next, press the PAUSE button to Double. If you use all of paper and prints a brief summary and instructions. The printer loads a sheet of the settings you can change and show your selection. )217ý/LJKWV DQJXDJH 2 # # 1 (QJOLVK 2 # # ) )UHQFK 1 # # 2 *HUPDQ 1 # # 1 ,WDOLDQ 1 # # ...
...for each carriage return (CR) code is accompanied by the Auto interface wait time). Page length This option is available only when you install an optional tractor and use continuous paper with the tractor. As you want to show you want to 8.5, 11, 12, or ... printed in the paper feeder. 2. Next, press the PAUSE button to Double. If you use all of paper and prints a brief summary and instructions. The printer loads a sheet of the settings you can change and show your selection. )217ý/LJKWV DQJXDJH 2 # # 1 (QJOLVK 2 # # ) )UHQFK 1 # # 2 *HUPDQ 1 # # 1 ,WDOLDQ 1 # # ...

Product Information Guide
Page 6
...2##1##2 1##1##2 2##2##1 1##2##1 2##1##1 1##1##1 1##2##2 2##1##2 1##1##2 2##2##2 1##1##1 2##2##2 1##1##1 7. To exit the default-settings mode, turn the printer off to check the new default settings, enter the default-settings mode again and print the current settings. Any changes you ...7. Repeat steps 5 and 7 to remove it up to make sure the printer is not plugged into an electrical outlet. 1. Note: t You may exit the default-settings ...mode any time by turning off . Open the printer cover to the upright position, then pull it . (3621 ,QNý-HW...
...2##1##2 1##1##2 2##2##1 1##2##1 2##1##1 1##1##1 1##2##2 2##1##2 1##1##2 2##2##2 1##1##1 2##2##2 1##1##1 7. To exit the default-settings mode, turn the printer off to check the new default settings, enter the default-settings mode again and print the current settings. Any changes you ...7. Repeat steps 5 and 7 to remove it up to make sure the printer is not plugged into an electrical outlet. 1. Note: t You may exit the default-settings ...mode any time by turning off . Open the printer cover to the upright position, then pull it . (3621 ,QNý-HW...
Product Information Guide
Page 7
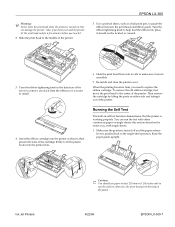
... to run the test with single sheets. 1. To remove the old ribbon cartridge, first move the print head while the printer is easier to install. 4. Make sure the printer is turned off and the paper-release lever is working properly. otherwise, the print head prints directly on either continuous paper... cartridge firmly to fit the plastic hooks into the printer slots. 6. Also, if you have just used the printer, let the print head cool for a few minutes before you need to replace the ribbon cartridge. Re-install and close the printer cover. When the printing becomes faint, you touch...
... to run the test with single sheets. 1. To remove the old ribbon cartridge, first move the print head while the printer is easier to install. 4. Make sure the printer is turned off and the paper-release lever is working properly. otherwise, the print head prints directly on either continuous paper... cartridge firmly to fit the plastic hooks into the printer slots. 6. Also, if you have just used the printer, let the print head cool for a few minutes before you need to replace the ribbon cartridge. Re-install and close the printer cover. When the printing becomes faint, you touch...
Product Information Guide
Page 8
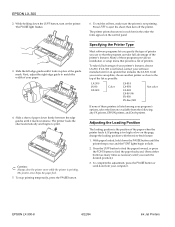
...the self test, make sure the printer is the position of these programs provide an installation or setup menu that includes the LX-300. then turn on the page, change the loading position with the micro-feed feature. 1. LX-300 JX-80 EX-800 Color LX-810 LX-850 LX-800 LX-80/86 FX-850 FX-86e.../800 Not color If none of the paper when the printer loads it. To complete the adjustment, press the PAUSE button or send data from the following: any FX printer, EPSON printer, and Draft printer. $GMXVWLQJý...
...the self test, make sure the printer is the position of these programs provide an installation or setup menu that includes the LX-300. then turn on the page, change the loading position with the micro-feed feature. 1. LX-300 JX-80 EX-800 Color LX-810 LX-850 LX-800 LX-80/86 FX-850 FX-86e.../800 Not color If none of the paper when the printer loads it. To complete the adjustment, press the PAUSE button or send data from the following: any FX printer, EPSON printer, and Draft printer. $GMXVWLQJý...
Product Information Guide
Page 9
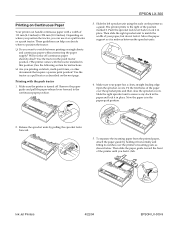
...234;íí 3ULQWLQJýRQý&RQWLQXRXVý3DSHUý Your printer can handle continuous paper with the tractor installed in this position.) See the following section for instructions. Will you feel it . The printer prints to match the width of the position marked 0. Move the paper... paper-park position. 2. Now the paper is turned off continuous paper sheet-by pulling the sprocket locks forward. 5. Make sure the printer is in place. These guidelines can use it is midway between printing on single sheets and continuous paper without removing the paper supply?...
...234;íí 3ULQWLQJýRQý&RQWLQXRXVý3DSHUý Your printer can handle continuous paper with the tractor installed in this position.) See the following section for instructions. Will you feel it . The printer prints to match the width of the position marked 0. Move the paper... paper-park position. 2. Now the paper is turned off continuous paper sheet-by pulling the sprocket locks forward. 5. Make sure the printer is in place. These guidelines can use it is midway between printing on single sheets and continuous paper without removing the paper supply?...
Product Information Guide
Page 11
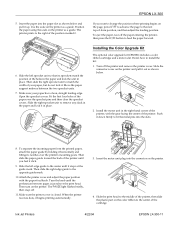
...opposite guide mark. 10.Attach the printer cover and adjust the paper position with the gear facing the center of the printer. The PAUSE light flashes briefly, then stays off the printer and remove the printer cover. then press the LF/FF button to install the kit: 1. Move the paper... support midway between pages is closed. Install the motor unit in place. 10 5 0...
...opposite guide mark. 10.Attach the printer cover and adjust the paper position with the gear facing the center of the printer. The PAUSE light flashes briefly, then stays off the printer and remove the printer cover. then press the LF/FF button to install the kit: 1. Move the paper... support midway between pages is closed. Install the motor unit in place. 10 5 0...
Product Information Guide
Page 12
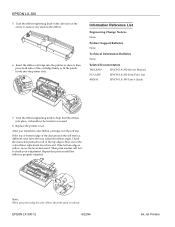
... None Product Support Bulletins None Technical Information Bulletins None Related Documentation TM-LX300 EPSON LX-300 Service Manual PL-LX300 EPSON LX-300 Parts Price List 4002661 EPSON LX-300 User's Guide 7. then press both sides of the arrow to help feed the ribbon into the printer as shown; After you print using the color ribbon, the print speed is... knob to remove any slack in the self test is blue, move the lever backward. Turn the ribbon-tightening knob in red. Note: When you install the color ribbon cartridge, run the self test.
... None Product Support Bulletins None Technical Information Bulletins None Related Documentation TM-LX300 EPSON LX-300 Service Manual PL-LX300 EPSON LX-300 Parts Price List 4002661 EPSON LX-300 User's Guide 7. then press both sides of the arrow to help feed the ribbon into the printer as shown; After you print using the color ribbon, the print speed is... knob to remove any slack in the self test is blue, move the lever backward. Turn the ribbon-tightening knob in red. Note: When you install the color ribbon cartridge, run the self test.

User Manual
Page 3
... void the user's authority to operate the equipment. These limits are designed to provide reasonable protection against harmful interference in a particular installation. t Reorient or relocate the receiving antenna t Increase the separation between the equipment and receiver t Connect the equipment into an outlet... shielded equipment interface cable with the instructions, may cause interference levels which can radiate radio frequency energy and, if not installed and used in accordance with this equipment has more than one or more of the FCC Rules. Changes or modifications not...
... void the user's authority to operate the equipment. These limits are designed to provide reasonable protection against harmful interference in a particular installation. t Reorient or relocate the receiving antenna t Increase the separation between the equipment and receiver t Connect the equipment into an outlet... shielded equipment interface cable with the instructions, may cause interference levels which can radiate radio frequency energy and, if not installed and used in accordance with this equipment has more than one or more of the FCC Rules. Changes or modifications not...
User Manual
Page 4
... t Customer Relations iii Where to Get Help for your nearest Authorized Epson Reseller or Service Center t Technical assistance with the installation, configuration, and operation of Epson products t Sales of the ESC/P® Reference Manual t Epson technical information library fax service t Product literature with technical specifications on our current and new products t Sales of ribbons...
... t Customer Relations iii Where to Get Help for your nearest Authorized Epson Reseller or Service Center t Technical assistance with the installation, configuration, and operation of Epson products t Sales of the ESC/P® Reference Manual t Epson technical information library fax service t Product literature with technical specifications on our current and new products t Sales of ribbons...
User Manual
Page 8
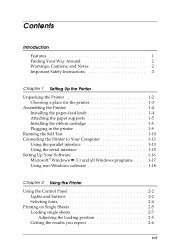
..., Cautions, and Notes 0-2 Important Safety Instructions 0-3 Chapter 1 Setting Up the Printer Unpacking the Printer 1-2 Choosing a place for the printer 1-3 Assembling the Printer 1-4 Installing the paper-feed knob 1-4 Attaching the paper supports 1-5 Installing the ribbon cartridge 1-5 Plugging in the printer 1-9 Running the Self Test 1-10 Connecting the Printer to Your Computer 1-13 Using the parallel interface 1-13 Using the...
..., Cautions, and Notes 0-2 Important Safety Instructions 0-3 Chapter 1 Setting Up the Printer Unpacking the Printer 1-2 Choosing a place for the printer 1-3 Assembling the Printer 1-4 Installing the paper-feed knob 1-4 Attaching the paper supports 1-5 Installing the ribbon cartridge 1-5 Plugging in the printer 1-9 Running the Self Test 1-10 Connecting the Printer to Your Computer 1-13 Using the parallel interface 1-13 Using the...

User Manual
Page 9
Installing and Using Options Cut-sheet feeder Pull Tractor unit Roll paper holder Color ...Problems and Solutions 3-2 Power Supply 3-2 Power is not being supplied 3-2 Printing 3-3 The printer does not print 3-3 The print is faint or uneven 3-4 Dots are missing in printed characters or graphics 3-4 Printed characters are not what you expected 3-5...on Special Paper Adjusting the paper-thickness lever Multi-part forms Labels Envelopes Changing the Printer Settings Printer setting descriptions Character spacing Shape of zero Skip-over-perforation Character table Auto line feed...
Installing and Using Options Cut-sheet feeder Pull Tractor unit Roll paper holder Color ...Problems and Solutions 3-2 Power Supply 3-2 Power is not being supplied 3-2 Printing 3-3 The printer does not print 3-3 The print is faint or uneven 3-4 Dots are missing in printed characters or graphics 3-4 Printed characters are not what you expected 3-5...on Special Paper Adjusting the paper-thickness lever Multi-part forms Labels Envelopes Changing the Printer Settings Printer setting descriptions Character spacing Shape of zero Skip-over-perforation Character table Auto line feed...
User Manual
Page 10
... the push tractor, continuous paper does not feed properly 3-10 With color upgrade kit installed, printer doesn't operate properly 3-10 Appendix Printer Specifications A-2 Printing A-2 Paper A-3 Mechanical A-6 Electrical A-6 Environmental A-7 Safety approvals A-7 Interface ... A-7 Parallel interface specifications A-7 Serial interface specifications A-8 Serial pin assignments A-8 Printer Settings A-9 Command Summary A-10 Sending printer commands A-10 Using the command summary A-10 Printer operation A-11 Data control A-11 Vertical motion A-11 Horizontal motion A-12 Overall...
... the push tractor, continuous paper does not feed properly 3-10 With color upgrade kit installed, printer doesn't operate properly 3-10 Appendix Printer Specifications A-2 Printing A-2 Paper A-3 Mechanical A-6 Electrical A-6 Environmental A-7 Safety approvals A-7 Interface ... A-7 Parallel interface specifications A-7 Serial interface specifications A-8 Serial pin assignments A-8 Printer Settings A-9 Command Summary A-10 Sending printer commands A-10 Using the command summary A-10 Printer operation A-11 Data control A-11 Vertical motion A-11 Horizontal motion A-12 Overall...
User Manual
Page 13
...contain important information and useful tips on solving printing problems. If printing results are not what you want, how to install options, and how to your printer. Finding Your Way Around This manual provides fully illustrated, step-by telexes and similar machines. t Chapter 1 describes ...how to unpack, set up, test, and connect the printer to maintain your printer. 2 Introduction c Cautions must be observed to avoid damage to read this chapter first. This option is not available in some ...
...contain important information and useful tips on solving printing problems. If printing results are not what you want, how to install options, and how to your printer. Finding Your Way Around This manual provides fully illustrated, step-by telexes and similar machines. t Chapter 1 describes ...how to unpack, set up, test, and connect the printer to maintain your printer. 2 Introduction c Cautions must be observed to avoid damage to read this chapter first. This option is not available in some ...
User Manual
Page 14
...insert the plug into a grounding-type outlet. Placing the printer on . If you are provided for cleaning and do not place the printer in a built-in the cabinet. Never place the printer near water or spill any slots or openings in installation, such as a bookcase, unless proper ventilation is a safety... feature. Use the type of the grounding-type plug. 10. If you set up your dealer or local power company. 9. Do not put your printer where the cord will be equipped with ...
...insert the plug into a grounding-type outlet. Placing the printer on . If you are provided for cleaning and do not place the printer in a built-in the cabinet. Never place the printer near water or spill any slots or openings in installation, such as a bookcase, unless proper ventilation is a safety... feature. Use the type of the grounding-type plug. 10. If you set up your dealer or local power company. 9. Do not put your printer where the cord will be equipped with ...
User Manual
Page 16
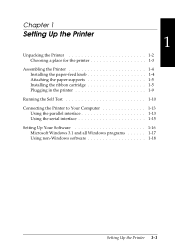
Chapter 1 Setting Up the Printer 1 Unpacking the Printer 1-2 Choosing a place for the printer 1-3 Assembling the Printer 1-4 Installing the paper-feed knob 1-4 Attaching the paper supports 1-5 Installing the ribbon cartridge 1-5 Plugging in the printer 1-9 Running the Self Test 1-10 Connecting the Printer to Your Computer 1-13 Using the parallel interface 1-13 Using the serial interface 1-15 Setting Up Your Software 1-16 Microsoft Windows 3.1 and all Windows programs 1-17 Using non-Windows software 1-18 Setting Up the Printer 1-1
Chapter 1 Setting Up the Printer 1 Unpacking the Printer 1-2 Choosing a place for the printer 1-3 Assembling the Printer 1-4 Installing the paper-feed knob 1-4 Attaching the paper supports 1-5 Installing the ribbon cartridge 1-5 Plugging in the printer 1-9 Running the Self Test 1-10 Connecting the Printer to Your Computer 1-13 Using the parallel interface 1-13 Using the serial interface 1-15 Setting Up Your Software 1-16 Microsoft Windows 3.1 and all Windows programs 1-17 Using non-Windows software 1-18 Setting Up the Printer 1-1
User Manual
Page 19
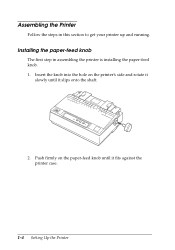
Assembling the Printer Follow the steps in assembling the printer is installing the paper-feed knob. 1. Installing the paper-feed knob The first step in this section to get your printer up and running. Insert the knob into the hole on the paper-feed knob until it fits against the printer case. 1-4 Setting Up the Printer Push firmly on the printer's side and rotate it slowly until it slips onto the shaft. 2.
Assembling the Printer Follow the steps in assembling the printer is installing the paper-feed knob. 1. Installing the paper-feed knob The first step in this section to get your printer up and running. Insert the knob into the hole on the paper-feed knob until it fits against the printer case. 1-4 Setting Up the Printer Push firmly on the printer's side and rotate it slowly until it slips onto the shaft. 2.
User Manual
Page 20
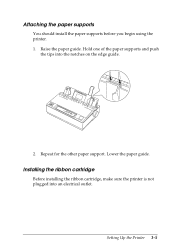
Repeat for the other paper support. Lower the paper guide. Hold one of the paper supports and push the tips into an electrical outlet. Raise the paper guide. Setting Up the Printer 1-5 Attaching the paper supports You should install the paper supports before you begin using the printer. 1. Installing the ribbon cartridge Before installing the ribbon cartridge, make sure the printer is not plugged into the notches on the edge guide. 2.
Repeat for the other paper support. Lower the paper guide. Hold one of the paper supports and push the tips into an electrical outlet. Raise the paper guide. Setting Up the Printer 1-5 Attaching the paper supports You should install the paper supports before you begin using the printer. 1. Installing the ribbon cartridge Before installing the ribbon cartridge, make sure the printer is not plugged into the notches on the edge guide. 2.
User Manual
Page 22
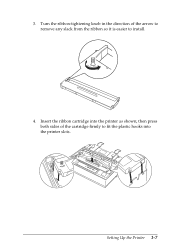
then press both sides of the arrow to remove any slack from the ribbon so it is easier to fit the plastic hooks into the printer as shown; Setting Up the Printer 1-7 Turn the ribbon-tightening knob in the direction of the cartridge firmly to install. 4. Insert the ribbon cartridge into the printer slots. 3.
then press both sides of the arrow to remove any slack from the ribbon so it is easier to fit the plastic hooks into the printer as shown; Setting Up the Printer 1-7 Turn the ribbon-tightening knob in the direction of the cartridge firmly to install. 4. Insert the ribbon cartridge into the printer slots. 3.
User Manual
Page 23
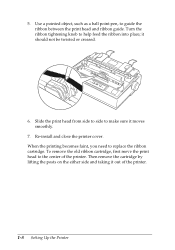
Turn the ribbon tightening knob to replace the ribbon cartridge. Re-install and close the printer cover. 5. Slide the print head from side to side to make sure it should not be twisted or creased. 6. When the printing becomes faint, you ... head to guide the ribbon between the print head and ribbon guide. Use a pointed object, such as a ball point pen, to the center of the printer. 1-8 Setting Up the Printer Then remove the cartridge by lifting the posts on the either side and taking it out of the...
Turn the ribbon tightening knob to replace the ribbon cartridge. Re-install and close the printer cover. 5. Slide the print head from side to side to make sure it should not be twisted or creased. 6. When the printing becomes faint, you ... head to guide the ribbon between the print head and ribbon guide. Use a pointed object, such as a ball point pen, to the center of the printer. 1-8 Setting Up the Printer Then remove the cartridge by lifting the posts on the either side and taking it out of the...


