

Product Information Guide
Page 1
PictureMate Deluxe Viewer Edition Printer Parts Power light On button Menu button Back button Control Panel Menu navigation buttons Paper support Handle Front Zoom buttons Cancel button Memory card light Print button Photo viewer screen Memory card door Output tray EXT/IF (USB) port for cameras, external drive, or optional Bluetooth Adapter Battery cover AC inlet USB port for computer Back Cartridge door Photo cartridge Accessories PictureMate Print Pack (part# T5570) Includes 100 sheets of PicureMate Photo Paper and a PictureMate Photo Cartridge PictureMate Deluxe Viewer Edition ...
PictureMate Deluxe Viewer Edition Printer Parts Power light On button Menu button Back button Control Panel Menu navigation buttons Paper support Handle Front Zoom buttons Cancel button Memory card light Print button Photo viewer screen Memory card door Output tray EXT/IF (USB) port for cameras, external drive, or optional Bluetooth Adapter Battery cover AC inlet USB port for computer Back Cartridge door Photo cartridge Accessories PictureMate Print Pack (part# T5570) Includes 100 sheets of PicureMate Photo Paper and a PictureMate Photo Cartridge PictureMate Deluxe Viewer Edition ...

Product Information Guide
Page 2
...;C). Place your paper against the paper. this could damage PictureMate. 1. Then open the output tray. 3. Do not use a genuine PictureMate Photo Cartridge and do not refill it is bent. 2 - PictureMate Deluxe Viewer Edition Electrical Normal operation Input voltage range 108 to 132 V Rated frequency range 50 to 60 Hz, Input frequency range 49.5 to 60.5 Hz Rated current 0.4 A Power consumption (approximate) Printing 13.0 W Sleep mode 5.0 W Powered off...
...;C). Place your paper against the paper. this could damage PictureMate. 1. Then open the output tray. 3. Do not use a genuine PictureMate Photo Cartridge and do not refill it is bent. 2 - PictureMate Deluxe Viewer Edition Electrical Normal operation Input voltage range 108 to 132 V Rated frequency range 50 to 60 Hz, Input frequency range 49.5 to 60.5 Hz Rated current 0.4 A Power consumption (approximate) Printing 13.0 W Sleep mode 5.0 W Powered off...
Product Information Guide
Page 3
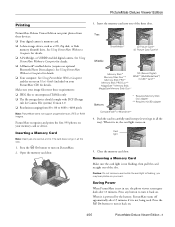
... memory card into one card at a time. Removing a Memory Card Make sure the card light is not in all the way). When it back on . Caution: Do not remove a card while the card light is not being used. you may lose photos on PictureMate. 2. Make sure your memory card or device. Card light 5. Open the memory card door. 3. or USBDP-enabled digital camera. When it is flashing; See Using PictureMate With a Computer and the on-screen User's Guide (included on your image files...
... memory card into one card at a time. Removing a Memory Card Make sure the card light is not in all the way). When it back on . Caution: Do not remove a card while the card light is not being used. you may lose photos on PictureMate. 2. Make sure your memory card or device. Card light 5. Open the memory card door. 3. or USBDP-enabled digital camera. When it is flashing; See Using PictureMate With a Computer and the on-screen User's Guide (included on your image files...
Product Information Guide
Page 4
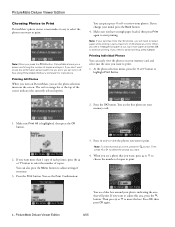
... you press the Print button, PictureMate shows you need to reload paper while printing. If you see the photo selection menu on your memory card: 1. Note: To view 9 photos at a time, press the button. When you change your card has more paper and press OK to continue printing. If you want to adjust this area, press the button. PictureMate Deluxe Viewer Edition Choosing Photos to Print PictureMate's photo viewer screen makes it off. See Using PictureMate Without a Computer for instructions. You can easily...
... you press the Print button, PictureMate shows you need to reload paper while printing. If you see the photo selection menu on your memory card: 1. Note: To view 9 photos at a time, press the button. When you change your card has more paper and press OK to continue printing. If you want to adjust this area, press the button. PictureMate Deluxe Viewer Edition Choosing Photos to Print PictureMate's photo viewer screen makes it off. See Using PictureMate Without a Computer for instructions. You can easily...

Product Information Guide
Page 5
... memory card, this makes it easier to find the ones you want. 1. Press or to select the number of one photo taken on specific dates. At the photo selection menu, press the or button to highlight Print by Date You can press the Menu button to adjust settings for example, photos 7 through 12). Press or to highlight the date you want to print, then press OK. PictureMate Deluxe Viewer Edition...
... memory card, this makes it easier to find the ones you want. 1. Press or to select the number of one photo taken on specific dates. At the photo selection menu, press the or button to highlight Print by Date You can press the Menu button to adjust settings for example, photos 7 through 12). Press or to highlight the date you want to print, then press OK. PictureMate Deluxe Viewer Edition...
Product Information Guide
Page 6
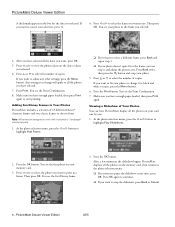
... other settings, press the Menu button. Make sure you have enough paper loaded, then press Print again to adjust any time, press OK. Viewing a Slideshow of copies. Press or to select the photo you want to cancel your card one by one. 1. You see the Print Confirmation. 8. PictureMate displays all the photos on the memory card, then returns to the photo selection menu. ❏ If you want to start printing. PictureMate Deluxe Viewer Edition 4/05...
... other settings, press the Menu button. Make sure you have enough paper loaded, then press Print again to adjust any time, press OK. Viewing a Slideshow of copies. Press or to select the photo you want to cancel your card one by one. 1. You see the Print Confirmation. 8. PictureMate displays all the photos on the memory card, then returns to the photo selection menu. ❏ If you want to start printing. PictureMate Deluxe Viewer Edition 4/05...
Product Information Guide
Page 7
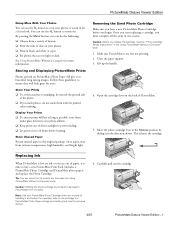
.... Removing the Used Photo Cartridge Make sure you begin. Once you start replacing a cartridge, you replace the cartridge, read the "Photo Cartridge Saftey Instructions" in the Using PictureMate Without a Computer book. 1. Make sure PictureMate is on your photos ❏ Print in black and white or sepia ❏ Fix photos that are out of paper, it is low on the back of direct sunlight to ensure they will give you stack photos, do not rub the printed side of installing...
.... Removing the Used Photo Cartridge Make sure you begin. Once you start replacing a cartridge, you replace the cartridge, read the "Photo Cartridge Saftey Instructions" in the Using PictureMate Without a Computer book. 1. Make sure PictureMate is on your photos ❏ Print in black and white or sepia ❏ Fix photos that are out of paper, it is low on the back of direct sunlight to ensure they will give you stack photos, do not rub the printed side of installing...

Product Information Guide
Page 8
... cleaning the print head. Make sure it snaps shut. 7. Caution: Don't touch the green circuit board. Install the photo cartridge immediately after flushing, see this message: Lever 4. The cleaning process takes about 40 seconds. Unwrap the cartridge. Press the Menu button. 2. Press OK to highlight Maintenance. 3. If discomfort or vision problems continue after you insert the cartridge, then carefully slide the cartridge, label side up, into the slot. PictureMate Deluxe Viewer Edition...
... cleaning the print head. Make sure it snaps shut. 7. Caution: Don't touch the green circuit board. Install the photo cartridge immediately after flushing, see this message: Lever 4. The cleaning process takes about 40 seconds. Unwrap the cartridge. Press the Menu button. 2. Press OK to highlight Maintenance. 3. If discomfort or vision problems continue after you insert the cartridge, then carefully slide the cartridge, label side up, into the slot. PictureMate Deluxe Viewer Edition...

Product Information Guide
Page 9
... blank, then unplug the power cord from the paper support and output tray. 4/05 PictureMate Deluxe Viewer Edition - 9 Look at the printed squares to determine which one room to the next, for the best pattern (1 to use plain paper; Note: The numbers that you enter become the default settings (#5) the next time you should pack it in the lines. OK Needs cleaning 9. You can get too hot. 1. Press or to open the Maintenance menu...
... blank, then unplug the power cord from the paper support and output tray. 4/05 PictureMate Deluxe Viewer Edition - 9 Look at the printed squares to determine which one room to the next, for the best pattern (1 to use plain paper; Note: The numbers that you enter become the default settings (#5) the next time you should pack it in the lines. OK Needs cleaning 9. You can get too hot. 1. Press or to open the Maintenance menu...

Product Information Guide
Page 10
Turn the printer off , and longer when it is installed before transporting. Open the battery cover on its power cable (both parts) into the box that it by connecting the AC adapter and plugging in the printer. Related Documentation CPD-19365 CPD-19367 CPD-19430 CPD-19366 PictureMate Start Here Using PictureMate Without a Computer book Using PictureMate With a Computer book PictureMate Deluxe Viewer Edition CD-ROM with electronic User's Guide 10 - Caution: Make sure the photo cartridge is...
Turn the printer off , and longer when it is installed before transporting. Open the battery cover on its power cable (both parts) into the box that it by connecting the AC adapter and plugging in the printer. Related Documentation CPD-19365 CPD-19367 CPD-19430 CPD-19366 PictureMate Start Here Using PictureMate Without a Computer book Using PictureMate With a Computer book PictureMate Deluxe Viewer Edition CD-ROM with electronic User's Guide 10 - Caution: Make sure the photo cartridge is...


