
Technical Brief (Impact Printers)
Page 1
... EPSON impact printers: Functionality M Printing technology M Control code/emulation M Paper handling M SmartPark™ settings Versatility M Flexible interfacing M Built-in their reliability with LQ FX-980-Nine-pin narrow carriage Wide carriage printers have 4 number in their names Narrow carriage printers have finer printhead pins which determines the type of printing and the number of multi-part...
... EPSON impact printers: Functionality M Printing technology M Control code/emulation M Paper handling M SmartPark™ settings Versatility M Flexible interfacing M Built-in their reliability with LQ FX-980-Nine-pin narrow carriage Wide carriage printers have 4 number in their names Narrow carriage printers have finer printhead pins which determines the type of printing and the number of multi-part...
Technical Brief (Impact Printers)
Page 2
... in front, bottom and rear paper paths. Bottom pull paper path Gives you the greatest control when printing on multi-part forms by ensuring that the forms stay properly aligned. Most EPSON impact printers also offer an IBM emulation, which is the industry standard for reports, forms, etc., and allows you to achieve...
... in front, bottom and rear paper paths. Bottom pull paper path Gives you the greatest control when printing on multi-part forms by ensuring that the forms stay properly aligned. Most EPSON impact printers also offer an IBM emulation, which is the industry standard for reports, forms, etc., and allows you to achieve...

Technical Brief (Impact Printers)
Page 3
... sheets, single sheet labels, top- Technical Brief-Multimedia projectors Page 3 Single sheet paper paths: EPSON impact printers all can handle single sheet paper and single sheet multi-part forms, many EPSON impact printers have a Paper Thickness Lever that allows the printer to accommodate various thicknesses of paper. Pull tractor position For loading continuous paper from the...
... sheets, single sheet labels, top- Technical Brief-Multimedia projectors Page 3 Single sheet paper paths: EPSON impact printers all can handle single sheet paper and single sheet multi-part forms, many EPSON impact printers have a Paper Thickness Lever that allows the printer to accommodate various thicknesses of paper. Pull tractor position For loading continuous paper from the...

User Manual - Hi-Capacity Cut Sheet Feeder
Page 2
...the prior written permission of the information contained herein. EPSON is assumed with respect to the use of Seiko Epson Corporation. Copyright © 1991 by any liability assumed for errors or omissions. All rights reserved. No part of this publication may be reproduced, stored in a... retrival system, or transmitted in the preparation of this book, Seiko Epson Corporation assumes no responsibility for damages resulting from the use of Seiko Epson Corporation. No patent liability is...
...the prior written permission of the information contained herein. EPSON is assumed with respect to the use of Seiko Epson Corporation. Copyright © 1991 by any liability assumed for errors or omissions. All rights reserved. No part of this publication may be reproduced, stored in a... retrival system, or transmitted in the preparation of this book, Seiko Epson Corporation assumes no responsibility for damages resulting from the use of Seiko Epson Corporation. No patent liability is...
Product Information Guide
Page 2
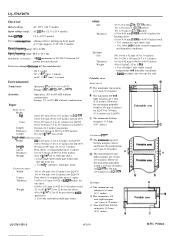
... to 0.0055 inches) 52.3 to 90 g/m2 (14 to 24 lb) Sing&sheet multi-part forms: Width 182 to 216 mm (7.2 to 8.5 inches) for LQ-570 182 to 364 mm (7.2 to 14.3 inches) for LQ-1070 Length copies 257 mm to 297 mm (10.1 to 11.7 inches) Four sheets (1 ...humidity conditions. The minimum left and right margins are 3 mm (0.12 inches). Printable area LQ-570/1070-2 8/20/91 24-Pin Printers l Use labels only under normal temperature and humidity conditions. l insert envelopes into the front slot. LQ-570/1070 Electrical Rated voltage: Input voltage range: AC 120 V (120 V model) AC ...
... to 0.0055 inches) 52.3 to 90 g/m2 (14 to 24 lb) Sing&sheet multi-part forms: Width 182 to 216 mm (7.2 to 8.5 inches) for LQ-570 182 to 364 mm (7.2 to 14.3 inches) for LQ-1070 Length copies 257 mm to 297 mm (10.1 to 11.7 inches) Four sheets (1 ...humidity conditions. The minimum left and right margins are 3 mm (0.12 inches). Printable area LQ-570/1070-2 8/20/91 24-Pin Printers l Use labels only under normal temperature and humidity conditions. l insert envelopes into the front slot. LQ-570/1070 Electrical Rated voltage: Input voltage range: AC 120 V (120 V model) AC ...
Product Information Guide
Page 3
... the loading position. ' J (LVFF) feed paper backward in the printer's buffer. MULTI-PART (green) On when you move the paper-thickness lever to the loading position. If single-sheet paper is on 24-Pin Printers 8/20/91 LQ-570/1070-3 PAPER OUT (red) On when the printer runs out of the optionai cut -sheet feeder is...
... the loading position. ' J (LVFF) feed paper backward in the printer's buffer. MULTI-PART (green) On when you move the paper-thickness lever to the loading position. If single-sheet paper is on 24-Pin Printers 8/20/91 LQ-570/1070-3 PAPER OUT (red) On when the printer runs out of the optionai cut -sheet feeder is...
Product Information Guide
Page 7
..., Epson printer, Standard printer, Draft printer To use so that presents a list of the software to l Reassign bit-image mode Select n/60-inch line spacing Select g-dot, single-density, bit-image printing Select g-dot, double-density, bit-image printing Select &dot, double-speed, double-density, bit-image printing Select quadruple-density bit-image printing Delete character LQ-570/1070...
..., Epson printer, Standard printer, Draft printer To use so that presents a list of the software to l Reassign bit-image mode Select n/60-inch line spacing Select g-dot, single-density, bit-image printing Select g-dot, double-density, bit-image printing Select &dot, double-speed, double-density, bit-image printing Select quadruple-density bit-image printing Delete character LQ-570/1070...
User Manual
Page 2
... the U.S.) failure to strictly comply with respect to the use of the information contained herein. Epson and Epson ESC/P are trademarks of Seiko Epson Corporation. No part of this product or unauthorized modifications, repairs, or alterations to the purchaser of this publication may...Nagano, Japan User's Guide Copyright © 1991 by purchaser or third parties as Original Epson Products or Epson Approved Products by any form or by Seiko Epson Corporation. EPSON® LQ-570/1070 All rights reserved. While every precaution has been taken in any means, mechanical, ...
... the U.S.) failure to strictly comply with respect to the use of the information contained herein. Epson and Epson ESC/P are trademarks of Seiko Epson Corporation. No part of this product or unauthorized modifications, repairs, or alterations to the purchaser of this publication may...Nagano, Japan User's Guide Copyright © 1991 by purchaser or third parties as Original Epson Products or Epson Approved Products by any form or by Seiko Epson Corporation. EPSON® LQ-570/1070 All rights reserved. While every precaution has been taken in any means, mechanical, ...

User Manual
Page 3
... with this device. For United States Users This equipment has been tested and found to comply with the limits for a Class B digital device, pursuant to Part 15 of a non-shielded equipment interface cable to this equipment will not occur in a particular installation. l Reorient or relocate the receiving antenna l Increase the separation...
... with this device. For United States Users This equipment has been tested and found to comply with the limits for a Class B digital device, pursuant to Part 15 of a non-shielded equipment interface cable to this equipment will not occur in a particular installation. l Reorient or relocate the receiving antenna l Increase the separation...

User Manual
Page 5
... installation, configuration, and operation of Epson products Epson technical information library fax service Product literature with technical specifications on our current and new products Sales of authorized Epson dealers and Service Centers. iv Epson also provides the following support services through a nationwide network of ribbons, supplies, parts, documentation, and accessories for your Epson product Customer Relations.
... installation, configuration, and operation of Epson products Epson technical information library fax service Product literature with technical specifications on our current and new products Sales of authorized Epson dealers and Service Centers. iv Epson also provides the following support services through a nationwide network of ribbons, supplies, parts, documentation, and accessories for your Epson product Customer Relations.
User Manual
Page 7
... covers that are marked "Do Not Remove" may expose you to dangerous voltage points or other controls may touch dangerous voltage points or short out parts that the total of fire or electric shock. When the power cord or plug is used with this product, make sure that could result in...
... covers that are marked "Do Not Remove" may expose you to dangerous voltage points or other controls may touch dangerous voltage points or short out parts that the total of fire or electric shock. When the power cord or plug is used with this product, make sure that could result in...
User Manual
Page 8
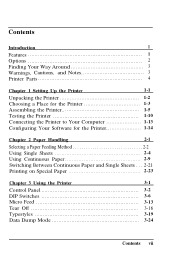
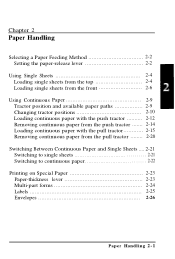
Contents Introduction 1 Features 1 Options 2 Finding Your Way Around 3 Warnings, Cautions, and Notes 3 Printer Parts 4 Chapter 1 Setting Up the Printer 1-1 Unpacking the Printer 1-2 Choosing a Place for the Printer 1-3 Assembling the Printer 1-5 Testing the Printer 1-10 Connecting the Printer to Your Computer 1-13 Configuring Your Software for the Printer 1-14 Chapter 2 Paper Handling 2-1 Selecting a Paper Feeding Method 2-2 Using Single Sheets 2-4 Using Continuous...
Contents Introduction 1 Features 1 Options 2 Finding Your Way Around 3 Warnings, Cautions, and Notes 3 Printer Parts 4 Chapter 1 Setting Up the Printer 1-1 Unpacking the Printer 1-2 Choosing a Place for the Printer 1-3 Assembling the Printer 1-5 Testing the Printer 1-10 Connecting the Printer to Your Computer 1-13 Configuring Your Software for the Printer 1-14 Chapter 2 Paper Handling 2-1 Selecting a Paper Feeding Method 2-2 Using Single Sheets 2-4 Using Continuous...
User Manual
Page 11
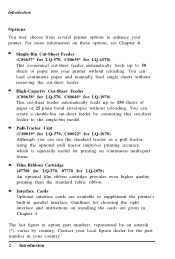
...feeder automatically feeds up to supplement the printer's built-in your printer. Introduction Options You may choose from several printer options to enhance your country. 2 Introduction Single-Bin Cut-Sheet Feeder (C80637* for LQ-570, C80639* for the part number in parallel interface. Interface Cards ...of paper into your local Epson dealer for LQ-1070) This economical cut -sheet feeder. Guidlines for LQ-1070) This cut -sheet feeder to the single-bin model. For more information on continuous multi-part forms. Film Ribbon Cartridge (#7768 for LQ-570, #7770 for printing on ...
...feeder automatically feeds up to supplement the printer's built-in your printer. Introduction Options You may choose from several printer options to enhance your country. 2 Introduction Single-Bin Cut-Sheet Feeder (C80637* for LQ-570, C80639* for the part number in parallel interface. Interface Cards ...of paper into your local Epson dealer for LQ-1070) This economical cut -sheet feeder. Guidlines for LQ-1070) This cut -sheet feeder to the single-bin model. For more information on continuous multi-part forms. Film Ribbon Cartridge (#7768 for LQ-570, #7770 for printing on ...
User Manual
Page 14
Chapter 1 Setting Up the Printer Unpacking the Printer 1-2 Checking the parts 1-2 Choosing a Place for the Printer 1-3 Assembling the Printer 1-5 Removing the protective materials 1-5 Installing the ribbon cartridge 1-6 Attaching the paper guide 1-9 Testing the Printer 1-10 Plugging in the printer 1-10 Running the self test 1-10 Connecting the Printer to Your Computer 1-13 Configuring Your Software for the Printer 1-14 Choosing from a menu 1-14 Setting Up the Printer 1-1
Chapter 1 Setting Up the Printer Unpacking the Printer 1-2 Checking the parts 1-2 Choosing a Place for the Printer 1-3 Assembling the Printer 1-5 Removing the protective materials 1-5 Installing the ribbon cartridge 1-6 Attaching the paper guide 1-9 Testing the Printer 1-10 Plugging in the printer 1-10 Running the self test 1-10 Connecting the Printer to Your Computer 1-13 Configuring Your Software for the Printer 1-14 Choosing from a menu 1-14 Setting Up the Printer 1-1
User Manual
Page 15
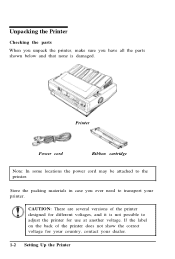
...that none is not possible to adjust the printer for your country, contact your printer. Printer Power cord Ribbon cartridge Note: In some locations the power cord may be attached to the printer. Unpacking the Printer Checking the parts When you unpack the printer, make sure you ever need to transport... your dealer. 1-2 Setting Up the Printer CAUTION: There are several versions of the printer does not show the correct voltage for use ...
...that none is not possible to adjust the printer for your country, contact your printer. Printer Power cord Ribbon cartridge Note: In some locations the power cord may be attached to the printer. Unpacking the Printer Checking the parts When you unpack the printer, make sure you ever need to transport... your dealer. 1-2 Setting Up the Printer CAUTION: There are several versions of the printer does not show the correct voltage for use ...
User Manual
Page 25
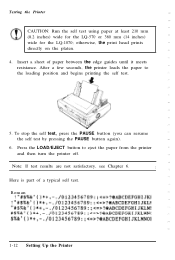
... is part of paper between the edge guides until it meets resistance. To stop the self test, press the PAUSE button (you can resume the self test by pressing the PAUSE button again). 6. Testing the Printer CAUTION: Run the self test using paper at least 210 mm (8.2 inches) wide for the LQ-570 or... 360 mm (14 inches) wide for the LQ-1070; Note: If test results are not satisfactory, see Chapter 6. After a few...
... is part of paper between the edge guides until it meets resistance. To stop the self test, press the PAUSE button (you can resume the self test by pressing the PAUSE button again). 6. Testing the Printer CAUTION: Run the self test using paper at least 210 mm (8.2 inches) wide for the LQ-570 or... 360 mm (14 inches) wide for the LQ-1070; Note: If test results are not satisfactory, see Chapter 6. After a few...
User Manual
Page 28
... Paper and Single Sheets .... 2-21 Switching to single sheets 2-21 Switching to continuous paper 2-22 Printing on Special Paper 2-23 Paper-thickness lever 2-23 Multi-part forms 2-24 Labels 2-25 Envelopes 2-26 Paper Handling 2-1
... Paper and Single Sheets .... 2-21 Switching to single sheets 2-21 Switching to continuous paper 2-22 Printing on Special Paper 2-23 Paper-thickness lever 2-23 Multi-part forms 2-24 Labels 2-25 Envelopes 2-26 Paper Handling 2-1
User Manual
Page 50
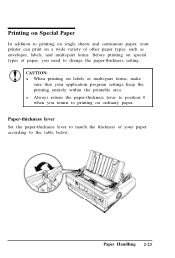
Printing on Special Paper In addition to printing on single sheets and continuous paper, your printer can print on a wide variety of other paper types, such as envelopes, labels, and multi-part forms. Before printing on special types of your application program settings keep the printing entirely within the printable area. CAUTION: l When..., you return to change the paper-thickness setting. l Always return the paper-thickness lever to position 0 when you need to printing on labels or multi-part forms, make sure that your paper according to the table below.
Printing on Special Paper In addition to printing on single sheets and continuous paper, your printer can print on a wide variety of other paper types, such as envelopes, labels, and multi-part forms. Before printing on special types of your application program settings keep the printing entirely within the printable area. CAUTION: l When..., you return to change the paper-thickness setting. l Always return the paper-thickness lever to position 0 when you need to printing on labels or multi-part forms, make sure that your paper according to the table below.
User Manual
Page 51
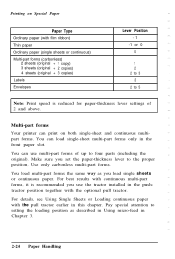
...pull tractor earlier in the front paper slot. Pay special attention to four parts (including the original). You can load single-sheet multi-part forms only in this chapter. For best results with continuous multi-part forms, it is reduced for paper-thickness lever settings of up to setting... Make sure you set the paper-thickness lever to 5 Note: Print speed is recommended you load single sheets or continuous paper. Multi-part forms Your printer can print on Special Paper Paper Type Ordinary paper (with film ribbon) Thin paper Ordinary paper (single sheets or continuous) Multi...
...pull tractor earlier in the front paper slot. Pay special attention to four parts (including the original). You can load single-sheet multi-part forms only in this chapter. For best results with continuous multi-part forms, it is reduced for paper-thickness lever settings of up to setting... Make sure you set the paper-thickness lever to 5 Note: Print speed is recommended you load single sheets or continuous paper. Multi-part forms Your printer can print on Special Paper Paper Type Ordinary paper (with film ribbon) Thin paper Ordinary paper (single sheets or continuous) Multi...
User Manual
Page 52
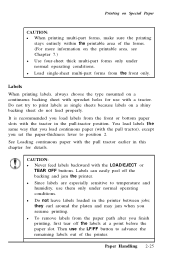
...the paper-thickness lever to position 2. You load labels the same way that you load continuous paper (with the pull tractor earlier in the printer between jobs; Labels can easily peel off the labels at a point before the paper slot. they curl around the platen and may jam ...load labels from the front only. Paper Handling 2-25 Printing on Special Paper CAUTION: l When printing multi-part forms, make sure the printing stays entirely within the printable area of the printer. See Loading continuous paper with the pull tractor), except you finish printing, first tear off the backing and...
...the paper-thickness lever to position 2. You load labels the same way that you load continuous paper (with the pull tractor earlier in the printer between jobs; Labels can easily peel off the labels at a point before the paper slot. they curl around the platen and may jam ...load labels from the front only. Paper Handling 2-25 Printing on Special Paper CAUTION: l When printing multi-part forms, make sure the printing stays entirely within the printable area of the printer. See Loading continuous paper with the pull tractor), except you finish printing, first tear off the backing and...


