Product Information Guide
Page 3
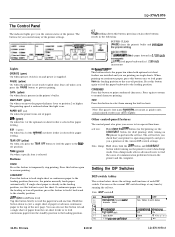
...-off unless you control many of the printer settings. LOAD/EJECT Press this button down the LF/FF button (for LQ printing) or the LOAD/EJECT button (for draft printing) while turning on single sheets. Table I DIP switch I On Bidvechonai ~On 18 K b y l e s 1 on and power is selected. LQ-570/1070 The Control Panel The indicator...
...-off unless you control many of the printer settings. LOAD/EJECT Press this button down the LF/FF button (for LQ printing) or the LOAD/EJECT button (for draft printing) while turning on single sheets. Table I DIP switch I On Bidvechonai ~On 18 K b y l e s 1 on and power is selected. LQ-570/1070 The Control Panel The indicator...
Product Information Guide
Page 4
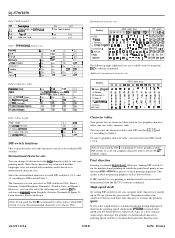
... Off On off oft 1 On / On j On Ioff DIP-switch functions This section describes all of dots in each draft-font character to normal draft speed for that line only. LQ-570/1070-4 8/20/91 24-Pin Printers On IOn j On /IOff Off ~ off On Off j On 'cm I Off ioff I 1/...character sets Country ASCII code (hex) 23 24 40 50 5C 50 5E 60 70 7C 70 7E 6 Japan (EngIl*) X $ @! [ Y 1 - ' 1 I R $ a ; However, turning DIP switch l-5 on , the international character set with DIP switches l-2,1-3, and 14, according to DIP-switch Table 3. Off On j off off , you can select the...
... Off On off oft 1 On / On j On Ioff DIP-switch functions This section describes all of dots in each draft-font character to normal draft speed for that line only. LQ-570/1070-4 8/20/91 24-Pin Printers On IOn j On /IOff Off ~ off On Off j On 'cm I Off ioff I 1/...character sets Country ASCII code (hex) 23 24 40 50 5C 50 5E 60 70 7C 70 7E 6 Japan (EngIl*) X $ @! [ Y 1 - ' 1 I R $ a ; However, turning DIP switch l-5 on , the international character set with DIP switches l-2,1-3, and 14, according to DIP-switch Table 3. Off On j off off , you can select the...
Product Information Guide
Page 5
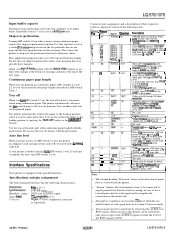
...printer accompanies each line overprints the next, turn on the return side. Specifications and pin assignments The built-in the following characteristics: Datafbrmat: Synch7unization: Handshake timing: Signal level: Connector: Bpbaitr a l l e l STROBE pulse BUSY and ACKNLG signal ITL compati%le level 36pin 57-30360 (Amphenol) connector or equivalent LQ-570..." denotes the twisted-pair return, to the tear-off feature is LOW.) 24-Pin Printers LQ-570/1070-5 Input buffer capacity The printer stores print data sent from your computer in DIP-switch Table 5. Adjust your topof-form...
...printer accompanies each line overprints the next, turn on the return side. Specifications and pin assignments The built-in the following characteristics: Datafbrmat: Synch7unization: Handshake timing: Signal level: Connector: Bpbaitr a l l e l STROBE pulse BUSY and ACKNLG signal ITL compati%le level 36pin 57-30360 (Amphenol) connector or equivalent LQ-570..." denotes the twisted-pair return, to the tear-off feature is LOW.) 24-Pin Printers LQ-570/1070-5 Input buffer capacity The printer stores print data sent from your computer in DIP-switch Table 5. Adjust your topof-form...

User Manual
Page 3
... of this equipment has more of Communications. These limits are designed to operate the equipment. It is encouraged to try to correct the interference by turning the equipment off and on a circuit different from digital apparatus as set out in accordance with the limits for this equipment will not occur in...
... of this equipment has more of Communications. These limits are designed to operate the equipment. It is encouraged to try to correct the interference by turning the equipment off and on a circuit different from digital apparatus as set out in accordance with the limits for this equipment will not occur in...

User Manual
Page 18
... front of the clear plastic paper-tension unit; Remove the locking clip from the paper-tension unit. Setting Up the Printer 1-5 Before you turn on the printer, you ever need to transport your printer. Grasp both ends of the unit and then lift it off . lift up and off . 2. Note: Store the clip with...
... front of the clear plastic paper-tension unit; Remove the locking clip from the paper-tension unit. Setting Up the Printer 1-5 Before you turn on the printer, you ever need to transport your printer. Grasp both ends of the unit and then lift it off . lift up and off . 2. Note: Store the clip with...
User Manual
Page 19
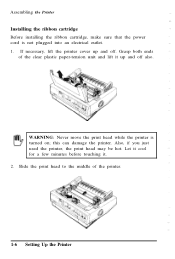
... Grasp both ends of the printer. 1-6 Setting Up the Printer Slide the print head to the middle of the clear plastic paper-tension unit and lift it . 2. Also, if you just used the printer, the print head may be hot. Assembling the Printer Installing the ribbon cartridge Before ...installing the ribbon cartridge, make sure that the power cord is turned on; WARNING: Never move the print head while the printer is not plugged into an electrical outlet. 1....
... Grasp both ends of the printer. 1-6 Setting Up the Printer Slide the print head to the middle of the clear plastic paper-tension unit and lift it . 2. Also, if you just used the printer, the print head may be hot. Assembling the Printer Installing the ribbon cartridge Before ...installing the ribbon cartridge, make sure that the power cord is turned on; WARNING: Never move the print head while the printer is not plugged into an electrical outlet. 1....

User Manual
Page 20
... firmly down into position; Assembling the Printer 3. This removes any slack in the direction of the cartridge to make sure the plastic hooks fit into place. 5 . Also check that the ribbon is not twisted or creased. then press on both ends of the arrow. Turn the ribbon-tightening knob to guide the...
... firmly down into position; Assembling the Printer 3. This removes any slack in the direction of the cartridge to make sure the plastic hooks fit into place. 5 . Also check that the ribbon is not twisted or creased. then press on both ends of the arrow. Turn the ribbon-tightening knob to guide the...
User Manual
Page 23
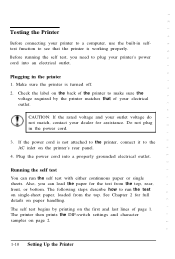
...lines of your electrical outlet. If the power cord is not attached to the printer, connect it to the AC inlet on page 2. 1-10 Setting Up the Printer Testing the Printer Before connecting your printer to a computer, use the built-in selftest function to see that of ... grounded electrical outlet. Make sure the printer is working properly. Do not plug in the printer 1. The printer then prints the DIP-switch settings and character samples on the printer's rear panel. 4. The self test begins by the printer matches that the printer is turned off. 2. Also, you need to...
...lines of your electrical outlet. If the power cord is not attached to the printer, connect it to the AC inlet on page 2. 1-10 Setting Up the Printer Testing the Printer Before connecting your printer to a computer, use the built-in selftest function to see that of ... grounded electrical outlet. Make sure the printer is working properly. Do not plug in the printer 1. The printer then prints the DIP-switch settings and character samples on the printer's rear panel. 4. The self test begins by the printer matches that the printer is turned off. 2. Also, you need to...
User Manual
Page 24
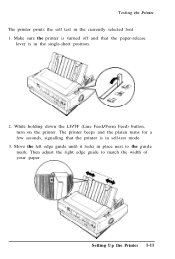
Testing the Printer The printer prints the self test in self-test mode. 3. Move the left edge guide until it locks in the single-sheet position. 2. Setting Up the Printer 1-11 While holding down the LF/FF (Line Feed/Form Feed) button, turn on the printer. The printer beeps and the platen turns for a few seconds, signalling that the paper-release lever is in the currently selected font. 1. Then adjust the right edge guide to the guide mark. Make sure the printer is turned off and that the printer is in place next to match the width of your paper.
Testing the Printer The printer prints the self test in self-test mode. 3. Move the left edge guide until it locks in the single-sheet position. 2. Setting Up the Printer 1-11 While holding down the LF/FF (Line Feed/Form Feed) button, turn on the printer. The printer beeps and the platen turns for a few seconds, signalling that the paper-release lever is in the currently selected font. 1. Then adjust the right edge guide to the guide mark. Make sure the printer is turned off and that the printer is in place next to match the width of your paper.
User Manual
Page 25
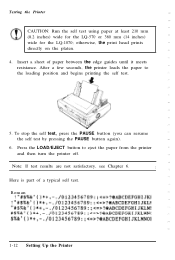
...I Here is part of paper between the edge guides until it meets resistance. After a few seconds, the printer loads the paper to eject the paper from the printer and then turn the printer off. Press the LOAD/EJECT button to the loading position and begins printing the self test. 5. otherwise, the...self test by pressing the PAUSE button again). 6. Note: If test results are not satisfactory, see Chapter 6. Roman 1-12 Setting Up the Printer Testing the Printer CAUTION: Run the self test using paper at least 210 mm (8.2 inches) wide for the LQ-570 or 360 mm (14 inches) wide for the...
...I Here is part of paper between the edge guides until it meets resistance. After a few seconds, the printer loads the paper to eject the paper from the printer and then turn the printer off. Press the LOAD/EJECT button to the loading position and begins printing the self test. 5. otherwise, the...self test by pressing the PAUSE button again). 6. Note: If test results are not satisfactory, see Chapter 6. Roman 1-12 Setting Up the Printer Testing the Printer CAUTION: Run the self test using paper at least 210 mm (8.2 inches) wide for the LQ-570 or 360 mm (14 inches) wide for the...
User Manual
Page 26
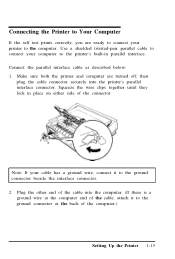
Squeeze the wire clips together until they lock in parallel interface. Connecting the Printer to Your Computer If the self test prints correctly, you are turned off; Use a shielded twisted-pair parallel cable to connect your computer to the computer. then plug the cable connector securely into the computer. (If there ...
Squeeze the wire clips together until they lock in parallel interface. Connecting the Printer to Your Computer If the self test prints correctly, you are turned off; Use a shielded twisted-pair parallel cable to connect your computer to the computer. then plug the cable connector securely into the computer. (If there ...
User Manual
Page 31
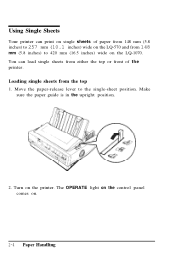
Loading single sheets from 148 mm (5.8 inches) to 420 mm (16.5 inches) wide on . 2-4 Paper Handling Make sure the paper guide is in the upright position. 2. The OPERATE light on the control panel comes on the LQ-1070. Move the paper-release lever to 257 mm (10.1 inches) wide on the LQ-570 and from the top 1. Using Single Sheets Your printer can load single sheets from either the top or front of paper from 148 mm (5.8 inches) to the single-sheet position. You can print on single sheets of the printer. Turn on the printer.
Loading single sheets from 148 mm (5.8 inches) to 420 mm (16.5 inches) wide on . 2-4 Paper Handling Make sure the paper guide is in the upright position. 2. The OPERATE light on the control panel comes on the LQ-1070. Move the paper-release lever to 257 mm (10.1 inches) wide on the LQ-570 and from the top 1. Using Single Sheets Your printer can load single sheets from either the top or front of paper from 148 mm (5.8 inches) to the single-sheet position. You can print on single sheets of the printer. Turn on the printer.
User Manual
Page 33
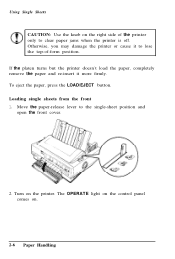
...paper and re-insert it to the single-sheet position and open the front cover. 2. Turn on . 2-6 Paper Handling The OPERATE light on the control panel comes on the printer. Otherwise, you may damage the printer or cause it more firmly. Move the paper-release lever to lose the top-of ...the printer only to clear paper jams when the printer is off. Loading single sheets from the front 1. Using...
...paper and re-insert it to the single-sheet position and open the front cover. 2. Turn on . 2-6 Paper Handling The OPERATE light on the control panel comes on the printer. Otherwise, you may damage the printer or cause it more firmly. Move the paper-release lever to lose the top-of ...the printer only to clear paper jams when the printer is off. Loading single sheets from the front 1. Using...
User Manual
Page 35
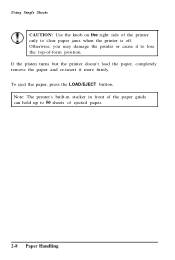
Using Single Sheets CAUTION: Use the knob on the right side of ejected paper. 2-8 Paper Handling Note: The printer's built-in stacker in front of the paper guide can hold up to 50 sheets of the printer only to lose the top-of-form position. If the platen turns but the printer doesn't load the paper, completely remove the paper and re-insert it to clear paper jams when the printer is off. To eject the paper, press the LOAD/EJECT button. Otherwise, you may damage the printer or cause it more firmly.
Using Single Sheets CAUTION: Use the knob on the right side of ejected paper. 2-8 Paper Handling Note: The printer's built-in stacker in front of the paper guide can hold up to 50 sheets of the printer only to lose the top-of-form position. If the platen turns but the printer doesn't load the paper, completely remove the paper and re-insert it to clear paper jams when the printer is off. To eject the paper, press the LOAD/EJECT button. Otherwise, you may damage the printer or cause it more firmly.
User Manual
Page 37
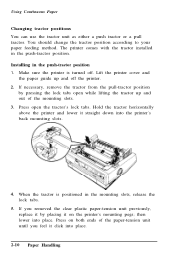
... with the tractor installed in the push-tractor position 1. Installing in the push-tractor position. then lower into the printer's back mounting slots. 4. Lift the printer cover and the paper guide up and out of the paper-tension unit until you feel it on both ends of the mounting ... in the mounting slots, release the lock tabs. 5. Hold the tractor horizontally above the printer and lower it by pressing the lock tabs open the tractor's lock tabs. When the tractor is turned off the printer. 2. Press open while lifting the tractor up and off . You should change the tractor...
... with the tractor installed in the push-tractor position 1. Installing in the push-tractor position. then lower into the printer's back mounting slots. 4. Lift the printer cover and the paper guide up and out of the paper-tension unit until you feel it on both ends of the mounting ... in the mounting slots, release the lock tabs. 5. Hold the tractor horizontally above the printer and lower it by pressing the lock tabs open the tractor's lock tabs. When the tractor is turned off the printer. 2. Press open while lifting the tractor up and off . You should change the tractor...
User Manual
Page 38
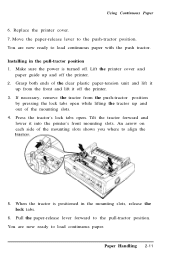
...to align the 5. If necessary, remove the tractor from the push-tractor position by pressing the lock tabs open . When the tractor is turned off. You are now ready to load continuous paper with the push tractor. Make sure the power is positioned in the pull-tractor position 1....lever forward to load continuous paper. Grasp both ends of the mounting slots. 4. Lift the printer cover and paper guide up and off the printer. 3. Paper Handling 2-11 Using Continuous Paper 6. Replace the printer cover. 7. Tilt the tractor forward and lower it up and out of the clear plastic paper...
...to align the 5. If necessary, remove the tractor from the push-tractor position by pressing the lock tabs open . When the tractor is turned off. You are now ready to load continuous paper with the push tractor. Make sure the power is positioned in the pull-tractor position 1....lever forward to load continuous paper. Grasp both ends of the mounting slots. 4. Lift the printer cover and paper guide up and off the printer. 3. Paper Handling 2-11 Using Continuous Paper 6. Replace the printer cover. 7. Tilt the tractor forward and lower it up and out of the clear plastic paper...
User Manual
Page 39
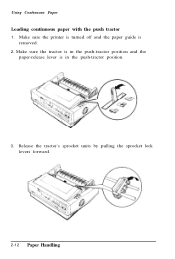
Using Continuous Paper Loading continuous paper with the push tractor 1. Make sure the tractor is in the push-tractor position and the paper-release lever is removed. 2. Release the tractor's sprocket units by pulling the sprocket lock levers forward. 2-12 Paper Handling Make sure the printer is turned off and the paper guide is in the push-tractor position. 3.
Using Continuous Paper Loading continuous paper with the push tractor 1. Make sure the tractor is in the push-tractor position and the paper-release lever is removed. 2. Release the tractor's sprocket units by pulling the sprocket lock levers forward. 2-12 Paper Handling Make sure the printer is turned off and the paper guide is in the push-tractor position. 3.
User Manual
Page 41
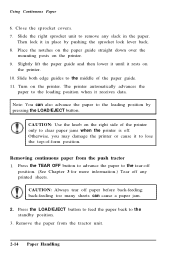
... the paper guide and then lower it until it receives data. Note: You can cause a paper jam. 2. The printer automatically advances the paper to clear paper jams when the printer is off. back-feeding too many sheets can also advance the paper to the tear-off position. (See Chapter 3 ...for more information.) Tear off paper before back-feeding; Press the TEAR OFF button to advance the paper to the loading position by pushing the sprocket lock lever back. 8. Turn...
... the paper guide and then lower it until it receives data. Note: You can cause a paper jam. 2. The printer automatically advances the paper to clear paper jams when the printer is off. back-feeding too many sheets can also advance the paper to the tear-off position. (See Chapter 3 ...for more information.) Tear off paper before back-feeding; Press the TEAR OFF button to advance the paper to the loading position by pushing the sprocket lock lever back. 8. Turn...
User Manual
Page 42
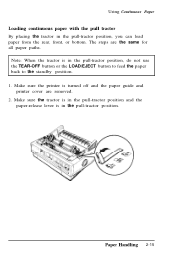
... from the rear, front, or bottom. The steps are removed. 2. Note: When the tractor is turned off and the paper guide and printer cover are the same for all paper paths. Paper Handling 2-15 Make sure the printer is in the pull-tractor position, do not use the TEAR-OFF button or the...
... from the rear, front, or bottom. The steps are removed. 2. Note: When the tractor is turned off and the paper guide and printer cover are the same for all paper paths. Paper Handling 2-15 Make sure the printer is in the pull-tractor position, do not use the TEAR-OFF button or the...
User Manual
Page 45
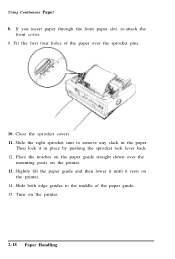
.... Slide both edge guides to remove any slack in place by pushing the sprocket lock lever back. 12. Turn on the printer. 14. Slide the right sprocket unit to the middle of the paper over the mounting posts on the paper guide straight down over the sprocket ...pins. 10. Then lock it rests on the printer. 2-18 Paper Handling Slightly lift the paper guide and then lower it until it in the paper. If you insert paper through the front paper...
.... Slide both edge guides to remove any slack in place by pushing the sprocket lock lever back. 12. Turn on the printer. 14. Slide the right sprocket unit to the middle of the paper over the mounting posts on the paper guide straight down over the sprocket ...pins. 10. Then lock it rests on the printer. 2-18 Paper Handling Slightly lift the paper guide and then lower it until it in the paper. If you insert paper through the front paper...
