
User Manual
Page 19
l Film Ribbon Cartridge (#7770) The optional film ribbon cartridge provides you with continuous multi-part forms. l Multi-Font Module (#7407-A) The optional Multi-Font module adds to the number of continuous paper handling. Introduction l Pull Tractor Unit (C800141) This option improves the performance of fonts available in the Letter Quality mode. Introduction 3 It is especially useful with even higher quality printing than the standard fabric ribbon.
l Film Ribbon Cartridge (#7770) The optional film ribbon cartridge provides you with continuous multi-part forms. l Multi-Font Module (#7407-A) The optional Multi-Font module adds to the number of continuous paper handling. Introduction l Pull Tractor Unit (C800141) This option improves the performance of fonts available in the Letter Quality mode. Introduction 3 It is especially useful with even higher quality printing than the standard fabric ribbon.

User Manual
Page 23
Chapter 1 Setting Up the Printer Unpacking the Printer 1-2 Checking the Parts 1-2 Removing the Protective Materials 1-3 Choosing a Place for the Printer 1-5 Assembling the Printer 1-7 Installing the Platen Knob 1-7 Installing the Ribbon Cartridge 1-8 Attaching the Paper Guide 1-12 Testing the Printer 1-14 Plugging in the Printer 1-14 Running the Self Test 1-15 If the Self Test Does Not Work 1-22 Connecting the Printer to Your Computer 1-23 The Parallel Interface 1-23 Setting Up Your Application Software 1-26 Choosing From a Menu 1-26 Setting Up the Printer 1-1
Chapter 1 Setting Up the Printer Unpacking the Printer 1-2 Checking the Parts 1-2 Removing the Protective Materials 1-3 Choosing a Place for the Printer 1-5 Assembling the Printer 1-7 Installing the Platen Knob 1-7 Installing the Ribbon Cartridge 1-8 Attaching the Paper Guide 1-12 Testing the Printer 1-14 Plugging in the Printer 1-14 Running the Self Test 1-15 If the Self Test Does Not Work 1-22 Connecting the Printer to Your Computer 1-23 The Parallel Interface 1-23 Setting Up Your Application Software 1-26 Choosing From a Menu 1-26 Setting Up the Printer 1-1
User Manual
Page 24
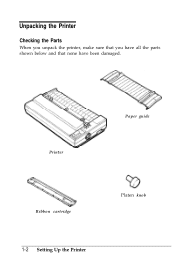
Unpacking the Printer Checking the Parts When you unpack the printer, make sure that you have all the parts shown below and that none have been damaged. Printer Paper guide Ribbon cartridge 1-2 Setting Up the Printer Platen knob
Unpacking the Printer Checking the Parts When you unpack the printer, make sure that you have all the parts shown below and that none have been damaged. Printer Paper guide Ribbon cartridge 1-2 Setting Up the Printer Platen knob
User Manual
Page 30
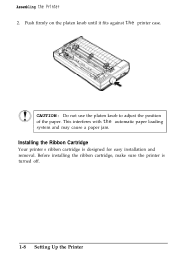
CAUTION: Do not use the platen knob to adjust the position of the paper. Assembling the Printer 2. Installing the Ribbon Cartridge Your printer's ribbon cartridge is turned off. 1-8 Setting Up the Printer This interferes with the automatic paper loading system and may cause a paper jam. Push firmly on the platen knob until it fits against the printer case. Before installing the ribbon cartridge, make sure the printer is designed for easy installation and removal.
CAUTION: Do not use the platen knob to adjust the position of the paper. Assembling the Printer 2. Installing the Ribbon Cartridge Your printer's ribbon cartridge is turned off. 1-8 Setting Up the Printer This interferes with the automatic paper loading system and may cause a paper jam. Push firmly on the platen knob until it fits against the printer case. Before installing the ribbon cartridge, make sure the printer is designed for easy installation and removal.
User Manual
Page 31
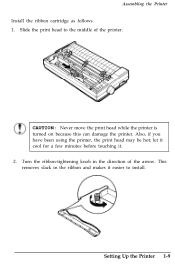
This removes slack in the direction of the printer. Setting Up the Printer 1-9 Also, if you have been using the printer, the print head may be hot; Slide the print head to install. let it cool for a few minutes before touching it easier to the middle of the arrow. CAUTION: Never move the print head while the printer is turned on because this can damage the printer. Assembling the Printer Install the ribbon cartridge as follows. 1. Turn the ribbon-tightening knob in the ribbon and makes it . 2.
This removes slack in the direction of the printer. Setting Up the Printer 1-9 Also, if you have been using the printer, the print head may be hot; Slide the print head to install. let it cool for a few minutes before touching it easier to the middle of the arrow. CAUTION: Never move the print head while the printer is turned on because this can damage the printer. Assembling the Printer Install the ribbon cartridge as follows. 1. Turn the ribbon-tightening knob in the ribbon and makes it . 2.
User Manual
Page 32
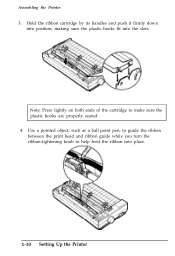
Hold the ribbon cartridge by its handles and push it firmly down into position, making sure the plastic hooks fit into place. 1-10 Setting Up the Printer Use a pointed object, such as a ball point pen, to guide the ribbon between the print head and ribbon guide while you turn the ribbon-tightening knob to make sure the plastic hooks are properly seated. 4. Note: Press lightly on both ends of the cartridge to help feed the ribbon into the slots. Assembling the Printer 3.
Hold the ribbon cartridge by its handles and push it firmly down into position, making sure the plastic hooks fit into place. 1-10 Setting Up the Printer Use a pointed object, such as a ball point pen, to guide the ribbon between the print head and ribbon guide while you turn the ribbon-tightening knob to make sure the plastic hooks are properly seated. 4. Note: Press lightly on both ends of the cartridge to help feed the ribbon into the slots. Assembling the Printer 3.
User Manual
Page 44
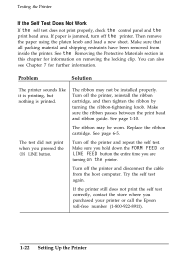
... is printed. You can also see Chapter 7 for information on the printer. Turn off the printer. Replace the ribbon cartridge. Turn off the printer and disconnect the cable from inside the printer. If the printer still does not print the self test correctly, contact the store where ...you pressed the ON LINE button. The test did not print when you purchased your printer or call the Epson...
... is printed. You can also see Chapter 7 for information on the printer. Turn off the printer. Replace the ribbon cartridge. Turn off the printer and disconnect the cable from inside the printer. If the printer still does not print the self test correctly, contact the store where ...you pressed the ON LINE button. The test did not print when you purchased your printer or call the Epson...
User Manual
Page 83
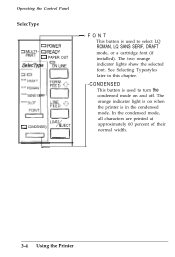
...~ -- F O N T This button is in the condensed mode. In the condensed mode, all characters are printed at approximately 60 percent of their normal width. 3-4 Using the Printer See Selecting Typestyles later in this chapter. -CONDENSED This button is used to turn the condensed mode on when the...
...~ -- F O N T This button is in the condensed mode. In the condensed mode, all characters are printed at approximately 60 percent of their normal width. 3-4 Using the Printer See Selecting Typestyles later in this chapter. -CONDENSED This button is used to turn the condensed mode on when the...

User Manual
Page 98
... widths, and other enhancements from the SelecType control panel or by SelecType. On SANS SERIF ma SLOT I FONT 0 CONDENSED DJ I Using the Printer 3-19 Selecting Typestyles You can use software commands, see the Command Summary in Chapter 9. For example, if both indicator lights are lit, the ...slot is selected for your optional font cartridge (if one is installed). You can produce a wide range of the control panel to choose fonts and condensed printing. Orange lights indicate ...
... widths, and other enhancements from the SelecType control panel or by SelecType. On SANS SERIF ma SLOT I FONT 0 CONDENSED DJ I Using the Printer 3-19 Selecting Typestyles You can use software commands, see the Command Summary in Chapter 9. For example, if both indicator lights are lit, the ...slot is selected for your optional font cartridge (if one is installed). You can produce a wide range of the control panel to choose fonts and condensed printing. Orange lights indicate ...
User Manual
Page 100
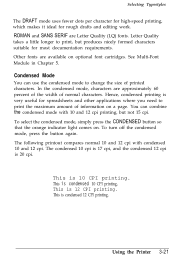
...CPI printing. Hence, condensed printing is very useful for most documentation requirements. This is 20 cpi. This is 12 CPI printing. Using the Printer 3-21 Other fonts are available on . In the condensed mode, characters are Letter Quality (LQ) fonts. To select the condensed mode,... simply press the CONDENSED button so that the orange indicator light comes on optional font cartridges. The following printout compares normal 10 and 12 cpi with 10 and 12 cpi printing, but produces nicely formed characters suitable for ...
...CPI printing. Hence, condensed printing is very useful for most documentation requirements. This is 20 cpi. This is 12 CPI printing. Using the Printer 3-21 Other fonts are available on . In the condensed mode, characters are Letter Quality (LQ) fonts. To select the condensed mode,... simply press the CONDENSED button so that the orange indicator light comes on optional font cartridges. The following printout compares normal 10 and 12 cpi with 10 and 12 cpi printing, but produces nicely formed characters suitable for ...

User Manual
Page 193
Then remove the printer cover. Do not use ribbons designed for your printer. Make sure that the printer is turned off. Replacing the Ribbon Replace the ribbon when the printout becomes too faint. The #7754 standard ribbon cartridge or #7770 film ribbon cartridge are recommended for nine-pin printers. 1. Maintenance 6-5
Then remove the printer cover. Do not use ribbons designed for your printer. Make sure that the printer is turned off. Replacing the Ribbon Replace the ribbon when the printout becomes too faint. The #7754 standard ribbon cartridge or #7770 film ribbon cartridge are recommended for nine-pin printers. 1. Maintenance 6-5

User Manual
Page 194
To remove the ribbon cartridge, grip it cool before attempting to replace the ribbon. 6-6 Maintenance WARNING: If the printer has just been used, the print head may be hot. Remove the paper tension unit. 3. Replacing the Ribbon 2. Let it by the black plastic handles and lift the cartridge straight up and out of the printer.
To remove the ribbon cartridge, grip it cool before attempting to replace the ribbon. 6-6 Maintenance WARNING: If the printer has just been used, the print head may be hot. Remove the paper tension unit. 3. Replacing the Ribbon 2. Let it by the black plastic handles and lift the cartridge straight up and out of the printer.

User Manual
Page 196
Note: Press lightly on both sides of the cartridge to make sure the hooks are properly inserted. 6-8 Maintenance Replacing the Ribbon 6 . Push the new ribbon cartridge firmly into position, making sure the plastic hooks fit into the slots, as shown below.
Note: Press lightly on both sides of the cartridge to make sure the hooks are properly inserted. 6-8 Maintenance Replacing the Ribbon 6 . Push the new ribbon cartridge firmly into position, making sure the plastic hooks fit into the slots, as shown below.
User Manual
Page 200
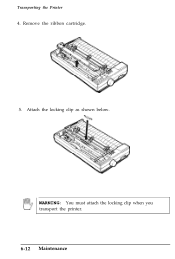
Remove the ribbon cartridge. 5. WARNING: You must attach the locking clip when you transport the printer. 6-12 Maintenance Attach the locking clip as shown below. Transporting the Printer 4.
Remove the ribbon cartridge. 5. WARNING: You must attach the locking clip when you transport the printer. 6-12 Maintenance Attach the locking clip as shown below. Transporting the Printer 4.
User Manual
Page 208
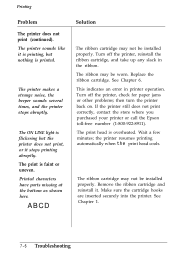
... indicates an error in the ribbon. If the printer still does not print correctly, contact the store where you purchased your printer or call the Epson toll-free number (1-800-922-8911). Make sure the cartridge hooks are inserted securely into the printer. ABCD Solution The ribbon cartridge may not be worn. The ribbon may not...
... indicates an error in the ribbon. If the printer still does not print correctly, contact the store where you purchased your printer or call the Epson toll-free number (1-800-922-8911). Make sure the cartridge hooks are inserted securely into the printer. ABCD Solution The ribbon cartridge may not be worn. The ribbon may not...
User Manual
Page 209
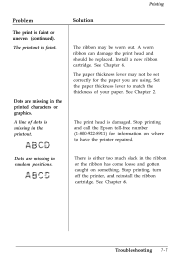
.... Solution The ribbon may not be set correctly for information on something. Stop printing, turn off the printer, and reinstall the ribbon cartridge. Printing Problem The print is missing in the printout. Install a new ribbon cartridge. See Chapter 2. Dots are missing in random positions. Troubleshooting 7-7 A line of your paper. The paper ...is faint or uneven (continued). Dots are missing in the printed characters or graphics. The print head is damaged. Stop printing and call the Epson toll-free number (1-800-922-8911) for the paper you are using. See Chapter 6.
.... Solution The ribbon may not be set correctly for information on something. Stop printing, turn off the printer, and reinstall the ribbon cartridge. Printing Problem The print is missing in the printout. Install a new ribbon cartridge. See Chapter 2. Dots are missing in random positions. Troubleshooting 7-7 A line of your paper. The paper ...is faint or uneven (continued). Dots are missing in the printed characters or graphics. The print head is damaged. Stop printing and call the Epson toll-free number (1-800-922-8911) for the paper you are using. See Chapter 6.
User Manual
Page 242
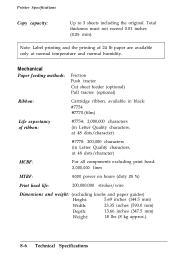
Printer Specifications Copy capacity: Up to 3 sheets including the original. Total thickness must not exceed 0.01 inches (0.25 mm). Mechanical Paper feeding methods: Friction Push tractor Cut sheet feeder (optional) Pull tractor (optional) Ribbon: Cartridge ribbon, available in Letter Quality characters, at normal temperature and normal humidity. Note: Label printing and the printing...
Printer Specifications Copy capacity: Up to 3 sheets including the original. Total thickness must not exceed 0.01 inches (0.25 mm). Mechanical Paper feeding methods: Friction Push tractor Cut sheet feeder (optional) Pull tractor (optional) Ribbon: Cartridge ribbon, available in Letter Quality characters, at normal temperature and normal humidity. Note: Label printing and the printing...
User Manual
Page 287
When defining characters, DIP switch 2-5 must be copied. The variable n represents the font family. The printer cannot select fonts 2 to off. Commands Arranged by Topic User-defined Characters See Chapter 4 for sample programs and full information on this ... d 2 d a t a 27 38 0 n1 n2 d1 d 2 d a t a 1B 26 00 n1 n2 d1 d 2 d a t a Comments: This command allows characters to be redefined. Fonts in font cartridges (except Orator and Orator-S) can be redefined in ROM to RAM ESC : 0 n 0 27 58 0 n 0 1B 3A 00 n 00 Comments: This sequence copies the characters in...
When defining characters, DIP switch 2-5 must be copied. The variable n represents the font family. The printer cannot select fonts 2 to off. Commands Arranged by Topic User-defined Characters See Chapter 4 for sample programs and full information on this ... d 2 d a t a 27 38 0 n1 n2 d1 d 2 d a t a 1B 26 00 n1 n2 d1 d 2 d a t a Comments: This command allows characters to be redefined. Fonts in font cartridges (except Orator and Orator-S) can be redefined in ROM to RAM ESC : 0 n 0 27 58 0 n 0 1B 3A 00 n 00 Comments: This sequence copies the characters in...
User Manual
Page 310
... - 29 removing, 5-30 - 33 Push tractor, 2-9 - 23 R Ready light, 3-2 Ribbon cartridge installing, 1-8 - 10 replacing, 6-5 - 10 specifications, 8-6 Roman font, 3-20 S Sans serif font, 3-20 SelecType options, 3-19 - 21, 5-34 Self test, printer, 1-15 - 22, 5-10 - 13 Serial interface, see Interface boards Setting up printer, l-l - 26 Shadow mode, 4-6, 9-32 Short tear-off, 3-15 - 18 Single...
... - 29 removing, 5-30 - 33 Push tractor, 2-9 - 23 R Ready light, 3-2 Ribbon cartridge installing, 1-8 - 10 replacing, 6-5 - 10 specifications, 8-6 Roman font, 3-20 S Sans serif font, 3-20 SelecType options, 3-19 - 21, 5-34 Self test, printer, 1-15 - 22, 5-10 - 13 Serial interface, see Interface boards Setting up printer, l-l - 26 Shadow mode, 4-6, 9-32 Short tear-off, 3-15 - 18 Single...

User Manual
Page 317
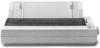
EPSON AMERICA, INC. 2780 Lomita Boulevard Torrance, California 90505 4500 KEY FEATURES: n Sharp 136-Column Letter Quality Printing n Fast 180-CPS Print Speed n High-Resolution Graphics Capability w Exclusive SelecType Control Panel w Five Resident Fonts and Optional 7 in 1 Font Cartridge w Epson Advanced Paper Handling n Short Form Tear-Off n User-Selectable 8K or 1 K Buffer n Epson One-Year Limited Warranty Printed in Japan 90.07-7
EPSON AMERICA, INC. 2780 Lomita Boulevard Torrance, California 90505 4500 KEY FEATURES: n Sharp 136-Column Letter Quality Printing n Fast 180-CPS Print Speed n High-Resolution Graphics Capability w Exclusive SelecType Control Panel w Five Resident Fonts and Optional 7 in 1 Font Cartridge w Epson Advanced Paper Handling n Short Form Tear-Off n User-Selectable 8K or 1 K Buffer n Epson One-Year Limited Warranty Printed in Japan 90.07-7

