Product Information Guide
Page 1
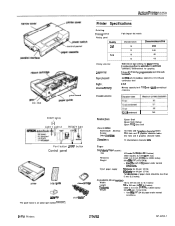
... AC inlet FONT lights I Residmtjmh: Character tables: North/South America: Europe: Other countxies: Chnractn sets: Epson Draft Epson NLQ Roman Epson NLQ Sans Serif One italic and 7 graphicscharacter tables One italic and 15 graphics character tables One italic and .../FF button Control panel output guide ribbon cart- l/hinch. g-Pin Printers 7/l 4192 AP-2250-1 ActionPrinter 2250 Printer Specifications Printing Printmg method: Printing speed: Ouality Draft NLQ Printing direction: he Fciq: PapPrfePd spd: BuJ/pr:, Lkwnlmd merwry: Y-pin impact dot matrix Characters/inch 10 12...
... AC inlet FONT lights I Residmtjmh: Character tables: North/South America: Europe: Other countxies: Chnractn sets: Epson Draft Epson NLQ Roman Epson NLQ Sans Serif One italic and 7 graphicscharacter tables One italic and 15 graphics character tables One italic and .../FF button Control panel output guide ribbon cart- l/hinch. g-Pin Printers 7/l 4192 AP-2250-1 ActionPrinter 2250 Printer Specifications Printing Printmg method: Printing speed: Ouality Draft NLQ Printing direction: he Fciq: PapPrfePd spd: BuJ/pr:, Lkwnlmd merwry: Y-pin impact dot matrix Characters/inch 10 12...

Product Information Guide
Page 2
...The minimum bottom margin is 13.8 mm (0.54 inches). only with the longer side inserted into the rear slot. If you notice increases in ribbon consumption and paper jamming, use them B The minimum left margin is 13 mm (0.51 inches). the maximum printable width is 203 mm (8...131°F) Humidity (without push tractor 4.9 kg (10.9 lb) with D3, CSA22.2 No.220 FCC part 15 subpart B class B AP-2250-2 7114/92 9-Pin Printers ActionPrinter 2250 Continuous paper: Width 101 to 254 mm (4 to 10 inches) Copies Thickness Weight Three sheets (one original plus two copies) 0.065 to 0....
...The minimum bottom margin is 13.8 mm (0.54 inches). only with the longer side inserted into the rear slot. If you notice increases in ribbon consumption and paper jamming, use them B The minimum left margin is 13 mm (0.51 inches). the maximum printable width is 203 mm (8...131°F) Humidity (without push tractor 4.9 kg (10.9 lb) with D3, CSA22.2 No.220 FCC part 15 subpart B class B AP-2250-2 7114/92 9-Pin Printers ActionPrinter 2250 Continuous paper: Width 101 to 254 mm (4 to 10 inches) Copies Thickness Weight Three sheets (one original plus two copies) 0.065 to 0....

Product Information Guide
Page 5
...RX, MX, Epson printer, Standard printer, Draft printer. l If the printer runs out of printed characters. However, most software programs take full advantage of the printer, however, it in the default-setting mode. b a s e l i n e o f c h a r a c t e r s 9-Pin Printers 7/l 4/92 AP-2250-5 Never move the small levers on the ribbon mask indicate the...800 FX-85 FX-80+ FX-80 If none of these printers is listed, select the first one of Epson printers shares a great many commands, you turn on its menu. ActionPrinter 2250 Running the Self Test You can run the self test with...
...RX, MX, Epson printer, Standard printer, Draft printer. l If the printer runs out of printed characters. However, most software programs take full advantage of the printer, however, it in the default-setting mode. b a s e l i n e o f c h a r a c t e r s 9-Pin Printers 7/l 4/92 AP-2250-5 Never move the small levers on the ribbon mask indicate the...800 FX-85 FX-80+ FX-80 If none of these printers is listed, select the first one of Epson printers shares a great many commands, you turn on its menu. ActionPrinter 2250 Running the Self Test You can run the self test with...

Product Support Bulletin(s)
Page 1
... key features of the AP-2250 printer: - Listed below . A. A. The AP-2250 automatically goes into a ready condition after being powered on the AP-2250 front panel? S015047 C800262 Fabric Ribbon Cartridge Push Tractor What is Epson's first narrow carriage light duty printer specifically designed to use as ...easy to meet the unique needs of this, the AP-2250 was designed to be as possible...
... key features of the AP-2250 printer: - Listed below . A. A. The AP-2250 automatically goes into a ready condition after being powered on the AP-2250 front panel? S015047 C800262 Fabric Ribbon Cartridge Push Tractor What is Epson's first narrow carriage light duty printer specifically designed to use as ...easy to meet the unique needs of this, the AP-2250 was designed to be as possible...

User Manual
Page 2
FONT lights rL ,~~ -~~~ Font button LF/FF button Control panel - Printer Parts printer cover ribbon Cartridge u parallel in&ace Never move this lever.
FONT lights rL ,~~ -~~~ Font button LF/FF button Control panel - Printer Parts printer cover ribbon Cartridge u parallel in&ace Never move this lever.

User Manual
Page 6
... qualified technician to restore the printer to ram or water If it has been exposed to normal operation. Adjust only those controls that are followed. Epson also provides the following support services through a nationwide network of ribbons, supplies, parts, documentation, ...and accessories for your nearest Authorized Epson Reseller or Service Center Technical assistance with the installation, ...
... qualified technician to restore the printer to ram or water If it has been exposed to normal operation. Adjust only those controls that are followed. Epson also provides the following support services through a nationwide network of ribbons, supplies, parts, documentation, ...and accessories for your nearest Authorized Epson Reseller or Service Center Technical assistance with the installation, ...

User Manual
Page 9
Contents Introduction 1 Features 1 Finding Your Way Around 2 Warnings, Cautions, and Notes 2 Chapter 1 Setting Up the Printer 1-1 Unpacking the Printer 1-2 Choosing a Place for the Printer 1-4 Installing the Ribbon Cartridge 1-5 Plugging in the Printer 1-7 Running the Self Test 1-8 Connecting the Printer to Your Computer 1-11 Setting Up Your Software Programs 1-13 Chapter 2 Paper Handling 2-1 Printing on Single Sheets 2-2 Using...
Contents Introduction 1 Features 1 Finding Your Way Around 2 Warnings, Cautions, and Notes 2 Chapter 1 Setting Up the Printer 1-1 Unpacking the Printer 1-2 Choosing a Place for the Printer 1-4 Installing the Ribbon Cartridge 1-5 Plugging in the Printer 1-7 Running the Self Test 1-8 Connecting the Printer to Your Computer 1-11 Setting Up Your Software Programs 1-13 Chapter 2 Paper Handling 2-1 Printing on Single Sheets 2-2 Using...

User Manual
Page 13
Chapter 1 Setting Up the Printer Unpacking the Printer 1-2 Removing the protective materials 1-3 Choosing a Place for the Printer 1-4 Installing the Ribbon Cartridge 1-5 Plugging in the Printer 1-7 Running the Self Test 1-8 Loading paper into the paper cassette 1-8 Running the test 1-11 Connecting the Printer to Your Computer 1-11 Setting Up Your Software Programs 1-13 Printing a test file 1-14 Setting Up the Printer 1-1
Chapter 1 Setting Up the Printer Unpacking the Printer 1-2 Removing the protective materials 1-3 Choosing a Place for the Printer 1-4 Installing the Ribbon Cartridge 1-5 Plugging in the Printer 1-7 Running the Self Test 1-8 Loading paper into the paper cassette 1-8 Running the test 1-11 Connecting the Printer to Your Computer 1-11 Setting Up Your Software Programs 1-13 Printing a test file 1-14 Setting Up the Printer 1-1

User Manual
Page 14
If the label on the back of this printer designed for your country, contact your dealer. 1-2 Setting Up the Printer Unpacking the Printer Your printer box should include these items. printer output guide ribbon cartridge power cord* @ i cable clip push tractor** l In some locations, the power cord is attached to the printer. ** In some countries, the push tractor is an option (part number CSOOZS*). 0t l CAUTION: There are several versions of the printer does not show the correct voltage for different voltages, and it is not possible to change the voltage.
If the label on the back of this printer designed for your country, contact your dealer. 1-2 Setting Up the Printer Unpacking the Printer Your printer box should include these items. printer output guide ribbon cartridge power cord* @ i cable clip push tractor** l In some locations, the power cord is attached to the printer. ** In some countries, the push tractor is an option (part number CSOOZS*). 0t l CAUTION: There are several versions of the printer does not show the correct voltage for different voltages, and it is not possible to change the voltage.

User Manual
Page 15
...materials During shipping, a piece of foam packing, a print head protector, and a piece of the printer cover to lift it off the printer. Use the tabs on both sides of tape protect the printer and paper cassette. Remove the tape that holds down the metal plate in the cassette during shipping.... Note: Store these protective items. 1. Then remove the foam packing and the two protectors from its foam packing. 3. Setting Up the Printer 1-3 Before you use the printer, you must remove these protective items with the other packing materials. Pull the paper cassette out of the...
...materials During shipping, a piece of foam packing, a print head protector, and a piece of the printer cover to lift it off the printer. Use the tabs on both sides of tape protect the printer and paper cassette. Remove the tape that holds down the metal plate in the cassette during shipping.... Note: Store these protective items. 1. Then remove the foam packing and the two protectors from its foam packing. 3. Setting Up the Printer 1-3 Before you use the printer, you must remove these protective items with the other packing materials. Pull the paper cassette out of the...

User Manual
Page 17
... a stand that tilts the printer. Installing the Ribbon Cartridge Before you plan to use a stand that supports at least 10 kg (22 lbs). Use the tabs on both sides of the printer. Then slide the print head to the middle of the printer cover to lift it off the printer. Make sure to a leg... the continuous paper stack so the paper feeds straight into an electrical outlet. 1. Choosing a Place for the Printer If you install the ribbon cartridge, make sure the power cord is not plugged into the tractor's sprocket units. Place cables so they do not interfere with paper feeding; ...
... a stand that tilts the printer. Installing the Ribbon Cartridge Before you plan to use a stand that supports at least 10 kg (22 lbs). Use the tabs on both sides of the printer. Then slide the print head to the middle of the printer cover to lift it off the printer. Make sure to a leg... the continuous paper stack so the paper feeds straight into an electrical outlet. 1. Choosing a Place for the Printer If you install the ribbon cartridge, make sure the power cord is not plugged into the tractor's sprocket units. Place cables so they do not interfere with paper feeding; ...

User Manual
Page 18
... in the direction of the arrow to feed the ribbon into place. They are not necessary for printer operation. 1-6 Setting Up the Printer Insert the ribbon cartridge into the slots. 3. Turn the ribbon-tightening knob to remove any slack in the ribbon. l Disregard the numbers 0 and 1 under the printer cover on the ends of the cartridge firmly...
... in the direction of the arrow to feed the ribbon into place. They are not necessary for printer operation. 1-6 Setting Up the Printer Insert the ribbon cartridge into the slots. 3. Turn the ribbon-tightening knob to remove any slack in the ribbon. l Disregard the numbers 0 and 1 under the printer cover on the ends of the cartridge firmly...

User Manual
Page 19
Plugging in the power cord. Check the label on the printer as shown below; Make sure the power switch on the printer is turned off when the 0 side of your electrical outlet. 01l CAUTION: If the rated voltage and your outlet voltage do not match, contact your ...dealer for assistance. Setting Up the Printer 1-7 Do not plug in the Printer 1. Replace the printer cover by inserting its tabs into the holes on the back of the printer to make sure the voltage required by the printer matches that of the switch is off . then close the cover...
Plugging in the power cord. Check the label on the printer as shown below; Make sure the power switch on the printer is turned off when the 0 side of your electrical outlet. 01l CAUTION: If the rated voltage and your outlet voltage do not match, contact your ...dealer for assistance. Setting Up the Printer 1-7 Do not plug in the Printer 1. Replace the printer cover by inserting its tabs into the holes on the back of the printer to make sure the voltage required by the printer matches that of the switch is off . then close the cover...

User Manual
Page 28
Load paper in Chapter 3. If the printer runs out of -form position on the printer. 2-2 Paper Handling ribbon mask - It is marked by + and - You usually don't need to set the top-of paper during a print job, reload the paper cassette and press ...the LF/FF button to load the paper. The gear adjustment affects only the loaded page. The notches on the ribbon mask indicate the base line of the top and bottom margins. When the printer receives data from 148 mm (5.8 inches) to eject a sheet of -form position with the gear under the...
Load paper in Chapter 3. If the printer runs out of -form position on the printer. 2-2 Paper Handling ribbon mask - It is marked by + and - You usually don't need to set the top-of paper during a print job, reload the paper cassette and press ...the LF/FF button to load the paper. The gear adjustment affects only the loaded page. The notches on the ribbon mask indicate the base line of the top and bottom margins. When the printer receives data from 148 mm (5.8 inches) to eject a sheet of -form position with the gear under the...

User Manual
Page 45
Chapter 3 Using the Printer Operating the Control Panel 3-2 Lights 3-2 Buttons 3-3 Other control-panel features 3-4 Selecting Character Fonts 3-5 Using the Default-Setting Mode 3-5 Changing the default settings 3-7 Default settings 3-13 Maintenance and Transportation 3-16 Cleaning the printer 3-16 Replacing the ribbon cartridge 3-17 Transporting the printer 3-18 Troubleshooting 3-19 Power supply 3-20 Printing 3-20 Paper handling 3-24 Using the Printer 3-1
Chapter 3 Using the Printer Operating the Control Panel 3-2 Lights 3-2 Buttons 3-3 Other control-panel features 3-4 Selecting Character Fonts 3-5 Using the Default-Setting Mode 3-5 Changing the default settings 3-7 Default settings 3-13 Maintenance and Transportation 3-16 Cleaning the printer 3-16 Replacing the ribbon cartridge 3-17 Transporting the printer 3-18 Troubleshooting 3-19 Power supply 3-20 Printing 3-20 Paper handling 3-24 Using the Printer 3-1

User Manual
Page 61
...as well as the case. Contact your dealer or a qualified service person if you use Epson ribbon cartridge S015047 for a few minutes before you need to clean the printer; We recommend that you think lubrication is needed. l Do not spray the inside of... the print head and other ribbon may damage your Epson printer. Their high quality ensures proper operation and long life of the printer with your printer or shorten its life. these chemicals can damage the mechanism. Using any other printer parts. Using the Printer 3-17 Maintenance and Transportation 0...
...as well as the case. Contact your dealer or a qualified service person if you use Epson ribbon cartridge S015047 for a few minutes before you need to clean the printer; We recommend that you think lubrication is needed. l Do not spray the inside of... the print head and other ribbon may damage your Epson printer. Their high quality ensures proper operation and long life of the printer with your printer or shorten its life. these chemicals can damage the mechanism. Using any other printer parts. Using the Printer 3-17 Maintenance and Transportation 0...

User Manual
Page 62
... the cartridge by lifting the posts on either side of the printer. Turn off the printer. To replace the ribbon cartridge, follow the steps in "Installing the Ribbon Cartridge" in the printer's original box. 3-18 Using the Printer Maintenance and Transportation To remove the old ribbon cartridge, first move the print head to the center of it...
... the cartridge by lifting the posts on either side of the printer. Turn off the printer. To replace the ribbon cartridge, follow the steps in "Installing the Ribbon Cartridge" in the printer's original box. 3-18 Using the Printer Maintenance and Transportation To remove the old ribbon cartridge, first move the print head to the center of it...

User Manual
Page 65
... a strange noise, the beeper sounds several times and the READY light goes off the printer and check for a paper jam, a ribbon jam, or other problems. If the printer still does not print correctly, contact your dealer or a qualified service person. (If an error occurs when you try...the bottom. Replace the ribbon cartridge as described earlier in Chapter 1. l The beeper sounds several times, and the printer stops abruptly. Troubleshooting l The printer sounds like it on again. An error has occurred. Using the Printer 3-21 If the READY light stays off the printer and turn it is ...
... a strange noise, the beeper sounds several times and the READY light goes off the printer and check for a paper jam, a ribbon jam, or other problems. If the printer still does not print correctly, contact your dealer or a qualified service person. (If an error occurs when you try...the bottom. Replace the ribbon cartridge as described earlier in Chapter 1. l The beeper sounds several times, and the printer stops abruptly. Troubleshooting l The printer sounds like it on again. An error has occurred. Using the Printer 3-21 If the READY light stays off the printer and turn it is ...

User Manual
Page 66
... described in "Changing the default settings" on the control panel does not print. l A line of dots is missing in the ribbon or the ribbon has come loose. Check that the software is damaged. Your software may be overriding your dealer to replace it. Either there is selected.... Check the font setting in printed characters or graphics. The print head is correctly configured for your printer. Stop printing and contact your...
... described in "Changing the default settings" on the control panel does not print. l A line of dots is missing in the ribbon or the ribbon has come loose. Check that the software is damaged. Your software may be overriding your dealer to replace it. Either there is selected.... Check the font setting in printed characters or graphics. The print head is correctly configured for your printer. Stop printing and contact your...

User Manual
Page 74
...) minimum for a label 0.07 to 0.09 mm (0.0028 to 0.0035 inches) for one sheet 40 to 58 g/m2 (12 to 15 lb) per sheet in ribbon consumption and paper jamming, use a higher grade of paper. Technical Specifications Single sheets (Manual insertion): Width 148 to 257 mm (5.8 to 10.1 inches) Length 92...
...) minimum for a label 0.07 to 0.09 mm (0.0028 to 0.0035 inches) for one sheet 40 to 58 g/m2 (12 to 15 lb) per sheet in ribbon consumption and paper jamming, use a higher grade of paper. Technical Specifications Single sheets (Manual insertion): Width 148 to 257 mm (5.8 to 10.1 inches) Length 92...


