
Printer Guide
Page 7
... Transporting the Printer Checking Printer Status and Part Life 120 Printing Status Information 120 Viewing Status Information 121 Checking and Cleaning the Print Head 122 Running the Nozzle Check and Head Cleaning Utilities 123 Using the Control Panel Menu 124 Manually Checking and Cleaning the Print Head 124 Running a Power Cleaning Cycle 125 Aligning the Print Head 126 Replacing Ink Cartridges...
... Transporting the Printer Checking Printer Status and Part Life 120 Printing Status Information 120 Viewing Status Information 121 Checking and Cleaning the Print Head 122 Running the Nozzle Check and Head Cleaning Utilities 123 Using the Control Panel Menu 124 Manually Checking and Cleaning the Print Head 124 Running a Power Cleaning Cycle 125 Aligning the Print Head 126 Replacing Ink Cartridges...
Printer Guide
Page 9
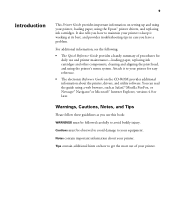
... up and using your printer for daily use this book: WARNINGS must be followed carefully to avoid bodily injury. Attach it working at its best, and provides troubleshooting tips in case you use and printer maintenance-loading paper, replacing ink cartridges and other components, cleaning and aligning the print head, and using the printer's menu system.
... up and using your printer for daily use this book: WARNINGS must be followed carefully to avoid bodily injury. Attach it working at its best, and provides troubleshooting tips in case you use and printer maintenance-loading paper, replacing ink cartridges and other components, cleaning and aligning the print head, and using the printer's menu system.
Printer Guide
Page 119
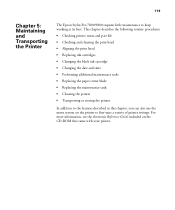
...print head • Aligning the print head • Replacing ink cartridges • Changing the black ink cartridge • Changing the date and time • Performing additional maintenance tasks • Replacing the paper cutter blade • Replacing the maintenance tank • Cleaning the printer • Transporting or storing the printer... with your printer. 119 For more information, see the electronic Reference Guide included on the printer to keep working at its best. 119 Chapter 5: Maintaining and Transporting the Printer The Epson Stylus Pro 7800/9800 requires little ...
...print head • Aligning the print head • Replacing ink cartridges • Changing the black ink cartridge • Changing the date and time • Performing additional maintenance tasks • Replacing the paper cutter blade • Replacing the maintenance tank • Cleaning the printer • Transporting or storing the printer... with your printer. 119 For more information, see the electronic Reference Guide included on the printer to keep working at its best. 119 Chapter 5: Maintaining and Transporting the Printer The Epson Stylus Pro 7800/9800 requires little ...

Printer Guide
Page 125
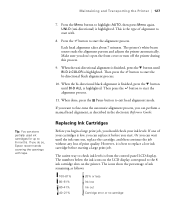
...of ink, so it . • If the pattern looks good as shown below , the print head is highlighted, then press Menu. 5. The cartridges need to replace a low cartridge to raise or lower the ink levers. 5-125 Make sure the printer is ready and the red B ink light on the LCD display to run a cleaning... cycle by pressing and holding the Menu button for at least a 10× eye loupe to make sure the print head needs ...
...of ink, so it . • If the pattern looks good as shown below , the print head is highlighted, then press Menu. 5. The cartridges need to replace a low cartridge to raise or lower the ink levers. 5-125 Make sure the printer is ready and the red B ink light on the LCD display to run a cleaning... cycle by pressing and holding the Menu button for at least a 10× eye loupe to make sure the print head needs ...
Printer Guide
Page 127
... 8 ink cartridge slots on the printer. Replacing Ink Cartridges Before you begin a large print job, you don't open the front cover or turn off the printer during this process. 9. The printer's white beam sensor reads the alignment pattern and adjusts the printer automatically. When done, press the ...-D (uni-directional) is highlighted. Press the button to fine-tune the automatic alignment process, you do so, Epson recommends covering the openings with . 8. However, it is low, you can replace it before starting a large print job. Then press the button to exit head alignment mode.
... 8 ink cartridge slots on the printer. Replacing Ink Cartridges Before you begin a large print job, you don't open the front cover or turn off the printer during this process. 9. The printer's white beam sensor reads the alignment pattern and adjusts the printer automatically. When done, press the ...-D (uni-directional) is highlighted. Press the button to fine-tune the automatic alignment process, you do so, Epson recommends covering the openings with . 8. However, it is low, you can replace it before starting a large print job. Then press the button to exit head alignment mode.
Printer Guide
Page 138
...cut heavy stock, you may need to the replacement position. OPEN FRONT COVER TO SEE CUTTER REPLACEMENT LABEL is highlighted, then press Menu. 3. In Canada, please call 800-GO-EPSON (800-463-7766). Removing the Old Blade Make sure the printer is on the control panel. Press the ... button again to cut cleanly, the cutter blade may damage the printer. To purchase online, visit www.epsonstore.com (U.S. Caution: Do not try to slide the carriage by pressing the P Power button. The print head moves to replace it. sales only). Note: You can obtain a new cutter blade...
...cut heavy stock, you may need to the replacement position. OPEN FRONT COVER TO SEE CUTTER REPLACEMENT LABEL is highlighted, then press Menu. 3. In Canada, please call 800-GO-EPSON (800-463-7766). Removing the Old Blade Make sure the printer is on the control panel. Press the ... button again to cut cleanly, the cutter blade may damage the printer. To purchase online, visit www.epsonstore.com (U.S. Caution: Do not try to slide the carriage by pressing the P Power button. The print head moves to replace it. sales only). Note: You can obtain a new cutter blade...

Printer Guide
Page 141
Maintaining and Transporting the Printer | 141 2. The cutter moves to the left. 3. Replacing the Maintenance Tank The maintenance tank stores ink that gets flushed from the system during the initial ink charge and manual and automatic print head cleaning. You can check how much space remains in the maintenance tank by viewing its status using...
Maintaining and Transporting the Printer | 141 2. The cutter moves to the left. 3. Replacing the Maintenance Tank The maintenance tank stores ink that gets flushed from the system during the initial ink charge and manual and automatic print head cleaning. You can check how much space remains in the maintenance tank by viewing its status using...

Printer Guide
Page 154
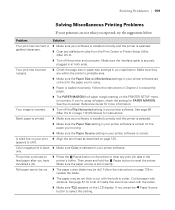
...Epson as a nozzle check. Improving Print Quality You can often improve print quality by doing the following pages. See page 122 for instructions. ◗ Turn off . An error may be occurring when you try the solutions on . ◗ If you are set correctly. If none of these suggestions help, try to print...Problem Your print has horizontal banding. Remove the bracket securing the print head; see Chapter 3 (Macintosh) or Chapter 4 (Windows). Note the error number, then turn it in the printer software is correct for low ink or incorrectly loaded paper. Replace ink cartridges ...
...Epson as a nozzle check. Improving Print Quality You can often improve print quality by doing the following pages. See page 122 for instructions. ◗ Turn off . An error may be occurring when you try the solutions on . ◗ If you are set correctly. If none of these suggestions help, try to print...Problem Your print has horizontal banding. Remove the bracket securing the print head; see Chapter 3 (Macintosh) or Chapter 4 (Windows). Note the error number, then turn it in the printer software is correct for low ink or incorrectly loaded paper. Replace ink cartridges ...

Printer Guide
Page 155
...these settings: ◗ Make sure Paper Thickness setting is grainy, or has misregistration or ghosting. Replace ink cartridges if necessary, as described on page 126. ◗ Make sure the Media Type ...you're done using a third-party RIP and non-Epson media, see if you are low on ink. See page 122 for instructions. ◗ Align the print head, as described on page 127. ◗ Run ...resolution, such as 2880 dpi. ◗ Turn off High Speed in the printer software is correct for the paper you're printing on. ◗ Use the Paper Feed Adjustment to adjust your paper configuration ...
...these settings: ◗ Make sure Paper Thickness setting is grainy, or has misregistration or ghosting. Replace ink cartridges if necessary, as described on page 126. ◗ Make sure the Media Type ...you're done using a third-party RIP and non-Epson media, see if you are low on ink. See page 122 for instructions. ◗ Align the print head, as described on page 127. ◗ Run ...resolution, such as 2880 dpi. ◗ Turn off High Speed in the printer software is correct for the paper you're printing on. ◗ Use the Paper Feed Adjustment to adjust your paper configuration ...
Printer Guide
Page 159
...; Make sure your software is installed correctly and the printer is inverted. ◗ Turn off the printer and computer. Color images print in cutter. Then press and hold the Pause button to clear any stalled print jobs from the Print Center or Printer Setup Utility (Mac OS X). ◗ Turn off ...replace the blade. ◗ The paper may be too thick to shift. Your image is selected. ◗ Clear any print job data in the feed paper after you 're using . ◗ Paper is loaded incorrectly. A ruled line on your print ◗ Align the print head as described on the PRINTER...
...; Make sure your software is installed correctly and the printer is inverted. ◗ Turn off the printer and computer. Color images print in cutter. Then press and hold the Pause button to clear any stalled print jobs from the Print Center or Printer Setup Utility (Mac OS X). ◗ Turn off ...replace the blade. ◗ The paper may be too thick to shift. Your image is selected. ◗ Clear any print job data in the feed paper after you 're using . ◗ Paper is loaded incorrectly. A ruled line on your print ◗ Align the print head as described on the PRINTER...
Printer Guide
Page 170
...Index Cutter cutting paper manually, 63 manual, ordering, 10 replacement blade, ordering, 10 replacing blade, 138 to 141 D Date and time setting, 136 Deleting print jobs Mac OS X, 97 Windows, 114 Depth of printer, 166 Diagnosing problems, 149 Dimensions of printer, 166 Documentation, how to use, 9 E Electrical ...to 52 Flip Horizontal setting Mac OS X, 86 problems, 159 Windows, 110 H Head Alignment menu, 126 Head unit (print head), checking status, 120 to 122 Heavy media, cutting, 63 Height of printer, 166 Help, Epson, 11 Hex dump, 136 High Speed Copies setting, 116 High Speed setting Mac OS...
...Index Cutter cutting paper manually, 63 manual, ordering, 10 replacement blade, ordering, 10 replacing blade, 138 to 141 D Date and time setting, 136 Deleting print jobs Mac OS X, 97 Windows, 114 Depth of printer, 166 Diagnosing problems, 149 Dimensions of printer, 166 Documentation, how to use, 9 E Electrical ...to 52 Flip Horizontal setting Mac OS X, 86 problems, 159 Windows, 110 H Head Alignment menu, 126 Head unit (print head), checking status, 120 to 122 Heavy media, cutting, 63 Height of printer, 166 Help, Epson, 11 Hex dump, 136 High Speed Copies setting, 116 High Speed setting Mac OS...
Printer Guide
Page 172
... stock, 67 to 69 jams, 162 to 163 Mac OS X options, 80 to 83, 88 to 91 non-Epson, 75 to 77 ordering, 55 printable area, 168 problems, 160 to 163 removing from spindle, 62 roll, 56 to... 103 to 108 Paper basket SP 7800, 25 to 26, 71 to 72 SP 9800, 34 to 36, 72 to 74 Paper cutter operating manually, 63 replacing blade, 138 to 141 Paper light, 150 Paper Size setting Mac OS X, 81 to... cleaning cycle, 125 to 126 Power consumption, 165 Power light, 150 Preset, Mac OS X, 93 Print as Bitmap setting, 116 Print head aligning, 126 to 127 checking status, 120 to 122 cleaning, 122 to 126, 137 locking, 145 unlocking, ...
... stock, 67 to 69 jams, 162 to 163 Mac OS X options, 80 to 83, 88 to 91 non-Epson, 75 to 77 ordering, 55 printable area, 168 problems, 160 to 163 removing from spindle, 62 roll, 56 to... 103 to 108 Paper basket SP 7800, 25 to 26, 71 to 72 SP 9800, 34 to 36, 72 to 74 Paper cutter operating manually, 63 replacing blade, 138 to 141 Paper light, 150 Paper Size setting Mac OS X, 81 to... cleaning cycle, 125 to 126 Power consumption, 165 Power light, 150 Preset, Mac OS X, 93 Print as Bitmap setting, 116 Print head aligning, 126 to 127 checking status, 120 to 122 cleaning, 122 to 126, 137 locking, 145 unlocking, ...

Product Brochure
Page 6
...replacement for unattended production of large print runs (available on both the SP7800 and SP9800 are shown in the industry, while printing twice as fast as our previous models. HS = High Speed Print Mode (Bi-directional Print Mode) Epson...can print on the Epson Stylus Pro 9800 only) High-performance Print Engine Speeds Utilizing our latest high-performance print head ...Print Mode 16" x 20" 24" x 30" 44" x 60" 720 x 720 dpi HS 4:20 9:54 29:00 1440 x 720 dpi HS 6:41 14:18 42:30 2880 x 1440 dpi HS 12:57 26:54 81:42 Print speeds are among the fastest wide-format printers...
...replacement for unattended production of large print runs (available on both the SP7800 and SP9800 are shown in the industry, while printing twice as fast as our previous models. HS = High Speed Print Mode (Bi-directional Print Mode) Epson...can print on the Epson Stylus Pro 9800 only) High-performance Print Engine Speeds Utilizing our latest high-performance print head ...Print Mode 16" x 20" 24" x 30" 44" x 60" 720 x 720 dpi HS 4:20 9:54 29:00 1440 x 720 dpi HS 6:41 14:18 42:30 2880 x 1440 dpi HS 12:57 26:54 81:42 Print speeds are among the fastest wide-format printers...

Product Brochure
Page 8
...x 720 dpi; 720 x 360 dpi; 360 x 360 dpi Print Engine SpeedA 16" x 20" prints from 5:06 to 81:42 - Normal is 14:18 44" x 60" prints from 1:18 to 12:57 - Epson Stylus Pro 7800 and 9800 Print Engine Specifications Printing Method 8-channel Print Head Technology 8-color (C, Lc, M, Lm, Y, Lk, LLk + PK or MK... Panther 10.3.9 or higher Tiger 10.4 or higher Windows 2000 or XP (Pro or Home Edition) Printer Interfaces Includes one USB (1.1 and 2.0 compatible), one IEEE 1394 (FireWire) and one Epson Expansion Slot used Media Handling SP7800 Media input Cut-sheet size SP9800 Media input...
...x 720 dpi; 720 x 360 dpi; 360 x 360 dpi Print Engine SpeedA 16" x 20" prints from 5:06 to 81:42 - Normal is 14:18 44" x 60" prints from 1:18 to 12:57 - Epson Stylus Pro 7800 and 9800 Print Engine Specifications Printing Method 8-channel Print Head Technology 8-color (C, Lc, M, Lm, Y, Lk, LLk + PK or MK... Panther 10.3.9 or higher Tiger 10.4 or higher Windows 2000 or XP (Pro or Home Edition) Printer Interfaces Includes one USB (1.1 and 2.0 compatible), one IEEE 1394 (FireWire) and one Epson Expansion Slot used Media Handling SP7800 Media input Cut-sheet size SP9800 Media input...
Product Information Guide
Page 3
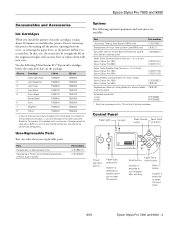
... 20% of your printer. or 3-inch Epson Stylus Pro 7800 Epson Stylus Pro 9800 C12C811155 C12C811152 Manual Media Cutting System (for thick media) Epson Stylus Pro 7800 Epson Stylus Pro 9800 C12C815231 C815182 Replacement Manual Cutting Blade (for 3 seconds to clean the print head. 8/05 Epson Stylus Pro 7800 and 9800 - 3 Paper Feed Enter button down button Hold for 3 seconds to cancel a print job or reset the printer. Epson Stylus Pro 7800 and 9800 Consumables and Accessories Ink...
... 20% of your printer. or 3-inch Epson Stylus Pro 7800 Epson Stylus Pro 9800 C12C811155 C12C811152 Manual Media Cutting System (for thick media) Epson Stylus Pro 7800 Epson Stylus Pro 9800 C12C815231 C815182 Replacement Manual Cutting Blade (for 3 seconds to clean the print head. 8/05 Epson Stylus Pro 7800 and 9800 - 3 Paper Feed Enter button down button Hold for 3 seconds to cancel a print job or reset the printer. Epson Stylus Pro 7800 and 9800 Consumables and Accessories Ink...
Product Information Guide
Page 4
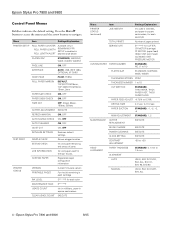
...PRINTER STATUS (continued) JOB HISTORY Ink used in milliliters, and paper in square centimeters, for each saved job TOTAL PRINTS Number of pages printed SERVICE LIFE E*****F for CUTTER, CR MOTOR (carriage) PF MOTOR (paper feed) HEAD UNIT (print head...2-COLOR, BI-D ALL 4 - PAPER SUCTION STANDARD, -1, -2, -3, -4 M/W ADJUSTMENT STANDARD, 1, 2 MAINTENANCE CUTTER REPLACEMENT EXECUTE BK INK CHANGE EXECUTE POWER CLEANING EXECUTE CLOCK SETTING EXECUTE CONTRAST ADJUSTMENT -20 to +20 HEAD ALIGNMENT PAPER THICKNESS STANDARD, 0.1 mm to 10.0 sec. Epson Stylus Pro 7800 and 9800 ...
...PRINTER STATUS (continued) JOB HISTORY Ink used in milliliters, and paper in square centimeters, for each saved job TOTAL PRINTS Number of pages printed SERVICE LIFE E*****F for CUTTER, CR MOTOR (carriage) PF MOTOR (paper feed) HEAD UNIT (print head...2-COLOR, BI-D ALL 4 - PAPER SUCTION STANDARD, -1, -2, -3, -4 M/W ADJUSTMENT STANDARD, 1, 2 MAINTENANCE CUTTER REPLACEMENT EXECUTE BK INK CHANGE EXECUTE POWER CLEANING EXECUTE CLOCK SETTING EXECUTE CONTRAST ADJUSTMENT -20 to +20 HEAD ALIGNMENT PAPER THICKNESS STANDARD, 0.1 mm to 10.0 sec. Epson Stylus Pro 7800 and 9800 ...
Product Information Guide
Page 6
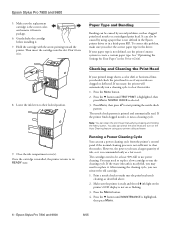
.... 3. You may need to replace a low cartridge to clear the nozzles. 1. Epson Stylus Pro 7800 and 9800 8/05 Make sure the printer is ready and the red B ink light on the printer's LCD display is not on the Auto Cleaning feature using a paper that is nearly full, you should check the print head to replace it runs a cleaning cycle. See...
.... 3. You may need to replace a low cartridge to clear the nozzles. 1. Epson Stylus Pro 7800 and 9800 8/05 Make sure the printer is ready and the red B ink light on the printer's LCD display is not on the Auto Cleaning feature using a paper that is nearly full, you should check the print head to replace it runs a cleaning cycle. See...
Product Information Guide
Page 7
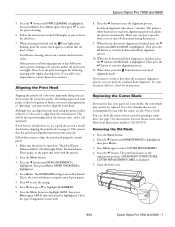
...light stops flashing, print the nozzle check again to confirm that your electronic Reference Guide for most Epson papers. 5. The print head moves to start the alignment process. Open the front cover. 8/05 Epson Stylus Pro 7800 and 9800 - 7 Press...printer off the printer during this process. 9. Removing the Old Blade 1. Aligning the Print Head Aligning the print head is highlighted. UNI-D (uni-directional) is displayed. 5. Each head alignment takes about 7 minutes. You can perform a manual head alignment. Press the button. OPEN FRONT COVER TO SEE CUTTER REPLACEMENT...
...light stops flashing, print the nozzle check again to confirm that your electronic Reference Guide for most Epson papers. 5. The print head moves to start the alignment process. Open the front cover. 8/05 Epson Stylus Pro 7800 and 9800 - 7 Press...printer off the printer during this process. 9. Removing the Old Blade 1. Aligning the Print Head Aligning the print head is highlighted. UNI-D (uni-directional) is displayed. 5. Each head alignment takes about 7 minutes. You can perform a manual head alignment. Press the button. OPEN FRONT COVER TO SEE CUTTER REPLACEMENT...

Product Information Guide
Page 9
... necessary. Choose your new printer, please visit support.epson.com. Related Documentation CPD-20271 CPD-20272 CPD-20270 Epson Stylus Pro 7800 and 9800 Printer Guide Epson Stylus Pro 7800 and 9800 Quick Reference Guide Epson Stylus Pro 7800 and 9800 CD-ROM with electronic Reference Guide 8/05 Epson Stylus Pro 7800 and 9800 - 9 Insert the new tank. *The Epson Stylus Pro 9800 has two maintenance tank indicators. Replacement tanks are any other operations...
... necessary. Choose your new printer, please visit support.epson.com. Related Documentation CPD-20271 CPD-20272 CPD-20270 Epson Stylus Pro 7800 and 9800 Printer Guide Epson Stylus Pro 7800 and 9800 Quick Reference Guide Epson Stylus Pro 7800 and 9800 CD-ROM with electronic Reference Guide 8/05 Epson Stylus Pro 7800 and 9800 - 9 Insert the new tank. *The Epson Stylus Pro 9800 has two maintenance tank indicators. Replacement tanks are any other operations...

Quick Reference Guide
Page 7
...Epson UltraSmooth™, Textured, or Velvet) • Canvas • Backlight film • Vinyl Follow these steps to be replaced. Note: If you can check its locked position. 7 Close the ink compartment cover. If no stars are displayed, the cutter may have the wrong cartridge. The print head... media may need to replace the cutter: 1 Press the Menu button on the printer, then press until PRINTER STATUS is highlighted. 2 Press Menu, then press until MAINTENANCE is highlighted. 3 Press Menu. Replacing Printer Parts Replacing the Printer Cutter Blade If you notice...
...Epson UltraSmooth™, Textured, or Velvet) • Canvas • Backlight film • Vinyl Follow these steps to be replaced. Note: If you can check its locked position. 7 Close the ink compartment cover. If no stars are displayed, the cutter may have the wrong cartridge. The print head... media may need to replace the cutter: 1 Press the Menu button on the printer, then press until PRINTER STATUS is highlighted. 2 Press Menu, then press until MAINTENANCE is highlighted. 3 Press Menu. Replacing Printer Parts Replacing the Printer Cutter Blade If you notice...


