Quick Reference Guide
Page 2
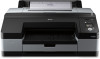
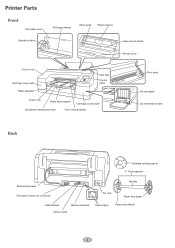
Printer Parts Front Roll paper cover Spindle holders Roll paper feeder Edge guide Paper support Rear manual feeder Printer cover Front cover Cartridge cover (left) Paper cassette Alert light Control panel Output tray Paper eject support Cartridge cover (right) Borderfree maintenance tank Front manual feeder Print head Ink cartridges Ink maintenance tank Back Bordless printing spacer 3" Core adapters Rear access panel Roll paper holder unit connector AC inlet Spindle Paper stop (gray) USB interface Network interface Airflow vents Status lights Paper stop (black) 1
Printer Parts Front Roll paper cover Spindle holders Roll paper feeder Edge guide Paper support Rear manual feeder Printer cover Front cover Cartridge cover (left) Paper cassette Alert light Control panel Output tray Paper eject support Cartridge cover (right) Borderfree maintenance tank Front manual feeder Print head Ink cartridges Ink maintenance tank Back Bordless printing spacer 3" Core adapters Rear access panel Roll paper holder unit connector AC inlet Spindle Paper stop (gray) USB interface Network interface Airflow vents Status lights Paper stop (black) 1
Quick Reference Guide
Page 5
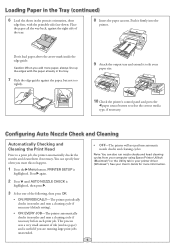
...of ink (and no paper) and is useful if you add more information. 4 You can also run nozzle checks and head cleaning cycles from your computer using Epson Printer Utility4 (Macintosh®) or the Utility tab in the portrait orientation, short edge first, with the paper already in the... and press the paper source button to select the correct media type, if necessary. Configuring Auto Nozzle Check and Cleaning Automatically Checking and Cleaning the Print Head Prior to happen. 1 Press the Menu button. Loading Paper in the Tray (continued) 6 Load the sheets in your User's Guide for more...
...of ink (and no paper) and is useful if you add more information. 4 You can also run nozzle checks and head cleaning cycles from your computer using Epson Printer Utility4 (Macintosh®) or the Utility tab in the portrait orientation, short edge first, with the paper already in the... and press the paper source button to select the correct media type, if necessary. Configuring Auto Nozzle Check and Cleaning Automatically Checking and Cleaning the Print Head Prior to happen. 1 Press the Menu button. Loading Paper in the Tray (continued) 6 Load the sheets in your User's Guide for more...
Quick Reference Guide
Page 6
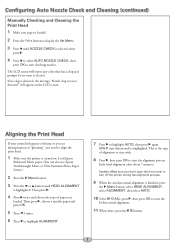
... the message "Nozzle clog was not detected" will report any color that has a clog and prompt if you loaded. Load Epson Enhanced Matte paper. (You can also use Epson Doubleweight Matte or Ultra Premium Photo Paper Luster.) 2 Press the Menu button. 3 Press the or button until NOZZLE CHECK is... and press OK. 5 Press 3 times. 6 Press to highlight ALIGNMENT. 7 Press to start the alignment process. Caution: Make sure you need to align the print head. 1 Make sure the printer is the type of paper you want to clean it. The LCD screen will appear on . UNI-D (uni-directional) is finished...
... the message "Nozzle clog was not detected" will report any color that has a clog and prompt if you loaded. Load Epson Enhanced Matte paper. (You can also use Epson Doubleweight Matte or Ultra Premium Photo Paper Luster.) 2 Press the Menu button. 3 Press the or button until NOZZLE CHECK is... and press OK. 5 Press 3 times. 6 Press to highlight ALIGNMENT. 7 Press to start the alignment process. Caution: Make sure you need to align the print head. 1 Make sure the printer is the type of paper you want to clean it. The LCD screen will appear on . UNI-D (uni-directional) is finished...
Users Guide
Page 7
... Printer Driver 117 Checking and Cleaning the Print Head 118 Running the Nozzle Check and Head Cleaning Utilities 118 Checking and Cleaning the Print Head Using the Control Panel . . 120 Automatically Checking and Cleaning the Print Head 121 Manually Checking and Cleaning the Print Head 121 Running Cleaning Cycles 122 Aligning the Print Head 123 Replacing Ink Cartridges 124 Changing the...
... Printer Driver 117 Checking and Cleaning the Print Head 118 Running the Nozzle Check and Head Cleaning Utilities 118 Checking and Cleaning the Print Head Using the Control Panel . . 120 Automatically Checking and Cleaning the Print Head 121 Manually Checking and Cleaning the Print Head 121 Running Cleaning Cycles 122 Aligning the Print Head 123 Replacing Ink Cartridges 124 Changing the...

Users Guide
Page 9
... for daily use this book: WARNINGS must be observed to avoid damage to keep it to your printer to your printer, loading paper, using the Epson printer drivers, and replacing ink cartridges. Attach it working at its best, and provides troubleshooting tips in case you have a problem. 9 Introduction This User's Guide... using the printer's menu system. It also tells you use and printer maintenance-loading paper, replacing ink cartridges and other components, cleaning and aligning the print head, and using your printer on a network.
... for daily use this book: WARNINGS must be observed to avoid damage to keep it to your printer to your printer, loading paper, using the Epson printer drivers, and replacing ink cartridges. Attach it working at its best, and provides troubleshooting tips in case you have a problem. 9 Introduction This User's Guide... using the printer's menu system. It also tells you use and printer maintenance-loading paper, replacing ink cartridges and other components, cleaning and aligning the print head, and using your printer on a network.

Users Guide
Page 14
...result in fire or electric shock. • The printer's power cord is designed for use an extension cord with the printer, make sure the print head is in the far right (home) position. 14 Also, make sure the total ampere rating of all devices plugged into the extension cord does... Avoid using electrical outlets controlled by an Epson service technician; Using it with other equipment may result in the printer's case. • Do not put your hand inside the printer or touch the ink cartridges during printing. • Do not move the print head by hand unless instructed to do so by...
...result in fire or electric shock. • The printer's power cord is designed for use an extension cord with the printer, make sure the print head is in the far right (home) position. 14 Also, make sure the total ampere rating of all devices plugged into the extension cord does... Avoid using electrical outlets controlled by an Epson service technician; Using it with other equipment may result in the printer's case. • Do not put your hand inside the printer or touch the ink cartridges during printing. • Do not move the print head by hand unless instructed to do so by...

Users Guide
Page 15
... Doing so may apply, See www.dtsc.ca.gov/hazardouswaste/perchlorate. This could damage the print head. • After bringing an ink cartridge inside from a cold storage site, allow it to warm up the ink cartridge within six months of installation for ... a cool, dark place. • If ink gets on your eyes, flush them for best results. • Do not use an ink cartridge beyond the date printed on the cartridge carton. • Use up at room temperature for at least three hours before installing them immediately with soap and water. Introduction | 15...
... Doing so may apply, See www.dtsc.ca.gov/hazardouswaste/perchlorate. This could damage the print head. • After bringing an ink cartridge inside from a cold storage site, allow it to warm up the ink cartridge within six months of installation for ... a cool, dark place. • If ink gets on your eyes, flush them for best results. • Do not use an ink cartridge beyond the date printed on the cartridge carton. • Use up at room temperature for at least three hours before installing them immediately with soap and water. Introduction | 15...

Users Guide
Page 16
16 | Introduction Printer Parts Front Spindle holders Roll paper cover Front cover Roll paper feeder Edge guide Paper support Rear manual feeder Printer cover Cartridge cover (left) Paper cassette Output tray Paper eject support Cartridge cover (right) Borderfree maintenance tank Front manual feeder Ink maintenance tank Print head Ink cartridges Back Rear access panel Borderless printing spacer 3-inch core adapters Roll paper holder unit connector USB interface Airflow vents Network interface AC inlet Spindle Paper stop Status lights (black) Paper stop (gray) 16
16 | Introduction Printer Parts Front Spindle holders Roll paper cover Front cover Roll paper feeder Edge guide Paper support Rear manual feeder Printer cover Cartridge cover (left) Paper cassette Output tray Paper eject support Cartridge cover (right) Borderfree maintenance tank Front manual feeder Ink maintenance tank Print head Ink cartridges Back Rear access panel Borderless printing spacer 3-inch core adapters Roll paper holder unit connector USB interface Airflow vents Network interface AC inlet Spindle Paper stop Status lights (black) Paper stop (gray) 16

Users Guide
Page 48
... appear on 3-inch core paper or wider paper. The or roll icon appears on the LCD screen. • Choose if you notice head strike marks or paper jams when printing on this type of the paper and it comes out of the paper due to strike the surface of the printer. Roll... cut . 48 Caution: Some 2-inch core roll paper at widths smaller than 10" may cause the print head to paper curling. This will damage the paper by leaving scratch marks on the surface of paper, Epson recommends printing on the LCD screen. Press OK. Press the l Paper Source button and press d to 17 inches...
... appear on 3-inch core paper or wider paper. The or roll icon appears on the LCD screen. • Choose if you notice head strike marks or paper jams when printing on this type of the paper and it comes out of the paper due to strike the surface of the printer. Roll... cut . 48 Caution: Some 2-inch core roll paper at widths smaller than 10" may cause the print head to paper curling. This will damage the paper by leaving scratch marks on the surface of paper, Epson recommends printing on the LCD screen. Press OK. Press the l Paper Source button and press d to 17 inches...

Users Guide
Page 55
...buttons to match the cutting position on the paper with the cutting position on the left side of the narrow or wide setting. you print on non-Epson media, you may also need to change the setting back to adjust the platen gap setting. A checkmark appears next to display PLATEN... paper configuration to save the setting. However, if print quality is displayed as the current setting. 4. Adjusting the Platen Gap for more information. 55 STANDARD is not satisfactory when using very thin or very thick stock, you of the print head. 4. Press the Menu button. See the following ...
...buttons to match the cutting position on the paper with the cutting position on the left side of the narrow or wide setting. you print on non-Epson media, you may also need to change the setting back to adjust the platen gap setting. A checkmark appears next to display PLATEN... paper configuration to save the setting. However, if print quality is displayed as the current setting. 4. Adjusting the Platen Gap for more information. 55 STANDARD is not satisfactory when using very thin or very thick stock, you of the print head. 4. Press the Menu button. See the following ...

Users Guide
Page 57
...TIME lets you print with the most even lines. You can also make the print head wait up to 10 seconds after each setting. The printer prints a pattern similar to save each pass to allow ink to enable or disable paper skew reduction. 57 Choose the number with non-Epson media and avoid... smearing the ink. After printing the pattern, THICKNESS NUMBER...
...TIME lets you print with the most even lines. You can also make the print head wait up to 10 seconds after each setting. The printer prints a pattern similar to save each pass to allow ink to enable or disable paper skew reduction. 57 Choose the number with non-Epson media and avoid... smearing the ink. After printing the pattern, THICKNESS NUMBER...

Users Guide
Page 75
Change the value if you find wrinkles on the page. • Paper Feed Adjustment helps reduce banding. When you print with non-Epson media and avoid smearing the ink. Printing With Epson Drivers for Windows | 75 • Color Density lets you control the ink saturation level (for example, when you turn ... lets you fine-tune the setting for various paper thicknesses. • Roll Paper Back Tension lets you adjust the tension when printing on roll paper. You can make the print head wait up to 5 seconds after each pass to allow ink to dry on your printouts when Auto is selected. 3. Choose...
Change the value if you find wrinkles on the page. • Paper Feed Adjustment helps reduce banding. When you print with non-Epson media and avoid smearing the ink. Printing With Epson Drivers for Windows | 75 • Color Density lets you control the ink saturation level (for example, when you turn ... lets you fine-tune the setting for various paper thicknesses. • Roll Paper Back Tension lets you adjust the tension when printing on roll paper. You can make the print head wait up to 5 seconds after each pass to allow ink to dry on your printouts when Auto is selected. 3. Choose...

Users Guide
Page 85
...85 Use this setting if print speed is extremely slow or the print head stops for older computers, and ensures that restrict the number of your output. • Change Standard Resolution allows you can print. • Print as Bitmap allows large or complex vector graphics to print faster in applications (such... the halftone output processing to save your output. 3. This feature speeds up processing, especially for a few minutes while printing. Click OK to be performed by rendering the entire page. Printing With Epson Drivers for Windows | 85 • Page Rendering Mode speeds...
...85 Use this setting if print speed is extremely slow or the print head stops for older computers, and ensures that restrict the number of your output. • Change Standard Resolution allows you can print. • Print as Bitmap allows large or complex vector graphics to print faster in applications (such... the halftone output processing to save your output. 3. This feature speeds up processing, especially for a few minutes while printing. Click OK to be performed by rendering the entire page. Printing With Epson Drivers for Windows | 85 • Page Rendering Mode speeds...

Users Guide
Page 95
... a higher value if you see dark lines. 95 Select Advanced Media Control from the drop-down menu. You can make the print head wait up to 5 seconds after each pass to allow ink to optimize D-max and color gamut. These settings override any paper configuration settings ...8226; Color Density lets you control the ink saturation level. • Drying Time per Print Head Pass lets you print with non-Epson media and avoid smearing the ink. Printing With Epson Drivers for OS X | 95 Note: You may have made using non-Epson media and you need to fine-tune its performance. 1. Choose a lower value if...
... a higher value if you see dark lines. 95 Select Advanced Media Control from the drop-down menu. You can make the print head wait up to 5 seconds after each pass to allow ink to optimize D-max and color gamut. These settings override any paper configuration settings ...8226; Color Density lets you control the ink saturation level. • Drying Time per Print Head Pass lets you print with non-Epson media and avoid smearing the ink. Printing With Epson Drivers for OS X | 95 Note: You may have made using non-Epson media and you need to fine-tune its performance. 1. Choose a lower value if...
Users Guide
Page 115
... The Epson Stylus Pro 4900 requires little maintenance to the features described in this chapter, you can check the amount of ink remaining, the total number of prints, and the status of printer settings. This chapter describes the following routine procedures: • Checking printer status and part life • Checking and cleaning the print head...
... The Epson Stylus Pro 4900 requires little maintenance to the features described in this chapter, you can check the amount of ink remaining, the total number of prints, and the status of printer settings. This chapter describes the following routine procedures: • Checking printer status and part life • Checking and cleaning the print head...

Users Guide
Page 118
...; OS X: Open the EPSON Printer Utility4 in your printer icon and select Printing Preferences. Running the Nozzle Check and Head Cleaning Utilities Follow these steps to use your printed image shows a color shift or horizontal lines, you should check the print head to check the print head nozzles and clean them if..., and click Devices and Printers. Make sure paper is loaded in the print job window or the icon on Auto Nozzle Check from the printer's control panel. Checking and Cleaning the Print Head If your printer software to see if any nozzles are clogged or deflected....
...; OS X: Open the EPSON Printer Utility4 in your printer icon and select Printing Preferences. Running the Nozzle Check and Head Cleaning Utilities Follow these steps to use your printed image shows a color shift or horizontal lines, you should check the print head to check the print head nozzles and clean them if..., and click Devices and Printers. Make sure paper is loaded in the print job window or the icon on Auto Nozzle Check from the printer's control panel. Checking and Cleaning the Print Head If your printer software to see if any nozzles are clogged or deflected....

Users Guide
Page 119
... 10× eye loupe to make sure the nozzles are clean. • If the nozzles are missing or deflected, as shown below , the print head is loaded in the printer. • If any dots or segments are still clogged after three cleaning cycles, run a power cleaning cycle as described ...on page 122. Maintaining and Transporting the Printer | 119 You see a menu like the following: Windows OS X 3. Then print another nozzle check pattern to examine it. • If the pattern looks good, as shown below , run a cleaning cycle while thick media is clean. ...
... 10× eye loupe to make sure the nozzles are clean. • If the nozzles are missing or deflected, as shown below , the print head is loaded in the printer. • If any dots or segments are still clogged after three cleaning cycles, run a power cleaning cycle as described ...on page 122. Maintaining and Transporting the Printer | 119 You see a menu like the following: Windows OS X 3. Then print another nozzle check pattern to examine it. • If the pattern looks good, as shown below , run a cleaning cycle while thick media is clean. ...

Users Guide
Page 120
...press OK to run a cleaning cycle as shown below , the print head is loaded in the printer. Caution: Don't run a cleaning cycle while thick media is clean. Then print another nozzle check pattern to start printing the nozzle check pattern. 120 | Maintaining and Transporting the Printer... Checking and Cleaning the Print Head Using the Control Panel You can run a cleaning cycle if necessary. 1. ...
...press OK to run a cleaning cycle as shown below , the print head is loaded in the printer. Caution: Don't run a cleaning cycle while thick media is clean. Then print another nozzle check pattern to start printing the nozzle check pattern. 120 | Maintaining and Transporting the Printer... Checking and Cleaning the Print Head Using the Control Panel You can run a cleaning cycle if necessary. 1. ...

Users Guide
Page 121
... 121 Press r Menu. Press l, then select PRINT NOZZLE PATTERN and press r. 5. Press the button to have a nozzle check pattern printed on a regular basis, so you print on roll paper. 6. Press r again. 2. Manually Checking and Cleaning the Print Head 1. Make sure paper is selected. Press d ... to display the Ink Menu. 3. Press OK to a print job, the printer automatically checks the nozzles and cleans them if necessary. Maintaining and Transporting the Printer | 121 Automatically Checking and Cleaning the Print Head Prior to save the setting. You can check it yourself....
... 121 Press r Menu. Press l, then select PRINT NOZZLE PATTERN and press r. 5. Press the button to have a nozzle check pattern printed on a regular basis, so you print on roll paper. 6. Press r again. 2. Manually Checking and Cleaning the Print Head 1. Make sure paper is selected. Press d ... to display the Ink Menu. 3. Press OK to a print job, the printer automatically checks the nozzles and cleans them if necessary. Maintaining and Transporting the Printer | 121 Automatically Checking and Cleaning the Print Head Prior to save the setting. You can check it yourself....

Users Guide
Page 122
...it is recommended only as described on page 121. 2. The power cycle uses a large quantity of ink colors. Print a nozzle check to clear the nozzles. Press d to select EXECUTE or EXECUTE (POWERFUL), then press OK to...is ready and the red B Ink Check light on the printer's control panel is not sufficient to make sure the print head needs cleaning, as a last resort. Do one of the following: • Choose the color pair you want ...types of cleaning cycles from the control panel (or from the Epson LFP Remote Panel): normal cleaning, power cleaning, and cleaning each pair of ink, so it .
...it is recommended only as described on page 121. 2. The power cycle uses a large quantity of ink colors. Print a nozzle check to clear the nozzles. Press d to select EXECUTE or EXECUTE (POWERFUL), then press OK to...is ready and the red B Ink Check light on the printer's control panel is not sufficient to make sure the print head needs cleaning, as a last resort. Do one of the following: • Choose the color pair you want ...types of cleaning cycles from the control panel (or from the Epson LFP Remote Panel): normal cleaning, power cleaning, and cleaning each pair of ink, so it .


