Printer Guide
Page 7
... Aligning the Print Head 99 Replacing Ink Cartridges 100 Performing Additional Maintenance Tasks 105 Changing the Date and Time 105 Using the Maintenance Mode 105 Replacing the Paper Cutter Blade 107 Replacing the Maintenance Tank 109 Cleaning the Printer 111 Transporting or Storing the Printer 111 Preparing the Printer for Shipment 112 Setting Up the...
... Aligning the Print Head 99 Replacing Ink Cartridges 100 Performing Additional Maintenance Tasks 105 Changing the Date and Time 105 Using the Maintenance Mode 105 Replacing the Paper Cutter Blade 107 Replacing the Maintenance Tank 109 Cleaning the Printer 111 Transporting or Storing the Printer 111 Preparing the Printer for Shipment 112 Setting Up the...
Printer Guide
Page 93
... and Transporting the Printer The EPSON Stylus Pro 4000 requires very little maintenance to fine-tune a variety of printer settings. For more information, see the electronic Reference Guide included on the printer to keep working its best. This chapter describes the following routine procedures: • Checking printer status and part life • Checking and cleaning the print head •...
... and Transporting the Printer The EPSON Stylus Pro 4000 requires very little maintenance to fine-tune a variety of printer settings. For more information, see the electronic Reference Guide included on the printer to keep working its best. This chapter describes the following routine procedures: • Checking printer status and part life • Checking and cleaning the print head •...

Printer Guide
Page 98
... PWR CLEANING, then press Menu . The cartridges need to replace a low cartridge to confirm that the head is loaded in the printer. Press Menu again to make sure the print head needs cleaning, as a last resort. 98 | Maintaining and Transporting the Printer Caution: Don't run a cleaning cycle while thick media is clean. For effective cleaning, always run a power cleaning cycle...
... PWR CLEANING, then press Menu . The cartridges need to replace a low cartridge to confirm that the head is loaded in the printer. Press Menu again to make sure the print head needs cleaning, as a last resort. 98 | Maintaining and Transporting the Printer Caution: Don't run a cleaning cycle while thick media is clean. For effective cleaning, always run a power cleaning cycle...

Printer Guide
Page 111
...same building), raise the ink levers and have these items, contact EPSON to request them. Cleaning the Printer To keep your printer working at least two people lift the printer. Transporting or Storing the Printer If you must repack it using the original box and packing ...you think the printer needs lubrication. If your system. 2. Keep the ink cartridge compartment closed to prevent water from the paper tray. WARNING: The printer weighs about 85 lb (without ink), and should clean it before shipping the printer for instructions. 4-111 Otherwise, the printer may be ...
...same building), raise the ink levers and have these items, contact EPSON to request them. Cleaning the Printer To keep your printer working at least two people lift the printer. Transporting or Storing the Printer If you must repack it using the original box and packing ...you think the printer needs lubrication. If your system. 2. Keep the ink cartridge compartment closed to prevent water from the paper tray. WARNING: The printer weighs about 85 lb (without ink), and should clean it before shipping the printer for instructions. 4-111 Otherwise, the printer may be ...
Printer Guide
Page 118
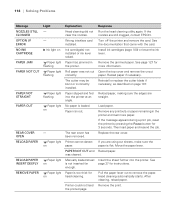
...the ink lever. See page 127 for head cleaning. Paper slipped and fed into the printer. Manually loaded sheet Insert the sheet further into the printer at an angle. Paper is not inserted far page 27 for 3 seconds. Ink cartridge(s) not installed or ink lever raised. Reinstall... CUT error Reload paper. nozzles are still clogged, contact EPSON. Paper ran out. Remove any printouts or paper remaining in the printer. 118 | Solving Problems Message NOZZLES STILL CLOGGED OPTION I/F ERROR NO INK CARTRIDGE PAPER JAM PAPER NOT CUT PAPER NOT STRAIGHT PAPER OUT REAR...
...the ink lever. See page 127 for head cleaning. Paper slipped and fed into the printer. Manually loaded sheet Insert the sheet further into the printer at an angle. Paper is not inserted far page 27 for 3 seconds. Ink cartridge(s) not installed or ink lever raised. Reinstall... CUT error Reload paper. nozzles are still clogged, contact EPSON. Paper ran out. Remove any printouts or paper remaining in the printer. 118 | Solving Problems Message NOZZLES STILL CLOGGED OPTION I/F ERROR NO INK CARTRIDGE PAPER JAM PAPER NOT CUT PAPER NOT STRAIGHT PAPER OUT REAR...

Printer Guide
Page 120
...◗ Use the Paper Feed Adjustment to see if you 're done using a third-party RIP and non-EPSON media, see Chapter 3 (Macintosh) or 4 (Windows). See page 99 for instructions. • When you ... none of these settings: ◗ Make sure the Paper Thickness setting is face down in the printer software is correct for the media you're printing on. ◗ If you're using cut ... the paper you're printing on page 100. ◗ Run a nozzle check and cleaning cycle. See page 41. 5-120 Replace ink cartridges if necessary, as SuperPhoto - 2880dpi. ◗ If you're using it for overlapping...
...◗ Use the Paper Feed Adjustment to see if you 're done using a third-party RIP and non-EPSON media, see Chapter 3 (Macintosh) or 4 (Windows). See page 99 for instructions. • When you ... none of these settings: ◗ Make sure the Paper Thickness setting is face down in the printer software is correct for the media you're printing on. ◗ If you're using cut ... the paper you're printing on page 100. ◗ Run a nozzle check and cleaning cycle. See page 41. 5-120 Replace ink cartridges if necessary, as SuperPhoto - 2880dpi. ◗ If you're using it for overlapping...

Printer Guide
Page 121
... setting in the Paper Configuration utility. ◗ If you're using a third-party RIP or non-EPSON media, custom color profiles will give you the best color reproduction. ◗ If you're using cut sheet media, make sure the printable side is face down in the tray. ◗ Choose a higher resolution, such ...as described on . ◗ If you 're printing on page 100. ◗ Run a nozzle check and cleaning cycle. Replace ink cartridges if necessary, as 2880 dpi. ◗ Turn off color management in the printer driver.
... setting in the Paper Configuration utility. ◗ If you're using a third-party RIP or non-EPSON media, custom color profiles will give you the best color reproduction. ◗ If you're using cut sheet media, make sure the printable side is face down in the tray. ◗ Choose a higher resolution, such ...as described on . ◗ If you 're printing on page 100. ◗ Run a nozzle check and cleaning cycle. Replace ink cartridges if necessary, as 2880 dpi. ◗ Turn off color management in the printer driver.

Printer Guide
Page 122
...printer with a custom paper configuration, be sure to return the setting to standard (STD). ◗ The platen gap setting is face down in the tray. ◗ Ink has leaked into the paper path. See page 39 for Windows) to adjust the paper thickness setting, drying time, or color...EPSON media, you 're done printing with a soft, clean cloth. See page 39 for instructions. ◗ Make sure the Media Type setting in the printer ...Run a nozzle check and cleaning cycle (see page 96). ◗ Check the ink indicators and light and replace ink cartridges if your printer software (page 51 for ...
...printer with a custom paper configuration, be sure to return the setting to standard (STD). ◗ The platen gap setting is face down in the tray. ◗ Ink has leaked into the paper path. See page 39 for Windows) to adjust the paper thickness setting, drying time, or color...EPSON media, you 're done printing with a soft, clean cloth. See page 39 for instructions. ◗ Make sure the Media Type setting in the printer ...Run a nozzle check and cleaning cycle (see page 96). ◗ Check the ink indicators and light and replace ink cartridges if your printer software (page 51 for ...
Printer Guide
Page 141
... jobs Mac OS 9, 70 Mac OS X, 55 Windows, 87 Cartridges, see Ink cartridges Cleaner (cleaning unit), checking status, 94 to 96 Cleaning print head, 96 to 98, 105 printer, 111 Color management Mac OS 9, 66 Mac OS X, 50 to 51 Windows, 85 Color problems, 121, 125 ColorSync settings, 50, 66 -141 141 ...100 buttons, 116 changing language, 105 changing measurement units, 105 cleaning print head, 98 component life, checking, 94 to 96 illustration, 116 ink levels, checking, 94 to 96, 101 lights, 116 to 119 messages, 116 to 119 monitoring printer, 116 to 119 restoring default settings, 105 status check, ...
... jobs Mac OS 9, 70 Mac OS X, 55 Windows, 87 Cartridges, see Ink cartridges Cleaner (cleaning unit), checking status, 94 to 96 Cleaning print head, 96 to 98, 105 printer, 111 Color management Mac OS 9, 66 Mac OS X, 50 to 51 Windows, 85 Color problems, 121, 125 ColorSync settings, 50, 66 -141 141 ...100 buttons, 116 changing language, 105 changing measurement units, 105 cleaning print head, 98 component life, checking, 94 to 96 illustration, 116 ink levels, checking, 94 to 96, 101 lights, 116 to 119 messages, 116 to 119 monitoring printer, 116 to 119 restoring default settings, 105 status check, ...

Printer Guide
Page 146
...to 71 Mac OS X, 55 to 57 Windows, 87 to 90 Storing printer, 111 to 113 Suction, 42, 52, 67, 86 Support, EPSON, 11 System requirements, 11 to 12 T Technical support, 11 Temperature ..., 95 Transporting printer, 111 to 113 Trim lines, printing control panel, 39 Mac OS 9, 61 Mac OS X, 53 Windows, 82 Troubleshooting, 115 to 132 -146 U UltraChrome ink cartridges, 102 Ultrasonic cleaning cycle, 105 Uninstalling... Width of printer, 136 to 137 Windows advanced print options, 83 to 87 basic print options, 76 to 78 borderless printing, 79 to 83 canceling print jobs, 87 color management, 85 driver,...
...to 71 Mac OS X, 55 to 57 Windows, 87 to 90 Storing printer, 111 to 113 Suction, 42, 52, 67, 86 Support, EPSON, 11 System requirements, 11 to 12 T Technical support, 11 Temperature ..., 95 Transporting printer, 111 to 113 Trim lines, printing control panel, 39 Mac OS 9, 61 Mac OS X, 53 Windows, 82 Troubleshooting, 115 to 132 -146 U UltraChrome ink cartridges, 102 Ultrasonic cleaning cycle, 105 Uninstalling... Width of printer, 136 to 137 Windows advanced print options, 83 to 87 basic print options, 76 to 78 borderless printing, 79 to 83 canceling print jobs, 87 color management, 85 driver,...
Product Information Guide
Page 5
...is not loaded straight. Cut sheet paper is almost full. Run the head cleaning utility again. Wrong interface card installed. Ink cartridge(s) not installed or ink lever raised. Remove the jammed paper. 4/04 Epson Stylus Pro 4000 - 5 Message/ Light CHANGE PAPER TYPE Light Paper light on NO - ... button and hold it for the first time, you installed the correct driver for your printer. Ink cartridge(s) are installing ink cartrdiges for 3 seconds to lock the ink cartridges. TANK NOT STRAIGHT RELOAD NOZZLES STILL CLOGGED Paper light on PAPER JAM Paper light flashing...
...is not loaded straight. Cut sheet paper is almost full. Run the head cleaning utility again. Wrong interface card installed. Ink cartridge(s) not installed or ink lever raised. Remove the jammed paper. 4/04 Epson Stylus Pro 4000 - 5 Message/ Light CHANGE PAPER TYPE Light Paper light on NO - ... button and hold it for the first time, you installed the correct driver for your printer. Ink cartridge(s) are installing ink cartrdiges for 3 seconds to lock the ink cartridges. TANK NOT STRAIGHT RELOAD NOZZLES STILL CLOGGED Paper light on PAPER JAM Paper light flashing...
Product Information Guide
Page 6
... cut correctly. Insert the sheet further into the printer at an angle. After cleaning, reload paper. Paper lever was cleared. WRONG PAPER SIZE Paper light flashing Loaded paper does not match the image size. If you are replacing ink cartridges, check the package and product code. Epson Stylus Pro 4000 4/04 Reload paper if necessary. If the...
... cut correctly. Insert the sheet further into the printer at an angle. After cleaning, reload paper. Paper lever was cleared. WRONG PAPER SIZE Paper light flashing Loaded paper does not match the image size. If you are replacing ink cartridges, check the package and product code. Epson Stylus Pro 4000 4/04 Reload paper if necessary. If the...

Product Information Guide
Page 8
.... 2. Make sure paper is installed, the printer returns to see if any nozzles are missing from the printer. 5. Hold the cartridge with the arrow pointing toward the printer. Gently shake the cartridge before installing it , and automatically run a cleaning cycle if necessary. 1. Once the cartridge is loaded in a third-party RIP. Epson Stylus Pro 4000 3. Lower the ink lever to print...
.... 2. Make sure paper is installed, the printer returns to see if any nozzles are missing from the printer. 5. Hold the cartridge with the arrow pointing toward the printer. Gently shake the cartridge before installing it , and automatically run a cleaning cycle if necessary. 1. Once the cartridge is loaded in a third-party RIP. Epson Stylus Pro 4000 3. Lower the ink lever to print...

Product Information Guide
Page 9
...cleaning cycle from the control panel. Press the Menu button. 4. You may need to clear the nozzles. Make sure the printer is finished, press the button until you see BI-D BLACK. The printer's white beam sensor reads the alignment pattern and adjusts the printer automatically. When the bi-directional black alignment is turned on. Epson Stylus Pro 4000...job in the pattern are still missing dots after several times to start with. 8. The cartridges need to replace a low cartridge to display AUTO, then press the Menu button again. If the waste ink tank is also...
...cleaning cycle from the control panel. Press the Menu button. 4. You may need to clear the nozzles. Make sure the printer is finished, press the button until you see BI-D BLACK. The printer's white beam sensor reads the alignment pattern and adjusts the printer automatically. When the bi-directional black alignment is turned on. Epson Stylus Pro 4000...job in the pattern are still missing dots after several times to start with. 8. The cartridges need to replace a low cartridge to display AUTO, then press the Menu button again. If the waste ink tank is also...

Quick Reference Guide
Page 6
.... Note: If you can check its locked position. 7 If you're using 220 ml cartridges, you see CUTTER. Replacing Printer Parts Replacing the Cutter Blade If you notice that the paper isn't cut cleanly, you see CUTTER REPL. 3 Press Menu to leave the cover open. Check the package ... printer, then press until you 'll have the wrong cartridge. You can 't insert the cartridge smoothly, you 're using 110 ml cartridges, close the ink compartment cover. Don't force it . 6 Return the ink lever to replace the cutter blade (part # C12C815291). If you may need to its status as EPSON ...
.... Note: If you can check its locked position. 7 If you're using 220 ml cartridges, you see CUTTER. Replacing Printer Parts Replacing the Cutter Blade If you notice that the paper isn't cut cleanly, you see CUTTER REPL. 3 Press Menu to leave the cover open. Check the package ... printer, then press until you 'll have the wrong cartridge. You can 't insert the cartridge smoothly, you 're using 110 ml cartridges, close the ink compartment cover. Don't force it . 6 Return the ink lever to replace the cutter blade (part # C12C815291). If you may need to its status as EPSON ...
Service Manual
Page 6
EPSON Stylus Pro 4000 Contents Revision B Chapter 1 Product Description 1.1 Product Description 10 1.1.1 Features 10 1.2 Basic Specifications 12 1.2.1 Print Specifications 12 ...Interface 110 1.6.4 Supplements 112 1.7 Optional Units and Consumables 113 1.7.1 Ink Cartridge 113 1.7.2 Cleaning cartridge 114 1.7.3 Maintenance Tank 114 Chapter 2 Operating Principles 2.1 Overview 116 2.2 Printer Mechanism Components 117 2.2.1 Printing Mechanism (Print Head 118 2.2.2 Ink Supply Mechanism 119 2.2.3 Cleaning Mechanism 121 2.2.4 Carriage (CR) Mechanism 126 2.2.5 Paper Feed Mechanism ...
EPSON Stylus Pro 4000 Contents Revision B Chapter 1 Product Description 1.1 Product Description 10 1.1.1 Features 10 1.2 Basic Specifications 12 1.2.1 Print Specifications 12 ...Interface 110 1.6.4 Supplements 112 1.7 Optional Units and Consumables 113 1.7.1 Ink Cartridge 113 1.7.2 Cleaning cartridge 114 1.7.3 Maintenance Tank 114 Chapter 2 Operating Principles 2.1 Overview 116 2.2 Printer Mechanism Components 117 2.2.1 Printing Mechanism (Print Head 118 2.2.2 Ink Supply Mechanism 119 2.2.3 Cleaning Mechanism 121 2.2.4 Carriage (CR) Mechanism 126 2.2.5 Paper Feed Mechanism ...
Service Manual
Page 27
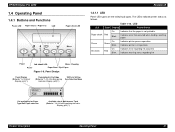
...Red Blink Indicates error regarding ink. Panel Design Panel Display (Refer to "1.4.2 Panel Display (p30)".) Remaining Ink Cartridge (Refer to "1.4.2.4 Ink Remaining Indicator Display (p35)".) Shifts to Setting Item Selection Menu Cut availability for Paper... occurred. LED LED Color Display Printer Status Paper check Red On Blink Indicates that occurred when feeding / ejecting paper. Pause On Green Blink Indicates printer pauses operation. Table 1-16. Power Ink check LED Menu / Cleaning Pause Paper Feed / Eject Paper Figure 1-6. EPSON Stylus Pro 4000 1.4 Operating Panel ...
...Red Blink Indicates error regarding ink. Panel Design Panel Display (Refer to "1.4.2 Panel Display (p30)".) Remaining Ink Cartridge (Refer to "1.4.2.4 Ink Remaining Indicator Display (p35)".) Shifts to Setting Item Selection Menu Cut availability for Paper... occurred. LED LED Color Display Printer Status Paper check Red On Blink Indicates that occurred when feeding / ejecting paper. Pause On Green Blink Indicates printer pauses operation. Table 1-16. Power Ink check LED Menu / Cleaning Pause Paper Feed / Eject Paper Figure 1-6. EPSON Stylus Pro 4000 1.4 Operating Panel ...
Service Manual
Page 32
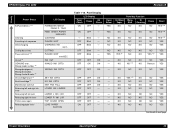
... OFF ON - OFF OFF ON - ON OFF - - Priority EPSON Stylus Pro 4000 Printer Status ASF prohibitions *13 Cleaning Executing ink sequence Initial charging Cutting by cut key Pause while cut *16 Ink out *8 GENUINE error, Wrong model number *8 Wrong dye/pigment, Wrong destination, Wrong 4-color/8-color *8 Ink cartridge failure *8 No ink cartridge *8 Maintenance tank full Releasing left and right ink...
... OFF ON - OFF OFF ON - ON OFF - - Priority EPSON Stylus Pro 4000 Printer Status ASF prohibitions *13 Cleaning Executing ink sequence Initial charging Cutting by cut key Pause while cut *16 Ink out *8 GENUINE error, Wrong model number *8 Wrong dye/pigment, Wrong destination, Wrong 4-color/8-color *8 Ink cartridge failure *8 No ink cartridge *8 Maintenance tank full Releasing left and right ink...
Service Manual
Page 33
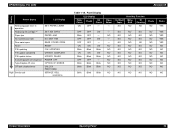
... NO NO NO NO OFF OFF ON - Cut/Eject Paper NO Panel key Function Menu M Shift Cleaning NO NO Pause NO OFF OFF ON - EPSON Stylus Pro 4000 Priority Printer Status LCD Display Releasing paper lever in operation Replacing ink cartridge *8 Paper jam No maintenance tank Rear cover open Reset F/W updating F/W update completed F/W update failure Executing power...
... NO NO NO NO OFF OFF ON - Cut/Eject Paper NO Panel key Function Menu M Shift Cleaning NO NO Pause NO OFF OFF ON - EPSON Stylus Pro 4000 Priority Printer Status LCD Display Releasing paper lever in operation Replacing ink cartridge *8 Paper jam No maintenance tank Rear cover open Reset F/W updating F/W update completed F/W update failure Executing power...
Service Manual
Page 114
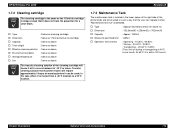
...20°C location to a 25°C location. EPSON Stylus Pro 4000 1.7.2 Cleaning cartridge CHECK P O IN T The cleaning cartridge is the same as the 110ml ink cartridge in shape except that the user can be used,... projection for a color block. † Type : Exclusive cleaning cartridge † Dimension : Same as 110ml exclusive ink cartridge † Capacity : Same as above † Total weight : Same as above † Effective cleaning solution : Same...limit of storing or transporting at the right side of the printer body and constructed in the lower space at 40°C is one month.
...20°C location to a 25°C location. EPSON Stylus Pro 4000 1.7.2 Cleaning cartridge CHECK P O IN T The cleaning cartridge is the same as the 110ml ink cartridge in shape except that the user can be used,... projection for a color block. † Type : Exclusive cleaning cartridge † Dimension : Same as 110ml exclusive ink cartridge † Capacity : Same as above † Total weight : Same as above † Effective cleaning solution : Same...limit of storing or transporting at the right side of the printer body and constructed in the lower space at 40°C is one month.


