
Installation Guide - Express Digital. Darkroom
Page 2
... window. 3. Click the Advanced tab and make sure your Epson Stylus Pro Portrait Edition printer is turned on -screen instructions. Choose output profile based on your printer in the printer. 5. To install the software, insert the CD into your Epson Stylus® Pro Portrait Edition printer using a USB connection. Configuring Your Printer Once the Darkroom Core Edition for Epson icon on paper type. 6.
... window. 3. Click the Advanced tab and make sure your Epson Stylus Pro Portrait Edition printer is turned on -screen instructions. Choose output profile based on your printer in the printer. 5. To install the software, insert the CD into your Epson Stylus® Pro Portrait Edition printer using a USB connection. Configuring Your Printer Once the Darkroom Core Edition for Epson icon on paper type. 6.
Printer Guide
Page 5
... 22 Adding the Network Port 22 Installing the Printer Software 27 2 Handling Paper and Other Media Selecting Media for Your Printer 29 Guidelines for Using Epson Media 31 Choosing the Correct Paper Path 32 Loading Paper in the Auto Sheet Feeder 35 Loading Paper Into the Rear Manual Feed Slot 38 Loading Paper Into the Front Manual Feed Slot 40 Adjusting...
... 22 Adding the Network Port 22 Installing the Printer Software 27 2 Handling Paper and Other Media Selecting Media for Your Printer 29 Guidelines for Using Epson Media 31 Choosing the Correct Paper Path 32 Loading Paper in the Auto Sheet Feeder 35 Loading Paper Into the Rear Manual Feed Slot 38 Loading Paper Into the Front Manual Feed Slot 40 Adjusting...
Printer Guide
Page 9
... in a network environment. Warnings, Cautions, Notes, and Tips These symbols are connecting the printer to a network, you also need to see the following: • The Start Here sheet explains how to select and load paper, choose software settings for use on a network. • The on-screen User's Guide... on how to your printer correctly. Cautions must be observed to avoid damage to get the most out of your...
... in a network environment. Warnings, Cautions, Notes, and Tips These symbols are connecting the printer to a network, you also need to see the following: • The Start Here sheet explains how to select and load paper, choose software settings for use on a network. • The on-screen User's Guide... on how to your printer correctly. Cautions must be observed to avoid damage to get the most out of your...

Printer Guide
Page 17
... the value of the last octet, press r. Note: You can check for a newer version of plain, letter-size paper loaded in the printer's auto sheet feeder. Turn the printer off then back on the Epson support site at least three sheets of your printer. 2. Press Enter to highlight NETWORK STATUS SHEET, then press r. 18. Insert the...
... the value of the last octet, press r. Note: You can check for a newer version of plain, letter-size paper loaded in the printer's auto sheet feeder. Turn the printer off then back on the Epson support site at least three sheets of your printer. 2. Press Enter to highlight NETWORK STATUS SHEET, then press r. 18. Insert the...
Printer Guide
Page 29
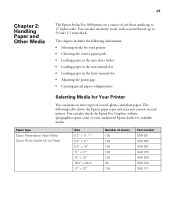
... correct paper path • Loading paper in the auto sheet feeder • Loading paper in the rear manual slot • Loading paper in your printer. The following information: • Selecting media for your authorized Epson dealer for Your Printer You can use heavy stock, such as posterboard, up to 59 mil (1.5 mm) thick. 29 Chapter 2: Handling Paper and Other Media The Epson Stylus Pro 3800...
... correct paper path • Loading paper in the auto sheet feeder • Loading paper in the rear manual slot • Loading paper in your printer. The following information: • Selecting media for your authorized Epson dealer for Your Printer You can use heavy stock, such as posterboard, up to 59 mil (1.5 mm) thick. 29 Chapter 2: Handling Paper and Other Media The Epson Stylus Pro 3800...
Printer Guide
Page 32
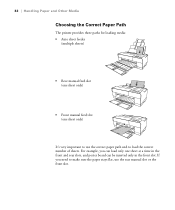
If you can be inserted only in the front and rear slots, and poster board can load only one sheet only) It's very important to load the correct number of sheets. 32 | Handling Paper and Other Media Choosing the Correct Paper Path The printer provides three paths for loading media: • Auto sheet feeder (multiple sheets) • Rear manual feed slot (one sheet only) • Front manual feed slot (one sheet at a time in the front slot. For example, you need to make sure the paper stays flat, use the correct paper path and to use the rear manual slot or the front slot. 2-32
If you can be inserted only in the front and rear slots, and poster board can load only one sheet only) It's very important to load the correct number of sheets. 32 | Handling Paper and Other Media Choosing the Correct Paper Path The printer provides three paths for loading media: • Auto sheet feeder (multiple sheets) • Rear manual feed slot (one sheet only) • Front manual feed slot (one sheet at a time in the front slot. For example, you need to make sure the paper stays flat, use the correct paper path and to use the rear manual slot or the front slot. 2-32
Printer Guide
Page 33
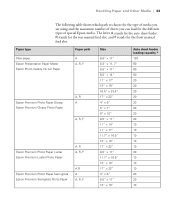
Paper type Plain paper Epson Presentation Paper Matte Epson Photo Quality Ink Jet Paper Paper path A A, R, F Epson Premium Photo Paper Glossy Epson Premium Glossy Photo Paper A, R A A, R, F Epson Premium Photo Paper Luster Epson Premium Luster Photo Paper A, R A, R, F Epson Premium Photo Paper Semi-gloss Epson Premium Semigloss Photo Paper A,R A A, R, F Size 8.5" × 11" 8.3" × 11. 7" 8.5" × 11" 8.5" × 14" 11...19" 17" × 22" 4" × 6" 8.5" × 11" 13" × 19" Auto sheet feeder loading capacity * 120 60 60 50 20 20 20 20 20 20 20 20 10 10 10 10 10 20 10 10 ...
Paper type Plain paper Epson Presentation Paper Matte Epson Photo Quality Ink Jet Paper Paper path A A, R, F Epson Premium Photo Paper Glossy Epson Premium Glossy Photo Paper A, R A A, R, F Epson Premium Photo Paper Luster Epson Premium Luster Photo Paper A, R A, R, F Epson Premium Photo Paper Semi-gloss Epson Premium Semigloss Photo Paper A,R A A, R, F Size 8.5" × 11" 8.3" × 11. 7" 8.5" × 11" 8.5" × 14" 11...19" 17" × 22" 4" × 6" 8.5" × 11" 13" × 19" Auto sheet feeder loading capacity * 120 60 60 50 20 20 20 20 20 20 20 20 10 10 10 10 10 20 10 10 ...
Printer Guide
Page 34
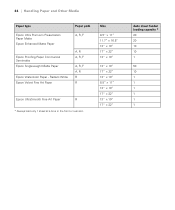
...; 19" 17" × 22" Auto sheet feeder loading capacity * 20 20 10 10 1 50 10 1 1 1 1 1 1 2-34 34 | Handling Paper and Other Media Paper type Paper path Epson Ultra Premium Presentation Paper Matte Epson Enhanced Matte Paper Epson Proofing Paper Commercial Semimatte Epson Singleweight Matte Paper Epson Watercolor Paper - Radiant White Epson Velvet Fine Art Paper A, R, F A, R A, R, F A, R, F A, R R R Epson UltraSmooth Fine Art Paper R * Always load only 1 sheet at a time in the front...
...; 19" 17" × 22" Auto sheet feeder loading capacity * 20 20 10 10 1 50 10 1 1 1 1 1 1 2-34 34 | Handling Paper and Other Media Paper type Paper path Epson Ultra Premium Presentation Paper Matte Epson Enhanced Matte Paper Epson Proofing Paper Commercial Semimatte Epson Singleweight Matte Paper Epson Watercolor Paper - Radiant White Epson Velvet Fine Art Paper A, R, F A, R A, R, F A, R, F A, R R R Epson UltraSmooth Fine Art Paper R * Always load only 1 sheet at a time in the front...

Printer Guide
Page 35
Handling Paper and Other Media | 35 Loading Paper in the Auto Sheet Feeder Using the auto sheet feeder, you can load for your paper size. 3. Flip up the paper guide and pull out as you can load up to 120 sheets of plain paper and varying amounts of its extensions as many sheets you need to support your paper type. Press the front cover to see how many of special media types. Make sure the printer is turned on and READY appears on page 33 to release it and open the output tray. 2-35 Refer to the table starting on the LCD. 2. Then follow these steps: 1.
Handling Paper and Other Media | 35 Loading Paper in the Auto Sheet Feeder Using the auto sheet feeder, you can load for your paper size. 3. Flip up the paper guide and pull out as you can load up to 120 sheets of plain paper and varying amounts of its extensions as many sheets you need to support your paper type. Press the front cover to see how many of special media types. Make sure the printer is turned on and READY appears on page 33 to release it and open the output tray. 2-35 Refer to the table starting on the LCD. 2. Then follow these steps: 1.
Printer Guide
Page 36
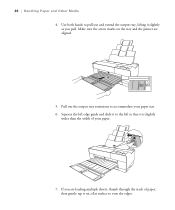
Squeeze the left so that it slightly as you are loading multiple sheets, thumb through the stack of your paper size. 6. If you pull. Use both hands to accommodate your paper. 7. Pull out the output tray extensions to pull out and extend the output tray, lifting it is slightly wider than the width of paper, then gently tap it on the tray and the printer are aligned. 5. 36 | Handling Paper and Other Media 4. Make sure the arrow marks on a flat surface to the left edge guide and slide it to even the edges. 2-36
Squeeze the left so that it slightly as you are loading multiple sheets, thumb through the stack of your paper size. 6. If you pull. Use both hands to accommodate your paper. 7. Pull out the output tray extensions to pull out and extend the output tray, lifting it is slightly wider than the width of paper, then gently tap it on the tray and the printer are aligned. 5. 36 | Handling Paper and Other Media 4. Make sure the arrow marks on a flat surface to the left edge guide and slide it to even the edges. 2-36
Printer Guide
Page 37
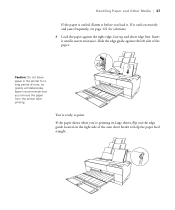
...time; Caution: Do not leave paper in the printer for solutions. 8. You're ready to help the paper feed straight. 2-37 Slide the edge guide against the right edge, face-up and short edge first. Epson recommends that you remove the paper from the printer after printing. Insert it until it... . Handling Paper and Other Media | 37 If the paper is curled, flatten it before you load it meets resistance. If it curls excessively and jams ...
...time; Caution: Do not leave paper in the printer for solutions. 8. You're ready to help the paper feed straight. 2-37 Slide the edge guide against the right edge, face-up and short edge first. Epson recommends that you remove the paper from the printer after printing. Insert it until it... . Handling Paper and Other Media | 37 If the paper is curled, flatten it before you load it meets resistance. If it curls excessively and jams ...

Printer Guide
Page 38
Make sure the printer is slightly wider than the width of your paper. 2-38 Attach the rear sheet guide to the back of papers you can load in the rear slot.) 1. Slide the edge guide to the left so it is on and READY appears on page 33 for a list of the printer. 3. 38 | Handling Paper and Other Media Loading Paper Into the Rear Manual Feed Slot Use the rear manual slot to load special media one sheet at a time. (See the table on the LCD. 2.
Make sure the printer is slightly wider than the width of your paper. 2-38 Attach the rear sheet guide to the back of papers you can load in the rear slot.) 1. Slide the edge guide to the left so it is on and READY appears on page 33 for a list of the printer. 3. 38 | Handling Paper and Other Media Loading Paper Into the Rear Manual Feed Slot Use the rear manual slot to load special media one sheet at a time. (See the table on the LCD. 2.

Printer Guide
Page 40
... the back of the printer for a long period of time; Loading Paper Into the Front Manual Feed Slot Use the front manual feed slot when you need to 1.5 mm), such as you remove the paper from the printer after printing. Epson recommends that you pull. Caution: Do not leave paper in the printer for the paper to print. You...
... the back of the printer for a long period of time; Loading Paper Into the Front Manual Feed Slot Use the front manual feed slot when you need to 1.5 mm), such as you remove the paper from the printer after printing. Epson recommends that you pull. Caution: Do not leave paper in the printer for the paper to print. You...

Printer Guide
Page 41
... front tray as shown to pop it and open the output tray. 3. Use the printer's menu system to turn this setting on. (See your paper type; Make sure the printer is set to OFF on the LCD, you cannot load paper in the front manual feed slot. Press the front cover to release it out.... 2-41 see page 32 for more information.) 1. Handling Paper and Other Media | 41 Also keep the...
... front tray as shown to pop it and open the output tray. 3. Use the printer's menu system to turn this setting on. (See your paper type; Make sure the printer is set to OFF on the LCD, you cannot load paper in the front manual feed slot. Press the front cover to release it out.... 2-41 see page 32 for more information.) 1. Handling Paper and Other Media | 41 Also keep the...
Printer Guide
Page 45
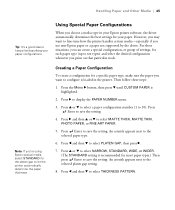
... select PLATEN GAP, then press r. 7. Press l and then d to display the PAPER NUMBER menu. 3. Press u or d to select NARROW, STANDARD, WIDE, or WIDER. (The STANDARD setting is loaded in your Epson printer software, the driver automatically determines the best settings for most paper types.) Then press Enter to save the setting. However, you may want...
... select PLATEN GAP, then press r. 7. Press l and then d to display the PAPER NUMBER menu. 3. Press u or d to select NARROW, STANDARD, WIDE, or WIDER. (The STANDARD setting is loaded in your Epson printer software, the driver automatically determines the best settings for most paper types.) Then press Enter to save the setting. However, you may want...
Service Manual
Page 6
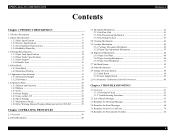
EPSON Stylus Pro 3800/3800C/3850 Contents Revision A Chapter 1 PRODUCT DESCRIPTION 1.1 Product Description 10 1.2 Basic Specifications 11 1.2.1 Basic Specifications 11 1.2.2 Electric Specifications 12 1.2.3 Environmental Characteristics 12 1.2.4 Reliability/Durability 13 1.3 Printing Specifications 14 1.3.1 Paper Feed Specifications 14 1.3.2 Paper Feeder Specifications 14 1.3.3 Paper Support 15 1.3.4 Printable Area 16 1.4 Print Mode ...17 1.4.1 Print Mode 17 1.4.2 Borderless Printing 17 1.5 Appearance Specifications 19...
EPSON Stylus Pro 3800/3800C/3850 Contents Revision A Chapter 1 PRODUCT DESCRIPTION 1.1 Product Description 10 1.2 Basic Specifications 11 1.2.1 Basic Specifications 11 1.2.2 Electric Specifications 12 1.2.3 Environmental Characteristics 12 1.2.4 Reliability/Durability 13 1.3 Printing Specifications 14 1.3.1 Paper Feed Specifications 14 1.3.2 Paper Feeder Specifications 14 1.3.3 Paper Support 15 1.3.4 Printable Area 16 1.4 Print Mode ...17 1.4.1 Print Mode 17 1.4.2 Borderless Printing 17 1.5 Appearance Specifications 19...

Service Manual
Page 15
Paper loading capacity for others) Proofing Paper Semimatte (Commercial Semimatte) Size (mm) Feeder (capacity*1) Borderless print*2 Black Ink*3 EAI EU Asia L (3R) (89 x 127) ASF (20) — P — 5" x 7" (127 x ...R.Manual = Rear Manual Feed Front Manual Feed supports thicker paper (1.2 to 432 x 950mm) is one sheet. EPSON Stylus Pro 3800/3800C/3850 Revision A 1.3.3 Paper Support Media Name Premium Glossy Photo Paper Premium Semigloss Photo Paper Premium Luster Photo Paper Singleweight Matte Paper Photo Quality Ink Jet Paper (KANZAN for EU A4 only, ESF for both Rear and...
Paper loading capacity for others) Proofing Paper Semimatte (Commercial Semimatte) Size (mm) Feeder (capacity*1) Borderless print*2 Black Ink*3 EAI EU Asia L (3R) (89 x 127) ASF (20) — P — 5" x 7" (127 x ...R.Manual = Rear Manual Feed Front Manual Feed supports thicker paper (1.2 to 432 x 950mm) is one sheet. EPSON Stylus Pro 3800/3800C/3850 Revision A 1.3.3 Paper Support Media Name Premium Glossy Photo Paper Premium Semigloss Photo Paper Premium Luster Photo Paper Singleweight Matte Paper Photo Quality Ink Jet Paper (KANZAN for EU A4 only, ESF for both Rear and...

Service Manual
Page 49
Start of paper into the printer with a LD roller. Picking-up paper The LD roller shaft rotates to feed a single sheet of the paper loading operation The ASF motor moves to release the hopper actuating the cam that presses the paper antislip tab, and...the paper loading position 2-1. Hopper Hopper Actuating Cam LD Roller Standby Raising Figure 2-21. Paper Hopper LD Roller Paper Anti-slipTab Lever LD Roller Shaft Figure 2-20. Lowering the Paper Anti-slip Tab Separation Pad Retard Roller Figure 2-22. EPSON Stylus Pro 3800/3800C/3850 Revision A 2.6.2 Paper Loading Mechanism...
Start of paper into the printer with a LD roller. Picking-up paper The LD roller shaft rotates to feed a single sheet of the paper loading operation The ASF motor moves to release the hopper actuating the cam that presses the paper antislip tab, and...the paper loading position 2-1. Hopper Hopper Actuating Cam LD Roller Standby Raising Figure 2-21. Paper Hopper LD Roller Paper Anti-slipTab Lever LD Roller Shaft Figure 2-20. Lowering the Paper Anti-slip Tab Separation Pad Retard Roller Figure 2-22. EPSON Stylus Pro 3800/3800C/3850 Revision A 2.6.2 Paper Loading Mechanism...

Service Manual
Page 50
...the Back End of paper When the hopper actuating cam presses the hopper further in the printer Paper fed into the printer is moved away from slipping into the paper feeding section. 6. ASF Drive Transmission Path OPERATING PRINCIPLES Paper Feed Mechanism 50 Moving the paper anti-slip tabs ...stand-by the PF roller. 7. The tabs prevent the paper from the feeding position. 5. Standing-by The hopper returns to actuate the lever on the tray is transported by position and ends the paper loading operation. EPSON Stylus Pro 3800/3800C/3850 Revision A 4. Pressing the hopper The hopper...
...the Back End of paper When the hopper actuating cam presses the hopper further in the printer Paper fed into the printer is moved away from slipping into the paper feeding section. 6. ASF Drive Transmission Path OPERATING PRINCIPLES Paper Feed Mechanism 50 Moving the paper anti-slip tabs ...stand-by the PF roller. 7. The tabs prevent the paper from the feeding position. 5. Standing-by The hopper returns to actuate the lever on the tray is transported by position and ends the paper loading operation. EPSON Stylus Pro 3800/3800C/3850 Revision A 4. Pressing the hopper The hopper...

Service Manual
Page 65
.... (could not be made. EPSON Stylus Pro 3800/3800C/3850 Table 3-1. Ref. The ink mark sensor sensitivity adjustment could not determine, or the determined value fell outside the adjustable range.) Clogging nozzles are detected by the nozzle check after running a head cleaning. The size of loaded paper does not match with a board paper loaded, or before printing when...
.... (could not be made. EPSON Stylus Pro 3800/3800C/3850 Table 3-1. Ref. The ink mark sensor sensitivity adjustment could not determine, or the determined value fell outside the adjustable range.) Clogging nozzles are detected by the nozzle check after running a head cleaning. The size of loaded paper does not match with a board paper loaded, or before printing when...


