Network Guide
Page 3
Contents Chapter 1 Introduction 5 About Your Printer 5 About This Guide 5 Warnings, Cautions, and Notes 6 Operating Environment 6 Features of the Network Interface 6 Network Interface Operation 7 Status lights 7 Network connector 7 About the Software... the Network Interface 14 Connecting the Network Interface to the Network 14 Configuring the Network Interface 14 Printing a Network Status Sheet 16 Installing the Printer Driver 16 Windows Vista 16 Windows XP 19 Macintosh 24 Chapter 3 Network Software 25 EpsonNet Config for Windows 25 About EpsonNet Config 25 Accessing the...
Contents Chapter 1 Introduction 5 About Your Printer 5 About This Guide 5 Warnings, Cautions, and Notes 6 Operating Environment 6 Features of the Network Interface 6 Network Interface Operation 7 Status lights 7 Network connector 7 About the Software... the Network Interface 14 Connecting the Network Interface to the Network 14 Configuring the Network Interface 14 Printing a Network Status Sheet 16 Installing the Printer Driver 16 Windows Vista 16 Windows XP 19 Macintosh 24 Chapter 3 Network Software 25 EpsonNet Config for Windows 25 About EpsonNet Config 25 Accessing the...

Network Guide
Page 9
... network interface for Windows" on the computer, and network settings (such as status lights and RJ-45 connector. Configure the network interface and install the printer driver. Select a printing method. For Windows users, see "EpsonNet Config for TCP/IP, AppleTalk, MS Network, etc. If you are installed on page 25. Chapter 2 Setting...
... network interface for Windows" on the computer, and network settings (such as status lights and RJ-45 connector. Configure the network interface and install the printer driver. Select a printing method. For Windows users, see "EpsonNet Config for TCP/IP, AppleTalk, MS Network, etc. If you are installed on page 25. Chapter 2 Setting...
Network Guide
Page 14
...interface to the network. Note: You can configure the network interface for Mac OS X: Since the printer supports Bonjour and is on a TCP/IP network and install the printer driver. Note for use both 10Base-T and 100Base-TX. Configuring the Network Interface Configure the network interface ...for details. See the next section for use on a network just by default, you can use on . Make sure the printer is turned off before...
...interface to the network. Note: You can configure the network interface for Mac OS X: Since the printer supports Bonjour and is on a TCP/IP network and install the printer driver. Note for use both 10Base-T and 100Base-TX. Configuring the Network Interface Configure the network interface ...for details. See the next section for use on a network just by default, you can use on . Make sure the printer is turned off before...
Network Guide
Page 16
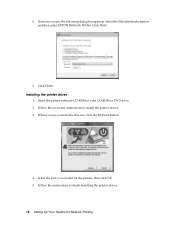
...5. See the section appropriate for Network Printing Click Add a local printer. 16 Setting Up Your System for your operating system. Windows Vista Adding the network port 1. Press d to install the printer driver on the printer's control panel to print the Network Status sheet. Press Enter to... enter the printer's menu system. 3. Press the Menu r button on each computer that the printer is not printing and the LCD displays READY. 2....
...5. See the section appropriate for Network Printing Click Add a local printer. 16 Setting Up Your System for your operating system. Windows Vista Adding the network port 1. Press d to install the printer driver on the printer's control panel to print the Network Status sheet. Press Enter to... enter the printer's menu system. 3. Press the Menu r button on each computer that the printer is not printing and the LCD displays READY. 2....
Network Guide
Page 18
6. Click Next. 7. Select the port you see a screen like this one, click the Manual button. 4. Follow the on-screen instructions to finish installing the printer driver. 18 Setting Up Your System for the printer, then click OK. 5. Click Finish. Select the Standard radio button and then select EPSON Network Printer. Follow the instructions to install the printer driver. 3. Insert the printer software CD-ROM in your CD-ROM or DVD drive. 2. If an error occurs, the following dialog box appears. Installing the printer driver 1. When you created for Network Printing
6. Click Next. 7. Select the port you see a screen like this one, click the Manual button. 4. Follow the on-screen instructions to finish installing the printer driver. 18 Setting Up Your System for the printer, then click OK. 5. Click Finish. Select the Standard radio button and then select EPSON Network Printer. Follow the instructions to install the printer driver. 3. Insert the printer software CD-ROM in your CD-ROM or DVD drive. 2. If an error occurs, the following dialog box appears. Installing the printer driver 1. When you created for Network Printing
Network Guide
Page 23
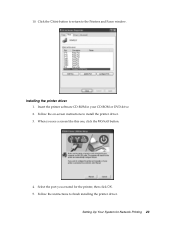
Setting Up Your System for the printer, then click OK. 5. Click the Close button to return to finish installing the printer driver. Follow the instructions to the Printers and Faxes window. Insert the printer software CD-ROM in your CD-ROM or DVD drive. 2. 10. When you created for Network Printing 23 Follow the on-screen instructions to install the printer driver. 3. Select the port you see a screen like this one, click the Manual button. 4. Installing the printer driver 1.
Setting Up Your System for the printer, then click OK. 5. Click the Close button to return to finish installing the printer driver. Follow the instructions to the Printers and Faxes window. Insert the printer software CD-ROM in your CD-ROM or DVD drive. 2. 10. When you created for Network Printing 23 Follow the on-screen instructions to install the printer driver. 3. Select the port you see a screen like this one, click the Manual button. 4. Installing the printer driver 1.
Network Guide
Page 24
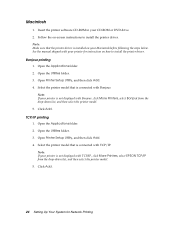
...Open the Applications folder. 2. Select the printer model that is connected with TCP/IP, click More Printers, select EPSON TCP/IP from the drop-down list, and then select the printer model. 5. Note: Make sure that the printer driver is not displayed with Bonjour. See the... manual shipped with your printer is installed on -screen instructions to install the printer driver. Bonjour printing 1. Open Printer...
...Open the Applications folder. 2. Select the printer model that is connected with TCP/IP, click More Printers, select EPSON TCP/IP from the drop-down list, and then select the printer model. 5. Note: Make sure that the printer driver is not displayed with Bonjour. See the... manual shipped with your printer is installed on -screen instructions to install the printer driver. Bonjour printing 1. Open Printer...

Network Guide
Page 45
...EpsonNet Config with Web Browser, 28 to 29 L LAN, checking, 42 Lights, status, 7 M MAC address, 31 Macintosh Bonjour printing, 24 installing printer driver, 24 network settings, 13 selecting a printing method, 10 TCP/IP printing, 24 Microsoft network, 34 N Network cable, 7 connector, 7 printing status ... connecting to network, 14 Network software, uninstalling, 43 O Operating environment, 6 P Password, EpsonNet Config with Web Browser, 37 ping, 42 Printer driver installing in Windows Vista, 16 to 18 installing in Windows XP, 19 to 23 installing on Macintosh, 24 Problems, solving, 39 to 40 ...
...EpsonNet Config with Web Browser, 28 to 29 L LAN, checking, 42 Lights, status, 7 M MAC address, 31 Macintosh Bonjour printing, 24 installing printer driver, 24 network settings, 13 selecting a printing method, 10 TCP/IP printing, 24 Microsoft network, 34 N Network cable, 7 connector, 7 printing status ... connecting to network, 14 Network software, uninstalling, 43 O Operating environment, 6 P Password, EpsonNet Config with Web Browser, 37 ping, 42 Printer driver installing in Windows Vista, 16 to 18 installing in Windows XP, 19 to 23 installing on Macintosh, 24 Problems, solving, 39 to 40 ...
Product Information Guide
Page 6
... Check using your printed image shows a color shift or horizontal lines, you can check the print head using the printer's control panel. NOZZLE CHECK is selected, then press r. Once the cartridge is not defined in the Epson printer driver or in . Doing so may prevent normal... check pattern to its package. See the User's Guide or Printer Guide for Your Paper" in the driver. Make sure the replacement cartridge is clean. 7. Press r, then press pattern. Use at least 3 seconds. Epson Stylus Pro 11880 10/07 Then insert the cartridge into the slot until TEST ...
... Check using your printed image shows a color shift or horizontal lines, you can check the print head using the printer's control panel. NOZZLE CHECK is selected, then press r. Once the cartridge is not defined in the Epson printer driver or in . Doing so may prevent normal... check pattern to its package. See the User's Guide or Printer Guide for Your Paper" in the driver. Make sure the replacement cartridge is clean. 7. Press r, then press pattern. Use at least 3 seconds. Epson Stylus Pro 11880 10/07 Then insert the cartridge into the slot until TEST ...
Quick Reference Guide
Page 4
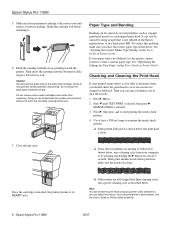
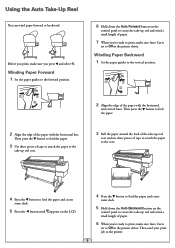
Then send your print job to Off in the printer driver. Then press the button to rotate the take -up reel and wind a small length of ... position. 2 Align the edge of paper. 6 When you're ready to print, make sure Auto Cut is set to the printer. 3 Then press the button to feed the paper. 3 Use three pieces of tape to attach the paper to the take-up... feed the paper and create some slack. 5 Hold down the Auto Forward button on the control panel to Off in the printer driver. Before you print, make sure you 're ready to print, make sure Auto Cut is set to rotate the take -up...
Then send your print job to Off in the printer driver. Then press the button to rotate the take -up reel and wind a small length of ... position. 2 Align the edge of paper. 6 When you're ready to print, make sure Auto Cut is set to the printer. 3 Then press the button to feed the paper. 3 Use three pieces of tape to attach the paper to the take-up... feed the paper and create some slack. 5 Hold down the Auto Forward button on the control panel to Off in the printer driver. Before you print, make sure you 're ready to print, make sure Auto Cut is set to rotate the take -up...

Quick Reference Guide
Page 6
... highlighted, then press Menu. 3 Select one of ink (and no paper) and is highlighted. ALIGNMENT AUTO UNI-D BI-D 2 COLOR BI-D ALL 9 To clean the print head manually, press the Menu button and hold it for more information. Then press Menu. 4 Press , ...you see misregistration or "ghosting," you want this to start with. See your printer driver (Windows). You can also run nozzle checks and head cleaning cycles from your computer using the Epson Printer Utility 2 (Macintosh) or the Utility tab in your Printer Guide for 3 seconds. Then press again to happen. 1 Press the Menu ...
... highlighted, then press Menu. 3 Select one of ink (and no paper) and is highlighted. ALIGNMENT AUTO UNI-D BI-D 2 COLOR BI-D ALL 9 To clean the print head manually, press the Menu button and hold it for more information. Then press Menu. 4 Press , ...you see misregistration or "ghosting," you want this to start with. See your printer driver (Windows). You can also run nozzle checks and head cleaning cycles from your computer using the Epson Printer Utility 2 (Macintosh) or the Utility tab in your Printer Guide for 3 seconds. Then press again to happen. 1 Press the Menu ...
User's Guide
Page 7
Contents | 7 4 Printing with Epson Drivers for Windows Choosing Basic Print Options 96 Selecting the Correct Media Type Setting 99 Choosing Printer Color Management Options 100 Choosing Roll Paper Options 102 Borderless Printing 104 Choosing Cut Sheet Paper Options 106 Choosing Page Layout Options 107 Choosing Paper Configuration ...
Contents | 7 4 Printing with Epson Drivers for Windows Choosing Basic Print Options 96 Selecting the Correct Media Type Setting 99 Choosing Printer Color Management Options 100 Choosing Roll Paper Options 102 Borderless Printing 104 Choosing Cut Sheet Paper Options 106 Choosing Page Layout Options 107 Choosing Paper Configuration ...
User's Guide
Page 8
... 154 Solving Paper Problems 155 Clearing Paper Jams 156 Uninstalling and Reinstalling the Printer Driver 158 Macintosh 158 Windows 158 7 Specifications Environmental 159 Electrical 159 Dimensions and Weight 159 Printer Interfaces 160 Safety Approvals 160 Media 160 Roll Paper 160 Cut Sheets 160 ...Printable Area 162 Ink Cartridges 162 Appendix Control Panel Menus 163 Epson Roll Paper Information and ICC Profiles 166 Epson Cut Sheet Paper Information and ICC Profiles 167 Managing Color ...
... 154 Solving Paper Problems 155 Clearing Paper Jams 156 Uninstalling and Reinstalling the Printer Driver 158 Macintosh 158 Windows 158 7 Specifications Environmental 159 Electrical 159 Dimensions and Weight 159 Printer Interfaces 160 Safety Approvals 160 Media 160 Roll Paper 160 Cut Sheets 160 ...Printable Area 162 Ink Cartridges 162 Appendix Control Panel Menus 163 Epson Roll Paper Information and ICC Profiles 166 Epson Cut Sheet Paper Information and ICC Profiles 167 Managing Color ...
User's Guide
Page 9
... equipment. 9 Introduction This User's Guide provides important information on setting up and configure the printer for use and printer maintenance-loading paper, replacing ink cartridges and other components, cleaning and aligning the print head, and using the Epson® printer drivers, and replacing ink cartridges. For additional information, see the following: • The Quick Reference...
... equipment. 9 Introduction This User's Guide provides important information on setting up and configure the printer for use and printer maintenance-loading paper, replacing ink cartridges and other components, cleaning and aligning the print head, and using the Epson® printer drivers, and replacing ink cartridges. For additional information, see the following: • The Quick Reference...

User's Guide
Page 42
...80 (Mac OS X) or page 99 (Windows) for instructions. • Always select the correct paper source (roll or sheet) in both the printer driver software and on the printer's control panel. See page 75 (Mac OS X) or page 106 (Windows) for instructions on selecting the paper source in your... humidity. Avoid storing your bare hands. 42 | Handling Paper and Other Media Guidelines for Using Epson Media Follow these guidelines, as well as those included in your paper package, when printing on Epson paper and other media: • Avoid touching the printable surface with the media. • Store...
...80 (Mac OS X) or page 99 (Windows) for instructions. • Always select the correct paper source (roll or sheet) in both the printer driver software and on the printer's control panel. See page 75 (Mac OS X) or page 106 (Windows) for instructions on selecting the paper source in your... humidity. Avoid storing your bare hands. 42 | Handling Paper and Other Media Guidelines for Using Epson Media Follow these guidelines, as well as those included in your paper package, when printing on Epson paper and other media: • Avoid touching the printable surface with the media. • Store...
User's Guide
Page 55
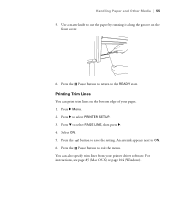
... trim lines on the front cover. 6. Use a matte knife to cut the paper by running it along the groove on the bottom edge of your printer driver software. Press the Pause button to ON. 6. Press r Menu. 2. An asterisk appears next to exit the menu. For instructions, see page 85 (Mac OS X) or... page 104 (Windows). 2-55 Handling Paper and Other Media | 55 5. Press r to the READY state. Press the Pause button to return to select PRINTER SETUP. 3. Printing Trim Lines You can also specify trim lines from your pages. 1.
... trim lines on the front cover. 6. Use a matte knife to cut the paper by running it along the groove on the bottom edge of your printer driver software. Press the Pause button to ON. 6. Press r Menu. 2. An asterisk appears next to exit the menu. For instructions, see page 85 (Mac OS X) or... page 104 (Windows). 2-55 Handling Paper and Other Media | 55 5. Press r to the READY state. Press the Pause button to return to select PRINTER SETUP. 3. Printing Trim Lines You can also specify trim lines from your pages. 1.

User's Guide
Page 58
Press the Auto Forward button on the control panel to the printer. Align the edge of paper. Hold down the Auto Forward button on the control panel, then send your print job to rotate the take -up ... horizontal line. Make sure there is enough slack between the paper and the take -up reel core. 9. If you 're ready to Off in the printer driver. 10. When you 're using the automatic media tracking system, the barcode is set to print, make sure Auto Cut is scanned. 2-58 Winding Paper...
Press the Auto Forward button on the control panel to the printer. Align the edge of paper. Hold down the Auto Forward button on the control panel, then send your print job to rotate the take -up ... horizontal line. Make sure there is enough slack between the paper and the take -up reel core. 9. If you 're ready to Off in the printer driver. 10. When you 're using the automatic media tracking system, the barcode is set to print, make sure Auto Cut is scanned. 2-58 Winding Paper...

User's Guide
Page 59
... slack. 7. Press d to feed the paper. 5. Hold down the Auto Backward button on the control panel, then send your print job to Off in the printer driver. 9. When you're ready to print, make sure Auto Cut is enough slack between the paper and the take-up reel core. 8. Pull the paper... rotate the take -up reel and wind a small length of tape to attach the paper to the core. 6. Make sure there is set to the printer. 2-59
... slack. 7. Press d to feed the paper. 5. Hold down the Auto Backward button on the control panel, then send your print job to Off in the printer driver. 9. When you're ready to print, make sure Auto Cut is enough slack between the paper and the take-up reel core. 8. Pull the paper... rotate the take -up reel and wind a small length of tape to attach the paper to the core. 6. Make sure there is set to the printer. 2-59
User's Guide
Page 70
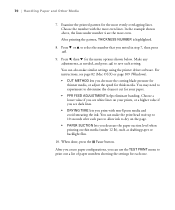
...use the TEST PRINT menu to determine the cleanest cut for each setting. Press l, then d for thick media. You can make similar settings using the printer driver software. 70 | Handling Paper and Other Media 7. After printing the pattern, THICKNESS NUMBER is highlighted. 8. For instructions, see dark lines. •...your paper. • PPR FEED ADJUSTMENT helps eliminate banding. Examine the printed pattern for the most even. Choose the number with non-Epson media and avoid smearing the ink. You can also make the print head wait up to 10 seconds after each pass to allow ...
...use the TEST PRINT menu to determine the cleanest cut for each setting. Press l, then d for thick media. You can make similar settings using the printer driver software. 70 | Handling Paper and Other Media 7. After printing the pattern, THICKNESS NUMBER is highlighted. 8. For instructions, see dark lines. •...your paper. • PPR FEED ADJUSTMENT helps eliminate banding. Examine the printed pattern for the most even. Choose the number with non-Epson media and avoid smearing the ink. You can also make the print head wait up to 10 seconds after each pass to allow ...

User's Guide
Page 73
... advanced print options, including color management and paper configuration settings • Choosing roll paper options • Choosing advanced black and white photo settings • Creating a custom preset and printing • Managing print jobs • Checking printer status 73 73 Chapter 3: Printing with Epson Drivers for Macintosh Your Epson Stylus Pro 11880 comes with drivers and utilities that may become...
... advanced print options, including color management and paper configuration settings • Choosing roll paper options • Choosing advanced black and white photo settings • Creating a custom preset and printing • Managing print jobs • Checking printer status 73 73 Chapter 3: Printing with Epson Drivers for Macintosh Your Epson Stylus Pro 11880 comes with drivers and utilities that may become...


