Datasheet
Page 1
... eliminates the hassle of needing to capture detailed videos in the event of network transmission interruption. Ltd. www.edimax.com IR-113E 3Mpx Outdoor PoE True Day & Night Network Camera Overview The Edimax IR-113E is an ONVIF compliant true day and night network camera with QXGA (2048 x 1536) video resolution at 20fps, which enables power and data transmission over a single Ethernet cable and eliminating the hassle of installing an additional power cable and adapter.
... eliminates the hassle of needing to capture detailed videos in the event of network transmission interruption. Ltd. www.edimax.com IR-113E 3Mpx Outdoor PoE True Day & Night Network Camera Overview The Edimax IR-113E is an ONVIF compliant true day and night network camera with QXGA (2048 x 1536) video resolution at 20fps, which enables power and data transmission over a single Ethernet cable and eliminating the hassle of installing an additional power cable and adapter.
Datasheet
Page 2
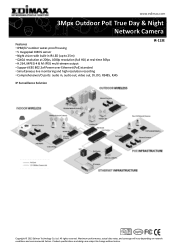
... HD) at real-time 30fps • H.264, MPEG-4 & M-JPEG multi-stream output • Support IEEE 802.3af Power over Ethernet (PoE) standard • Simultaneous live monitoring and high resolution recording • Comprehensive I/O ports: audio in IR LED (up to change without notice. Maximum performance, actual data rates, and coverage will vary depending on network conditions and environmental factors. www.edimax.com 3Mpx Outdoor PoE True Day & Night Network Camera Features •...
... HD) at real-time 30fps • H.264, MPEG-4 & M-JPEG multi-stream output • Support IEEE 802.3af Power over Ethernet (PoE) standard • Simultaneous live monitoring and high resolution recording • Comprehensive I/O ports: audio in IR LED (up to change without notice. Maximum performance, actual data rates, and coverage will vary depending on network conditions and environmental factors. www.edimax.com 3Mpx Outdoor PoE True Day & Night Network Camera Features •...
Datasheet
Page 3
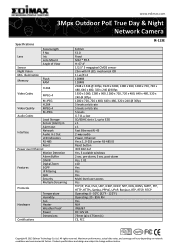
... RS-485 ID Reset button IEEE 802.3af Yes, 3 scalable windows 2 sec. www.edimax.com 3Mpx Outdoor PoE True Day & Night Network Camera Specifications Lens Sensor Night Vision Min. Iris Lens Mount Angle of View Flash RAM H.264 Video Codec MPEG-4 M-JPEG H.264 Video Quality MPEG-4 M-JPEG Audio Codec Local Storage Sensor (Alarm) in Alarm out Interface Network Audio In / Out LED Indicators RS-485 Reset Power over Ethernet Motion Detection Alarm Buffer...
... RS-485 ID Reset button IEEE 802.3af Yes, 3 scalable windows 2 sec. www.edimax.com 3Mpx Outdoor PoE True Day & Night Network Camera Specifications Lens Sensor Night Vision Min. Iris Lens Mount Angle of View Flash RAM H.264 Video Codec MPEG-4 M-JPEG H.264 Video Quality MPEG-4 M-JPEG Audio Codec Local Storage Sensor (Alarm) in Alarm out Interface Network Audio In / Out LED Indicators RS-485 Reset Power over Ethernet Motion Detection Alarm Buffer...
Quick Install Guide
Page 3
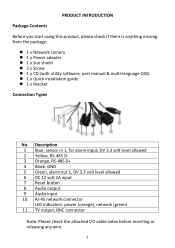
...‐45 network connector LED indicators: power (orange), network (green) 11 TV output, BNC connector Note: Please check the attached I/O cable index before inserting or releasing any wire. 2 PRODUCT INTRODUCTION Package Contents Before you start using this product, please check if there is anything missing from the package: z 1 x Network camera z 1 x Power adapter z 1 x Sun shield z 2 x Screw z 1 x CD (with utility software, user manual & multi‐language QIG) z 1 x Quick installation guide z 1 x Bracket Connection Types No.
...‐45 network connector LED indicators: power (orange), network (green) 11 TV output, BNC connector Note: Please check the attached I/O cable index before inserting or releasing any wire. 2 PRODUCT INTRODUCTION Package Contents Before you start using this product, please check if there is anything missing from the package: z 1 x Network camera z 1 x Power adapter z 1 x Sun shield z 2 x Screw z 1 x CD (with utility software, user manual & multi‐language QIG) z 1 x Quick installation guide z 1 x Bracket Connection Types No.
Quick Install Guide
Page 5
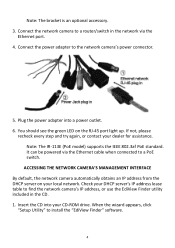
...;ROM drive. ACCESSING THE NETWORK CAMERA'S MANAGEMENT INTERFACE By default, the network camera automatically obtains an IP address from the DHCP server on the RJ‐45 port light up. It can be powered via the Ethernet port. 4. Insert the CD into a power outlet. 6. Plug the power adapter into your local network. Check your dealer for assistance. When the wizard appears, click "Setup Utility" to the network camera's power connector. 5. Connect the power adapter to install the "EdiView Finder" software. 4 Connect the network camera...
...;ROM drive. ACCESSING THE NETWORK CAMERA'S MANAGEMENT INTERFACE By default, the network camera automatically obtains an IP address from the DHCP server on the RJ‐45 port light up. It can be powered via the Ethernet port. 4. Insert the CD into a power outlet. 6. Plug the power adapter into your local network. Check your dealer for assistance. When the wizard appears, click "Setup Utility" to the network camera's power connector. 5. Connect the power adapter to install the "EdiView Finder" software. 4 Connect the network camera...
Quick Install Guide
Page 7
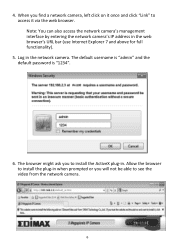
... the video from the network camera. 6 Log in the web browser's URL bar (use Internet Explorer 7 and above for full functionality). 5. The default username is "admin" and the default password is "1234". 6. Allow the browser to install the plug‐in . When you will not be able to install the ActiveX plug‐in when prompted or you find a network camera, left click on it once and click "Link" to access it...
... the video from the network camera. 6 Log in the web browser's URL bar (use Internet Explorer 7 and above for full functionality). 5. The default username is "admin" and the default password is "1234". 6. Allow the browser to install the plug‐in . When you will not be able to install the ActiveX plug‐in when prompted or you find a network camera, left click on it once and click "Link" to access it...
Quick Install Guide
Page 8
...user is restricted for use with Part 15 of the FCC Rules. EU Countries Intended for Use The ETSI version of this device is intended for home and office use in laptop computer(s) with all times to the following measures: 1. The ETSI version of this device is also authorized for use in accordance with the instructions...device complies with the specific antenna tested in conjunction with the utmost care for the safety of those who install and use it. If this device must not be co‐located or operating in conjunction with FCC radiation exposure set forth for compliance ...
...user is restricted for use with Part 15 of the FCC Rules. EU Countries Intended for Use The ETSI version of this device is intended for home and office use in laptop computer(s) with all times to the following measures: 1. The ETSI version of this device is also authorized for use in accordance with the instructions...device complies with the specific antenna tested in conjunction with the utmost care for the safety of those who install and use it. If this device must not be co‐located or operating in conjunction with FCC radiation exposure set forth for compliance ...
Manual
Page 2
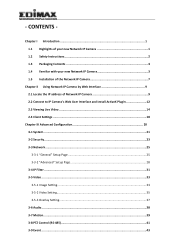
... IP Camera 3 1.5 Installation of the Network IP Camera 7 Chapter II Using Network IP Camera by Web Interface 9 2.1 Locate the IP address of Network IP Camera 9 2.2 Connect to IP Camera's Web User Interface and Install ActiveX Plugin 12 2.3 Viewing Live Video 14 2.4 Client Settings ...18 Chapter III Advanced Configuration 20 3-1 System...21 3-2 Security...23 3-3 Network...25 3-3-1 "General" Setup Page 25 3-3-2 "Advanced" Setup Page 28 3-4 IP Filter ...31 3-5 Video ...33 3-5-1 Image Setting ...33 3-5-2 Video Setting...35 3-5-3 Overlay Setting...37 3-6 Audio...38 3-7 Motion...39 3-8 PTZ...
... IP Camera 3 1.5 Installation of the Network IP Camera 7 Chapter II Using Network IP Camera by Web Interface 9 2.1 Locate the IP address of Network IP Camera 9 2.2 Connect to IP Camera's Web User Interface and Install ActiveX Plugin 12 2.3 Viewing Live Video 14 2.4 Client Settings ...18 Chapter III Advanced Configuration 20 3-1 System...21 3-2 Security...23 3-3 Network...25 3-3-1 "General" Setup Page 25 3-3-2 "Advanced" Setup Page 28 3-4 IP Filter ...31 3-5 Video ...33 3-5-1 Image Setting ...33 3-5-2 Video Setting...35 3-5-3 Overlay Setting...37 3-6 Audio...38 3-7 Motion...39 3-8 PTZ...
Manual
Page 4
...-alone DVR. Two Way audio. 3GPP Mobile Surveillance Supported. RS-485 communication supported. ONVIF Compliant. The IR-113E (PoE model) Supports IEEE802.3af Power over Ethernet (PoE) standard. 1 Other highlights of your new Network IP Camera Congratulates on purchasing this network IP Camera include: Ultra-high resolution 5Mega pixel CMOS image sensor. Analog video (BNC) output, works with the advanced megapixel lens, you can listen to...
...-alone DVR. Two Way audio. 3GPP Mobile Surveillance Supported. RS-485 communication supported. ONVIF Compliant. The IR-113E (PoE model) Supports IEEE802.3af Power over Ethernet (PoE) standard. 1 Other highlights of your new Network IP Camera Congratulates on purchasing this network IP Camera include: Ultra-high resolution 5Mega pixel CMOS image sensor. Analog video (BNC) output, works with the advanced megapixel lens, you can listen to...

Manual
Page 12
...: Microsoft Windows XP/Vista/7 ■ Browser: IE7 (and above for full functionality) ■ Cell phone: 3GPP player ■ Quick Time 6.5 or above . Insert the CD into your DHCP server's IP address lease table to install the "EdiView Finder" software. 9 By default, the network camera automatically obtains an IP address from the DHCP server on your new Network IP Camera by Web Interface 2.1 Locate the IP address of Network IP Camera You can use Microsoft Windows Internet Explorer...
...: Microsoft Windows XP/Vista/7 ■ Browser: IE7 (and above for full functionality) ■ Cell phone: 3GPP player ■ Quick Time 6.5 or above . Insert the CD into your DHCP server's IP address lease table to install the "EdiView Finder" software. 9 By default, the network camera automatically obtains an IP address from the DHCP server on your new Network IP Camera by Web Interface 2.1 Locate the IP address of Network IP Camera You can use Microsoft Windows Internet Explorer...
Manual
Page 17
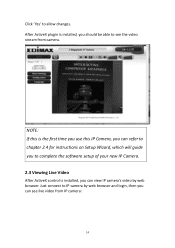
Click 'Yes' to complete the software setup of your new IP Camera. 2.3 Viewing Live Video After ActiveX control is installed, you can view IP camera's video by web browser. After ActiveX plugin is installed, you can see the video stream from IP camera: 14 Just connect to IP camera by web browser and login, then you should be able to see live video from camera. NOTE: If this is the first time you use this IP Camera, you can refer to chapter 2.4 for instructions on Setup Wizard, which will guide you to allow changes.
Click 'Yes' to complete the software setup of your new IP Camera. 2.3 Viewing Live Video After ActiveX control is installed, you can view IP camera's video by web browser. After ActiveX plugin is installed, you can see the video stream from IP camera: 14 Just connect to IP camera by web browser and login, then you should be able to see live video from camera. NOTE: If this is the first time you use this IP Camera, you can refer to chapter 2.4 for instructions on Setup Wizard, which will guide you to allow changes.

Manual
Page 33
... login dynamic IP service provider. HTTPS Password: Input the password used to encrypt transferred data. Host Name: Input the host name you finish, click 'Apply' to save changes. 30 Provider: Select dynamic IP service provider. You can also define HTTPS port number in 'HTTPS Port' field if you . Currently this IP camera supports Dyndns, TZO and No-ip dynamic IP service. DDNS Enable DDNS support if your ISP assigns dynamic IP address...
... login dynamic IP service provider. HTTPS Password: Input the password used to encrypt transferred data. Host Name: Input the host name you finish, click 'Apply' to save changes. 30 Provider: Select dynamic IP service provider. You can also define HTTPS port number in 'HTTPS Port' field if you . Currently this IP camera supports Dyndns, TZO and No-ip dynamic IP service. DDNS Enable DDNS support if your ISP assigns dynamic IP address...
Manual
Page 50
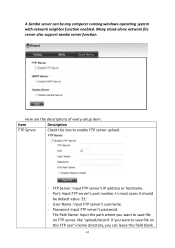
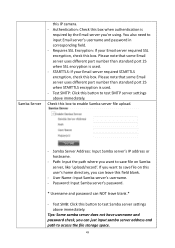
... support samba server function. FTP Server: Input FTP server's IP address or hostname. - In most cases it should be any computer running windows operating system with network neighbor function enabled. Port: Input FTP server's port number. File Path Name: Input the path where you want to save file on this FTP user's home directory, you want to save file on FTP server, like 'upload/record'. Password: Input FTP server's password. - If you can be default value '21'. - User Name: Input FTP server's username. - A Samba server can leave this box to enable FTP server upload...
... support samba server function. FTP Server: Input FTP server's IP address or hostname. - In most cases it should be any computer running windows operating system with network neighbor function enabled. Port: Input FTP server's port number. File Path Name: Input the path where you want to save file on this FTP user's home directory, you want to save file on FTP server, like 'upload/record'. Password: Input FTP server's password. - If you can be default value '21'. - User Name: Input FTP server's username. - A Samba server can leave this box to enable FTP server upload...
Manual
Page 52
... Samba server's password. * Username and password can leave this user's home directory, you want to access the file storage space. 49 Please note that some Email server uses different port number than standard port 25 when STARTTLS encryption is used . - You also need to enable Samba server file upload. - Requires SSL Encryption: If your Email server required STARTTLS encryption, check this box. Test SMTP: Click this button to test SMTP server settings above immediately. Test SMB: Click this button to test Samba server settings...
... Samba server's password. * Username and password can leave this user's home directory, you want to access the file storage space. 49 Please note that some Email server uses different port number than standard port 25 when STARTTLS encryption is used . - You also need to enable Samba server file upload. - Requires SSL Encryption: If your Email server required STARTTLS encryption, check this box. Test SMTP: Click this button to test SMTP server settings above immediately. Test SMB: Click this button to test Samba server settings...
Manual
Page 60
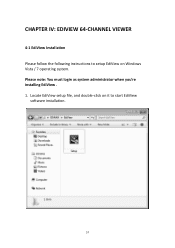
Please note: You must login as system administrator when you're installing EdiView . 1. Locate EdiView setup file, and double-click on it to setup EdiView on Windows Vista / 7 operating system. CHAPTER IV: EDIVIEW 64-CHANNEL VIEWER 4-1 EdiView Installation Please follow the following instructions to start EdiView software installation. 57
Please note: You must login as system administrator when you're installing EdiView . 1. Locate EdiView setup file, and double-click on it to setup EdiView on Windows Vista / 7 operating system. CHAPTER IV: EDIVIEW 64-CHANNEL VIEWER 4-1 EdiView Installation Please follow the following instructions to start EdiView software installation. 57
Manual
Page 80
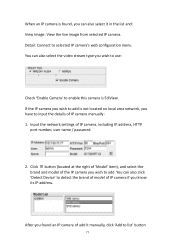
... live image from selected IP camera. You can also select it manually, click 'Add to list' button 77 Click button (located at the right of 'Model' item), and select the brand and model of the IP camera you know its IP address. When an IP camera is EdiView. Detail: Connect to detect the brand of model of IP camera, including IP address, HTTP port number, user name / password. 2. You can also select the video stream type...
... live image from selected IP camera. You can also select it manually, click 'Add to list' button 77 Click button (located at the right of 'Model' item), and select the brand and model of the IP camera you know its IP address. When an IP camera is EdiView. Detail: Connect to detect the brand of model of IP camera, including IP address, HTTP port number, user name / password. 2. You can also select the video stream type...
Manual
Page 81
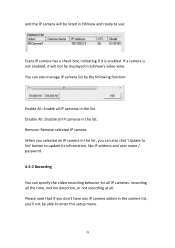
Disable All: Disable all IP cameras in the list. When you selected an IP camera in the list, you 'll not be displayed in EdiView's video view. You can specify the video recording behavior for all IP cameras: recording all the time, motion detection, or not recording at all. and the IP camera will be listed in EdiView and ready to use: Every IP camera has a check box...
Disable All: Disable all IP cameras in the list. When you selected an IP camera in the list, you 'll not be displayed in EdiView's video view. You can specify the video recording behavior for all IP cameras: recording all the time, motion detection, or not recording at all. and the IP camera will be listed in EdiView and ready to use: Every IP camera has a check box...
Manual
Page 83
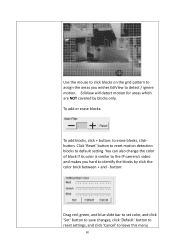
... the IP camera's video and makes you wishes EdiView to identify the blocks by blocks only. Use the mouse to click blocks on the grid pattern to assign the areas you hard to detect / ignore motion. button: Drag red, green, and blue slide bar to set color, and click 'Set' button to save changes, click 'Default' button to reset settings, and click 'Cancel' to default setting. EdiView will detect motion for...
... the IP camera's video and makes you wishes EdiView to identify the blocks by blocks only. Use the mouse to click blocks on the grid pattern to assign the areas you hard to detect / ignore motion. button: Drag red, green, and blue slide bar to set color, and click 'Set' button to save changes, click 'Default' button to reset settings, and click 'Cancel' to default setting. EdiView will detect motion for...
Manual
Page 96
.... Select IP cameras you wish to allow this user to add this new user. When you finishes setting, click 'Add/Modify' button to view. You can start or stop video recording. Camera List Playback: User can click 'Playback' button in both fields. The descriptions of every setup items are listed as follow: Item User ID Description Password / Confirm Password User Privilege Description Input the user ID used to login EdiView Input any...
.... Select IP cameras you wish to allow this user to add this new user. When you finishes setting, click 'Add/Modify' button to view. You can start or stop video recording. Camera List Playback: User can click 'Playback' button in both fields. The descriptions of every setup items are listed as follow: Item User ID Description Password / Confirm Password User Privilege Description Input the user ID used to login EdiView Input any...

Manual
Page 108
... local area network. 3) Please make sure power cable is correctly connected to IP Camera. 4) Please make sure IP Camera is switched on (the LED lights on IP Camera will light up). 1) 'Auto search' function only works on IP Cameras located on control panel in Window OS 2. Chapter V Troubleshooting Please don't panic when you need to manually remove" SetupEdiview " *3. Before you send this IP Camera is too dark, try to add some...
... local area network. 3) Please make sure power cable is correctly connected to IP Camera. 4) Please make sure IP Camera is switched on (the LED lights on IP Camera will light up). 1) 'Auto search' function only works on IP Cameras located on control panel in Window OS 2. Chapter V Troubleshooting Please don't panic when you need to manually remove" SetupEdiview " *3. Before you send this IP Camera is too dark, try to add some...

