Datasheet
Page 1
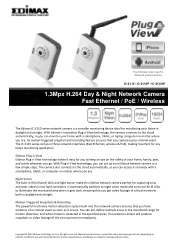
... of a criminal event as soon as it perfect for any home monitoring application. The camera also connects to illuminate the monitored area when it remotely with a smartphone, tablet, or laptop computer no matter where you are. All rights reserved. Free EdiView viewer app for iPhone & Android phones IC-3110 / IC-3110P / IC-3110W 1.3Mpx H.264 Day & Night Network Camera Fast Ethernet / PoE / Wireless The Edimax IC‐3110 series network camera is detected in the...
... of a criminal event as soon as it perfect for any home monitoring application. The camera also connects to illuminate the monitored area when it remotely with a smartphone, tablet, or laptop computer no matter where you are. All rights reserved. Free EdiView viewer app for iPhone & Android phones IC-3110 / IC-3110P / IC-3110W 1.3Mpx H.264 Day & Night Network Camera Fast Ethernet / PoE / Wireless The Edimax IC‐3110 series network camera is detected in the...
Datasheet
Page 2
... Power 1 x Ethernet (RJ‐45) port 1 x Power jack 1 x Audio output 1 x Microphone 1 x Reset/WPS button (IC‐3110W only) 1 x SDHC/SD card slot (up to change without notice. All rights reserved. Ltd. Product specifications and design are subject to 32GB) 1 x USB port for Wi‐Fi adapter (IC‐3110 only) 1 x Detachable antenna (IC‐3110W only) EdiView Finder (Windows/Mac) 16‐channel viewer Web management interface Firmware upgradable iPhone & iPad viewer app Android phone viewer...
... Power 1 x Ethernet (RJ‐45) port 1 x Power jack 1 x Audio output 1 x Microphone 1 x Reset/WPS button (IC‐3110W only) 1 x SDHC/SD card slot (up to change without notice. All rights reserved. Ltd. Product specifications and design are subject to 32GB) 1 x USB port for Wi‐Fi adapter (IC‐3110 only) 1 x Detachable antenna (IC‐3110W only) EdiView Finder (Windows/Mac) 16‐channel viewer Web management interface Firmware upgradable iPhone & iPad viewer app Android phone viewer...
Quick Install Guide
Page 6
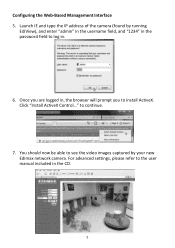
Once you are logged in . 6. Click "Install ActiveX Control..." You should now be able to install ActiveX. to log in , the browser will prompt you to see the video images captured by running EdiView), and enter "admin" in the username field, and "1234" in the CD. 5 Launch IE and type the IP address of the camera (found by your new Edimax network camera. Configuring the Web-Based Management Interface 5. For advanced settings, please refer to the user manual included in the password field to continue. 7.
Once you are logged in . 6. Click "Install ActiveX Control..." You should now be able to install ActiveX. to log in , the browser will prompt you to see the video images captured by running EdiView), and enter "admin" in the username field, and "1234" in the CD. 5 Launch IE and type the IP address of the camera (found by your new Edimax network camera. Configuring the Web-Based Management Interface 5. For advanced settings, please refer to the user manual included in the password field to continue. 7.

Quick Install Guide
Page 9
... FCC radiation exposure set forth for help. Federal Communications Commission (FCC) Radiation Exposure Statement This equipment complies with Part 15 of FCC Rules. R&TTE Compliance Statement This equipment complies with the specific antenna tested in a residential installation. Consult the dealer or an experienced radio technician for an uncontrolled environment. Use in other devices such as tested in the application...
... FCC radiation exposure set forth for help. Federal Communications Commission (FCC) Radiation Exposure Statement This equipment complies with Part 15 of FCC Rules. R&TTE Compliance Statement This equipment complies with the specific antenna tested in a residential installation. Consult the dealer or an experienced radio technician for an uncontrolled environment. Use in other devices such as tested in the application...
Manual
Page 3
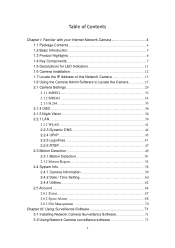
... 7 1.5 Descriptions for LED Indicators 11 1.6 Camera Installation 12 1.7 Locate the IP Address of this Network Camera 13 1.8 Using the Camera Admin Software to Locate the Camera 17 2.1 Camera Settings 29 2.1.1 MJPEG 33 2.1.2 MPEG4 34 2.1.3 H.264 35 2.1.4 OSD...36 2.1.5 Night Vision 36 2.2.1 LAN...39 2.2.2 WLAN 41 2.2.3 Dynamic DNS 44 2.2.4 UPnP 45 2.2.5 LoginFree 47 2.2.6 RTSP 47 2.3 Motion Detection 49 2.3.1 Motion Detection 50 2.3.2 Motion Region 52 2.4 System Info 58 2.4.1 Camera Information 59 2.4.2 Date / Time Setting 60 2.4.4 Utilities 62 2.5 Account...64...
... 7 1.5 Descriptions for LED Indicators 11 1.6 Camera Installation 12 1.7 Locate the IP Address of this Network Camera 13 1.8 Using the Camera Admin Software to Locate the Camera 17 2.1 Camera Settings 29 2.1.1 MJPEG 33 2.1.2 MPEG4 34 2.1.3 H.264 35 2.1.4 OSD...36 2.1.5 Night Vision 36 2.2.1 LAN...39 2.2.2 WLAN 41 2.2.3 Dynamic DNS 44 2.2.4 UPnP 45 2.2.5 LoginFree 47 2.2.6 RTSP 47 2.3 Motion Detection 49 2.3.1 Motion Detection 50 2.3.2 Motion Region 52 2.4 System Info 58 2.4.1 Camera Information 59 2.4.2 Date / Time Setting 60 2.4.4 Utilities 62 2.5 Account...64...
Manual
Page 4
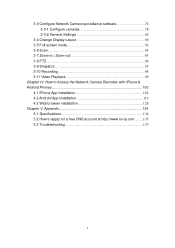
3-3 Configure Network Camera surveillance software 78 3-3-1 Configure cameras 78 3-3-2 General Settings 85 3-4 Change Display Layout 90 3-5 Full-screen mode 93 3-6 Scan...94 3-7 Zoom-in / Zoom-out 95 3-8 PTZ ...96 3-9 Snapshot...97 3-10 Recording 98 3-11 Video Playback 99 Chapter IV: How to Access the Network Camera Remotely with iPhone & Android Phones 100 4.1 iPhone App Installation 102 4.2 Android App installation 113 4.3 Web browser installation 128 Chapter V: Appendix 134 5.1 Specifications 134 5.2 How to apply for a free DNS account at http://www.no-ip.com...
3-3 Configure Network Camera surveillance software 78 3-3-1 Configure cameras 78 3-3-2 General Settings 85 3-4 Change Display Layout 90 3-5 Full-screen mode 93 3-6 Scan...94 3-7 Zoom-in / Zoom-out 95 3-8 PTZ ...96 3-9 Snapshot...97 3-10 Recording 98 3-11 Video Playback 99 Chapter IV: How to Access the Network Camera Remotely with iPhone & Android Phones 100 4.1 iPhone App Installation 102 4.2 Android App installation 113 4.3 Web browser installation 128 Chapter V: Appendix 134 5.1 Specifications 134 5.2 How to apply for a free DNS account at http://www.no-ip.com...
Manual
Page 5
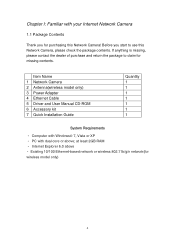
... 1 Network Camera 2 Antenna(wireless model only) 3 Power Adapter 4 Ethernet Cable 5 Driver and User Manual CD-ROM 6 Accessory kit 7 Quick Installation Guide Quantity 1 1 1 1 1 1 1 System Requirements • Computer with Windows® 7, Vista or XP • PC with your Internet Network Camera 1.1 Package Contents Thank you start to claim for missing contents. at least 2GB RAM • Internet Explorer 6.0 above ; If anything is missing, please contact the dealer of purchase and return the package to use...
... 1 Network Camera 2 Antenna(wireless model only) 3 Power Adapter 4 Ethernet Cable 5 Driver and User Manual CD-ROM 6 Accessory kit 7 Quick Installation Guide Quantity 1 1 1 1 1 1 1 System Requirements • Computer with Windows® 7, Vista or XP • PC with your Internet Network Camera 1.1 Package Contents Thank you start to claim for missing contents. at least 2GB RAM • Internet Explorer 6.0 above ; If anything is missing, please contact the dealer of purchase and return the package to use...
Manual
Page 7
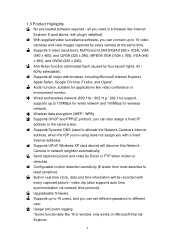
... be recorded with every captured picture / video clip (also supports auto time synchronization via network time protocol). Supports up to different user. Supports all you can set different password to 16 video cameras and view images captured by fluorescent lights, 50 / 60Hz selectable). Built-in network neighbor automatically. Wireless data encryption (WEP / WPA) Supports DHCP and PPPoE protocol, you need is detected. 1.3 Product Highlights No pre-loaded software required - With supplied video surveillance software, you with plugin installed). Configurable motion...
... be recorded with every captured picture / video clip (also supports auto time synchronization via network time protocol). Supports up to different user. Supports all you can set different password to 16 video cameras and view images captured by fluorescent lights, 50 / 60Hz selectable). Built-in network neighbor automatically. Wireless data encryption (WEP / WPA) Supports DHCP and PPPoE protocol, you need is detected. 1.3 Product Highlights No pre-loaded software required - With supplied video surveillance software, you with plugin installed). Configurable motion...
Manual
Page 10
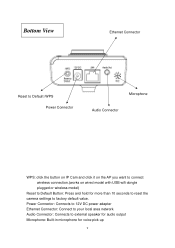
... Power Connector Microphone Audio Connector WPS: click the button on IP Cam and click it on the AP you want to connect wireless connection.(works on wired model with USB wifi dongle plugged or wireless model) Reset to Default Button: Press and hold for more than 10 seconds to reset the camera settings to external speaker for audio output Microphone: Built-in microphone for voice pick-up 9 Power Connector: Connects to 12V DC power adapter Ethernet Connector: Connect to your local area network Audio Connector: Connects to factory default...
... Power Connector Microphone Audio Connector WPS: click the button on IP Cam and click it on the AP you want to connect wireless connection.(works on wired model with USB wifi dongle plugged or wireless model) Reset to Default Button: Press and hold for more than 10 seconds to reset the camera settings to external speaker for audio output Microphone: Built-in microphone for voice pick-up 9 Power Connector: Connects to 12V DC power adapter Ethernet Connector: Connect to your local area network Audio Connector: Connects to factory default...

Manual
Page 25
.... If you 'll have to reset the camera. 24 This should be changed. 1.9 Logging in the Management Interface Make sure the network camera is correctly powered (Power LED is '1234'. Click 'OK' to input the user name and password: Default user name is 'admin' and password is on), and then launch Internet Explorer and type the IP address of the network camera in address bar of Internet Explorer. Please try to obtain the...
.... If you 'll have to reset the camera. 24 This should be changed. 1.9 Logging in the Management Interface Make sure the network camera is correctly powered (Power LED is '1234'. Click 'OK' to input the user name and password: Default user name is 'admin' and password is on), and then launch Internet Explorer and type the IP address of the network camera in address bar of Internet Explorer. Please try to obtain the...
Manual
Page 40
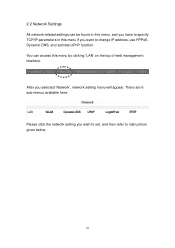
2.2 Network Settings All network-related settings can access this menu if you selected 'Network', network setting menu will appear. After you want to instructions given below: 39 There are 6 sub-menus available here: Please click the network setting you wish to set, and then refer to change IP address, use PPPoE, Dynamic DNS, and activate UPnP function. You can be found in this menu, and you have to specify TCP/IP parameters in this menu by clicking 'LAN' on the top of web management interface.
2.2 Network Settings All network-related settings can access this menu if you selected 'Network', network setting menu will appear. After you want to instructions given below: 39 There are 6 sub-menus available here: Please click the network setting you wish to set, and then refer to change IP address, use PPPoE, Dynamic DNS, and activate UPnP function. You can be found in this menu, and you have to specify TCP/IP parameters in this menu by clicking 'LAN' on the top of web management interface.
Manual
Page 42
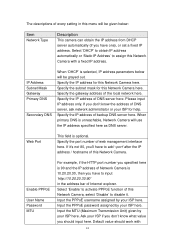
... address for this Network Camera here. Specify the IP address of web management interface here. Enable PPPoE User Name Password MTU For example, if the HTTP port number you specified here is 90 and the IP address of Network Camera is optional. IP Address Subnet Mask Gateway Primary DNS Secondary DNS When 'DHCP' is unreachable, Network Camera will use the IP address specified here as DNS server. Default value should input here. Specify the port number of DNS server...
... address for this Network Camera here. Specify the IP address of web management interface here. Enable PPPoE User Name Password MTU For example, if the HTTP port number you specified here is 90 and the IP address of Network Camera is optional. IP Address Subnet Mask Gateway Primary DNS Secondary DNS When 'DHCP' is unreachable, Network Camera will use the IP address specified here as DNS server. Default value should input here. Specify the port number of DNS server...
Manual
Page 67
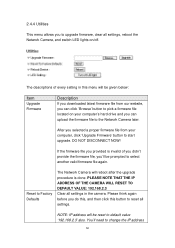
... all settings, reboot the Network Camera, and switch LED lights on your computer, click 'Upgrade Firmware' button to start upgrade. The descriptions of you didn't provide the firmware file, you'll be reset to Factory Defaults The Network Camera will be prompted to select another valid firmware file again. You'll need to change the IP address 66 After you selected a proper firmware file from our website, you can upload the firmware file to the Network Camera later. 2.4.4 Utilities This...
... all settings, reboot the Network Camera, and switch LED lights on your computer, click 'Upgrade Firmware' button to start upgrade. The descriptions of you didn't provide the firmware file, you'll be reset to Factory Defaults The Network Camera will be prompted to select another valid firmware file again. You'll need to change the IP address 66 After you selected a proper firmware file from our website, you can upload the firmware file to the Network Camera later. 2.4.4 Utilities This...
Manual
Page 69
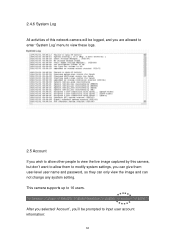
2.4.6 System Log All activities of this network camera will be prompted to input user account information: 68 This camera supports up to modify system settings, you can give them user-level user name and password, so they can only view the image and can not change any system setting. After you selected 'Account', you'll be logged, and you are allowed to enter 'System Log' menu to view these logs. 2.5 Account If you wish to allow other people to view the live image captured by this camera, but don't want to allow them to 16 users.
2.4.6 System Log All activities of this network camera will be prompted to input user account information: 68 This camera supports up to modify system settings, you can give them user-level user name and password, so they can only view the image and can not change any system setting. After you selected 'Account', you'll be logged, and you are allowed to enter 'System Log' menu to view these logs. 2.5 Account If you wish to allow other people to view the live image captured by this camera, but don't want to allow them to 16 users.
Manual
Page 70
... view the image of Network Camera at the same time. 69 Remove an existing user. Input the password of this button to add the account. Modify an existing user's information. Input the login name (user name) of this user here again for confirmation. Click 'Apply' to select a user from user list first. The descriptions of every setting in this menu will be given below: Item User List Login Password...
... view the image of Network Camera at the same time. 69 Remove an existing user. Input the password of this button to add the account. Modify an existing user's information. Input the login name (user name) of this user here again for confirmation. Click 'Apply' to select a user from user list first. The descriptions of every setting in this menu will be given below: Item User List Login Password...
Manual
Page 81
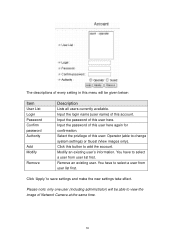
... switch displaying the image of all connected camera automatically. Click this button and the Network Camera surveillance software will become white ). Zoom In Zoom-in PTZ control ring. If the camera you connect support PTZ, you can put the mouse cursor on a certain component and see more objects). Start video recording. This function is only available for supported cameras. Change camera image display layout (Click a layout icon to change the direction that camera points to. This...
... switch displaying the image of all connected camera automatically. Click this button and the Network Camera surveillance software will become white ). Zoom In Zoom-in PTZ control ring. If the camera you connect support PTZ, you can put the mouse cursor on a certain component and see more objects). Start video recording. This function is only available for supported cameras. Change camera image display layout (Click a layout icon to change the direction that camera points to. This...
Manual
Page 85
... available for cameras support this camera (MJPEG or MPEG4). Web Port* Input the web port of selected camera, this tab. OK Save settings in Network Camera surveillance software's main menu: 84 name of camera so you can not be changed the password of camera. Username* Input the user name of purpose easily. You should change the password if you changed . Password Input the password of selected camera. Video Format** Select the video encoding format of camera. Default value is '1234...
... available for cameras support this camera (MJPEG or MPEG4). Web Port* Input the web port of selected camera, this tab. OK Save settings in Network Camera surveillance software's main menu: 84 name of camera so you can not be changed the password of camera. Username* Input the user name of purpose easily. You should change the password if you changed . Password Input the password of selected camera. Video Format** Select the video encoding format of camera. Default value is '1234...
Manual
Page 126
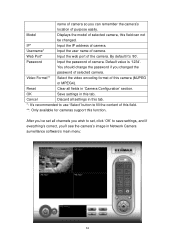
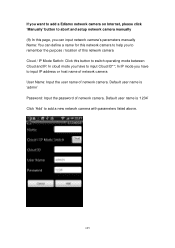
... to add a Ediamx network camera on Internet, please click 'Manually' button to abort and setup network camera manually (9) In this page, you can input network camera's parameters manually Name: You can define a name for this button to switch operating mode between Cloud and IP. Default user name is '1234' Click 'Add' to input Cloud ID**; In IP mode you to remember the purpose / location of network camera. Default user name is 'admin' Password: Input the password of this network camera...
... to add a Ediamx network camera on Internet, please click 'Manually' button to abort and setup network camera manually (9) In this page, you can input network camera's parameters manually Name: You can define a name for this button to switch operating mode between Cloud and IP. Default user name is '1234' Click 'Add' to input Cloud ID**; In IP mode you to remember the purpose / location of network camera. Default user name is 'admin' Password: Input the password of this network camera...
Manual
Page 142
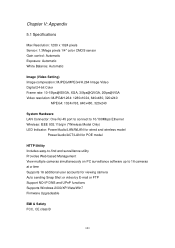
... port to connect to 10/100Mbps Ethernet Wireless: IEEE 802.11b/g/n (*Wireless Model Only) LED Indicator: Power/Audio/LAN/WLAN for wired and wireless model Power/Audio/ACT/LAN for POE model HTTP/Utility Includes easy-to-find and surveillance utility Provides Web based Management View multiple cameras simultaneously on PC surveillance software up to 16 cameras at a time Supports 16 additional user accounts for viewing camera Auto sending Snap Shot or video by E-mail or FTP Support NO-IP DNS and UPnP functions Supports Windows 2000/XP/Vista/Win7 Firmware Upgradeable...
... port to connect to 10/100Mbps Ethernet Wireless: IEEE 802.11b/g/n (*Wireless Model Only) LED Indicator: Power/Audio/LAN/WLAN for wired and wireless model Power/Audio/ACT/LAN for POE model HTTP/Utility Includes easy-to-find and surveillance utility Provides Web based Management View multiple cameras simultaneously on PC surveillance software up to 16 cameras at a time Supports 16 additional user accounts for viewing camera Auto sending Snap Shot or video by E-mail or FTP Support NO-IP DNS and UPnP functions Supports Windows 2000/XP/Vista/Win7 Firmware Upgradeable...
Manual
Page 145
Please make the IP address you to solve the problem by yourself and therefore saves your valuable time. c. Press and hold reset button for 5 seconds, then try to connect to the network camera from Internet, please make sure network camera is not working properly, before you contact the dealer of purchase for help you used to connect to factory default value (which is 192.168.2.3) by firewall or other...
Please make the IP address you to solve the problem by yourself and therefore saves your valuable time. c. Press and hold reset button for 5 seconds, then try to connect to the network camera from Internet, please make sure network camera is not working properly, before you contact the dealer of purchase for help you used to connect to factory default value (which is 192.168.2.3) by firewall or other...

