Datasheet
Page 2
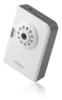
... & M‐JPEG 2‐way audio Fast Ethernet IEEE 802.3/802.3u Wireless IEEE 802.11b/g/n (IC‐3110W only) PoE IEEE 802.3af (IC‐3110P only) LAN Wi‐Fi (IC‐3110W only) Power/Cloud Interface Management RF Output Power 1 x Ethernet (RJ‐45) port ... Microphone 1 x Reset/WPS button (IC‐3110W only) 1 x SDHC/SD card slot (up to change without notice. All rights reserved. Maximum performance, actual data rates, and coverage will vary depending on network conditions and environmental factors. Ltd. www.edimax.com FEATURES & TECHNICAL SPECIFICATIONS • ...
... & M‐JPEG 2‐way audio Fast Ethernet IEEE 802.3/802.3u Wireless IEEE 802.11b/g/n (IC‐3110W only) PoE IEEE 802.3af (IC‐3110P only) LAN Wi‐Fi (IC‐3110W only) Power/Cloud Interface Management RF Output Power 1 x Ethernet (RJ‐45) port ... Microphone 1 x Reset/WPS button (IC‐3110W only) 1 x SDHC/SD card slot (up to change without notice. All rights reserved. Maximum performance, actual data rates, and coverage will vary depending on network conditions and environmental factors. Ltd. www.edimax.com FEATURES & TECHNICAL SPECIFICATIONS • ...
Quick Install Guide
Page 3
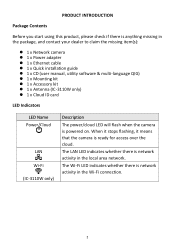
PRODUCT INTRODUCTION Package Contents Before you start using this product, please check if there is anything missing in the local area network. The LAN LED indicates whether there is network activity in the package, and contact your dealer to claim the missing item(s): 1 x ...manual, utility software & multi-language QIG) 1 x Mounting kit 1 x Accessory kit 1 x Antenna (IC-3110W only) 1 x Cloud ID card LED Indicators LED Name Power/Cloud LAN Wi-Fi (IC-3110W only) Description The power/cloud LED will flash when the camera is powered on. The Wi-Fi...
PRODUCT INTRODUCTION Package Contents Before you start using this product, please check if there is anything missing in the local area network. The LAN LED indicates whether there is network activity in the package, and contact your dealer to claim the missing item(s): 1 x ...manual, utility software & multi-language QIG) 1 x Mounting kit 1 x Accessory kit 1 x Antenna (IC-3110W only) 1 x Cloud ID card LED Indicators LED Name Power/Cloud LAN Wi-Fi (IC-3110W only) Description The power/cloud LED will flash when the camera is powered on. The Wi-Fi...
Quick Install Guide
Page 4
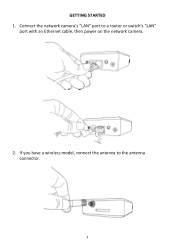
GETTING STARTED 1. Connect the network camera's "LAN" port to the antenna connector. 3 If you have a wireless model, connect the antenna to a router or switch's "LAN" port with an Ethernet cable, then power on the network camera. 2.
GETTING STARTED 1. Connect the network camera's "LAN" port to the antenna connector. 3 If you have a wireless model, connect the antenna to a router or switch's "LAN" port with an Ethernet cable, then power on the network camera. 2.
Quick Install Guide
Page 5
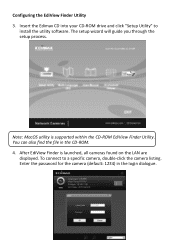
To connect to install the utility software. Insert the Edimax CD into your CD-ROM drive and click "Setup Utility" to a specific camera, double-click the camera listing. After EdiView Finder is supported within the CD-ROM EdiView Finder Utility. Enter the password for the camera (default: 1234) in the CD-ROM. 4. The setup wizard will guide you through the setup process. Configuring the EdiView Finder Utility 3. Note: MacOS utility is launched, all cameras found on the LAN are displayed. You can also find the file in the login dialogue. 4
To connect to install the utility software. Insert the Edimax CD into your CD-ROM drive and click "Setup Utility" to a specific camera, double-click the camera listing. After EdiView Finder is supported within the CD-ROM EdiView Finder Utility. Enter the password for the camera (default: 1234) in the CD-ROM. 4. The setup wizard will guide you through the setup process. Configuring the EdiView Finder Utility 3. Note: MacOS utility is launched, all cameras found on the LAN are displayed. You can also find the file in the login dialogue. 4

Quick Install Guide
Page 7
... MAC address. 3. Run the Ediview Finder application to finish the installation. Please go to the Apple App store or Google Android market to "System">"Status">"LAN", find Cloud ID by the following methods: 1. The sticker on the bottom of the camera says MAC:xxxxxxxxxxxxxx. 2. Go to download "Ediview". Note: You may...
... MAC address. 3. Run the Ediview Finder application to finish the installation. Please go to the Apple App store or Google Android market to "System">"Status">"LAN", find Cloud ID by the following methods: 1. The sticker on the bottom of the camera says MAC:xxxxxxxxxxxxxx. 2. Go to download "Ediview". Note: You may...
Manual
Page 3
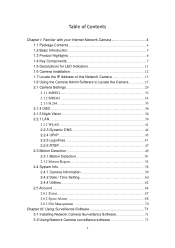
... 13 1.8 Using the Camera Admin Software to Locate the Camera 17 2.1 Camera Settings 29 2.1.1 MJPEG 33 2.1.2 MPEG4 34 2.1.3 H.264 35 2.1.4 OSD...36 2.1.5 Night Vision 36 2.2.1 LAN...39 2.2.2 WLAN 41 2.2.3 Dynamic DNS 44 2.2.4 UPnP 45 2.2.5 LoginFree 47 2.2.6 RTSP 47 2.3 Motion Detection 49 2.3.1 Motion Detection 50 2.3.2 Motion Region 52 2.4 System Info 58 2.4.1 Camera...
... 13 1.8 Using the Camera Admin Software to Locate the Camera 17 2.1 Camera Settings 29 2.1.1 MJPEG 33 2.1.2 MPEG4 34 2.1.3 H.264 35 2.1.4 OSD...36 2.1.5 Night Vision 36 2.2.1 LAN...39 2.2.2 WLAN 41 2.2.3 Dynamic DNS 44 2.2.4 UPnP 45 2.2.5 LoginFree 47 2.2.6 RTSP 47 2.3 Motion Detection 49 2.3.1 Motion Detection 50 2.3.2 Motion Region 52 2.4 System Info 58 2.4.1 Camera...

Manual
Page 8
1.4 Key Components Front View LAN LED WLAN LED Power LED Light Sensor IR LED Camera Focus Ring LAN LED: Indicates LAN activity WLAN LED: Indicates Wireless LAN activity (only work on wired model plugged with USB WiFi dongle and wireless model) Power LED: Indicates power status IR LEDs: Lights up when environment is too dark Light Sensor: Detects lights of the environment Focus Ring: Adjusts focus 7
1.4 Key Components Front View LAN LED WLAN LED Power LED Light Sensor IR LED Camera Focus Ring LAN LED: Indicates LAN activity WLAN LED: Indicates Wireless LAN activity (only work on wired model plugged with USB WiFi dongle and wireless model) Power LED: Indicates power status IR LEDs: Lights up when environment is too dark Light Sensor: Detects lights of the environment Focus Ring: Adjusts focus 7
Manual
Page 12
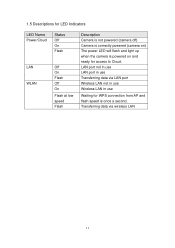
Transferring data via LAN port Wireless LAN not in use Wireless LAN in use Waiting for access to Cloud. 1.5 Descriptions for LED Indicators LED Name Power/Cloud LAN WLAN Status Off On Flash Off On Flash Off On Flash at low speed Flash Description Camera is not powered (camera off) Camera is correctly powered (camera on) The power LED will flash and light up when the camera is powered on and ready for WPS connection from AP and flash speed is once a second. LAN port not in use LAN port in use Transferring data via wireless LAN 11
Transferring data via LAN port Wireless LAN not in use Wireless LAN in use Waiting for access to Cloud. 1.5 Descriptions for LED Indicators LED Name Power/Cloud LAN WLAN Status Off On Flash Off On Flash Off On Flash at low speed Flash Description Camera is not powered (camera off) Camera is correctly powered (camera on) The power LED will flash and light up when the camera is powered on and ready for WPS connection from AP and flash speed is once a second. LAN port not in use LAN port in use Transferring data via wireless LAN 11
Manual
Page 13
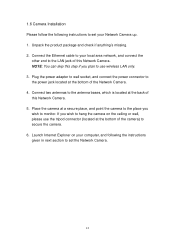
... of this step if you wish to hang the camera on your local area network, and connect the other end to the LAN jack of the camera) to use wireless LAN only. 3. NOTE: You can skip this Network Camera. Unpack the product package and check if anything's missing. 2. Connect the Ethernet cable...
... of this step if you wish to hang the camera on your local area network, and connect the other end to the LAN jack of the camera) to use wireless LAN only. 3. NOTE: You can skip this Network Camera. Unpack the product package and check if anything's missing. 2. Connect the Ethernet cable...
Manual
Page 24
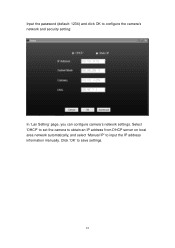
Select 'DHCP' to set the camera to obtain an IP address from DHCP server on local area network automatically, and select 'Manual IP' to save settings. 23 Click 'OK' to input the IP address information manually. Input the password (default: 1234) and click OK to configure the camera's network and security setting: In 'Lan Setting' page, you can configure camera's network settings.
Select 'DHCP' to set the camera to obtain an IP address from DHCP server on local area network automatically, and select 'Manual IP' to save settings. 23 Click 'OK' to input the IP address information manually. Input the password (default: 1234) and click OK to configure the camera's network and security setting: In 'Lan Setting' page, you can configure camera's network settings.
Manual
Page 40
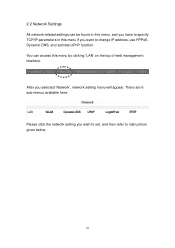
You can be found in this menu, and you have to specify TCP/IP parameters in this menu by clicking 'LAN' on the top of web management interface. There are 6 sub-menus available here: Please click the network setting you selected 'Network', network setting menu will appear. After you wish to set, and then refer to instructions given below: 39 2.2 Network Settings All network-related settings can access this menu if you want to change IP address, use PPPoE, Dynamic DNS, and activate UPnP function.
You can be found in this menu, and you have to specify TCP/IP parameters in this menu by clicking 'LAN' on the top of web management interface. There are 6 sub-menus available here: Please click the network setting you selected 'Network', network setting menu will appear. After you wish to set, and then refer to instructions given below: 39 2.2 Network Settings All network-related settings can access this menu if you want to change IP address, use PPPoE, Dynamic DNS, and activate UPnP function.
Manual
Page 41
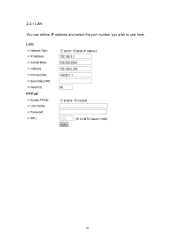
2.2.1 LAN You can define IP address and select the port number you wish to use here. 40
2.2.1 LAN You can define IP address and select the port number you wish to use here. 40
Manual
Page 138
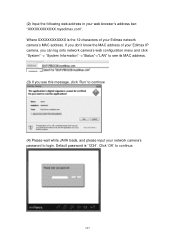
... browser's address bar: "XXXXXXXXXXXX.myedimax.com". If you see its MAC address. (3) If you don't know the MAC address of your Edimax network camera's MAC address. Default password is the 12 characters of your Edimax IP camera, you can log onto network camera's web configuration menu and click "System" -> "System Information" ->"Status...
... browser's address bar: "XXXXXXXXXXXX.myedimax.com". If you see its MAC address. (3) If you don't know the MAC address of your Edimax network camera's MAC address. Default password is the 12 characters of your Edimax IP camera, you can log onto network camera's web configuration menu and click "System" -> "System Information" ->"Status...
Manual
Page 142
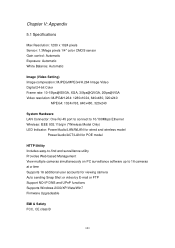
... 10-15fps@SXGA, XGA, 30fps@QVGA, 20fps@VGA Video resolution: MJPG&H.264: 1280x1024, 640x480, 320x240 MPEG4: 1024x768, 640x480, 320x240 System Hardware LAN Connector: One RJ-45 port to connect to 10/100Mbps Ethernet Wireless: IEEE 802.11b/g/n (*Wireless Model Only) LED Indicator: Power/Audio.../LAN/WLAN for wired and wireless model Power/Audio/ACT/LAN for POE model HTTP/Utility Includes easy-to-find and surveillance utility Provides Web based Management View multiple cameras simultaneously...
... 10-15fps@SXGA, XGA, 30fps@QVGA, 20fps@VGA Video resolution: MJPG&H.264: 1280x1024, 640x480, 320x240 MPEG4: 1024x768, 640x480, 320x240 System Hardware LAN Connector: One RJ-45 port to connect to 10/100Mbps Ethernet Wireless: IEEE 802.11b/g/n (*Wireless Model Only) LED Indicator: Power/Audio.../LAN/WLAN for wired and wireless model Power/Audio/ACT/LAN for POE model HTTP/Utility Includes easy-to-find and surveillance utility Provides Web based Management View multiple cameras simultaneously...