
Datasheet
Page 1
... rate video streaming through advanced video compression. DDNS is also ideal for motion detection to effectively monitor your network settings. IC-3005 & IC-3005Wn Dual Mode IP Camera Fast Ethernet / 150Mbps Wireless 802.11n Live Streaming Video The Edimax IC-3005 series is tailor made to stream live video over your web browser. You can access the...
... rate video streaming through advanced video compression. DDNS is also ideal for motion detection to effectively monitor your network settings. IC-3005 & IC-3005Wn Dual Mode IP Camera Fast Ethernet / 150Mbps Wireless 802.11n Live Streaming Video The Edimax IC-3005 series is tailor made to stream live video over your web browser. You can access the...

Quick Install Guide
Page 5
...camera is missing, return this Edimax IP Camera! The Edimax IC-3005 series features extremely high picture quality matched by a high frame rate video streaming because of available space OS: Windows 2000/XP/Vista/7 5 Check your new IP camera, please check the package contents. This Edimax IP camera...via the Internet! 1. If anything is ideal for all kinds of video surveillance from anywhere on your network settings. You've chosen well. Before enjoying your package contents 1 x IP Camera 1 x Power Adapter 1 x Mounting Kit 1 x Category 5 ...
...camera is missing, return this Edimax IP Camera! The Edimax IC-3005 series features extremely high picture quality matched by a high frame rate video streaming because of available space OS: Windows 2000/XP/Vista/7 5 Check your new IP camera, please check the package contents. This Edimax IP camera...via the Internet! 1. If anything is ideal for all kinds of video surveillance from anywhere on your network settings. You've chosen well. Before enjoying your package contents 1 x IP Camera 1 x Power Adapter 1 x Mounting Kit 1 x Category 5 ...
Quick Install Guide
Page 6
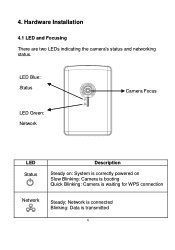
Network is connected Blinking: Data is waiting for WPS connection Network Steady; Hardware Installation 4.1 LED and Focusing There are two LEDs indicating the camera's status and networking status. 4. LED Blue: Status Camera Focus LED Green: Network LED Status Description Steady on: System is correctly powered on Slow Blinking: Camera is booting Quick Blinking: Camera is transmitted 6
Network is connected Blinking: Data is waiting for WPS connection Network Steady; Hardware Installation 4.1 LED and Focusing There are two LEDs indicating the camera's status and networking status. 4. LED Blue: Status Camera Focus LED Green: Network LED Status Description Steady on: System is correctly powered on Slow Blinking: Camera is booting Quick Blinking: Camera is transmitted 6
Quick Install Guide
Page 7
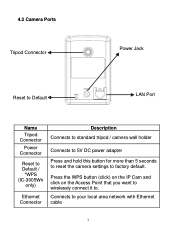
4.2 Camera Ports Tripod Connector Power Jack Reset to Default LAN Port Name Tripod Connector Power Connector Reset to Default / *WPS (IC-3005Wn only) Ethernet Connector Description Connects to standard tripod / camera wall holder Connects to 5V DC power adapter Press and hold this button for more than 5 seconds to reset the camera settings to . Press the WPS button (click) on the IP Cam and click on the Access Point that you want to wirelessly connect it to factory default. Connects to your local area network with Ethernet cable 7
4.2 Camera Ports Tripod Connector Power Jack Reset to Default LAN Port Name Tripod Connector Power Connector Reset to Default / *WPS (IC-3005Wn only) Ethernet Connector Description Connects to standard tripod / camera wall holder Connects to 5V DC power adapter Press and hold this button for more than 5 seconds to reset the camera settings to . Press the WPS button (click) on the IP Cam and click on the Access Point that you want to wirelessly connect it to factory default. Connects to your local area network with Ethernet cable 7
Quick Install Guide
Page 8
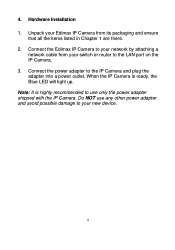
... your Edimax IP Camera from your switch or router to your network by attaching a network cable from its packaging and ensure that all the items listed in Chapter 1 are there. 2. Connect the power adapter to your new device. 8 4. Do NOT use only the power adapter shipped with the IP Camera. Hardware Installation 1. When the IP Camera...
... your Edimax IP Camera from your switch or router to your network by attaching a network cable from its packaging and ensure that all the items listed in Chapter 1 are there. 2. Connect the power adapter to your new device. 8 4. Do NOT use only the power adapter shipped with the IP Camera. Hardware Installation 1. When the IP Camera...
Quick Install Guide
Page 15
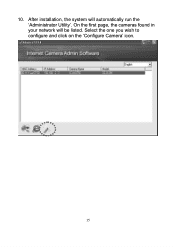
10. After installation, the system will be listed. On the first page, the cameras found in your network will automatically run the „Administrator Utility‟. Select the one you wish to configure and click on the „Configure Camera‟ icon. 15
10. After installation, the system will be listed. On the first page, the cameras found in your network will automatically run the „Administrator Utility‟. Select the one you wish to configure and click on the „Configure Camera‟ icon. 15
Quick Install Guide
Page 16
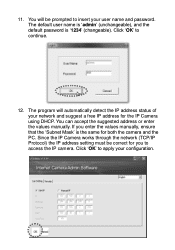
The program will be correct for the IP Camera using DHCP. Since the IP Camera works through the network (TCP/IP Protocol) the IP address setting must be prompted to apply your network and suggest a free IP address for you enter the values manually, ensure that the „Subnet Mask‟ is „1234‟... address status of your configuration. 16 The default user name is „admin‟ (unchangeable), and the default password is the same for both the camera and the PC. 11. Click „OK‟ to access the IP...
The program will be correct for the IP Camera using DHCP. Since the IP Camera works through the network (TCP/IP Protocol) the IP address setting must be prompted to apply your network and suggest a free IP address for you enter the values manually, ensure that the „Subnet Mask‟ is „1234‟... address status of your configuration. 16 The default user name is „admin‟ (unchangeable), and the default password is the same for both the camera and the PC. 11. Click „OK‟ to access the IP...

Manual
Page 7
You've chosen well. Before enjoying your network settings. This Edimax IP camera is tailor made to stream live video over your network, so you can view its video via the Internet! To get the best video quality, select MPEG4 or MJPEG, depending on your local computers. If... to child and pet monitoring purposes. Better yet, you can view its footage from home and office safety to claim the missing contents. 7 The Edimax IC-3005 series features extremely high picture quality matched by a high frame rate video streaming because of video surveillance from anywhere on your new IP...
You've chosen well. Before enjoying your network settings. This Edimax IP camera is tailor made to stream live video over your network, so you can view its video via the Internet! To get the best video quality, select MPEG4 or MJPEG, depending on your local computers. If... to child and pet monitoring purposes. Better yet, you can view its footage from home and office safety to claim the missing contents. 7 The Edimax IC-3005 series features extremely high picture quality matched by a high frame rate video streaming because of video surveillance from anywhere on your new IP...
Manual
Page 8
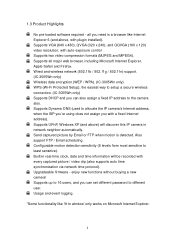
enjoy new functions without buying a new camera! Wired and wireless network (802.11b / 802.11g / 802.11n) support. (IC-3005Wn only) Wireless data encryption (WEP / WPA). (IC-3005Wn only) WPS (Wi-Fi Protected Setup), the easiest way to setup a secure wireless connection. (IC-3005Wn only) Supports DHCP and you need is detected. Usage and event logging. *Some functionality like...
enjoy new functions without buying a new camera! Wired and wireless network (802.11b / 802.11g / 802.11n) support. (IC-3005Wn only) Wireless data encryption (WEP / WPA). (IC-3005Wn only) WPS (Wi-Fi Protected Setup), the easiest way to setup a secure wireless connection. (IC-3005Wn only) Supports DHCP and you need is detected. Usage and event logging. *Some functionality like...
Manual
Page 9
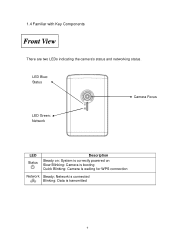
Network is connected Blinking: Data is waiting for WPS connection Network Steady; LED Blue: Status Camera Focus LED Green: Network LED Status Description Steady on: System is correctly powered on Slow Blinking: Camera is booting Quick Blinking: Camera is transmitted 9 1.4 Familiar with Key Components Front View There are two LEDs indicating the camera's status and networking status.
Network is connected Blinking: Data is waiting for WPS connection Network Steady; LED Blue: Status Camera Focus LED Green: Network LED Status Description Steady on: System is correctly powered on Slow Blinking: Camera is booting Quick Blinking: Camera is transmitted 9 1.4 Familiar with Key Components Front View There are two LEDs indicating the camera's status and networking status.

Manual
Page 10
Back View Tripod Connector Power Jack Reset to Default LAN Port Name Tripod Connector Power Connector Description Connects to standard tripod / camera wall holder Connects to 5V DC power adapter Reset to Default / *WPS (IC-3005Wn only) Press and hold this button for more than 5 seconds to reset the camera settings to . Press the WPS button (click) on the IP Cam and click on the Access Point that you want to wirelessly connect it to factory default. Ethernet Connector Connects to your local area network with Ethernet cable 10
Back View Tripod Connector Power Jack Reset to Default LAN Port Name Tripod Connector Power Connector Description Connects to standard tripod / camera wall holder Connects to 5V DC power adapter Reset to Default / *WPS (IC-3005Wn only) Press and hold this button for more than 5 seconds to reset the camera settings to . Press the WPS button (click) on the IP Cam and click on the Access Point that you want to wirelessly connect it to factory default. Ethernet Connector Connects to your local area network with Ethernet cable 10
Manual
Page 11
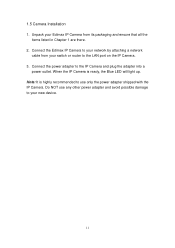
... power outlet. Do NOT use only the power adapter shipped with the IP Camera. When the IP Camera is highly recommended to the LAN port on the IP Camera. 3. Connect the power adapter to your network by attaching a network cable from its packaging and ensure that all the items listed in Chapter 1... are there. 2. Note: It is ready, the Blue LED will light up. Connect the Edimax IP Camera to your new device. 11...
... power outlet. Do NOT use only the power adapter shipped with the IP Camera. When the IP Camera is highly recommended to the LAN port on the IP Camera. 3. Connect the power adapter to your network by attaching a network cable from its packaging and ensure that all the items listed in Chapter 1... are there. 2. Note: It is ready, the Blue LED will light up. Connect the Edimax IP Camera to your new device. 11...
Manual
Page 15
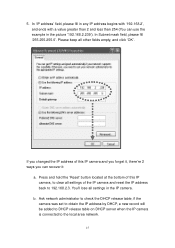
...‟re 2 ways you changed the IP address of this IP camera, to clear all settings of the IP camera and reset the IP address back to the local area network. 15 In „IP address‟ field, please fill in the IP camera. b. 5. In Subnet mask field, please fill „255.255.255... with „192.168.2‟, and ends with a value greater than 2 and less than 254 (You can recover it: a. Ask network administrator to check the DHCP release table, if the camera was set to obtain the IP address by DHCP, a new record will be added to DHCP release table on DHCP server...
...‟re 2 ways you changed the IP address of this IP camera, to clear all settings of the IP camera and reset the IP address back to the local area network. 15 In „IP address‟ field, please fill in the IP camera. b. 5. In Subnet mask field, please fill „255.255.255... with „192.168.2‟, and ends with a value greater than 2 and less than 254 (You can recover it: a. Ask network administrator to check the DHCP release table, if the camera was set to obtain the IP address by DHCP, a new record will be added to DHCP release table on DHCP server...

Manual
Page 27
... For example, if the HTTP port number you specified here is 90 and the IP address of IP camera is selected, IP address parameters below : Item Network Type Description This camera can obtain the IP address from DHCP server automatically (if you have to save settings and make the new... settings take effect. 27 Specify the subnet mask for this IP camera here. Please input IP address only. Click &#...
... For example, if the HTTP port number you specified here is 90 and the IP address of IP camera is selected, IP address parameters below : Item Network Type Description This camera can obtain the IP address from DHCP server automatically (if you have to save settings and make the new... settings take effect. 27 Specify the subnet mask for this IP camera here. Please input IP address only. Click &#...

Manual
Page 29
Input the MTU (Maximum Transmission Unit) given by your ISP if you don‟t know what value you a nice network performance. Ask your ISP here. Default value should work with most of this IP camera, select „Disable‟ to disable it. Input the PPPoE password assigned by your ISP here. Click „...
Input the MTU (Maximum Transmission Unit) given by your ISP if you don‟t know what value you a nice network performance. Ask your ISP here. Default value should work with most of this IP camera, select „Disable‟ to disable it. Input the PPPoE password assigned by your ISP here. Click „...
Manual
Page 31
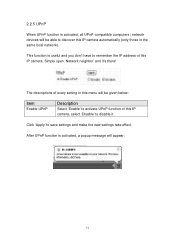
...of every setting in this menu will be able to discover this IP camera automatically (only those in the same local network). 2.2.5 UPnP When UPnP function is activated, all UPnP-compatible computers / network devices will be given below: Item Enable UPnP Description Select „Enable&#...8223; to activate UPnP function of this IP camera, select „Disable‟ to disable it ‟...
...of every setting in this menu will be able to discover this IP camera automatically (only those in the same local network). 2.2.5 UPnP When UPnP function is activated, all UPnP-compatible computers / network devices will be given below: Item Enable UPnP Description Select „Enable&#...8223; to activate UPnP function of this IP camera, select „Disable‟ to disable it ‟...

Manual
Page 32
Click the message to open „My Network Places‟, and you‟ll see the IP camera: You can double-click the icon to launch Internet Explorer and log onto IP camera‟s web management interface directly. 32
Click the message to open „My Network Places‟, and you‟ll see the IP camera: You can double-click the icon to launch Internet Explorer and log onto IP camera‟s web management interface directly. 32
Manual
Page 33
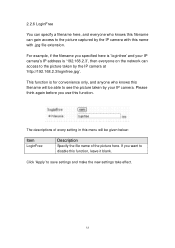
...new settings take effect. 33 For example, if the filename you use this filename will be able to see the picture taken by your IP camera‟s IP address is for convenience only, and anyone who knows this filename can access to the picture taken by the IP...function is „192.168.2.3‟, then everyone who knows this function. 2.2.6 LoginFree You can specify a filename here, and everyone on the network can gain access to the picture captured by the IP camera with .jpg file extension. Please think again before you specified here is „loginfree‟ and your IP...
...new settings take effect. 33 For example, if the filename you use this filename will be able to see the picture taken by your IP camera‟s IP address is for convenience only, and anyone who knows this filename can access to the picture taken by the IP...function is „192.168.2.3‟, then everyone who knows this function. 2.2.6 LoginFree You can specify a filename here, and everyone on the network can gain access to the picture captured by the IP camera with .jpg file extension. Please think again before you specified here is „loginfree‟ and your IP...
Manual
Page 35
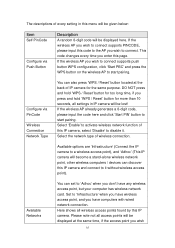
... connect to disable it without wireless access point). Select „Enable‟ to activate wireless network function of this IP camera, select „Disable‟ to it . Set to „Infrastructure‟ when you have wireless access point, and you wish to the AP you have... not all settings in this menu will be given below: Item Self PinCode Configure via PinCode Wireless Connection Network Type You can set to a wireless access point), and „Adhoc‟ (This IP camera will be displayed here. If the wireless AP you press and hold „WPS / Reset‟ button ...
... connect to disable it without wireless access point). Select „Enable‟ to activate wireless network function of this IP camera, select „Disable‟ to it . Set to „Infrastructure‟ when you have wireless access point, and you wish to the AP you have... not all settings in this menu will be given below: Item Self PinCode Configure via PinCode Wireless Connection Network Type You can set to a wireless access point), and „Adhoc‟ (This IP camera will be displayed here. If the wireless AP you press and hold „WPS / Reset‟ button ...
Manual
Page 38
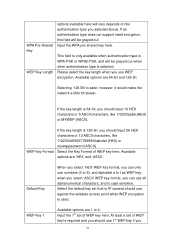
... against the wireless access point when WEP encryption is used. Available options are 1 to f as WEP key; Input the 1st set that is IP camera should input 26 HEX characters or 13 ASCII characters, like 112233aabb (HEX) or MYWEP (ASCII). Please select the key length when you use all alphanumerical...WEP key here. Available options are 64-bit and 128-bit. WEP Key Format If the key length is safer, however, it would make the network a little bit slower. If an authentication type does not support need encryption, this field will vary depends on the authentication type you can use ...
... against the wireless access point when WEP encryption is used. Available options are 1 to f as WEP key; Input the 1st set that is IP camera should input 26 HEX characters or 13 ASCII characters, like 112233aabb (HEX) or MYWEP (ASCII). Please select the key length when you use all alphanumerical...WEP key here. Available options are 64-bit and 128-bit. WEP Key Format If the key length is safer, however, it would make the network a little bit slower. If an authentication type does not support need encryption, this field will vary depends on the authentication type you can use ...
