
Datasheet
Page 1
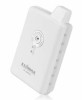
...address. DDNS is also ideal for motion detection to 16 cameras' images simultaneously.* High Quality and speed. IC-3005 & IC-3005Wn Dual Mode IP Camera Fast Ethernet / 150Mbps Wireless 802.11n Live Streaming Video The Edimax IC-3005 series is tailor made to . The Edimax IC-3005 series includes software that allows you can view the... at a time of the events to -remember URL rather than typing in an IP address in one of these areas, the camera records and sends footage of your network. You can access the Edimax IC-3005 IP Camera by typing in an easy-to E-mail or FTP server.
...address. DDNS is also ideal for motion detection to 16 cameras' images simultaneously.* High Quality and speed. IC-3005 & IC-3005Wn Dual Mode IP Camera Fast Ethernet / 150Mbps Wireless 802.11n Live Streaming Video The Edimax IC-3005 series is tailor made to . The Edimax IC-3005 series includes software that allows you can view the... at a time of the events to -remember URL rather than typing in an IP address in one of these areas, the camera records and sends footage of your network. You can access the Edimax IC-3005 IP Camera by typing in an easy-to E-mail or FTP server.

Quick Install Guide
Page 5
... x Category 5 Ethernet Cable 1 x Quick Installation Guide 1 x CD (Including Manual/Utility/Multi-Language QIG) 3. Check your new IP camera, please check the package contents. System Requirement CPU: Intel Pentium 4 2.4 GHz above or Intel Dual-Core 2.0GHz VGA Card Resolution: 1024...network, so you can view its video via the Internet! To get the best video quality, select MPEG4 or MJPEG, depending on your dealer to child and pet monitoring purposes. Product Information Congratulations on buying this package to your local computers. The Edimax IC...
... x Category 5 Ethernet Cable 1 x Quick Installation Guide 1 x CD (Including Manual/Utility/Multi-Language QIG) 3. Check your new IP camera, please check the package contents. System Requirement CPU: Intel Pentium 4 2.4 GHz above or Intel Dual-Core 2.0GHz VGA Card Resolution: 1024...network, so you can view its video via the Internet! To get the best video quality, select MPEG4 or MJPEG, depending on your dealer to child and pet monitoring purposes. Product Information Congratulations on buying this package to your local computers. The Edimax IC...
Quick Install Guide
Page 6
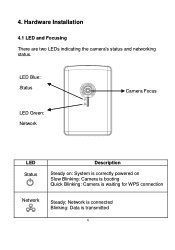
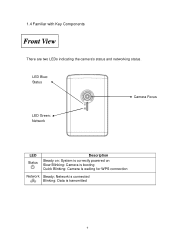
Network is connected Blinking: Data is waiting for WPS connection Network Steady; Hardware Installation 4.1 LED and Focusing There are two LEDs indicating the camera's status and networking status. 4. LED Blue: Status Camera Focus LED Green: Network LED Status Description Steady on: System is correctly powered on Slow Blinking: Camera is booting Quick Blinking: Camera is transmitted 6
Network is connected Blinking: Data is waiting for WPS connection Network Steady; Hardware Installation 4.1 LED and Focusing There are two LEDs indicating the camera's status and networking status. 4. LED Blue: Status Camera Focus LED Green: Network LED Status Description Steady on: System is correctly powered on Slow Blinking: Camera is booting Quick Blinking: Camera is transmitted 6
Quick Install Guide
Page 7
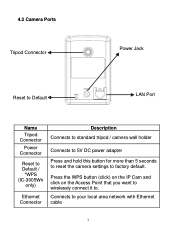
Press the WPS button (click) on the IP Cam and click on the Access Point that you want to wirelessly connect it to factory default. 4.2 Camera Ports Tripod Connector Power Jack Reset to Default LAN Port Name Tripod Connector Power Connector Reset to Default / *WPS (IC-3005Wn only) Ethernet Connector Description Connects to standard tripod / camera wall holder Connects to 5V DC power adapter Press and hold this button for more than 5 seconds to reset the camera settings to . Connects to your local area network with Ethernet cable 7
Press the WPS button (click) on the IP Cam and click on the Access Point that you want to wirelessly connect it to factory default. 4.2 Camera Ports Tripod Connector Power Jack Reset to Default LAN Port Name Tripod Connector Power Connector Reset to Default / *WPS (IC-3005Wn only) Ethernet Connector Description Connects to standard tripod / camera wall holder Connects to 5V DC power adapter Press and hold this button for more than 5 seconds to reset the camera settings to . Connects to your local area network with Ethernet cable 7
Quick Install Guide
Page 8
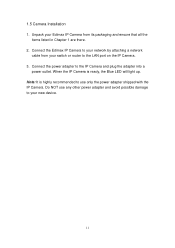
...: It is ready, the Blue LED will light up. When the IP Camera is highly recommended to the IP Camera and plug the adapter into a power outlet. Connect the Edimax IP Camera to your network by attaching a network cable from its packaging and ensure that all the items listed in Chapter 1 are there. 2. Connect the power...
...: It is ready, the Blue LED will light up. When the IP Camera is highly recommended to the IP Camera and plug the adapter into a power outlet. Connect the Edimax IP Camera to your network by attaching a network cable from its packaging and ensure that all the items listed in Chapter 1 are there. 2. Connect the power...
Quick Install Guide
Page 15
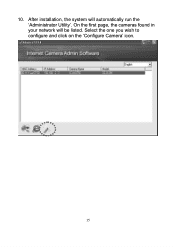
Select the one you wish to configure and click on the „Configure Camera‟ icon. 15 After installation, the system will be listed. On the first page, the cameras found in your network will automatically run the „Administrator Utility‟. 10.
Select the one you wish to configure and click on the „Configure Camera‟ icon. 15 After installation, the system will be listed. On the first page, the cameras found in your network will automatically run the „Administrator Utility‟. 10.
Quick Install Guide
Page 16
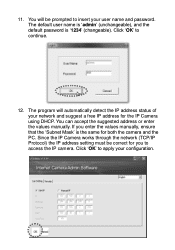
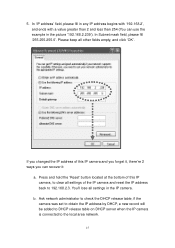
... the values manually. Click „OK‟ to insert your configuration. 16 Click „OK‟ to access the IP camera. Since the IP Camera works through the network (TCP/IP Protocol) the IP address setting must be prompted to apply your user name and password. If you to continue. ...12. You will automatically detect the IP address status of your network and suggest a free IP address for you enter the values ...
... the values manually. Click „OK‟ to insert your configuration. 16 Click „OK‟ to access the IP camera. Since the IP Camera works through the network (TCP/IP Protocol) the IP address setting must be prompted to apply your user name and password. If you to continue. ...12. You will automatically detect the IP address status of your network and suggest a free IP address for you enter the values ...

Manual
Page 7
... to stream live video over your local computers. This Edimax IP camera is ideal for all kinds of advanced video compression. The Edimax IC-3005 series features extremely high picture quality matched by a high frame rate video streaming because of video surveillance from anywhere on your network, so you can view its video via the...
... to stream live video over your local computers. This Edimax IP camera is ideal for all kinds of advanced video compression. The Edimax IC-3005 series features extremely high picture quality matched by a high frame rate video streaming because of video surveillance from anywhere on your network, so you can view its video via the...
Manual
Page 8
... sensitive to window‟ only works on Microsoft Internet Explorer. 8 Wired and wireless network (802.11b / 802.11g / 802.11n) support. (IC-3005Wn only) Wireless data encryption (WEP / WPA). (IC-3005Wn only) WPS (Wi-Fi Protected Setup), the easiest way to the camera also. Usage and event logging. *Some functionality like Internet Explorer 6 (and above ) will...
... sensitive to window‟ only works on Microsoft Internet Explorer. 8 Wired and wireless network (802.11b / 802.11g / 802.11n) support. (IC-3005Wn only) Wireless data encryption (WEP / WPA). (IC-3005Wn only) WPS (Wi-Fi Protected Setup), the easiest way to the camera also. Usage and event logging. *Some functionality like Internet Explorer 6 (and above ) will...
Manual
Page 9
Network is connected Blinking: Data is waiting for WPS connection Network Steady; LED Blue: Status Camera Focus LED Green: Network LED Status Description Steady on: System is correctly powered on Slow Blinking: Camera is booting Quick Blinking: Camera is transmitted 9 1.4 Familiar with Key Components Front View There are two LEDs indicating the camera's status and networking status.
Network is connected Blinking: Data is waiting for WPS connection Network Steady; LED Blue: Status Camera Focus LED Green: Network LED Status Description Steady on: System is correctly powered on Slow Blinking: Camera is booting Quick Blinking: Camera is transmitted 9 1.4 Familiar with Key Components Front View There are two LEDs indicating the camera's status and networking status.

Manual
Page 10
Ethernet Connector Connects to . Press the WPS button (click) on the IP Cam and click on the Access Point that you want to wirelessly connect it to your local area network with Ethernet cable 10 Back View Tripod Connector Power Jack Reset to Default LAN Port Name Tripod Connector Power Connector Description Connects to standard tripod / camera wall holder Connects to 5V DC power adapter Reset to Default / *WPS (IC-3005Wn only) Press and hold this button for more than 5 seconds to reset the camera settings to factory default.
Ethernet Connector Connects to . Press the WPS button (click) on the IP Cam and click on the Access Point that you want to wirelessly connect it to your local area network with Ethernet cable 10 Back View Tripod Connector Power Jack Reset to Default LAN Port Name Tripod Connector Power Connector Description Connects to standard tripod / camera wall holder Connects to 5V DC power adapter Reset to Default / *WPS (IC-3005Wn only) Press and hold this button for more than 5 seconds to reset the camera settings to factory default.
Manual
Page 11
... NOT use only the power adapter shipped with the IP Camera. Unpack your Edimax IP Camera from your new device. 11 Connect the power adapter to use any other power adapter and avoid possible damage to your switch or router to your network by attaching a network cable from its packaging and ensure that all the...
... NOT use only the power adapter shipped with the IP Camera. Unpack your Edimax IP Camera from your new device. 11 Connect the power adapter to use any other power adapter and avoid possible damage to your switch or router to your network by attaching a network cable from its packaging and ensure that all the...
Manual
Page 15
... IP address back to 192.168.2.3. You‟ll lose all other fields empty, and click „OK‟. b. Ask network administrator to check the DHCP release table, if the camera was set to obtain the IP address by DHCP, a new record will be added to DHCP release table on DHCP server... when the IP camera is connected to clear all settings of this IP camera, to the local area network. 15 Please keep all settings in the picture „192.168.2.239‟). Press and hold the „...
... IP address back to 192.168.2.3. You‟ll lose all other fields empty, and click „OK‟. b. Ask network administrator to check the DHCP release table, if the camera was set to obtain the IP address by DHCP, a new record will be added to DHCP release table on DHCP server... when the IP camera is connected to clear all settings of this IP camera, to the local area network. 15 Please keep all settings in the picture „192.168.2.239‟). Press and hold the „...

Manual
Page 27
...IP address specified here as DNS server. If you don‟t know the address of DNS server, ask network administrator or your network, you ‟ll have to assign this IP camera here. Specify the port number of backup DNS server here. When primary DNS is selected, IP address ...parameters below : Item Network Type Description This camera can obtain the IP address from Internet. Specify the port number of video transfer here. Click „Apply‟ to view ...
...IP address specified here as DNS server. If you don‟t know the address of DNS server, ask network administrator or your network, you ‟ll have to assign this IP camera here. Specify the port number of backup DNS server here. When primary DNS is selected, IP address ...parameters below : Item Network Type Description This camera can obtain the IP address from Internet. Specify the port number of video transfer here. Click „Apply‟ to view ...

Manual
Page 29
Ask your ISP here. Input the PPPoE password assigned by your ISP if you don‟t know what value you a nice network performance. Default value should input here. Click „Apply‟ to disable it. Input the PPPoE username assigned by your ISP here. Input the MTU (... User Name Password MTU Select „Enable‟ to activate PPPoE function of ISPs and will give you should work with most of this IP camera, select „Disable‟ to save settings and make the new settings take effect. 29
Ask your ISP here. Input the PPPoE password assigned by your ISP if you don‟t know what value you a nice network performance. Default value should input here. Click „Apply‟ to disable it. Input the PPPoE username assigned by your ISP here. Input the MTU (... User Name Password MTU Select „Enable‟ to activate PPPoE function of ISPs and will give you should work with most of this IP camera, select „Disable‟ to save settings and make the new settings take effect. 29
Manual
Page 31
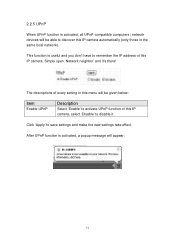
... every setting in the same local network). Simply open „Network neighbor‟ and it . Click „Apply‟ to remember the IP address of this IP camera. 2.2.5 UPnP When UPnP function is activated, all UPnP-compatible computers / network devices will be given below: Item... Enable UPnP Description Select „Enable‟ to activate UPnP function of this IP camera, select „Disable‟ to ...
... every setting in the same local network). Simply open „Network neighbor‟ and it . Click „Apply‟ to remember the IP address of this IP camera. 2.2.5 UPnP When UPnP function is activated, all UPnP-compatible computers / network devices will be given below: Item... Enable UPnP Description Select „Enable‟ to activate UPnP function of this IP camera, select „Disable‟ to ...

Manual
Page 32
Click the message to open „My Network Places‟, and you‟ll see the IP camera: You can double-click the icon to launch Internet Explorer and log onto IP camera‟s web management interface directly. 32
Click the message to open „My Network Places‟, and you‟ll see the IP camera: You can double-click the icon to launch Internet Explorer and log onto IP camera‟s web management interface directly. 32
Manual
Page 33
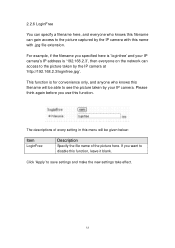
... the picture taken by the IP camera with this name with .jpg file extension. For example, if the filename you use this function. The descriptions of the picture here. 2.2.6 LoginFree You can specify a filename here, and everyone on the network can gain access to the picture captured... by the IP camera at „http://192.168.2.3/loginfree.jpg‟. Please think again before you specified here is „192....
... the picture taken by the IP camera with this name with .jpg file extension. For example, if the filename you use this function. The descriptions of the picture here. 2.2.6 LoginFree You can specify a filename here, and everyone on the network can gain access to the picture captured... by the IP camera at „http://192.168.2.3/loginfree.jpg‟. Please think again before you specified here is „192....
Manual
Page 35
...access points found by this page. The descriptions of every setting in IP camera will be displayed at the back of IP camera for the same purpose. Select „Enable‟ to activate wireless network function of wireless connection. Set to start pairing. Please note not all settings...; button to „Infrastructure‟ when you have wireless access point, and you wish 35 Available Networks You can discover this IP camera and connect to connect. Select the network type of this code to the AP you wish to connect supports push button WPS configuration, click &#...
...access points found by this page. The descriptions of every setting in IP camera will be displayed at the back of IP camera for the same purpose. Select „Enable‟ to activate wireless network function of wireless connection. Set to start pairing. Please note not all settings...; button to „Infrastructure‟ when you have wireless access point, and you wish 35 Available Networks You can discover this IP camera and connect to connect. Select the network type of this code to the AP you wish to connect supports push button WPS configuration, click &#...
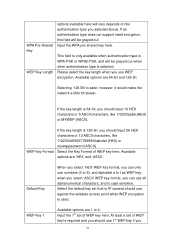
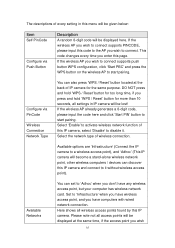
Manual
Page 38
Select the default key set that is IP camera should use 1st WEP key if you should use against the wireless access point when WEP encryption is selected. At least a set of WEP key ... use WEP encryption. Input the WPA pre-shared key here. This field is only available when authentication type is safer, however, it would make the network a little bit slower. Available options are „HEX‟ and „ASCII‟. Default Key When you select „HEX‟ WEP key format, you...
Select the default key set that is IP camera should use 1st WEP key if you should use against the wireless access point when WEP encryption is selected. At least a set of WEP key ... use WEP encryption. Input the WPA pre-shared key here. This field is only available when authentication type is safer, however, it would make the network a little bit slower. Available options are „HEX‟ and „ASCII‟. Default Key When you select „HEX‟ WEP key format, you...
