
Quick Install Guide
Page 5
...; 1 x Quick Installation Guide 1 x CD (Including Manual/Utility/Multi-Language QIG) 3. System Requirement CPU: Intel Pentium 4 2.4 GHz above or Intel Dual-Core 2.0GHz VGA Card Resolution: 1024 x 768 or above A CD-ROM Drive Hard Disk: At least 128MB (256MB recommended) of advanced video compression. The Edimax IC-3005 series...
...; 1 x Quick Installation Guide 1 x CD (Including Manual/Utility/Multi-Language QIG) 3. System Requirement CPU: Intel Pentium 4 2.4 GHz above or Intel Dual-Core 2.0GHz VGA Card Resolution: 1024 x 768 or above A CD-ROM Drive Hard Disk: At least 128MB (256MB recommended) of advanced video compression. The Edimax IC-3005 series...
Quick Install Guide
Page 6
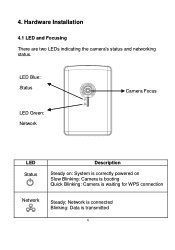
LED Blue: Status Camera Focus LED Green: Network LED Status Description Steady on: System is correctly powered on Slow Blinking: Camera is booting Quick Blinking: Camera is transmitted 6 Hardware Installation 4.1 LED and Focusing There are two LEDs indicating the camera's status and networking status. 4. Network is connected Blinking: Data is waiting for WPS connection Network Steady;
LED Blue: Status Camera Focus LED Green: Network LED Status Description Steady on: System is correctly powered on Slow Blinking: Camera is booting Quick Blinking: Camera is transmitted 6 Hardware Installation 4.1 LED and Focusing There are two LEDs indicating the camera's status and networking status. 4. Network is connected Blinking: Data is waiting for WPS connection Network Steady;
Quick Install Guide
Page 8
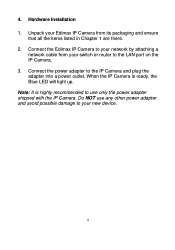
Hardware Installation 1. When the IP Camera is highly recommended to use any other power adapter and avoid possible damage to your network by attaching a network cable from your Edimax IP Camera from its packaging and ensure that all the items listed in Chapter 1 are there. 2. Connect the Edimax IP Camera to your new device...
Hardware Installation 1. When the IP Camera is highly recommended to use any other power adapter and avoid possible damage to your network by attaching a network cable from your Edimax IP Camera from its packaging and ensure that all the items listed in Chapter 1 are there. 2. Connect the Edimax IP Camera to your new device...
Quick Install Guide
Page 9
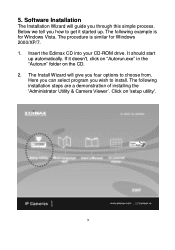
The procedure is for Windows 2000/XP/7. 1. Insert the Edimax CD into your CD-ROM drive. The Install Wizard will guide you how to get it doesn't, click on "Autorun.exe" in the "Autorun" folder on 'setup utility'. 9 The ... simple process. If it started up automatically. Here you can select program you four options to install. Software Installation The Installation Wizard will give you wish to choose from. It should start up . 5. The following installation steps are a demonstration of installing the 'Administrator Utility & Camera Viewer‟. Click on the CD. 2.
The procedure is for Windows 2000/XP/7. 1. Insert the Edimax CD into your CD-ROM drive. The Install Wizard will guide you how to get it doesn't, click on "Autorun.exe" in the "Autorun" folder on 'setup utility'. 9 The ... simple process. If it started up automatically. Here you can select program you four options to install. Software Installation The Installation Wizard will give you wish to choose from. It should start up . 5. The following installation steps are a demonstration of installing the 'Administrator Utility & Camera Viewer‟. Click on the CD. 2.
Quick Install Guide
Page 10
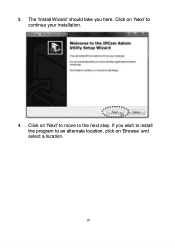
Click on „Next‟ to continue your installation. 4. Click on 'Next' to move to an alternate location, click on „Browse‟ and select a location. 10 If you here. The 'Install Wizard' should take you wish to install the program to the next step. 3.
Click on „Next‟ to continue your installation. 4. Click on 'Next' to move to an alternate location, click on „Browse‟ and select a location. 10 If you here. The 'Install Wizard' should take you wish to install the program to the next step. 3.
Quick Install Guide
Page 12
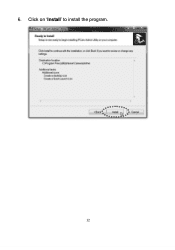
6. Click on „Install‟ to install the program. 12
6. Click on „Install‟ to install the program. 12

Quick Install Guide
Page 13
Not doing so may see the following or a similar message, Please click „Unblock‟ to allow your Edimax IP camera Utility to pass through the firewall. Click „Finish‟ to not function optimally. 13 7. If you have Windows Defender or other 3rd party firewall software, you may cause the IP camera utility to confirm the software installation. 8.
Not doing so may see the following or a similar message, Please click „Unblock‟ to allow your Edimax IP camera Utility to pass through the firewall. Click „Finish‟ to not function optimally. 13 7. If you have Windows Defender or other 3rd party firewall software, you may cause the IP camera utility to confirm the software installation. 8.
Quick Install Guide
Page 15
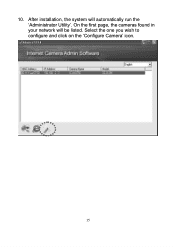
Select the one you wish to configure and click on the „Configure Camera‟ icon. 15 On the first page, the cameras found in your network will automatically run the „Administrator Utility‟. 10. After installation, the system will be listed.
Select the one you wish to configure and click on the „Configure Camera‟ icon. 15 On the first page, the cameras found in your network will automatically run the „Administrator Utility‟. 10. After installation, the system will be listed.

Quick Install Guide
Page 17
WEB Management Interface You can use . You‟ll be prompted to insert a user name and password: User name: admin / Password: 1234 Once you will see 5.12) in the address bar of your WEB browser (Internet Explorer 5.5 or above) to connect to the IP camera. Type the IP address (see the following message appear at the top of future use your web browser. Bookmark the address for ease of Internet Explorer. Click on , you 're logged on the message, and click „Install ActiveX Control...‟ 17 6.
WEB Management Interface You can use . You‟ll be prompted to insert a user name and password: User name: admin / Password: 1234 Once you will see 5.12) in the address bar of your WEB browser (Internet Explorer 5.5 or above) to connect to the IP camera. Type the IP address (see the following message appear at the top of future use your web browser. Bookmark the address for ease of Internet Explorer. Click on , you 're logged on the message, and click „Install ActiveX Control...‟ 17 6.
Quick Install Guide
Page 18
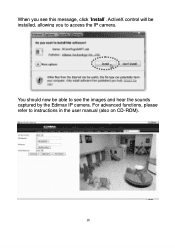
ActiveX control will be able to see this message, click ‟Install‟. For advanced functions, please refer to instructions in the user manual (also on CD-ROM). 18 You should now be installed, allowing you see the images and hear the sounds captured by the Edimax IP camera. When you to access the IP camera.
ActiveX control will be able to see this message, click ‟Install‟. For advanced functions, please refer to instructions in the user manual (also on CD-ROM). 18 You should now be installed, allowing you see the images and hear the sounds captured by the Edimax IP camera. When you to access the IP camera.

Quick Install Guide
Page 19
... (R&TTE) The R&TTE Directive repeals and replaces in the directive 98/13/EEC (Telecommunications Terminal Equipment and Satellite Earth Station Equipment) As of those who install and use it. R&TTE Compliance Statement This equipment complies with all times to the dangers of this device is intended for use in EFTA member...
... (R&TTE) The R&TTE Directive repeals and replaces in the directive 98/13/EEC (Telecommunications Terminal Equipment and Satellite Earth Station Equipment) As of those who install and use it. R&TTE Compliance Statement This equipment complies with all times to the dangers of this device is intended for use in EFTA member...
Manual
Page 4
... I: Familiar with your Internet IP Camera 6 1.1 Package Contents 6 1.2 Basic Introduction 7 1.3 Product Highlights 8 1.4 Familiar with Key Components 9 1.5 Camera Installation 11 1.6 Locate the IP Address of this IP Camera 12 1.7 Log Onto Web Management Interface 16 1.7.1 Install ActiveX 19 Chapter II: Using Web Management Interface 22 2.1 Camera Settings 22 2.1.1 About 25 2.2 LAN Settings 26...
... I: Familiar with your Internet IP Camera 6 1.1 Package Contents 6 1.2 Basic Introduction 7 1.3 Product Highlights 8 1.4 Familiar with Key Components 9 1.5 Camera Installation 11 1.6 Locate the IP Address of this IP Camera 12 1.7 Log Onto Web Management Interface 16 1.7.1 Install ActiveX 19 Chapter II: Using Web Management Interface 22 2.1 Camera Settings 22 2.1.1 About 25 2.2 LAN Settings 26...
Manual
Page 5
2.10 Account 61 2.11 Log 63 2.12 Language Menu 64 Chapter III: Using Surveillance Software 65 3-1 Installing IP Camera Surveillance Software 65 3-2 Using IP camera surveillance software 69 3-3 Configure IP camera surveillance software 72 3-3-1 Configure cameras 72 3-3-2 General Settings 81 3-4 Change Display ...
2.10 Account 61 2.11 Log 63 2.12 Language Menu 64 Chapter III: Using Surveillance Software 65 3-1 Installing IP Camera Surveillance Software 65 3-2 Using IP camera surveillance software 69 3-3 Configure IP camera surveillance software 72 3-3-1 Configure cameras 72 3-3-2 General Settings 81 3-4 Change Display ...
Manual
Page 6
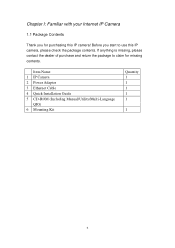
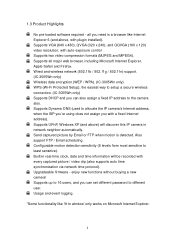
If anything is missing, please contact the dealer of purchase and return the package to use this IP camera! Item Name 1 IP Camera 2 Power Adapter 3 Ethernet Cable 4 Quick Installation Guide 5 CD-ROM (Including Manual/Utility/Multi-Language QIG) 6 Mounting Kit Quantity 1 1 1 1 1 1 6 Chapter I: Familiar with your Internet IP Camera 1.1 Package Contents Thank you start to claim for purchasing this IP camera, please check the package contents. Before you for missing contents.
If anything is missing, please contact the dealer of purchase and return the package to use this IP camera! Item Name 1 IP Camera 2 Power Adapter 3 Ethernet Cable 4 Quick Installation Guide 5 CD-ROM (Including Manual/Utility/Multi-Language QIG) 6 Mounting Kit Quantity 1 1 1 1 1 1 6 Chapter I: Familiar with your Internet IP Camera 1.1 Package Contents Thank you start to claim for purchasing this IP camera, please check the package contents. Before you for missing contents.
Manual
Page 8
Wired and wireless network (802.11b / 802.11g / 802.11n) support. (IC-3005Wn only) Wireless data encryption (WEP / WPA). (IC-3005Wn only) WPS (Wi-Fi Protected Setup), the easiest way to setup a secure wireless connection. (IC-3005Wn only) Supports DHCP and you can also assign a fixed IP address to the camera also. Configurable motion detection sensitivity ..., including Microsoft Internet Explorer, Apple Safari and Firefox. Supports VGA (640 x 480), QVGA (320 x 240), and QQVGA (160 x 120) video resolution, with plugin installed). 1.3 Product Highlights No pre-loaded software required -
Wired and wireless network (802.11b / 802.11g / 802.11n) support. (IC-3005Wn only) Wireless data encryption (WEP / WPA). (IC-3005Wn only) WPS (Wi-Fi Protected Setup), the easiest way to setup a secure wireless connection. (IC-3005Wn only) Supports DHCP and you can also assign a fixed IP address to the camera also. Configurable motion detection sensitivity ..., including Microsoft Internet Explorer, Apple Safari and Firefox. Supports VGA (640 x 480), QVGA (320 x 240), and QQVGA (160 x 120) video resolution, with plugin installed). 1.3 Product Highlights No pre-loaded software required -
Manual
Page 11
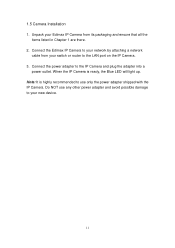
Connect the Edimax IP Camera to your network by attaching a network cable from its packaging and ensure that all the items listed in Chapter 1 are there. 2. When the ... plug the adapter into a power outlet. Do NOT use only the power adapter shipped with the IP Camera. 1.5 Camera Installation 1. Note: It is ready, the Blue LED will light up. Unpack your Edimax IP Camera from your new device. 11 Connect the power adapter to the LAN port on the IP Camera. 3.
Connect the Edimax IP Camera to your network by attaching a network cable from its packaging and ensure that all the items listed in Chapter 1 are there. 2. When the ... plug the adapter into a power outlet. Do NOT use only the power adapter shipped with the IP Camera. 1.5 Camera Installation 1. Note: It is ready, the Blue LED will light up. Unpack your Edimax IP Camera from your new device. 11 Connect the power adapter to the LAN port on the IP Camera. 3.
Manual
Page 17
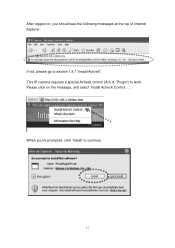
Please click on , you ‟re prompted, click „Install‟ to continue. 17 After logged on the message, and select „Install ActiveX Control...‟: When you should see the following messages at the top of Internet Explorer: If not, please go to section 1.8.1 „Install ActiveX‟. This IP camera requires a special ActiveX control (A.K.A. „Plugin‟) to work.
Please click on , you ‟re prompted, click „Install‟ to continue. 17 After logged on the message, and select „Install ActiveX Control...‟: When you should see the following messages at the top of Internet Explorer: If not, please go to section 1.8.1 „Install ActiveX‟. This IP camera requires a special ActiveX control (A.K.A. „Plugin‟) to work.
Manual
Page 18
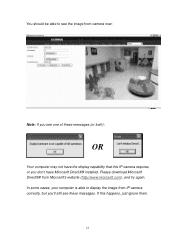
In some cases, your computer is able to see the image from camera now: Note: If you see these messages (or both): OR Your computer may not have the display capability that this happens, just ignore them. 18 If this IP camera requires, or you don't have Microsoft DirectX® installed. You should be able to display the image from IP camera correctly, but you'll still see one of these messages. Please download Microsoft DirectX® from Microsoft's website (http://www.microsoft.com), and try again.
In some cases, your computer is able to see the image from camera now: Note: If you see these messages (or both): OR Your computer may not have the display capability that this happens, just ignore them. 18 If this IP camera requires, or you don't have Microsoft DirectX® installed. You should be able to display the image from IP camera correctly, but you'll still see one of these messages. Please download Microsoft DirectX® from Microsoft's website (http://www.microsoft.com), and try again.

Manual
Page 19
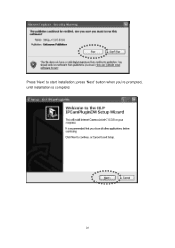
If you see this message when you can use this Internet camera. 1.7.1 Install ActiveX Most of browsers support Microsoft ActiveX, but if ActiveX is not present on your computer, you need to install it before you log onto IP camera, please click the link to download ActiveX: Press „Run‟ to download ActiveX installation package: Press „Run‟ to install ActiveX: 19
If you see this message when you can use this Internet camera. 1.7.1 Install ActiveX Most of browsers support Microsoft ActiveX, but if ActiveX is not present on your computer, you need to install it before you log onto IP camera, please click the link to download ActiveX: Press „Run‟ to download ActiveX installation package: Press „Run‟ to install ActiveX: 19
Manual
Page 20
Press „Next‟ to start installation; press „Next‟ button when you‟re prompted, until installation is complete: 20
Press „Next‟ to start installation; press „Next‟ button when you‟re prompted, until installation is complete: 20
