User Guide
Page 2
... and Removing the Label Cartridge 6 Setting the Label Width 6 Selecting a Language 7 Selecting Units of Measure 7 Getting to Know Your Printer 7 Power 7 ...Label Files 8 Creating a Label File 8 Adding Labels to a Label File 8 Removing Labels from a File 9 Printing a Label File 9 Formatting a Label 9 Changing the Text Size 9 Changing the Text Style 9 Creating Multi-Line Labels 9 Using International Characters 10 Creating Industrial Labels 10 Creating Cable and Wire Labels 10 Creating Cable Labels 10 Creating Wire Labels 10 Creating Flag Labels 10 Creating Fixed Length Labels...
... and Removing the Label Cartridge 6 Setting the Label Width 6 Selecting a Language 7 Selecting Units of Measure 7 Getting to Know Your Printer 7 Power 7 ...Label Files 8 Creating a Label File 8 Adding Labels to a Label File 8 Removing Labels from a File 9 Printing a Label File 9 Formatting a Label 9 Changing the Text Size 9 Changing the Text Style 9 Creating Multi-Line Labels 9 Using International Characters 10 Creating Industrial Labels 10 Creating Cable and Wire Labels 10 Creating Cable Labels 10 Creating Wire Labels 10 Creating Flag Labels 10 Creating Fixed Length Labels...
User Guide
Page 3
...Text Library 15 Adding My Library Text 15 Inserting Library Text 15 Deleting My Library Text 15 Creating a Series of Labels 15 Using Simple Serialization 16 Using Simultaneous Serialization 16 Using Advanced Serialization 16 Printing Options 16 Printing Multiple Copies 16 ...Collating Multiple Copies 17 Pausing Between Labels 17 Advancing the Label 17 Adjusting Print Contrast 17 Using Printer Memory 17 Saving a Label File 17 Recalling a Label File from Memory 17 Deleting a Label File from Memory 18 Cleaning Your Printer 18 Symbols 19 Troubleshooting 20 3
...Text Library 15 Adding My Library Text 15 Inserting Library Text 15 Deleting My Library Text 15 Creating a Series of Labels 15 Using Simple Serialization 16 Using Simultaneous Serialization 16 Using Advanced Serialization 16 Printing Options 16 Printing Multiple Copies 16 ...Collating Multiple Copies 17 Pausing Between Labels 17 Advancing the Label 17 Adjusting Print Contrast 17 Using Printer Memory 17 Saving a Label File 17 Recalling a Label File from Memory 17 Deleting a Label File from Memory 18 Cleaning Your Printer 18 Symbols 19 Troubleshooting 20 3
User Guide
Page 4
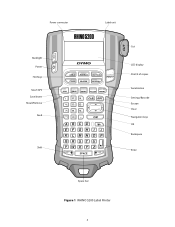
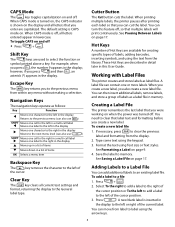
Power connector Backlight Power Hot Keys Size/CAPS Save/Insert Recall/Remove Feed Shift S HIF T Label exit BKSP S HIF T Cut LCD display Print/# of copies Serialization Settings/Barcode Escape Clear Navigation keys OK Backspace Enter Space bar Figure 1 RHINO 5200 Label Printer 4
Power connector Backlight Power Hot Keys Size/CAPS Save/Insert Recall/Remove Feed Shift S HIF T Label exit BKSP S HIF T Cut LCD display Print/# of copies Serialization Settings/Barcode Escape Clear Navigation keys OK Backspace Enter Space bar Figure 1 RHINO 5200 Label Printer 4
User Guide
Page 5
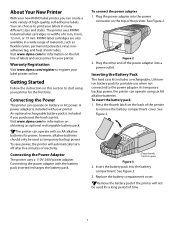
...pack. See Figure 3. RHINO label cartridges are also available in widths of 6 mm, 9 mm, 12 mm, or 19 mm. Warranty Registration Visit www.dymo.com/register to register your printer. An optional rechargeable battery pack is included with your label printer online. however, alkaline batteries...the printer can create a wide variety of the printer to remove the battery compartment cover. Plug the power adapter into the power connector on battery or AC power. Press thumb latch to start using six AA alkaline batteries. See Figure 2. The printer uses RHINO Industrial label ...
...pack. See Figure 3. RHINO label cartridges are also available in widths of 6 mm, 9 mm, 12 mm, or 19 mm. Warranty Registration Visit www.dymo.com/register to register your printer. An optional rechargeable battery pack is included with your label printer online. however, alkaline batteries...the printer can create a wide variety of the printer to remove the battery compartment cover. Plug the power adapter into the power connector on battery or AC power. Press thumb latch to start using six AA alkaline batteries. See Figure 2. The printer uses RHINO Industrial label ...
User Guide
Page 6
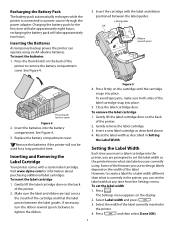
... . To insert the batteries 1. Visit www.dymo.com for a long period of the features you are currently using six AA alkaline batteries. The Settings menu appears on the back of the printer. 2. Charging the battery pack for a label width different than what size label you use to design labels depend on the cartridge until the...
... . To insert the batteries 1. Visit www.dymo.com for a long period of the features you are currently using six AA alkaline batteries. The Settings menu appears on the back of the printer. 2. Charging the battery pack for a label width different than what size label you use to design labels depend on the cartridge until the...
User Guide
Page 7
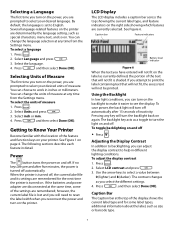
... turn off automatically. The contrast changes as you can turn on the backlight to make it easier to reset the label width when you reconnect the power and turn on the printer. Press and then select Done (OK). Select Units and press . 3. Getting to select your desired units of inactivity. See Figure... text, and so on. By default, the language is shaded. You can change the units of the display shows the current label type and for the next time the printer is turned off . If the batteries and power adapter are disconnected at the top of measure at any key will not fit...
... turn off automatically. The contrast changes as you can turn on the backlight to make it easier to reset the label width when you reconnect the power and turn on the printer. Press and then select Done (OK). Select Units and press . 3. Getting to select your desired units of inactivity. See Figure... text, and so on. By default, the language is shaded. You can change the units of the display shows the current label type and for the next time the printer is turned off . If the batteries and power adapter are disconnected at the top of measure at any key will not fit...
User Guide
Page 8
...number 9 appears in this feature off . When printing multiple labels, the printer pauses after printing each label so that multiple labels will print continuously. Type some text using Text size or Text styles. Save the label to the previous menu from the library. Select To the ... SHIFT Moves one cell to the left in a multi-cell label , Moves one label to the left of labels, adding barcodes, inserting symbols, and using the arrow keys. 8 Creating a Label File The printer remembers the last label that label text and formatting before you press SHIFT and then , an ...
...number 9 appears in this feature off . When printing multiple labels, the printer pauses after printing each label so that multiple labels will print continuously. Type some text using Text size or Text styles. Save the label to the previous menu from the library. Select To the ... SHIFT Moves one cell to the left in a multi-cell label , Moves one label to the left of labels, adding barcodes, inserting symbols, and using the arrow keys. 8 Creating a Label File The printer remembers the last label that label text and formatting before you press SHIFT and then , an ...
User Guide
Page 10
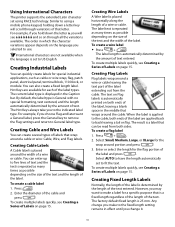
... and the length of the label are not available when the language is set to US English. Creating Fixed Length Labels Normally, the length of the label is automatically determined by the amount of the text. Using International Characters The printer supports the extended Latin character ...applied back to back leaving a tail or flag. The current label type is a fixed length regardless of the length of text. Creating Cable Labels A Cable label is 25 mm. Select Small, Medium, Large, or XLarge for special industrial applications, such as cable or wire wrap, flag, patch panel...
... and the length of the label are not available when the language is set to US English. Creating Fixed Length Labels Normally, the length of the label is automatically determined by the amount of the text. Using International Characters The printer supports the extended Latin character ...applied back to back leaving a tail or flag. The current label type is a fixed length regardless of the length of text. Creating Cable Labels A Cable label is 25 mm. Select Small, Medium, Large, or XLarge for special industrial applications, such as cable or wire wrap, flag, patch panel...
User Guide
Page 14
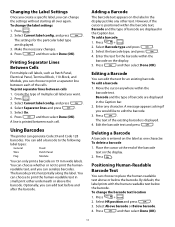
... Patch Panel, Electrical Panel, Terminal Block, 110-Block, and Module, you would like any character. Press and then select Done (OK). Select Current label config. Using Barcodes The printer can edit the text for the barcode within the barcode text. To add a barcode 1. Editing a Barcode You can generate Code 39 and Code...
... Patch Panel, Electrical Panel, Terminal Block, 110-Block, and Module, you would like any character. Press and then select Done (OK). Select Current label config. Using Barcodes The printer can edit the text for the barcode within the barcode text. To add a barcode 1. Editing a Barcode You can generate Code 39 and Code...
User Guide
Page 15
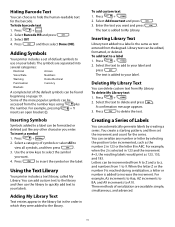
... Press S HIFT + . 2. When the letter Z or the number 9 is reached during serialization, a letter or number is added to a label can be formatted or deleted just like any number or letter by creating a series. Inserting Symbols Symbols added to My Library. Using the Text Library... Your printer includes a text library, called My Library. Library text can be edited, formatted, or deleted. Deleting My Library Text You can delete...
... Press S HIFT + . 2. When the letter Z or the number 9 is reached during serialization, a letter or number is added to a label can be formatted or deleted just like any number or letter by creating a series. Inserting Symbols Symbols added to My Library. Using the Text Library... Your printer includes a text library, called My Library. Library text can be edited, formatted, or deleted. Deleting My Library Text You can delete...
User Guide
Page 17
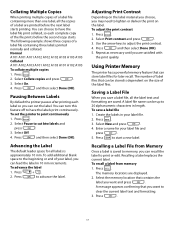
... then select Done (OK). 5. Using Printer Memory The printer has a powerful memory feature that contains the label you save a label file 1. The number of a label file containing three labels printed normally and collated. Press . 3. Select New and press . 4. To recall a label from Memory Once a label is dependent on the size of the label files. The memory locations are printed...
... then select Done (OK). 5. Using Printer Memory The printer has a powerful memory feature that contains the label you save a label file 1. The number of a label file containing three labels printed normally and collated. Press . 3. Select New and press . 4. To recall a label from Memory Once a label is dependent on the size of the label files. The memory locations are printed...
User Guide
Page 18
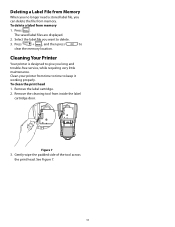
... to time to keep it working properly. Press . Cleaning Your Printer Your printer is designed to give you want to clear the memory location. Clean your printer from inside the label cartridge door. The saved label files are displayed. 2. See Figure 7. 18 Select the label file you long and trouble-free service, while requiring very little...
... to time to keep it working properly. Press . Cleaning Your Printer Your printer is designed to give you want to clear the memory location. Clean your printer from inside the label cartridge door. The saved label files are displayed. 2. See Figure 7. 18 Select the label file you long and trouble-free service, while requiring very little...
User Guide
Page 20
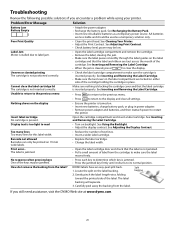
...Insert new AA alkaline batteries as a temporary solution only. See Cleaning Your Printer. • Adjust the Print Contrast. See Inserting and Removing the Label Cartridge. • When the jam is present. Insert label cartridge No cartridge is cleared, press to clear the display. Display text ...See Inserting and Removing the Label Cartridge. • Make sure the two levers in place. RHINO labels have an easy-peel split back. 1. Troubleshooting Review the following possible solutions if you still need assistance, visit the DYMO Web site at www.dymo.com. 20 Make sure ...
...Insert new AA alkaline batteries as a temporary solution only. See Cleaning Your Printer. • Adjust the Print Contrast. See Inserting and Removing the Label Cartridge. • When the jam is present. Insert label cartridge No cartridge is cleared, press to clear the display. Display text ...See Inserting and Removing the Label Cartridge. • Make sure the two levers in place. RHINO labels have an easy-peel split back. 1. Troubleshooting Review the following possible solutions if you still need assistance, visit the DYMO Web site at www.dymo.com. 20 Make sure ...


