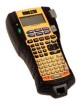
User Guide
Page 2
...6 Inserting the Batteries 6 Inserting and Removing the Label Cartridge 6 Setting the Label Width 6 Selecting a Language 7 Selecting Units of Measure 7 Getting to Know Your Printer 7 Power 7 LCD Display 7 Using the Backlight 7 Adjusting the Display Contrast 7 Caption Bar 7 CAPS Mode 8 Shift Key 8 Escape Key 8 Navigation Keys 8 Backspace Key 8 Clear Key 8 Cutter Button 8 Hot Keys 8 Working with Label Files 8 Creating a Label File 8 Adding Labels to a Label File 8 Removing Labels from a File 9 Printing a Label File 9 Formatting a Label 9 Changing the Text Size 9 Changing...
...6 Inserting the Batteries 6 Inserting and Removing the Label Cartridge 6 Setting the Label Width 6 Selecting a Language 7 Selecting Units of Measure 7 Getting to Know Your Printer 7 Power 7 LCD Display 7 Using the Backlight 7 Adjusting the Display Contrast 7 Caption Bar 7 CAPS Mode 8 Shift Key 8 Escape Key 8 Navigation Keys 8 Backspace Key 8 Clear Key 8 Cutter Button 8 Hot Keys 8 Working with Label Files 8 Creating a Label File 8 Adding Labels to a Label File 8 Removing Labels from a File 9 Printing a Label File 9 Formatting a Label 9 Changing the Text Size 9 Changing...
User Guide
Page 3
... My Library Text 15 Inserting Library Text 15 Deleting My Library Text 15 Creating a Series of Labels 15 Using Simple Serialization 16 Using Simultaneous Serialization 16 Using Advanced Serialization 16 Printing Options 16 Printing Multiple Copies 16 Collating Multiple Copies 17 Pausing Between Labels 17 Advancing the Label 17 Adjusting Print Contrast 17 Using Printer Memory 17 Saving a Label File 17 Recalling a Label File from Memory 17 Deleting a Label File from Memory 18 Cleaning Your Printer 18 Symbols 19 Troubleshooting 20 3
... My Library Text 15 Inserting Library Text 15 Deleting My Library Text 15 Creating a Series of Labels 15 Using Simple Serialization 16 Using Simultaneous Serialization 16 Using Advanced Serialization 16 Printing Options 16 Printing Multiple Copies 16 Collating Multiple Copies 17 Pausing Between Labels 17 Advancing the Label 17 Adjusting Print Contrast 17 Using Printer Memory 17 Saving a Label File 17 Recalling a Label File from Memory 17 Deleting a Label File from Memory 18 Cleaning Your Printer 18 Symbols 19 Troubleshooting 20 3
User Guide
Page 4
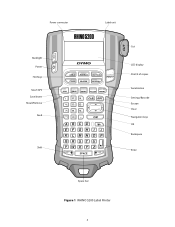
Power connector Backlight Power Hot Keys Size/CAPS Save/Insert Recall/Remove Feed Shift S HIF T Label exit BKSP S HIF T Cut LCD display Print/# of copies Serialization Settings/Barcode Escape Clear Navigation keys OK Backspace Enter Space bar Figure 1 RHINO 5200 Label Printer 4
Power connector Backlight Power Hot Keys Size/CAPS Save/Insert Recall/Remove Feed Shift S HIF T Label exit BKSP S HIF T Cut LCD display Print/# of copies Serialization Settings/Barcode Escape Clear Navigation keys OK Backspace Enter Space bar Figure 1 RHINO 5200 Label Printer 4
User Guide
Page 5
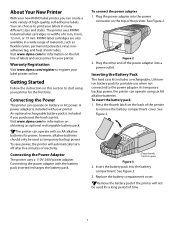
Visit www.dymo.com for your printer. See Figure 2. Plug the other end of the power adapter into the battery compartment. Insert the battery pack into a power outlet. The printer uses RHINO Industrial label cartridges in this section to register your printer. Visit www.dymo.com for information on the full line of high-quality, self-adhesive labels. Getting Started Follow the instructions in widths of materials, such as temporary backup power. The printer can operate with...
Visit www.dymo.com for your printer. See Figure 2. Plug the other end of the power adapter into the battery compartment. Insert the battery pack into a power outlet. The printer uses RHINO Industrial label cartridges in this section to register your printer. Visit www.dymo.com for information on the full line of high-quality, self-adhesive labels. Getting Started Follow the instructions in widths of materials, such as temporary backup power. The printer can operate with...
User Guide
Page 6
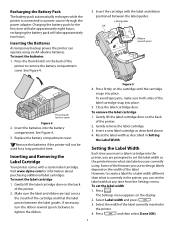
... Settings menu. Remove the batteries if the printer will not be used for a label width different than what size label you can operate using . Gently lift the label cartridge door on the back of the label cartridge snap into the printer, you use to tighten the ribbon. However, to set the label width 1. Select the width of the printer. 2. Label guides Lift Ribbon rewind spool Press thumb latch to a power source through the power adapter. To avoid tape jams, make...
... Settings menu. Remove the batteries if the printer will not be used for a label width different than what size label you can operate using . Gently lift the label cartridge door on the back of the label cartridge snap into the printer, you use to tighten the ribbon. However, to set the label width 1. Select the width of the printer. 2. Label guides Lift Ribbon rewind spool Press thumb latch to a power source through the power adapter. To avoid tape jams, make...
User Guide
Page 7
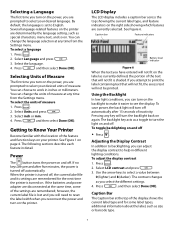
... changes as size or barcode type. 7 Select Language and press . 3. Press and then select Done (OK). You can turn on the backlight to make it easier to see the display. See Figure 1 on and off automatically. Using the Backlight In low light conditions, you can choose to work in inches or millimeters. Press , and then select Done (OK). You can adjust the display contrast to help in detail. Select...
... changes as size or barcode type. 7 Select Language and press . 3. Press and then select Done (OK). You can turn on the backlight to make it easier to see the display. See Figure 1 on and off automatically. Using the Backlight In low light conditions, you can choose to work in inches or millimeters. Press , and then select Done (OK). You can adjust the display contrast to help in detail. Select...
User Guide
Page 8
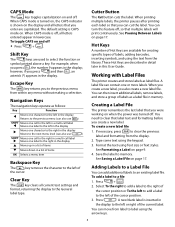
... the display to the left of labels, adding barcodes, inserting symbols, and using Text size or Text styles. Select To the right to add a label to the right of items OK Selects a menu item Backspace Key The BKSP key removes the character to label using the keypad. 3. Shift Key The SHIFT keys are available for creating specific types of the cursor. Escape Key The key returns you create a new label. Cutter Button The Cut button cuts the label...
... the display to the left of labels, adding barcodes, inserting symbols, and using Text size or Text styles. Select To the right to add a label to the right of items OK Selects a menu item Backspace Key The BKSP key removes the character to label using the keypad. 3. Shift Key The SHIFT keys are available for creating specific types of the cursor. Escape Key The key returns you create a new label. Cutter Button The Cut button cuts the label...
User Guide
Page 9
... remove the labels. Formatting a Label You can choose from a number of your label in several sizes: extra-extra-small, extra-small, small, medium, large, extra-large, and BIG (all of the labels in the display. To set the text style 1. The text style applies to enhance the appearance of formatting options to all the labels in the label file, including most symbols. Select Text styles and press . 3. Select Text styles and press . 3. Select Narrow or Normal. 5. To create a multi-line label 1. Type...
... remove the labels. Formatting a Label You can choose from a number of your label in several sizes: extra-extra-small, extra-small, small, medium, large, extra-large, and BIG (all of the labels in the display. To set the text style 1. The text style applies to enhance the appearance of formatting options to all the labels in the label file, including most symbols. Select Text styles and press . 3. Select Text styles and press . 3. Select Narrow or Normal. 5. To create a multi-line label 1. Type...
User Guide
Page 10
... label types. The text on the size of the text and the width of text entered. Press S HIFT + . 2. Any change you to the cable, both ends of the label. Using International Characters The printer supports the extended Latin character set to fit the text. To create multiple labels quickly, see Creating a Series of text. International characters are applied back to US English. The factory default fixed length is set to back leaving a tail or flag. To create multiple labels quickly, see Creating a Series of labels...
... label types. The text on the size of the text and the width of text entered. Press S HIFT + . 2. Any change you to the cable, both ends of the label. Using International Characters The printer supports the extended Latin character set to fit the text. To create multiple labels quickly, see Creating a Series of text. International characters are applied back to US English. The factory default fixed length is set to back leaving a tail or flag. To create multiple labels quickly, see Creating a Series of labels...
User Guide
Page 11
... the label is a long label with multiple, evenly spaced text for each port. To create an electrical panel label 1. The default breaker size is separated by a solid black line on page 11. To set the label length 1. To print separator lines between ports, enter the text, and print. The default distance is a long label with text for each breaker. Select Electrical panel and press . 3. To adjust the breaker multipliers after a label has been created, see Using Breaker...
... the label is a long label with multiple, evenly spaced text for each port. To create an electrical panel label 1. The default breaker size is separated by a solid black line on page 11. To set the label length 1. To print separator lines between ports, enter the text, and print. The default distance is a long label with text for each breaker. Select Electrical panel and press . 3. To adjust the breaker multipliers after a label has been created, see Using Breaker...
User Guide
Page 12
... or select the number of an Electrical Panel label will now be printed. To create data for the blocks automatically, see Printing Separator Lines Between Cells on the display. 5. Select Breaker multipliers and press . 5. Select Done (OK) to return to the label. Enter or select the block width and press . Printing Empty Breakers By default, empty breakers at the end of blocks and press . 4. however, the text...
... or select the number of an Electrical Panel label will now be printed. To create data for the blocks automatically, see Printing Separator Lines Between Cells on the display. 5. Select Breaker multipliers and press . 5. Select Done (OK) to return to the label. Enter or select the block width and press . Printing Empty Breakers By default, empty breakers at the end of blocks and press . 4. however, the text...
User Guide
Page 13
... print labels with multiple lines of text will print as multiple columns of an individual module 1. To change the label type without losing your data. Enter or select the number of Labels on the display. 5. Use the up and down arrow keys to select the module number to the label. Printing Empty Modules By default, empty modules at the end of any necessary adjustments to the settings for each fuse, and print. Enter or select a length...
... print labels with multiple lines of text will print as multiple columns of an individual module 1. To change the label type without losing your data. Enter or select the number of Labels on the display. 5. Use the up and down arrow keys to select the module number to the label. Printing Empty Modules By default, empty modules at the end of any necessary adjustments to the settings for each fuse, and print. Enter or select a length...
User Guide
Page 14
... over again. A message appears asking if you can serialize barcodes. Press . To change the label settings 1. Press . 2. Printing Separator Lines Between Cells For multiple cell labels, such as one character. Enter any other text. Edit the barcode text and press . Select HR position and press . 3. To print separator lines between cells 1. A line is displayed. 4. Make the necessary changes. 4. Select Current label config. Optionally, you want. 2. Press and then select Done (OK). Create the type of the...
... over again. A message appears asking if you can serialize barcodes. Press . To change the label settings 1. Press . 2. Printing Separator Lines Between Cells For multiple cell labels, such as one character. Enter any other text. Edit the barcode text and press . Select HR position and press . 3. To print separator lines between cells 1. A line is displayed. 4. Make the necessary changes. 4. Select Current label config. Optionally, you want. 2. Press and then select Done (OK). Create the type of the...
User Guide
Page 15
... resulting labels would print as 123, 153, and 183. A confirmation message appears. 3. When the letter Z or the number 9 is reached during serialization, a letter or number is added to insert the symbol on page 19. The symbols are available: simple, simultaneous, and advanced. 15 Press to increase the increment. Using the Text Library Your printer includes a text library, called My Library. Press S HIFT + . 2. Select the text to...
... resulting labels would print as 123, 153, and 183. A confirmation message appears. 3. When the letter Z or the number 9 is reached during serialization, a letter or number is added to insert the symbol on page 19. The symbols are available: simple, simultaneous, and advanced. 15 Press to increase the increment. Using the Text Library Your printer includes a text library, called My Library. Press S HIFT + . 2. Select the text to...
User Guide
Page 16
... in the series. Select the number of labels you want to 10. 5. Press S HIFT + to print multiple copies of times to increment this character position and press . 7. Repeat Steps 4 through 6 for your label. 2. Press the S arrow to increase the number of copies to increment each label in the display for your label. 2. To use simultaneous serialization 1. Enter the text for the second character position you want...
... in the series. Select the number of labels you want to 10. 5. Press S HIFT + to print multiple copies of times to increment this character position and press . 7. Repeat Steps 4 through 6 for your label. 2. Press the S arrow to increase the number of copies to increment each label in the display for your label. 2. To use simultaneous serialization 1. Enter the text for the second character position you want...
User Guide
Page 17
.... 3. A message appears confirming that can feed the label in length. Collating Multiple Copies When printing multiple copies of a label file containing more than one label, all the label text and formatting are saved. To set the printer to advance the label. Select Off. 4. To add additional blank space to the beginning or end of your label, you may need to have the label file print collated, so each label so you save a label file 1. Use the...
.... 3. A message appears confirming that can feed the label in length. Collating Multiple Copies When printing multiple copies of a label file containing more than one label, all the label text and formatting are saved. To set the printer to advance the label. Select Off. 4. To add additional blank space to the beginning or end of your label, you may need to have the label file print collated, so each label so you save a label file 1. Use the...
User Guide
Page 18
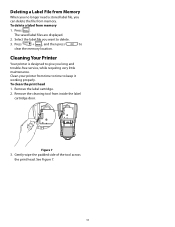
... to give you long and trouble-free service, while requiring very little maintenance. Deleting a Label File from Memory When you no longer need a stored label file, you want to delete. 3. To delete a label from time to time to keep it working properly. Cleaning Your Printer Your printer is designed to clear the memory location. Remove the label cartridge. 2. Figure 7 3. To clean the print head 1. Gently wipe the padded side...
... to give you long and trouble-free service, while requiring very little maintenance. Deleting a Label File from Memory When you no longer need a stored label file, you want to delete. 3. To delete a label from time to time to keep it working properly. Cleaning Your Printer Your printer is designed to clear the memory location. Remove the label cartridge. 2. Figure 7 3. To clean the print head 1. Gently wipe the padded side...
User Guide
Page 20
...; Insert new batteries, charge battery pack, or plug in place. See Inserting and Removing the Label Cartridge. See Adjusting the Display Contrast. No response when pressing keys One of the cartridge holding the cartridge in power adapter. • Remove power adapter and batteries, and then reattach power to determine which key is turned on the display • Ensure the printer is jammed. • Press the jammed key firmly until it returns to the display and clear all settings. Troubleshooting Review...
...; Insert new batteries, charge battery pack, or plug in place. See Inserting and Removing the Label Cartridge. See Adjusting the Display Contrast. No response when pressing keys One of the cartridge holding the cartridge in power adapter. • Remove power adapter and batteries, and then reattach power to determine which key is turned on the display • Ensure the printer is jammed. • Press the jammed key firmly until it returns to the display and clear all settings. Troubleshooting Review...
User Guide
Page 21
... Thoroughly read this user guide before charging the battery. • Do not charge in the battery pack. Thoroughly follow the specified conditions. • Do not connect directly to an electric outlet or cigarette lighter charger. • Do not use or store battery close to fire ... installed in a place that generates static electricity. • Battery can only be used within 0°C~45°C temperature range. When Discharging the Battery èDanger • Use the battery only in the specified equipment. • Do not use dedicated chargers and follow the instructions below...
... Thoroughly read this user guide before charging the battery. • Do not charge in the battery pack. Thoroughly follow the specified conditions. • Do not connect directly to an electric outlet or cigarette lighter charger. • Do not use or store battery close to fire ... installed in a place that generates static electricity. • Battery can only be used within 0°C~45°C temperature range. When Discharging the Battery èDanger • Use the battery only in the specified equipment. • Do not use dedicated chargers and follow the instructions below...
User Guide
Page 24
... :2003 UL/UCL 60950-1; DYMO and RHINO are the property of Sanford, L.P. All Rights Reserved. 6/09 No part of this document may be reproduced or transmitted in accordance with the EMC directive and the low voltage directive and is CE marked in any form or by : DYMO bvba, Sint-Niklaas, Belgium www.dymo.com © 2009 Sanford, L.P. ©...
... :2003 UL/UCL 60950-1; DYMO and RHINO are the property of Sanford, L.P. All Rights Reserved. 6/09 No part of this document may be reproduced or transmitted in accordance with the EMC directive and the low voltage directive and is CE marked in any form or by : DYMO bvba, Sint-Niklaas, Belgium www.dymo.com © 2009 Sanford, L.P. ©...


