
User Guide 1
Page 3
Contents About Your New Label Maker 6 Registering Your Label Maker 6 Getting Started 6 Connecting the Power 6 Inserting the Battery Pack 6 Removing the Battery Pack 6 Charging the Battery Pack 6 Inserting the Label Cassette 6 Using the Label Maker for the First Time 7 Getting to Know the Label Maker 7 Power 7 Home 7 Touch Screen Display 7 Navigation Keys 7 Caps Lock 7 Shift 7 Backspace 8 Delete 8 Using the Touch Screen 8 Making a Selection 8 Selecting...
Contents About Your New Label Maker 6 Registering Your Label Maker 6 Getting Started 6 Connecting the Power 6 Inserting the Battery Pack 6 Removing the Battery Pack 6 Charging the Battery Pack 6 Inserting the Label Cassette 6 Using the Label Maker for the First Time 7 Getting to Know the Label Maker 7 Power 7 Home 7 Touch Screen Display 7 Navigation Keys 7 Caps Lock 7 Shift 7 Backspace 8 Delete 8 Using the Touch Screen 8 Making a Selection 8 Selecting...

User Guide 1
Page 4
... Accounts 14 Changing User Settings 15 Deleting User Accounts 15 Maintaining Your Label Maker 15 Cleaning Your Label Maker 15 Calibrating the Touch Screen 15 Using the Label Maker with Your Computer 16 Installing DYMO Label Software 16 Connecting the Label Maker to Your Computer 16 Using DYMO Label Software 17 Viewing the Label Maker Status 17 Troubleshooting 18 Documentation Feedback 18 Safety Precautions for Lithium...
... Accounts 14 Changing User Settings 15 Deleting User Accounts 15 Maintaining Your Label Maker 15 Cleaning Your Label Maker 15 Calibrating the Touch Screen 15 Using the Label Maker with Your Computer 16 Installing DYMO Label Software 16 Connecting the Label Maker to Your Computer 16 Using DYMO Label Software 17 Viewing the Label Maker Status 17 Troubleshooting 18 Documentation Feedback 18 Safety Precautions for Lithium...

User Guide 1
Page 5
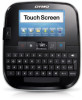
Currency 10 Delete 11 Accented characters 12 Space bar 13 Shift 14 Caps Lock 15 Symbols - 1 2 20 3 19 18 4 17 5 16 6 7 15 8 14 9 13 10 1 USB connector 2 Power connector 3 Touch screen 4 OK 5 Print 6 Print preview 7 Backspace 11 12 Figure 1 LabelManager 500TS label maker 8 Return 9 Symbols - Punctuation 16 Home 17 On/Off 18 Cutter 19 Label exit slot 20 Navigation 5
Currency 10 Delete 11 Accented characters 12 Space bar 13 Shift 14 Caps Lock 15 Symbols - 1 2 20 3 19 18 4 17 5 16 6 7 15 8 14 9 13 10 1 USB connector 2 Power connector 3 Touch screen 4 OK 5 Print 6 Print preview 7 Backspace 11 12 Figure 1 LabelManager 500TS label maker 8 Return 9 Symbols - Punctuation 16 Home 17 On/Off 18 Cutter 19 Label exit slot 20 Navigation 5

User Guide 1
Page 7
...character. 7 These selections remain set up the label maker 1 Press to turn on your label using the touch screen display. Congratulations! When the charging adapter is connected, a clock appears in the display while the label maker is turned off . When the label maker power is in detail. Home The key ...Continue reading to expose the adhesive, and then attach the label. Refer to start up message. To save power, the label maker goes into standby mode after two minutes of the battery pack. Touch Screen Display You can move through menu selections using all the letters...
...character. 7 These selections remain set up the label maker 1 Press to turn on your label using the touch screen display. Congratulations! When the charging adapter is connected, a clock appears in the display while the label maker is turned off . When the label maker power is in detail. Home The key ...Continue reading to expose the adhesive, and then attach the label. Refer to start up message. To save power, the label maker goes into standby mode after two minutes of the battery pack. Touch Screen Display You can move through menu selections using all the letters...

User Guide 1
Page 15
... polish remover, benzene, or other organic solvents. To change the settings for each user individually. Cleaning Your Label Maker Clean your label maker working properly. To clean the touch screen 1 Use a lint-free cloth to wipe the exterior of the tool across the print head. Print head...wipe the padded side of the printer and the touch screen. Changing User Settings You can delete that user account from inside the label compartment cover. Clean your label maker and calibrate the screen regularly to keep your label maker regularly to keep it working properly. Do not press...
... polish remover, benzene, or other organic solvents. To change the settings for each user individually. Cleaning Your Label Maker Clean your label maker working properly. To clean the touch screen 1 Use a lint-free cloth to wipe the exterior of the tool across the print head. Print head...wipe the padded side of the printer and the touch screen. Changing User Settings You can delete that user account from inside the label compartment cover. Clean your label maker and calibrate the screen regularly to keep your label maker regularly to keep it working properly. Do not press...


