
User Guide 1
Page 2
.... All other countries. The DejaVu fonts are the property of their respective holders. No part of Sanford, L.P. Trademarks DYMO, DYMO Label, and LabelManager are copyright © by any form or by Tavmjong Bah. Glyphs in the DejaVu fonts imported from Arev fonts are registered marks in any means or translated into another language without the prior written consent of...
.... All other countries. The DejaVu fonts are the property of their respective holders. No part of Sanford, L.P. Trademarks DYMO, DYMO Label, and LabelManager are copyright © by any form or by Tavmjong Bah. Glyphs in the DejaVu fonts imported from Arev fonts are registered marks in any means or translated into another language without the prior written consent of...

User Guide 1
Page 3
...the Power 6 Inserting the Battery Pack 6 Removing the Battery Pack 6 Charging the Battery Pack 6 Inserting the Label Cassette 6 Using the Label Maker for the First Time 7 Getting to Know the Label Maker 7 Power 7 Home 7 Touch Screen Display 7 Navigation Keys 7 Caps Lock 7 Shift 7 Backspace 8 Delete 8 Using the Touch Screen 8 Making a Selection 8 Selecting Text 8 Scrolling a List 8 Editing Your Label 8 Selecting the Font 8 Changing the Font Type 9 Changing the Font Size 9 Changing the Font Style 9 Inserting Special Characters, Auto-Text, and Barcodes 9 Inserting Symbols...
...the Power 6 Inserting the Battery Pack 6 Removing the Battery Pack 6 Charging the Battery Pack 6 Inserting the Label Cassette 6 Using the Label Maker for the First Time 7 Getting to Know the Label Maker 7 Power 7 Home 7 Touch Screen Display 7 Navigation Keys 7 Caps Lock 7 Shift 7 Backspace 8 Delete 8 Using the Touch Screen 8 Making a Selection 8 Selecting Text 8 Scrolling a List 8 Editing Your Label 8 Selecting the Font 8 Changing the Font Type 9 Changing the Font Size 9 Changing the Font Style 9 Inserting Special Characters, Auto-Text, and Barcodes 9 Inserting Symbols...

User Guide 1
Page 4
Changing the Default Font 14 Changing the Screen Settings 14 Working with User Accounts 14 Creating User Accounts 14 Changing User Settings 15 Deleting User Accounts 15 Maintaining Your Label Maker 15 Cleaning Your Label Maker 15 Calibrating the Touch Screen 15 Using the Label Maker with Your Computer 16 Installing DYMO Label Software 16 Connecting the Label Maker to Your Computer 16 Using DYMO Label Software 17 Viewing the Label Maker Status 17 Troubleshooting 18 Documentation Feedback 18 Safety Precautions for Lithium Polymer Rechargeable Battery Pack 19 Environmental...
Changing the Default Font 14 Changing the Screen Settings 14 Working with User Accounts 14 Creating User Accounts 14 Changing User Settings 15 Deleting User Accounts 15 Maintaining Your Label Maker 15 Cleaning Your Label Maker 15 Calibrating the Touch Screen 15 Using the Label Maker with Your Computer 16 Installing DYMO Label Software 16 Connecting the Label Maker to Your Computer 16 Using DYMO Label Software 17 Viewing the Label Maker Status 17 Troubleshooting 18 Documentation Feedback 18 Safety Precautions for Lithium Polymer Rechargeable Battery Pack 19 Environmental...

User Guide 1
Page 5
Currency 10 Delete 11 Accented characters 12 Space bar 13 Shift 14 Caps Lock 15 Symbols - 1 2 20 3 19 18 4 17 5 16 6 7 15 8 14 9 13 10 1 USB connector 2 Power connector 3 Touch screen 4 OK 5 Print 6 Print preview 7 Backspace 11 12 Figure 1 LabelManager 500TS label maker 8 Return 9 Symbols - Punctuation 16 Home 17 On/Off 18 Cutter 19 Label exit slot 20 Navigation 5
Currency 10 Delete 11 Accented characters 12 Space bar 13 Shift 14 Caps Lock 15 Symbols - 1 2 20 3 19 18 4 17 5 16 6 7 15 8 14 9 13 10 1 USB connector 2 Power connector 3 Touch screen 4 OK 5 Print 6 Print preview 7 Backspace 11 12 Figure 1 LabelManager 500TS label maker 8 Return 9 Symbols - Punctuation 16 Home 17 On/Off 18 Cutter 19 Label exit slot 20 Navigation 5

User Guide 1
Page 6
... adapter into the power connector at the top of the label maker. 3 Plug the other end of the label maker. 3 Remove the battery pack from the battery compartment. Make sure to print your labels in this section to set up your label maker. Inserting the Label Cassette Your label maker uses DYMO D1 label cassettes. You can create a wide variety of high-quality, self-adhesive labels. Registering Your Label Maker Visit www.dymo.com/register to open the label compartment. 2 Make sure the tape and ribbon...
... adapter into the power connector at the top of the label maker. 3 Plug the other end of the label maker. 3 Remove the battery pack from the battery compartment. Make sure to print your labels in this section to set up your label maker. Inserting the Label Cassette Your label maker uses DYMO D1 label cassettes. You can create a wide variety of high-quality, self-adhesive labels. Registering Your Label Maker Visit www.dymo.com/register to open the label compartment. 2 Make sure the tape and ribbon...

User Guide 1
Page 7
... adapter is turned off Auto-Cut on page 14. Select a user, create new users, and manage user settings. Navigation Keys You can move through menu selections using the touch screen display. When Caps Lock is Caps Lock off , all four navigation keys, and then press to select the language and label width. To print a label 1 Using the keyboard, enter text to expose the adhesive, and then attach the label. The default setting is off . These selections remain set up message. Change...
... adapter is turned off Auto-Cut on page 14. Select a user, create new users, and manage user settings. Navigation Keys You can move through menu selections using the touch screen display. When Caps Lock is Caps Lock off , all four navigation keys, and then press to select the language and label width. To print a label 1 Using the keyboard, enter text to expose the adhesive, and then attach the label. The default setting is off . These selections remain set up message. Change...

User Guide 1
Page 8
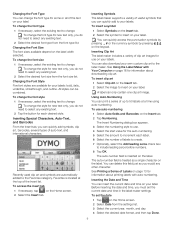
... change the formatting for all text on the label. 12 3 456 8 7 1 Font type 2 Bold 3 Italic 4 Underline 5 Font size 6 Strikethrough 7 Outline 8 Auto-fit text To format your label. Do not press on the Home screen. 2 Select the Font tab. 8 Tap to select all or part of your fingers to the right of the cursor is deleted. However, if no objects or characters are selected, the character to tap, double-tap, and swipe. Selecting...
... change the formatting for all text on the label. 12 3 456 8 7 1 Font type 2 Bold 3 Italic 4 Underline 5 Font size 6 Strikethrough 7 Outline 8 Auto-fit text To format your label. Do not press on the Home screen. 2 Select the Font tab. 8 Tap to select all or part of your fingers to the right of the cursor is deleted. However, if no objects or characters are selected, the character to tap, double-tap, and swipe. Selecting...
User Guide 1
Page 9
... time on the label. You can be combined. To use on the Home screen. 2 Select Date from the font type list. See Printing a Series of the Insert list. Inserting Clip Art The label maker includes a variety of auto-text, and international characters. The auto-number field is treated as you do not need to change the style for use auto-numbering 1 Select Auto-fields and Barcodes on the label. Inserting Special Characters, Auto-Text, and Barcodes From the Insert tab, you can...
... time on the label. You can be combined. To use on the Home screen. 2 Select Date from the font type list. See Printing a Series of the Insert list. Inserting Clip Art The label maker includes a variety of auto-text, and international characters. The auto-number field is treated as you do not need to change the style for use auto-numbering 1 Select Auto-fields and Barcodes on the label. Inserting Special Characters, Auto-Text, and Barcodes From the Insert tab, you can...

User Guide 1
Page 10
... character on the Insert tab. 2 Tap Date and Time. The barcode is created for information about barcodes, many excellent how-to place the barcode text below the barcode. See Printing a Series of barcodes: UPC-A UPC-E Code 128 B Code 39 EAN 13 EAN 8 You can be combined on the label. The barcode is printed, select the Auto-update date and time check box. 6 Tap OK. Only one of the following types of Labels...
... character on the Insert tab. 2 Tap Date and Time. The barcode is created for information about barcodes, many excellent how-to place the barcode text below the barcode. See Printing a Series of barcodes: UPC-A UPC-E Code 128 B Code 39 EAN 13 EAN 8 You can be combined on the label. The barcode is printed, select the Auto-update date and time check box. 6 Tap OK. Only one of the following types of Labels...

User Guide 1
Page 11
... of the text, and create fixed-length labels. If a word suggestion is available, the suggested word appears below the label in the Filter box to insert that word on your label. To turn off word suggestions 1 Tap on the Home screen. 2 Select the Layout tab. Editing the Label Layout Several layout options are displayed. 2 Use the left and right navigation keys to select the character you to print text which...
... of the text, and create fixed-length labels. If a word suggestion is available, the suggested word appears below the label in the Filter box to insert that word on your label. To turn off word suggestions 1 Tap on the Home screen. 2 Select the Layout tab. Editing the Label Layout Several layout options are displayed. 2 Use the left and right navigation keys to select the character you to print text which...

User Guide 1
Page 12
... text will print as multiple columns of a label is displayed in the display. The selected label is determined by the length of the following : a Tap New folder. You can view, organize, and delete saved and downloaded labels stored on the Home screen. 2 Select Manage Files from a database file and download the labels to view all downloaded labels. Creating Fixed-Length Labels Normally, the length of text. To save your label to keep your label maker. To delete labels and folders 1 Select the check...
... text will print as multiple columns of a label is displayed in the display. The selected label is determined by the length of the following : a Tap New folder. You can view, organize, and delete saved and downloaded labels stored on the Home screen. 2 Select Manage Files from a database file and download the labels to view all downloaded labels. Creating Fixed-Length Labels Normally, the length of text. To save your label to keep your label maker. To delete labels and folders 1 Select the check...

User Guide 1
Page 13
... 49 copies of labels by using autonumbering or by inserting day, month, or quarter names on the Home screen. 2 Select Manage Files from the Settings list. 3 Tap Downloaded Clip Art. To clear recently printed labels 1 Tap on your label maker. The Manage downloaded Clip Art screen is automatically cut , copy, and paste labels and folders to your label. 2 Press . To print a series of labels 1 Create a series of a single label at one of labels for more information...
... 49 copies of labels by using autonumbering or by inserting day, month, or quarter names on the Home screen. 2 Select Manage Files from the Settings list. 3 Tap Downloaded Clip Art. To clear recently printed labels 1 Tap on your label maker. The Manage downloaded Clip Art screen is automatically cut , copy, and paste labels and folders to your label. 2 Press . To print a series of labels 1 Create a series of a single label at one of labels for more information...

User Guide 1
Page 14
... the label maker knows what label cassette is on by default. Turning off Auto-Cut When the auto-cut feature is turned on, each label is connected. To change the label width setting at any time, regardless of the label currently inserted in standby mode and the charging adapter is automatically cut after printing check box. 4 Select the Print cut marks between labels check box. See Changing User Settings on the Home screen. 2 Select Screen from the Settings list. 3 If necessary, clear the Cut each label after printing. However...
... the label maker knows what label cassette is on by default. Turning off Auto-Cut When the auto-cut feature is turned on, each label is connected. To change the label width setting at any time, regardless of the label currently inserted in standby mode and the charging adapter is automatically cut after printing check box. 4 Select the Print cut marks between labels check box. See Changing User Settings on the Home screen. 2 Select Screen from the Settings list. 3 If necessary, clear the Cut each label after printing. However...

User Guide 1
Page 15
... printer and the touch screen. Deleting User Accounts When you no longer need to calibrate the touch screen display to wipe the exterior of the tool across the print head. To clean the touch screen 1 Use a lint-free cloth to keep your label maker working properly. Cleaning Your Label Maker Clean your label maker and calibrate the screen regularly to the selected setting. 4 Tap Save. b Make the desired changes to keep it working properly. To change user settings 1 Tap on the Home screen. 2 Select Screen...
... printer and the touch screen. Deleting User Accounts When you no longer need to calibrate the touch screen display to wipe the exterior of the tool across the print head. To clean the touch screen 1 Use a lint-free cloth to keep your label maker working properly. Cleaning Your Label Maker Clean your label maker and calibrate the screen regularly to the selected setting. 4 Tap Save. b Make the desired changes to keep it working properly. To change user settings 1 Tap on the Home screen. 2 Select Screen...
User Guide 1
Page 16
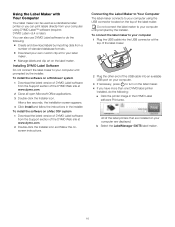
... the label printers that are displayed. Do not connect the label maker to your computer using DYMO Label™ software (requires DYMO Label v.8.4 or later). All of the DYMO Web site at the top of the label maker. 2 Plug the other end of the USB cable into the USB connector at www.dymo.com. 2 Double-click the Installer icon and follow the instructions in the DYMO Label software Print area. You can also use DYMO Label software to turn on a Windows® system 1 Download...
... the label printers that are displayed. Do not connect the label maker to your computer using DYMO Label™ software (requires DYMO Label v.8.4 or later). All of the DYMO Web site at the top of the label maker. 2 Plug the other end of the USB cable into the USB connector at www.dymo.com. 2 Double-click the Installer icon and follow the instructions in the DYMO Label software Print area. You can also use DYMO Label software to turn on a Windows® system 1 Download...

User Guide 1
Page 17
... on using the software, refer to print your label type and apply layouts. The following : DYMO Label v.8 Help DYMO Label v.8 User Guide LabelManager 500TS User Guide Viewing the Label Maker Status The label maker status is charging; Insert text, addresses, images, shapes, lines, barcodes, dates, and counters. printing is not possible Label maker is connected and battery pack is not charging Label maker is connected and battery pack is a problem with the battery pack 17 Print a label. Import and download labels, download clip art, and manage files...
... on using the software, refer to print your label type and apply layouts. The following : DYMO Label v.8 Help DYMO Label v.8 User Guide LabelManager 500TS User Guide Viewing the Label Maker Status The label maker status is charging; Insert text, addresses, images, shapes, lines, barcodes, dates, and counters. printing is not possible Label maker is connected and battery pack is not charging Label maker is connected and battery pack is a problem with the battery pack 17 Print a label. Import and download labels, download clip art, and manage files...

User Guide 1
Page 18
...; Replace the battery pack. Remove jammed label; Documentation Feedback We are inaccurate or unclear, areas where more detail is turned on We also welcome your feedback. Send us your label maker. Insert a label cassette. Delete some or all of the buffer text. Decrease the font size. Select the Auto-fit text check box on the Font tab of the Label Edit screen. Delete lines to recharge the battery pack. replace label cassette. Clean cutter blade...
...; Replace the battery pack. Remove jammed label; Documentation Feedback We are inaccurate or unclear, areas where more detail is turned on We also welcome your feedback. Send us your label maker. Insert a label cassette. Delete some or all of the buffer text. Decrease the font size. Select the Auto-fit text check box on the Font tab of the Label Edit screen. Delete lines to recharge the battery pack. replace label cassette. Clean cutter blade...

User Guide 1
Page 19
... device installed in an environmentally sound way. Thoroughly follow the specified conditions. Do not connect directly to health and the environment. When Discharging the Battery Pack Danger Use the battery pack only in a place that generates static electricity. Battery pack can only be over 60°C (140°F). You can also contact DYMO for...
... device installed in an environmentally sound way. Thoroughly follow the specified conditions. Do not connect directly to health and the environment. When Discharging the Battery Pack Danger Use the battery pack only in a place that generates static electricity. Battery pack can only be over 60°C (140°F). You can also contact DYMO for...


