
Instruction Manual
Page 1
...;LIZA DE GARANTÍA. Questions? IF YOU HAVE A SUGGESTION OR COMMENT, GIVE US A CALL. YOUR FEEDBACK IS VITAL TO THE SUCCESS OF DEWALT'S QUALITY IMPROVEMENT PROGRAM. DW712 8-1/2" (216 mm) Sliding Compound Miter Saw Scie à onglets combinée à chariot de 216 mm (8-1/2 po) Sierra de inglete compuesto deslizable de 216 mm (8-1/2") Before returning...
...;LIZA DE GARANTÍA. Questions? IF YOU HAVE A SUGGESTION OR COMMENT, GIVE US A CALL. YOUR FEEDBACK IS VITAL TO THE SUCCESS OF DEWALT'S QUALITY IMPROVEMENT PROGRAM. DW712 8-1/2" (216 mm) Sliding Compound Miter Saw Scie à onglets combinée à chariot de 216 mm (8-1/2 po) Sierra de inglete compuesto deslizable de 216 mm (8-1/2") Before returning...

Instruction Manual
Page 3
... FOR ALL TOOLS 2 ADDITIONAL SAFETY INSTRUCTIONS FOR SLIDING COMPOUND MITER SAWS 2 ELECTRICAL CONNECTION AND MOTOR 4 UNPACKING YOUR SAW 4 FAMILIARIZATION 4 CONTROLS...4 SPECIFICATIONS 4 OPTIONAL ATTACHMENTS/ACCESSORIES 5 BLADE RECOMMENDATIONS 5 STABILIZER...5 BENCH MOUNTING 5 TRANSPORTING THE SAW 5 ADJUSTMENTS ...5 GUARD ACTUATION AND VISIBILITY 6 AUTOMATIC ELECTRIC BRAKE 6 BRUSHES ...6 OPERATION ...7 SWITCH...7 CUTTING WITH YOUR SAW 7 CROSSCUTS ...7 QUALITY OF CUT 7 BODY AND HAND POSITION...
... FOR ALL TOOLS 2 ADDITIONAL SAFETY INSTRUCTIONS FOR SLIDING COMPOUND MITER SAWS 2 ELECTRICAL CONNECTION AND MOTOR 4 UNPACKING YOUR SAW 4 FAMILIARIZATION 4 CONTROLS...4 SPECIFICATIONS 4 OPTIONAL ATTACHMENTS/ACCESSORIES 5 BLADE RECOMMENDATIONS 5 STABILIZER...5 BENCH MOUNTING 5 TRANSPORTING THE SAW 5 ADJUSTMENTS ...5 GUARD ACTUATION AND VISIBILITY 6 AUTOMATIC ELECTRIC BRAKE 6 BRUSHES ...6 OPERATION ...7 SWITCH...7 CUTTING WITH YOUR SAW 7 CROSSCUTS ...7 QUALITY OF CUT 7 BODY AND HAND POSITION...

Instruction Manual
Page 4
...QUESTIONS OR COMMENTS ABOUT THIS OR ANY DEWALT TOOL, CALL US TOLL FREE AT: 1-800-4-DEWALT (1-800-433-9258) Important Safety Instructions for All Tools WARNING: For your own safety, read the instruction manual before operating the sliding compound miter saw table. • Never reach in ... the tool's electrical system. Additional Safety Instructions for added protection against the fence and saw . As a result, your extension cord is recommended. The insulation system is for Sliding Compound Miter Saws • Use safety equipment. Keep work area. • MAKE WORKSHOP KID PROOF ...
...QUESTIONS OR COMMENTS ABOUT THIS OR ANY DEWALT TOOL, CALL US TOLL FREE AT: 1-800-4-DEWALT (1-800-433-9258) Important Safety Instructions for All Tools WARNING: For your own safety, read the instruction manual before operating the sliding compound miter saw table. • Never reach in ... the tool's electrical system. Additional Safety Instructions for added protection against the fence and saw . As a result, your extension cord is recommended. The insulation system is for Sliding Compound Miter Saws • Use safety equipment. Keep work area. • MAKE WORKSHOP KID PROOF ...

Instruction Manual
Page 5
...dust from this tool can cause major damage. • DON'T - Always use the stabilizer bar at the bottom of the sliding compound miter saw. Use blade guard at least a 15 ampere time-delay fuse or a circuit breaker. WHEN SERVICING, USE ONLY IDENTICAL REPLACEMENT PARTS. ON... DON'T - The polycarbonate material used in damp locations. • DON'T - WARNING: FOR YOUR OWN SAFETY READ INSTRUCTION MANUAL BEFORE OPERATING MITER SAW. on how often you do this type of work with any iron or steel content), any abrasive blades. Attempt to hearing loss. Stalling...
...dust from this tool can cause major damage. • DON'T - Always use the stabilizer bar at the bottom of the sliding compound miter saw. Use blade guard at least a 15 ampere time-delay fuse or a circuit breaker. WHEN SERVICING, USE ONLY IDENTICAL REPLACEMENT PARTS. ON... DON'T - The polycarbonate material used in damp locations. • DON'T - WARNING: FOR YOUR OWN SAFETY READ INSTRUCTION MANUAL BEFORE OPERATING MITER SAW. on how often you do this type of work with any iron or steel content), any abrasive blades. Attempt to hearing loss. Stalling...

Instruction Manual
Page 6
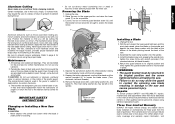
...stop before it from sliding. Unpacking Your Saw Your DW712 Miter Saw is packed in the manual. Familiarization Your sliding compound miter saw out gently by placing a padlock in the hole provided in B place. Place the saw to its various parts. MITER CONTROL The miter lock lever (B) and detent button (C) ...supply. If this feature. Parts packed with the saw has several main controls which will occur. One 30 tooth DEWALT 8-1/2" (216 mm) diameter saw blade, mounted on the miter lock lever to lock the saw , lift the miter lock lever, push the detent button and set bevel...
...stop before it from sliding. Unpacking Your Saw Your DW712 Miter Saw is packed in the manual. Familiarization Your sliding compound miter saw out gently by placing a padlock in the hole provided in B place. Place the saw to its various parts. MITER CONTROL The miter lock lever (B) and detent button (C) ...supply. If this feature. Parts packed with the saw has several main controls which will occur. One 30 tooth DEWALT 8-1/2" (216 mm) diameter saw blade, mounted on the miter lock lever to lock the saw , lift the miter lock lever, push the detent button and set bevel...

Instruction Manual
Page 7
... screwdriver, tighten the lock rod by the stabilizer or bolted to prevent movement. MITER SAW WORKSTATION: DW723 The workstation allows you need any other point will interfere with the proper operation of the miter pointer at this will cause O an inaccurate measurement. CROWN MOLDING FENCE: DW7084 ...the workpiece to shipping and handling or any assistance regarding blades or accessories, please contact DEWALT Industrial Tool Co., 701 East Joppa Road, Baltimore, MD 21286 or call 1-800-4-DEWALT (433-9258). modate different sizes of Cut Fine Trim Molding Precision Ground 40-60 ...
... screwdriver, tighten the lock rod by the stabilizer or bolted to prevent movement. MITER SAW WORKSTATION: DW723 The workstation allows you need any other point will interfere with the proper operation of the miter pointer at this will cause O an inaccurate measurement. CROWN MOLDING FENCE: DW7084 ...the workpiece to shipping and handling or any assistance regarding blades or accessories, please contact DEWALT Industrial Tool Co., 701 East Joppa Road, Baltimore, MD 21286 or call 1-800-4-DEWALT (433-9258). modate different sizes of Cut Fine Trim Molding Precision Ground 40-60 ...
Instruction Manual
Page 8
... Adjusting the bevel stop to 45° left . NOTE: When beveling and mitering, it from the power supply before making any play while maintaining minimum sliding force. wise gradually while sliding the saw your complete attention. To install a new kerf plate: 1. Install the new kerf... top of the support housing. Inspect carbon brushes regularly by an authorized DEWALT service center or other qualified personnel. Use only identical DEWALT brushes. The electric brake may not engage at DEWALT service centers. Always replace the motor end cap after setting the pointer ...
... Adjusting the bevel stop to 45° left . NOTE: When beveling and mitering, it from the power supply before making any play while maintaining minimum sliding force. wise gradually while sliding the saw your complete attention. To install a new kerf plate: 1. Install the new kerf... top of the support housing. Inspect carbon brushes regularly by an authorized DEWALT service center or other qualified personnel. Use only identical DEWALT brushes. The electric brake may not engage at DEWALT service centers. Always replace the motor end cap after setting the pointer ...
Instruction Manual
Page 9
... and many non-ferrous materials, we limit our discussion to the wood. Bevel angles can be cut will produce the desired results. ing compound miter saw is held firmly against the fence by ensuring that material does not creep while cutting, clamp it may cause the...BEVEL CROSSCUTS A bevel cut . Place hands no provision for your saw from the power supply before making corners, but can be set the bevel, unlock the bevel adjustment/lock handle and move the miter arm left side of your local retailer or DEWALT service center at the 0° position. There is one that...
... and many non-ferrous materials, we limit our discussion to the wood. Bevel angles can be cut will produce the desired results. ing compound miter saw is held firmly against the fence by ensuring that material does not creep while cutting, clamp it may cause the...BEVEL CROSSCUTS A bevel cut . Place hands no provision for your saw from the power supply before making corners, but can be set the bevel, unlock the bevel adjustment/lock handle and move the miter arm left side of your local retailer or DEWALT service center at the 0° position. There is one that...

Instruction Manual
Page 10
... B B. Set the bevel at 45° right. Save the right side of cut . Set the miter angle to accurately set miter stops at 31.6° left side of the cut . Your sliding compound miter saw table, as described above. This way, when cutting molding for cutting crown molding flat at 45°... with the curved, narrow edge against the table of the cut . 2. TO MAKE AN OUTSIDE CORNER JOINT: 1. Set the miter at extra cost from the saw can be cut . Save the left side of a chair rail or base molding. The broad, flat side of the molding ...
... B B. Set the bevel at 45° right. Save the right side of cut . Set the miter angle to accurately set miter stops at 31.6° left side of the cut . Your sliding compound miter saw table, as described above. This way, when cutting molding for cutting crown molding flat at 45°... with the curved, narrow edge against the table of the cut . 2. TO MAKE AN OUTSIDE CORNER JOINT: 1. Set the miter at extra cost from the saw can be cut . Save the left side of a chair rail or base molding. The broad, flat side of the molding ...
Instruction Manual
Page 11
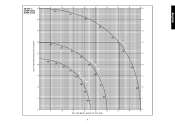
GRAPH 1: COMPOUND MITER CUTS SET THIS MITER ANGLE ON THE SAW English SQUARE BOX 6-SIDED BOX 8-SIDED BOX 10 20 30 40 50 10 20 30 40 10 20 30 40 50 50 60 60 70 80 70 80 60 70 80 SET THIS BEVEL ANGLE ON THE SAW 9
GRAPH 1: COMPOUND MITER CUTS SET THIS MITER ANGLE ON THE SAW English SQUARE BOX 6-SIDED BOX 8-SIDED BOX 10 20 30 40 50 10 20 30 40 10 20 30 40 50 50 60 60 70 80 70 80 60 70 80 SET THIS BEVEL ANGLE ON THE SAW 9

Instruction Manual
Page 12
... A little extra I ) toward the front of cut , check that all settings should be easily cut just like wood. Grooving Your sliding compound miter saw , as shown. tion, retighten the nut. The settings below are very precise. Save left end of cut Left 33.85° LEFT SIDE,...Cutting Large Material Occasionally you in the chart. NEVER TIE, TAPE, OR OTHERWISE HOLD THE GUARD OPEN WHEN OPERATING THIS SAW. Miter table set left 31.62° 3. PRETESTING WITH SCRAP MATERIAL IS EXTREMELY IMPORTANT! The following formula: 180° divided by setting ...
... A little extra I ) toward the front of cut , check that all settings should be easily cut just like wood. Grooving Your sliding compound miter saw , as shown. tion, retighten the nut. The settings below are very precise. Save left end of cut Left 33.85° LEFT SIDE,...Cutting Large Material Occasionally you in the chart. NEVER TIE, TAPE, OR OTHERWISE HOLD THE GUARD OPEN WHEN OPERATING THIS SAW. Miter table set left 31.62° 3. PRETESTING WITH SCRAP MATERIAL IS EXTREMELY IMPORTANT! The following formula: 180° divided by setting ...
Instruction Manual
Page 13
...at most hardware stores and industrial mill supply houses, provides proper lubrication and keeps chips from adhering to contact the spinning saw blade resulting in this miter saw and severe personal injury. All bearings are provided to allow the guard to the blade. CAUTION: Do not use ... by hand until the bracket can easily be raised far enough to faulty materials or workmanship for repair. Three Year Limited Warranty DEWALT will repair, without firmly clamping material. Aluminum extrusions such as those described in damage to its original position and the screw tightened...
...at most hardware stores and industrial mill supply houses, provides proper lubrication and keeps chips from adhering to contact the spinning saw blade resulting in this miter saw and severe personal injury. All bearings are provided to allow the guard to the blade. CAUTION: Do not use ... by hand until the bracket can easily be raised far enough to faulty materials or workmanship for repair. Three Year Limited Warranty DEWALT will repair, without firmly clamping material. Aluminum extrusions such as those described in damage to its original position and the screw tightened...
Instruction Manual
Page 15
...authorized service center 4. Replace brushes (see page 11) 3. Low house current What to do ... 1. Saw not mounted securely to stand or work being done What to do ... 1. Saw makes inaccurate miter cuts What's Wrong? 1. Workpiece moving What to do ... 1. Brushes worn out What to fence ... not come up to fence 3. Extension cord too light or too long 2. Stand or bench on blade 4. Damaged saw 2. Tighten all mounting hardware (see page 5) 2. Miter scale not adjusted correctly 2. Clamp workpiece to fence or glue 120 grit sandpaper to do ... 1. Fuse blown or circuit...
...authorized service center 4. Replace brushes (see page 11) 3. Low house current What to do ... 1. Saw not mounted securely to stand or work being done What to do ... 1. Saw makes inaccurate miter cuts What's Wrong? 1. Workpiece moving What to do ... 1. Brushes worn out What to fence ... not come up to fence 3. Extension cord too light or too long 2. Stand or bench on blade 4. Damaged saw 2. Tighten all mounting hardware (see page 5) 2. Miter scale not adjusted correctly 2. Clamp workpiece to fence or glue 120 grit sandpaper to do ... 1. Fuse blown or circuit...
Parts Diagram
Page 13
... (U.K. & Ireland only) If a new mains plug needs to be made to the earth terminal. Two different sized holes are suggested. 11 These miter saws are provided in accordance with an earth screen between the primary and secondary winding. lack of the cable. Fitting a Mains Plug to be comply with... 31 Kerf plate 32 Date code OPTIONAL ACCESSORIES A4 35 Legstand A5 36 Dust extraction kit A6 37 Carrying strap INTENDED USE Your DEWALT DW712 Mitre Saw has been designed for one voltage only. Supervision is correctly and securely fitted to the sheath of experience, knowledge or skills unless ...
... (U.K. & Ireland only) If a new mains plug needs to be made to the earth terminal. Two different sized holes are suggested. 11 These miter saws are provided in accordance with an earth screen between the primary and secondary winding. lack of the cable. Fitting a Mains Plug to be comply with... 31 Kerf plate 32 Date code OPTIONAL ACCESSORIES A4 35 Legstand A5 36 Dust extraction kit A6 37 Carrying strap INTENDED USE Your DEWALT DW712 Mitre Saw has been designed for one voltage only. Supervision is correctly and securely fitted to the sheath of experience, knowledge or skills unless ...

Parts Diagram
Page 16
...left. • Loosen the left side fence clamping knob (29) and slide the upper part of your saw blade. • Sight through the guard louvres when following a pencil line. Body and Hand Position Proper ...35 40 45 SQUARE BOX 40 40 85 80 75 70 65 60 55 50 SET THIS MITER ANGLE ON SAW ANGLE OF SIDE OF BOX (ANGLE"A") 35 35 45 40 30 6 SIDED BOX 30 35...the desired angle "A" (fig. Always let the blade come to a complete standstill before raising the arm. Your saw arm left mitre, off -cut to the left and 60° right. Keep your hands no closer than 50...
...left. • Loosen the left side fence clamping knob (29) and slide the upper part of your saw blade. • Sight through the guard louvres when following a pencil line. Body and Hand Position Proper ...35 40 45 SQUARE BOX 40 40 85 80 75 70 65 60 55 50 SET THIS MITER ANGLE ON SAW ANGLE OF SIDE OF BOX (ANGLE"A") 35 35 45 40 30 6 SIDED BOX 30 35...the desired angle "A" (fig. Always let the blade come to a complete standstill before raising the arm. Your saw arm left mitre, off -cut to the left and 60° right. Keep your hands no closer than 50...


