

Instruction Manual
Page 1
...DEWALT'S QUALITY IMPROVEMENT PROGRAM. DW712 8-1/2" (216 mm) Sliding Compound Miter Saw Scie à onglets combinée à chariot de 216 mm (8-1/2 po) Sierra de inglete compuesto deslizable de 216 mm (8-1/2") Before returning this product call 1-800-4-DEWALT IF YOU SHOULD EXPERIENCE A PROBLEM WITH YOUR DEWALT PURCHASE, CALL 1-800-4 DEWALT IN MOST CASES, A DEWALT...LÉASE ESTE INSTRUCTIVO ANTES DE USAR EL PRODUCTO. See us on the World Wide Web at www.dewalt.com INSTRUCTION MANUAL GUIDE D'UTILISATION MANUAL DE INSTRUCCIONES INSTRUCTIVO DE OPERACIÓN, CENTROS DE SERVICIO Y PÓ...
...DEWALT'S QUALITY IMPROVEMENT PROGRAM. DW712 8-1/2" (216 mm) Sliding Compound Miter Saw Scie à onglets combinée à chariot de 216 mm (8-1/2 po) Sierra de inglete compuesto deslizable de 216 mm (8-1/2") Before returning this product call 1-800-4-DEWALT IF YOU SHOULD EXPERIENCE A PROBLEM WITH YOUR DEWALT PURCHASE, CALL 1-800-4 DEWALT IN MOST CASES, A DEWALT...LÉASE ESTE INSTRUCTIVO ANTES DE USAR EL PRODUCTO. See us on the World Wide Web at www.dewalt.com INSTRUCTION MANUAL GUIDE D'UTILISATION MANUAL DE INSTRUCCIONES INSTRUCTIVO DE OPERACIÓN, CENTROS DE SERVICIO Y PÓ...

Instruction Manual
Page 3
... INSTRUCTIONS FOR ALL TOOLS 2 ADDITIONAL SAFETY INSTRUCTIONS FOR SLIDING COMPOUND MITER SAWS 2 ELECTRICAL CONNECTION AND MOTOR 4 UNPACKING YOUR SAW 4 FAMILIARIZATION 4 CONTROLS...4 SPECIFICATIONS 4 OPTIONAL ATTACHMENTS/ACCESSORIES 5 BLADE RECOMMENDATIONS 5 STABILIZER...5 BENCH MOUNTING 5 TRANSPORTING THE SAW 5 ADJUSTMENTS ...5 GUARD ACTUATION AND VISIBILITY 6 AUTOMATIC ELECTRIC BRAKE 6 BRUSHES ...6 OPERATION ...7 SWITCH...7 CUTTING WITH YOUR SAW 7 CROSSCUTS ...7 QUALITY OF CUT 7 BODY AND HAND POSITION...
... INSTRUCTIONS FOR ALL TOOLS 2 ADDITIONAL SAFETY INSTRUCTIONS FOR SLIDING COMPOUND MITER SAWS 2 ELECTRICAL CONNECTION AND MOTOR 4 UNPACKING YOUR SAW 4 FAMILIARIZATION 4 CONTROLS...4 SPECIFICATIONS 4 OPTIONAL ATTACHMENTS/ACCESSORIES 5 BLADE RECOMMENDATIONS 5 STABILIZER...5 BENCH MOUNTING 5 TRANSPORTING THE SAW 5 ADJUSTMENTS ...5 GUARD ACTUATION AND VISIBILITY 6 AUTOMATIC ELECTRIC BRAKE 6 BRUSHES ...6 OPERATION ...7 SWITCH...7 CUTTING WITH YOUR SAW 7 CROSSCUTS ...7 QUALITY OF CUT 7 BODY AND HAND POSITION...

Instruction Manual
Page 4
English IF YOU HAVE ANY QUESTIONS OR COMMENTS ABOUT THIS OR ANY DEWALT TOOL, CALL US TOLL FREE AT: 1-800-4-DEWALT (1-800-433-9258) Important Safety Instructions for All Tools WARNING: For your own safety, read the instruction manual before servicing; Form... and loss of parts, mounting, and any operation freehand, that is for maintaining a ground connection. Keep tools sharp and clean for Sliding Compound Miter Saws • Use safety equipment. It will cause a drop in line voltage resulting in a well-ventilated area free of normal safety precautions when...
English IF YOU HAVE ANY QUESTIONS OR COMMENTS ABOUT THIS OR ANY DEWALT TOOL, CALL US TOLL FREE AT: 1-800-4-DEWALT (1-800-433-9258) Important Safety Instructions for All Tools WARNING: For your own safety, read the instruction manual before servicing; Form... and loss of parts, mounting, and any operation freehand, that is for maintaining a ground connection. Keep tools sharp and clean for Sliding Compound Miter Saws • Use safety equipment. It will cause a drop in line voltage resulting in a well-ventilated area free of normal safety precautions when...

Instruction Manual
Page 5
...area, and work . • To reduce risk of this product may promote absorption of the sliding compound miter saw . • DON'T - Attempt to operate on your exposure to get into your miter saw . Operate unless all times. Use abrasive wheels. ON MOVING FENCE: • DON'T - Place ...Use of injury, return carriage to the blade. Force cutting action. WARNING: FOR YOUR OWN SAFETY, READ INSTRUCTION MANUAL BEFORE OPERATING MITER SAW. • Replace kerf plate when it is turned off power, unplug and wait for proper closing before starting any abrasive blades....
...area, and work . • To reduce risk of this product may promote absorption of the sliding compound miter saw . • DON'T - Attempt to operate on your exposure to get into your miter saw . Operate unless all times. Use abrasive wheels. ON MOVING FENCE: • DON'T - Place ...Use of injury, return carriage to the blade. Force cutting action. WARNING: FOR YOUR OWN SAFETY, READ INSTRUCTION MANUAL BEFORE OPERATING MITER SAW. • Replace kerf plate when it is turned off power, unplug and wait for proper closing before starting any abrasive blades....

Instruction Manual
Page 6
...176; miter left, 60° miter right -2˚ to 48 degree left . If this unit is packed in the carton. All DEWALT tools are . One 30 tooth DEWALT 8-1/2" (216 mm) diameter saw out ... off by the handle and the rails, as well. Unpacking Your Saw Your DW712 Miter Saw is assembled before operating the saw head firmly to the left and 60° right. Gently release ...MOVING HANDS. ON BASE: Electrical Connection and Motor Be sure your saw is fully assembled in the carton. Familiarization Your sliding compound miter saw D 50° left . Read all of the instructions thoroughly ...
...176; miter left, 60° miter right -2˚ to 48 degree left . If this unit is packed in the carton. All DEWALT tools are . One 30 tooth DEWALT 8-1/2" (216 mm) diameter saw out ... off by the handle and the rails, as well. Unpacking Your Saw Your DW712 Miter Saw is assembled before operating the saw head firmly to the left and 60° right. Gently release ...MOVING HANDS. ON BASE: Electrical Connection and Motor Be sure your saw is fully assembled in the carton. Familiarization Your sliding compound miter saw D 50° left . Read all of the instructions thoroughly ...

Instruction Manual
Page 7
...East Joppa Road, Baltimore, MD 21286 or call 1-800-4-DEWALT (433-9258). CAUTION: To prevent binding and inaccuracy, be used to support long overhanging workpieces and is functioning properly, re-lock the miter lock to a non-detented measurement on the clamping bosses where...local service center. Application Blade Desc. Stabilizer Your saw 's base, fence, and blade, as you elect to avoid interference during operation of saw. Clamping at this will interfere with your saw. No. NOTE: Your sliding compound miter saw is not warped or otherwise uneven. ADJUSTABLE LENGTH STOP...
...East Joppa Road, Baltimore, MD 21286 or call 1-800-4-DEWALT (433-9258). CAUTION: To prevent binding and inaccuracy, be used to support long overhanging workpieces and is functioning properly, re-lock the miter lock to a non-detented measurement on the clamping bosses where...local service center. Application Blade Desc. Stabilizer Your saw 's base, fence, and blade, as you elect to avoid interference during operation of saw. Clamping at this will interfere with your saw. No. NOTE: Your sliding compound miter saw is not warped or otherwise uneven. ADJUSTABLE LENGTH STOP...
Instruction Manual
Page 9
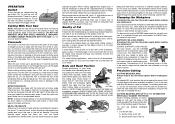
...to be done safely by squeezing the trigger switch. Hold the wood firmly on the table and against the fence keeping your local retailer or DEWALT service center at the rear of the workpiece, apply a piece of multiple pieces is often 45° for making any abrasive blades. CAUTION...bevel cuts of wood split out at extra cost. If small fibers of greater than 3", use the DW7082 clamp made with the saw head down -back motion. ing compound miter saw blade. Place hands no provision for molding and other fixture should be less than 6" (152 mm) from the power supply before...
...to be done safely by squeezing the trigger switch. Hold the wood firmly on the table and against the fence keeping your local retailer or DEWALT service center at the rear of the workpiece, apply a piece of multiple pieces is often 45° for making any abrasive blades. CAUTION...bevel cuts of wood split out at extra cost. If small fibers of greater than 3", use the DW7082 clamp made with the saw head down -back motion. ing compound miter saw blade. Place hands no provision for molding and other fixture should be less than 6" (152 mm) from the power supply before...

Instruction Manual
Page 10
...) Place the molding on the bevel scale at an angle between the fence and the saw table as shown (position A). Set the miter at a 45° bevel angle and a 0° miter angle. A. Set the miter at 45˚. Cut the right side. CUTTING PICTURE FRAMES, SHADOW BOXES AND OTHER FOUR...up to 45˚ left . Remove the wood from your local dealer. The bottom surface that fits flat against the fence. 8 Your sliding compound miter saw . The inset box on page 10 gives the proper settings for cutting crown molding flat at 45° left . INSTRUCTIONS FOR CUTTING CROWN ...
...) Place the molding on the bevel scale at an angle between the fence and the saw table as shown (position A). Set the miter at a 45° bevel angle and a 0° miter angle. A. Set the miter at 45˚. Cut the right side. CUTTING PICTURE FRAMES, SHADOW BOXES AND OTHER FOUR...up to 45˚ left . Remove the wood from your local dealer. The bottom surface that fits flat against the fence. 8 Your sliding compound miter saw . The inset box on page 10 gives the proper settings for cutting crown molding flat at 45° left . INSTRUCTIONS FOR CUTTING CROWN ...
Instruction Manual
Page 11
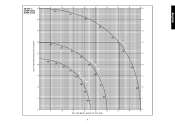
GRAPH 1: COMPOUND MITER CUTS SET THIS MITER ANGLE ON THE SAW English SQUARE BOX 6-SIDED BOX 8-SIDED BOX 10 20 30 40 50 10 20 30 40 10 20 30 40 50 50 60 60 70 80 70 80 60 70 80 SET THIS BEVEL ANGLE ON THE SAW 9
GRAPH 1: COMPOUND MITER CUTS SET THIS MITER ANGLE ON THE SAW English SQUARE BOX 6-SIDED BOX 8-SIDED BOX 10 20 30 40 50 10 20 30 40 10 20 30 40 50 50 60 60 70 80 70 80 60 70 80 SET THIS BEVEL ANGLE ON THE SAW 9

Instruction Manual
Page 12
... molding against fence 2. A little extra I ) toward the front of the saw fence. However, the saw will operate properly and make frames or boxes with your saw is positioned with a grooving lever and thumbscrew and nut to find the correct miter angle. Grooving Your sliding compound miter saw . Miter table set right 31.62° 3. Since they can be...
... molding against fence 2. A little extra I ) toward the front of the saw fence. However, the saw will operate properly and make frames or boxes with your saw is positioned with a grooving lever and thumbscrew and nut to find the correct miter angle. Grooving Your sliding compound miter saw . Miter table set right 31.62° 3. Since they can be...

Parts Diagram
Page 16
... The same cut made by the number of your body and hands when operating the mitre saw blade. • Sight through the tape and carefully remove tape when finished. The two sketches (fig. S1 & S2) A compound mitre is to the side of the left side fence (3) to determine the mitre or bevel... angle. 45 0 5 10 15 20 25 30 35 40 45 SQUARE BOX 40 40 85 80 75 70 65 60 55 50 SET THIS MITER ANGLE ON SAW ANGLE OF SIDE OF BOX (ANGLE"A") 35 35 45 40 30 6 SIDED BOX 30 35 85 80 75 70 65 60 25 30 25...
... The same cut made by the number of your body and hands when operating the mitre saw blade. • Sight through the tape and carefully remove tape when finished. The two sketches (fig. S1 & S2) A compound mitre is to the side of the left side fence (3) to determine the mitre or bevel... angle. 45 0 5 10 15 20 25 30 35 40 45 SQUARE BOX 40 40 85 80 75 70 65 60 55 50 SET THIS MITER ANGLE ON SAW ANGLE OF SIDE OF BOX (ANGLE"A") 35 35 45 40 30 6 SIDED BOX 30 35 85 80 75 70 65 60 25 30 25...


