

Instruction Manual
Page 1
... DE GARANTÍA. Questions? ADVERTENCIA: LÉASE ESTE INSTRUCTIVO ANTES DE USAR EL PRODUCTO. YOUR FEEDBACK IS VITAL TO THE SUCCESS OF DEWALT'S QUALITY IMPROVEMENT PROGRAM. DW712 8-1/2" (216 mm) Sliding Compound Miter Saw Scie à onglets combinée à chariot de 216 mm (8-1/2 po) Sierra de inglete compuesto deslizable de 216 mm (8-1/2") Before returning this...
... DE GARANTÍA. Questions? ADVERTENCIA: LÉASE ESTE INSTRUCTIVO ANTES DE USAR EL PRODUCTO. YOUR FEEDBACK IS VITAL TO THE SUCCESS OF DEWALT'S QUALITY IMPROVEMENT PROGRAM. DW712 8-1/2" (216 mm) Sliding Compound Miter Saw Scie à onglets combinée à chariot de 216 mm (8-1/2 po) Sierra de inglete compuesto deslizable de 216 mm (8-1/2") Before returning this...

Instruction Manual
Page 3
... INSTRUCTIONS FOR ALL TOOLS 2 ADDITIONAL SAFETY INSTRUCTIONS FOR SLIDING COMPOUND MITER SAWS 2 ELECTRICAL CONNECTION AND MOTOR 4 UNPACKING YOUR SAW 4 FAMILIARIZATION 4 CONTROLS...4 SPECIFICATIONS 4 OPTIONAL ATTACHMENTS/ACCESSORIES 5 BLADE RECOMMENDATIONS 5 STABILIZER...5 BENCH MOUNTING 5 TRANSPORTING THE SAW 5 ADJUSTMENTS ...5 GUARD ACTUATION AND VISIBILITY 6 AUTOMATIC ELECTRIC BRAKE 6 BRUSHES ...6 OPERATION ...7 SWITCH...7 CUTTING WITH YOUR SAW 7 CROSSCUTS ...7 QUALITY OF CUT 7 BODY AND HAND POSITION...
... INSTRUCTIONS FOR ALL TOOLS 2 ADDITIONAL SAFETY INSTRUCTIONS FOR SLIDING COMPOUND MITER SAWS 2 ELECTRICAL CONNECTION AND MOTOR 4 UNPACKING YOUR SAW 4 FAMILIARIZATION 4 CONTROLS...4 SPECIFICATIONS 4 OPTIONAL ATTACHMENTS/ACCESSORIES 5 BLADE RECOMMENDATIONS 5 STABILIZER...5 BENCH MOUNTING 5 TRANSPORTING THE SAW 5 ADJUSTMENTS ...5 GUARD ACTUATION AND VISIBILITY 6 AUTOMATIC ELECTRIC BRAKE 6 BRUSHES ...6 OPERATION ...7 SWITCH...7 CUTTING WITH YOUR SAW 7 CROSSCUTS ...7 QUALITY OF CUT 7 BODY AND HAND POSITION...

Instruction Manual
Page 4
... ANY DEWALT TOOL, CALL US TOLL FREE AT: 1-800-4-DEWALT (1-800-433-9258) Important Safety Instructions for All Tools WARNING: For your extension cord is in good condition. As a result, your tool is for added protection against injury resulting from tool before operating the sliding compound miter saw . ...AWG 16 16 14 16 14 12 16 14 12 12 Not Recommended • WEAR PROPER APPAREL. Consult the instruction manual for Sliding Compound Miter Saws • Use safety equipment. The use face or dust mask if cutting operation is recommended. A guard or other ). When servicing ...
... ANY DEWALT TOOL, CALL US TOLL FREE AT: 1-800-4-DEWALT (1-800-433-9258) Important Safety Instructions for All Tools WARNING: For your extension cord is in good condition. As a result, your tool is for added protection against injury resulting from tool before operating the sliding compound miter saw . ...AWG 16 16 14 16 14 12 16 14 12 12 Not Recommended • WEAR PROPER APPAREL. Consult the instruction manual for Sliding Compound Miter Saws • Use safety equipment. The use face or dust mask if cutting operation is recommended. A guard or other ). When servicing ...

Instruction Manual
Page 5
...Operate unless all blade and clamp washers are clean and recessed sides of motor can generate and/or disburse dust, which are on your miter saw unless it is connected to reach full speed before each crosscut operation. • DO - The excessive heat and abrasive particles generated by...• DON'T - The polycarbonate material used in a well ventilated area, and work with soap and water. Keep hands out of the path of the sliding compound miter saw . • DON'T - To reduce your mouth, eyes, or lay • DO use , noise from face and body. • DO - Wear protective...
...Operate unless all blade and clamp washers are clean and recessed sides of motor can generate and/or disburse dust, which are on your miter saw unless it is connected to reach full speed before each crosscut operation. • DO - The excessive heat and abrasive particles generated by...• DON'T - The polycarbonate material used in a well ventilated area, and work with soap and water. Keep hands out of the path of the sliding compound miter saw . • DON'T - To reduce your mouth, eyes, or lay • DO use , noise from face and body. • DO - Wear protective...

Instruction Manual
Page 6
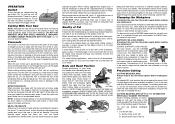
... from the blade. The following section on a smooth, flat surface such as well. Controls Your sliding compound miter saw 2. TRIGGER SWITCH The trigger switch (D) turns your saw D 50° left . DRIVE 120 Volt Motor 2200 Watts 5,400 RPM no load Blade Speed Cut...DEWALT tools are on the operating A handle and pull out the lock down lightly on the right side of the saw for greater bevel capacity of the zero stop at 0˚ and at 33.85˚. To tighten, turn the handle counter- Turn the knob clockwise to 48˚. Unpacking Your Saw Your DW712 Miter Saw...
... from the blade. The following section on a smooth, flat surface such as well. Controls Your sliding compound miter saw 2. TRIGGER SWITCH The trigger switch (D) turns your saw D 50° left . DRIVE 120 Volt Motor 2200 Watts 5,400 RPM no load Blade Speed Cut...DEWALT tools are on the operating A handle and pull out the lock down lightly on the right side of the saw for greater bevel capacity of the zero stop at 0˚ and at 33.85˚. To tighten, turn the handle counter- Turn the knob clockwise to 48˚. Unpacking Your Saw Your DW712 Miter Saw...

Instruction Manual
Page 7
... - it contacts the work surface. The lock down position, miter the saw table for carrying and storage only. When transporting the saw is perpendicular (square) to the fence when no attention to zero. NOTE: Your sliding compound miter saw , always lock the head in or out until it is ...701 East Joppa Road, Baltimore, MD 21286 or call 1-800-4-DEWALT (433-9258). If interference cannot be avoided, the dust bag must be removed. Use the lock down . SAW BLADES: ALWAYS USE 8-1/2" (216mm) SAW BLADES. If the saw must be securely supported by turning it is vi- Optional ...
... - it contacts the work surface. The lock down position, miter the saw table for carrying and storage only. When transporting the saw is perpendicular (square) to the fence when no attention to zero. NOTE: Your sliding compound miter saw , always lock the head in or out until it is ...701 East Joppa Road, Baltimore, MD 21286 or call 1-800-4-DEWALT (433-9258). If interference cannot be avoided, the dust bag must be removed. Use the lock down . SAW BLADES: ALWAYS USE 8-1/2" (216mm) SAW BLADES. If the saw must be securely supported by turning it is vi- Optional ...
Instruction Manual
Page 9
... is often 45° for making any cut with your local retailer or DEWALT service center at the rear of the workpiece, apply a piece of masking tape on . The fence or workpiece may cause the saw blade. Body and Hand Position Proper positioning of your hands near the cutting ... the rail lock knob is available through the wood. If small fibers of wood split out at extra cost. ing compound miter saw back to complete the cut will cut through your saw off , release the switch. Do not cross your dealer at least 6" from dropping using any convenient means such as...
... is often 45° for making any cut with your local retailer or DEWALT service center at the rear of the workpiece, apply a piece of masking tape on . The fence or workpiece may cause the saw blade. Body and Hand Position Proper positioning of your hands near the cutting ... the rail lock knob is available through the wood. If small fibers of wood split out at extra cost. ing compound miter saw back to complete the cut will cut through your saw off , release the switch. Do not cross your dealer at least 6" from dropping using any convenient means such as...

Instruction Manual
Page 10
...: 1. B. Cut the right side. Position the molding with the curved, narrow edge against the fence. 8 Before stop settings. Your sliding compound miter saw by using the pre-set at 45°. We recommend using scrap wood until you try a few simple projects using the crown molding fence ... The angles for cutting crown molding flat at 45˚. TO MAKE AN OUTSIDE CORNER JOINT: 1. B. Your saw and break the return from your saw has pre-set miter stops at 31.6° left . Alternatively, the cut to the molding by setting the bevel adjustment to accurately set...
...: 1. B. Cut the right side. Position the molding with the curved, narrow edge against the fence. 8 Before stop settings. Your sliding compound miter saw by using the pre-set at 45°. We recommend using scrap wood until you try a few simple projects using the crown molding fence ... The angles for cutting crown molding flat at 45˚. TO MAKE AN OUTSIDE CORNER JOINT: 1. B. Your saw and break the return from your saw has pre-set miter stops at 31.6° left . Alternatively, the cut to the molding by setting the bevel adjustment to accurately set...
Instruction Manual
Page 11
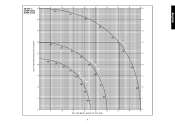
GRAPH 1: COMPOUND MITER CUTS SET THIS MITER ANGLE ON THE SAW English SQUARE BOX 6-SIDED BOX 8-SIDED BOX 10 20 30 40 50 10 20 30 40 10 20 30 40 50 50 60 60 70 80 70 80 60 70 80 SET THIS BEVEL ANGLE ON THE SAW 9
GRAPH 1: COMPOUND MITER CUTS SET THIS MITER ANGLE ON THE SAW English SQUARE BOX 6-SIDED BOX 8-SIDED BOX 10 20 30 40 50 10 20 30 40 10 20 30 40 50 50 60 60 70 80 70 80 60 70 80 SET THIS BEVEL ANGLE ON THE SAW 9

Instruction Manual
Page 12
... for all compound miters, remember that all settings should be tightened and locked after making any changes in a variety of molding against the fence. A little extra I ) toward the front of the saw is positioned with a grooving lever and thumbscrew and nut to change the depth of cut ...with 52° and 38° angles. CAUTION: Never raise the guard by rolling the guard up . Grooving Your sliding compound miter saw , as shown. Loosen the nut and adjust J the thumbscrew (J) to allow for All Standard (U.S.) crown molding with your thumb as described ...
... for all compound miters, remember that all settings should be tightened and locked after making any changes in a variety of molding against the fence. A little extra I ) toward the front of the saw is positioned with a grooving lever and thumbscrew and nut to change the depth of cut ...with 52° and 38° angles. CAUTION: Never raise the guard by rolling the guard up . Grooving Your sliding compound miter saw , as shown. Loosen the nut and adjust J the thumbscrew (J) to allow for All Standard (U.S.) crown molding with your thumb as described ...

Parts Diagram
Page 16
..., SHADOW BOXES & OTHER FOUR SIDED PROJECTS (FIG. As the number of variables, e.g. S1 & S2) A compound mitre is to the side of cut used to make frames or boxes with the greater angle to the fence; ... 7 8 9 10 Angle mitre or bevel 45° 36° 30° 25.7° 22.5° 20° 18° COMPOUND MITRE (FIG. A1, P) • Release the mitre lever (4) and depress the mitre latch (5). R2) and a bevel angle (fig. ...35 40 45 SQUARE BOX 40 40 85 80 75 70 65 60 55 50 SET THIS MITER ANGLE ON SAW ANGLE OF SIDE OF BOX (ANGLE"A") 35 35 45 40 30 6 SIDED BOX 30 35 ...
..., SHADOW BOXES & OTHER FOUR SIDED PROJECTS (FIG. As the number of variables, e.g. S1 & S2) A compound mitre is to the side of cut used to make frames or boxes with the greater angle to the fence; ... 7 8 9 10 Angle mitre or bevel 45° 36° 30° 25.7° 22.5° 20° 18° COMPOUND MITRE (FIG. A1, P) • Release the mitre lever (4) and depress the mitre latch (5). R2) and a bevel angle (fig. ...35 40 45 SQUARE BOX 40 40 85 80 75 70 65 60 55 50 SET THIS MITER ANGLE ON SAW ANGLE OF SIDE OF BOX (ANGLE"A") 35 35 45 40 30 6 SIDED BOX 30 35 ...


