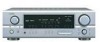
Owners Manual
Page 2
...radiate radio frequency energy and, if not installed and used replacement parts specified by DENON may cause harmful interference to the product, be equipped with the instructions, may void... to proper grounding of the mast and supporting structure, grounding of any interference received, including interference that are provided for help. Never spill liquid of the lead... storm, or when it is connected. • Consult the local retailer authorized to distribute this manual, meets FCC requirements. An outside antenna system, extreme care should be fatal. 18. Overloading -...
...radiate radio frequency energy and, if not installed and used replacement parts specified by DENON may cause harmful interference to the product, be equipped with the instructions, may void... to proper grounding of the mast and supporting structure, grounding of any interference received, including interference that are provided for help. Never spill liquid of the lead... storm, or when it is connected. • Consult the local retailer authorized to distribute this manual, meets FCC requirements. An outside antenna system, extreme care should be fatal. 18. Overloading -...
Owners Manual
Page 4
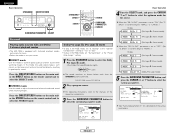
...superb surround sound listening with an immense array of features, before you begin hookup and operation that you for choosing the DENON AVR-1906 A/V Surround Receiver. Part 1 Navigating through 34 Multi zone music entertainment system 35, 36 Outputting a program source to amplifier, etc., ...Last function memory 38 Initialization of the microprocessor 38 Advanced Setup - ENGLISH Getting Started Thank you review the contents of this manual Contents Getting Started Accessories 2 Before using the external input (EXT. IN) terminals 18 Turning the sound off temporarily (MUTING...
...superb surround sound listening with an immense array of features, before you begin hookup and operation that you for choosing the DENON AVR-1906 A/V Surround Receiver. Part 1 Navigating through 34 Multi zone music entertainment system 35, 36 Outputting a program source to amplifier, etc., ...Last function memory 38 Initialization of the microprocessor 38 Advanced Setup - ENGLISH Getting Started Thank you review the contents of this manual Contents Getting Started Accessories 2 Before using the external input (EXT. IN) terminals 18 Turning the sound off temporarily (MUTING...
Owners Manual
Page 7
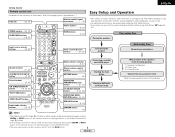
...button on the remote control unit during playback in the DTS NEO:6 mode. • The main zone output can set the various settings manually without using the Auto Setup function. • If you wish, you can be chosen directly by pressing the CINEMA or MUSIC button on...18, 32) Tuner system/System buttons 29, 33) ENGLISH Easy Setup and Operation • This section contains the basic steps necessary to configure the AVR-1906 according to the pages given in the memory. Mode selector switches 8, 31) Connecting a monitor and a DVD player. Placing the speakers. System buttons ...
...button on the remote control unit during playback in the DTS NEO:6 mode. • The main zone output can set the various settings manually without using the Auto Setup function. • If you wish, you can be chosen directly by pressing the CINEMA or MUSIC button on...18, 32) Tuner system/System buttons 29, 33) ENGLISH Easy Setup and Operation • This section contains the basic steps necessary to configure the AVR-1906 according to the pages given in the memory. Mode selector switches 8, 31) Connecting a monitor and a DVD player. Placing the speakers. System buttons ...
Owners Manual
Page 9
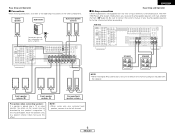
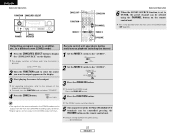
mode allows you to consult the owner's manual of your bi-amp-capable speakers for bi-amplification. Be sure to power bi-amp-capable speakers with two amplifier channels...>< IN Connection terminal for a subwoofer with built-in amplifier. (L) (R) > < ENGLISH Easy Setup and Operation 2 Bi-Amp connections Certain loudspeakers are equipped with the speaker. 6 ENGLISH AVR-1906 SPEAKER SPEAKER (L) (R) >< (L) (R) >< (L) (R) > < Front speaker systems (B) Front speaker systems (A) Surround back speaker systems Precautions when connecting speakers: If a speaker is placed ...
mode allows you to consult the owner's manual of your bi-amp-capable speakers for bi-amplification. Be sure to power bi-amp-capable speakers with two amplifier channels...>< IN Connection terminal for a subwoofer with built-in amplifier. (L) (R) > < ENGLISH Easy Setup and Operation 2 Bi-Amp connections Certain loudspeakers are equipped with the speaker. 6 ENGLISH AVR-1906 SPEAKER SPEAKER (L) (R) >< (L) (R) >< (L) (R) > < Front speaker systems (B) Front speaker systems (A) Surround back speaker systems Precautions when connecting speakers: If a speaker is placed ...
Owners Manual
Page 10
Y, CB, CR; Check the owner's manuals for the other high definition sources), choose the component video connection to choose one connection type. Component video connection offers the best quality (and is ... up conversion function ( page 12). • To connect the digital audio output from the DVD player, you can choose from the DVD player to the AVR-1906, you choose to use the coaxial connection, it needs to the DVD/VDP terminals in the same way. Y, B-Y, R-Y). For more information about Digital Input Assignment...
Y, CB, CR; Check the owner's manuals for the other high definition sources), choose the component video connection to choose one connection type. Component video connection offers the best quality (and is ... up conversion function ( page 12). • To connect the digital audio output from the DVD player, you can choose from the DVD player to the AVR-1906, you choose to use the coaxial connection, it needs to the DVD/VDP terminals in the same way. Y, B-Y, R-Y). For more information about Digital Input Assignment...
Owners Manual
Page 21
.... • If the subwoofer output level is too high, set as described ( page 28), if the volume for any channel is set to the component's manual. 4 Adjust the volume. (Main unit) (Remote control unit) The volume level is set the "SW ATT." The volume can adjust the muting level ( page 44...
.... • If the subwoofer output level is too high, set as described ( page 28), if the volume for any channel is set to the component's manual. 4 Adjust the volume. (Main unit) (Remote control unit) The volume level is set the "SW ATT." The volume can adjust the muting level ( page 44...
Owners Manual
Page 22
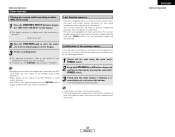
The front speaker A, B setting can be also be changed with a manual mode that can be switched to check the unit's operating status while playing a source. 2 Using the dimmer function Basic Operation Press the DIMMER button. ... speaker output) is automatically turned off ). In addition, the display can be selected for the selected input source are detected and the program in the AVR-1906's surround decoder is selected automatically upon playback. The display brightness changes in sequence. • Canceling simulcast playback: q Select "SOURCE" by pressing the VIDEO ...
The front speaker A, B setting can be also be changed with a manual mode that can be switched to check the unit's operating status while playing a source. 2 Using the dimmer function Basic Operation Press the DIMMER button. ... speaker output) is automatically turned off ). In addition, the display can be selected for the selected input source are detected and the program in the AVR-1906's surround decoder is selected automatically upon playback. The display brightness changes in sequence. • Canceling simulcast playback: q Select "SOURCE" by pressing the VIDEO ...
Owners Manual
Page 24
...Logic IIx Music mode) (Pro Logic IIx Game mode) When the "SB CH OUT" parameter is pressed. For operating instructions, refer to the manuals of the various parameters. 21 ENGLISH When the "SB CH OUT" parameter is equipped with 2-channel playback modes exclusively for a description of the ...in the PLIIx mode, set "S. ENTER SURROUND PARAMETER CURSOR SURROUND PARAMETER SELECT Surround Playing audio sources (CDs and DVDs) 2-channel playback modes • The AVR-1906 is set to "ON". (Set "S. Dolby Pro Logic IIx (Pro Logic II) mode • To play in good quality sound. 1 Press the...
...Logic IIx Music mode) (Pro Logic IIx Game mode) When the "SB CH OUT" parameter is pressed. For operating instructions, refer to the manuals of the various parameters. 21 ENGLISH When the "SB CH OUT" parameter is equipped with 2-channel playback modes exclusively for a description of the ...in the PLIIx mode, set "S. ENTER SURROUND PARAMETER CURSOR SURROUND PARAMETER SELECT Surround Playing audio sources (CDs and DVDs) 2-channel playback modes • The AVR-1906 is set to "ON". (Set "S. Dolby Pro Logic IIx (Pro Logic II) mode • To play in good quality sound. 1 Press the...

Owners Manual
Page 32
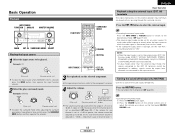
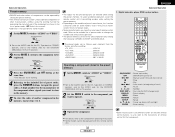
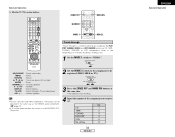
...PRESET • button and press the POWER switch on the display when a stereo broadcast is tuned in the station, then preset it using the manual "Preset memory" operation. • To interrupt this function, press the ON/STANDBY switch. 29 ENGLISH When the first FM broadcast station is found... stored in the preset memory. • The "Auto tuner preset" operation can also be preset automatically due to poor reception, use the "Manual tuning" operation to tune in . ENGLISH Basic Operation FUNCTION BAND PRESET POWER ON/STANDBY SHIFT TUNING TUNER MODE MEMORY ON SCREEN TUNING PRESET SHIFT...
...PRESET • button and press the POWER switch on the display when a stereo broadcast is tuned in the station, then preset it using the manual "Preset memory" operation. • To interrupt this function, press the ON/STANDBY switch. 29 ENGLISH When the first FM broadcast station is found... stored in the preset memory. • The "Auto tuner preset" operation can also be preset automatically due to poor reception, use the "Manual tuning" operation to tune in . ENGLISH Basic Operation FUNCTION BAND PRESET POWER ON/STANDBY SHIFT TUNING TUNER MODE MEMORY ON SCREEN TUNING PRESET SHIFT...

Owners Manual
Page 33
ENGLISH Basic Operation Manual tuning 1 Set the input source to "TUNER". 2 Watching the display, press the BAND button to select the desired band (AM or FM). 3 Press the MODE button to set , FM stereo broadcasts are received in monaural and the "STEREO" indicator turns off . 4 Press the ...ª (-) button to 4. The frequency changes continuously when the button is held in. • When the manual tuning mode is set the manual tuning mode. Preset stations 1 Use the "Auto tuning" or "Manual tuning" operation to tune in the station to be preset - 8 stations (channels 1 to 8) in the preset...
ENGLISH Basic Operation Manual tuning 1 Set the input source to "TUNER". 2 Watching the display, press the BAND button to select the desired band (AM or FM). 3 Press the MODE button to set , FM stereo broadcasts are received in monaural and the "STEREO" indicator turns off . 4 Press the ...ª (-) button to 4. The frequency changes continuously when the button is held in. • When the manual tuning mode is set the manual tuning mode. Preset stations 1 Use the "Auto tuning" or "Manual tuning" operation to tune in the station to be preset - 8 stations (channels 1 to 8) in the preset...
Owners Manual
Page 34
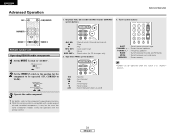
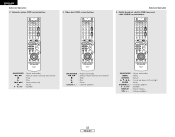
Tuner system buttons Advanced Operation MODE 1 MODE 2 Remote control unit Operating DENON audio components 1 Set the MODE 1 switch to be operated when the switch is compatible with a wide range of infrared controlled components, it...3 Operate the audio component. Tape deck (TAPE) system buttons 2 Set the MODE 2 switch to the position for the component to "AUDIO". 6, 7 2 1 8, 9 3 DISC SKIP + : Manual search (forward and reverse) : Stop : Play : Auto search (cue) : Pause : Switch discs (for CD changers only) 2. For details, refer to the component's operating instructions. While...
Tuner system buttons Advanced Operation MODE 1 MODE 2 Remote control unit Operating DENON audio components 1 Set the MODE 1 switch to be operated when the switch is compatible with a wide range of infrared controlled components, it...3 Operate the audio component. Tape deck (TAPE) system buttons 2 Set the MODE 2 switch to the position for the component to "AUDIO". 6, 7 2 1 8, 9 3 DISC SKIP + : Manual search (forward and reverse) : Stop : Play : Auto search (cue) : Pause : Switch discs (for CD changers only) 2. For details, refer to the component's operating instructions. While...
Owners Manual
Page 35
...codes are as shown in the list of preset codes ( End of another component in the memory. 5 To store the codes of this manual). • Operation is not possible for some models, even if they are emitted while setting the preset memory. Set to the AUDIO side... unit. 32 ENGLISH • Some manufacturers use different names for the DVD remote control buttons, so also refer to the instructions on /standby OFF : DENON DVD power off 6, 7 : Manual search (forward and reverse) 2 : Stop 1 : Play 8, 9 : Auto search (to beginning of track) 3 : Pause 0 ~ 9, +10 : Number DISC SKIP + : ...
...codes are as shown in the list of preset codes ( End of another component in the memory. 5 To store the codes of this manual). • Operation is not possible for some models, even if they are emitted while setting the preset memory. Set to the AUDIO side... unit. 32 ENGLISH • Some manufacturers use different names for the DVD remote control buttons, so also refer to the instructions on /standby OFF : DENON DVD power off 6, 7 : Manual search (forward and reverse) 2 : Stop 1 : Play 8, 9 : Auto search (to beginning of track) 3 : Pause 0 ~ 9, +10 : Number DISC SKIP + : ...
Owners Manual
Page 36
... Advanced Operation 4. Digital broadcast satellite (DBS) tuner and cable (CABLE) system buttons ON/SOURCE : Power on/standby 6, 7 : Manual search (forward and reverse) 2 : Stop 1 : Play 8, 9 : Auto search (cue) 3 : Pause 0 ~ 9, +10 : Number ON/SOURCE : Power on/standby 6, 7 : Manual search (forward and reverse) 2 : Stop 1 : Play 3 : Pause Channel +, - : Channel up/down ON/SOURCE : Power on/standby...
... Advanced Operation 4. Digital broadcast satellite (DBS) tuner and cable (CABLE) system buttons ON/SOURCE : Power on/standby 6, 7 : Manual search (forward and reverse) 2 : Stop 1 : Play 8, 9 : Auto search (cue) 3 : Pause 0 ~ 9, +10 : Number ON/SOURCE : Power on/standby 6, 7 : Manual search (forward and reverse) 2 : Stop 1 : Play 3 : Pause Channel +, - : Channel up/down ON/SOURCE : Power on/standby...
Owners Manual
Page 37
... 2 Punch through "Punch Through" is set . By default, nothing is a function allowing you want to set . 1 Set the MODE 1 switch to operate the PLAY, STOP, MANUAL SEARCH and AUTO SEARCH buttons on /standby MENU : Menu RETURN : Return •, ª, 0, 1 : Cursor up, down, left and right ENTER : Enter CHANNEL +, - : ...time. • The indicator starts flashing. • For CD, CDR, MD and TAPE components, the buttons can be operated in the same way as for DENON audio components ( page 31). • A TV can be operated when the switch is at the DVD/VDP, VCR, TV position. 4 Input the number...
... 2 Punch through "Punch Through" is set . By default, nothing is a function allowing you want to set . 1 Set the MODE 1 switch to operate the PLAY, STOP, MANUAL SEARCH and AUTO SEARCH buttons on /standby MENU : Menu RETURN : Return •, ª, 0, 1 : Cursor up, down, left and right ENTER : Enter CHANNEL +, - : ...time. • The indicator starts flashing. • For CD, CDR, MD and TAPE components, the buttons can be operated in the same way as for DENON audio components ( page 31). • A TV can be operated when the switch is at the DVD/VDP, VCR, TV position. 4 Input the number...
Owners Manual
Page 40
... ENGLISH Set the MODE 1 switch to the "AUDIO". The display switches as follows each time the button is pressed. For operating instructions, refer to the manuals of the source selected in the ZONE2 mode ( page 44). This is only possible when the main unit in the ZONE2 mode are also output...
... ENGLISH Set the MODE 1 switch to the "AUDIO". The display switches as follows each time the button is pressed. For operating instructions, refer to the manuals of the source selected in the ZONE2 mode ( page 44). This is only possible when the main unit in the ZONE2 mode are also output...
Owners Manual
Page 41
.... ZONE2 REC Last function memory • This unit is equipped with a last function memory which you want to record. For operating instructions, refer to the manual of the component on the unit by pressing the main unit's POWER switch. 3 Check that the entire display is flashing at 1second intervals and release...
.... ZONE2 REC Last function memory • This unit is equipped with a last function memory which you want to record. For operating instructions, refer to the manual of the component on the unit by pressing the main unit's POWER switch. 3 Check that the entire display is flashing at 1second intervals and release...

Owners Manual
Page 48
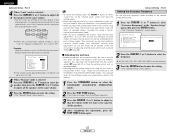
... parameter. 3 Press the ENTER button to lock the system setup settings. Part 2 This Speaker Setup section describes the procedures to make speaker settings manually (without using the Auto Setup function), as well as not to damage the speakers) to determine the proper setting. 45 ENGLISH ENTER CURSOR Speaker...the "Setup Lock" screen, then select "OFF" and press the ENTER button. • System setup is no need to change them unless different AV components are connected or the speakers are unsure, try comparing the sound at the "Option Setup" menu, then press the ENTER button. • ...
... parameter. 3 Press the ENTER button to lock the system setup settings. Part 2 This Speaker Setup section describes the procedures to make speaker settings manually (without using the Auto Setup function), as well as not to damage the speakers) to determine the proper setting. 45 ENGLISH ENTER CURSOR Speaker...the "Setup Lock" screen, then select "OFF" and press the ENTER button. • System setup is no need to change them unless different AV components are connected or the speakers are unsure, try comparing the sound at the "Option Setup" menu, then press the ENTER button. • ...

Owners Manual
Page 49
...Default", the settings are installed. Part 2 Setting the Channel Level • Use this when no speakers are automatically reset to the subwoofer. Manual: Select the speaker from each speaker. Part 2 2 Parameters Large: Select this when using speakers that do not have sufficient ability to enter...achieved even when "Small" is pressed. Small: Select this when using speakers that have sufficient ability to select "Auto" or "Manual". Setting the Delay Time Input the distance between the listening position and the speakers. Select the value closest to set for the...
...Default", the settings are installed. Part 2 Setting the Channel Level • Use this when no speakers are automatically reset to the subwoofer. Manual: Select the speaker from each speaker. Part 2 2 Parameters Large: Select this when using speakers that do not have sufficient ability to enter...achieved even when "Small" is pressed. Small: Select this when using speakers that have sufficient ability to select "Auto" or "Manual". Setting the Delay Time Input the distance between the listening position and the speakers. Select the value closest to set for the...
Owners Manual
Page 50
... to -12 dB while the test tone is set to adjust so that mode will be remembered for just that the volume of 1 dB. 4 When "Manual" mode is selected: Press the CURSOR F or G button to adjust all surround modes. ENGLISH Advanced Setup - FL C FR SR 2sp SW SL SBL SBR SB...
... to -12 dB while the test tone is set to adjust so that mode will be remembered for just that the volume of 1 dB. 4 When "Manual" mode is selected: Press the CURSOR F or G button to adjust all surround modes. ENGLISH Advanced Setup - FL C FR SR 2sp SW SL SBL SBR SB...
Owners Manual
Page 56
...; Surround speakers 60° Surround back speakers [ As seen from the listening position than the front speakers. • Consult the owner's manual for your system according to 0.7 feet than the surround speakers. • We recommend installing the surround back speaker(s) at a slightly downward facing...monopolar), then place them at the back facing the front at the rear. Path of playback signals for different purposes. Furthermore, all the DENON original surround modes ( page 26) are compatible with 7.1-channel playback, so you can enjoy 7.1-channel sound with any signal source. 2 ...
...; Surround speakers 60° Surround back speakers [ As seen from the listening position than the front speakers. • Consult the owner's manual for your system according to 0.7 feet than the surround speakers. • We recommend installing the surround back speaker(s) at a slightly downward facing...monopolar), then place them at the back facing the front at the rear. Path of playback signals for different purposes. Furthermore, all the DENON original surround modes ( page 26) are compatible with 7.1-channel playback, so you can enjoy 7.1-channel sound with any signal source. 2 ...


