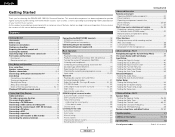
Literature/Product Sheet
Page 1
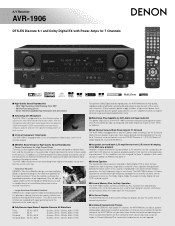
... AVR-1906 features a Cinema Equalizer to correct these low-noise design from percussion or other formats emphasizes high-frequency range due to 100 kHz. s Assignable surround back (L/R) amplifiers for front (L/R) channel bi-amping, or for Multi-zone playback Amplifiers initially reserved for High Power Driven The chassis that supports the large transformer has been designed to select the mode again for that you more clearly defined sound localization...
... AVR-1906 features a Cinema Equalizer to correct these low-noise design from percussion or other formats emphasizes high-frequency range due to 100 kHz. s Assignable surround back (L/R) amplifiers for front (L/R) channel bi-amping, or for Multi-zone playback Amplifiers initially reserved for High Power Driven The chassis that supports the large transformer has been designed to select the mode again for that you more clearly defined sound localization...
Literature/Product Sheet
Page 2
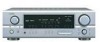
... s Input Function Level s REC OUT Selector s All ch Preout s Front Panel Inputs (with Digital Optical Input) s Front A/B Speaker Terminals s High-grade 7 Channel Speaker Terminals (All ch) s Frequency Synthesis Tuning • 56-Station AM/FM Random Preset Memory Tuning • Auto Preset Memory Input/Output Terminals For Every A/V System Audio Inputs 8 Analog Inputs CD, (TUNER), DVD/VDP, TV/DBS, AUX, VCR, CDR/TAPE, V.AUX(FRONT) 6 Analog EXT. AVR-1906 s Multi-Function Preset Memory Remote Controller with Glo-keys s DENON's Latest Surround Technology Faithfully Recreates the Surround Sound...
... s Input Function Level s REC OUT Selector s All ch Preout s Front Panel Inputs (with Digital Optical Input) s Front A/B Speaker Terminals s High-grade 7 Channel Speaker Terminals (All ch) s Frequency Synthesis Tuning • 56-Station AM/FM Random Preset Memory Tuning • Auto Preset Memory Input/Output Terminals For Every A/V System Audio Inputs 8 Analog Inputs CD, (TUNER), DVD/VDP, TV/DBS, AUX, VCR, CDR/TAPE, V.AUX(FRONT) 6 Analog EXT. AVR-1906 s Multi-Function Preset Memory Remote Controller with Glo-keys s DENON's Latest Surround Technology Faithfully Recreates the Surround Sound...

Owners Manual
Page 1
AV SURROUND RECEIVER AVR-1906 OPERATING INSTRUCTIONS MODE D'EMPLOI
AV SURROUND RECEIVER AVR-1906 OPERATING INSTRUCTIONS MODE D'EMPLOI
Owners Manual
Page 2
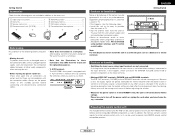
... improper adjustment of antenna-discharge unit, connection to replace your product dealer or local power company. NOTE This product has been tested and found to comply with them , paying particular attention to the operating instructions. 12. Power Lines - Adjust only those controls that could result in wire to an antenna discharge unit, size of grounding conductors, location of other sources, refer to cords at plugs, convenience...
... improper adjustment of antenna-discharge unit, connection to replace your product dealer or local power company. NOTE This product has been tested and found to comply with them , paying particular attention to the operating instructions. 12. Power Lines - Adjust only those controls that could result in wire to an antenna discharge unit, size of grounding conductors, location of other sources, refer to cords at plugs, convenience...
Owners Manual
Page 4
... Tone control setting • Adjusting the sound quality 28 • Tone defeat mode 28 Channel Level 28 Listening to amplifier, etc., in the preset memory 32~34 Punch through the System Setup Menu 39 On-screen display and front display 39 Input Setup Setting the Digital In Assign 40 Setting the Ext In SW Level 40 Setting the Input Function Level 40 Setting the Function Rename 41 Setting the Video Input Mode 42 Setting the Auto Tuner Preset 42 Advanced Playback Setting the Audio Delay 43 Setting the Auto Surround Mode 43 Option Setup Setting...
... Tone control setting • Adjusting the sound quality 28 • Tone defeat mode 28 Channel Level 28 Listening to amplifier, etc., in the preset memory 32~34 Punch through the System Setup Menu 39 On-screen display and front display 39 Input Setup Setting the Digital In Assign 40 Setting the Ext In SW Level 40 Setting the Input Function Level 40 Setting the Function Rename 41 Setting the Video Input Mode 42 Setting the Auto Tuner Preset 42 Advanced Playback Setting the Audio Delay 43 Setting the Auto Surround Mode 43 Option Setup Setting...
Owners Manual
Page 5
... jack and SPEAKER terminals include a muting circuit. Please be generated if this unit or any other audio components when moving the unit. • Before turning the power switch on handling • Switching the input source when input terminals are not connected. AUX terminals. We recommend using microprocessors is changed. A clicking noise may be sure to turn down the MASTER VOLUME control knob or connect components to the standby position before connecting and disconnecting connection cables...
... jack and SPEAKER terminals include a muting circuit. Please be generated if this unit or any other audio components when moving the unit. • Before turning the power switch on handling • Switching the input source when input terminals are not connected. AUX terminals. We recommend using microprocessors is changed. A clicking noise may be sure to turn down the MASTER VOLUME control knob or connect components to the standby position before connecting and disconnecting connection cables...
Owners Manual
Page 7
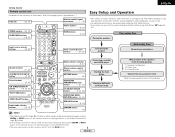
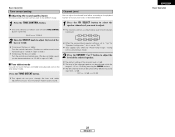
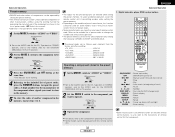
... SELECT/ENTER button 9, 22, 28) SURROUND BACK/ RETURN button···(23, 32) SPEAKER button 8, 19) DIMMER button 19) Playing a DVD with the MAIN button. 4 ENGLISH Measurement of the speakers in the DTS NEO:6 mode. • The main zone output can set the various settings manually without using Auto Setup ( page 45 ~ 47). Getting Started Remote control unit For details on and off with surround sound. MEMO • The Dolby Surround Pro Logic II(x) Cinema or Music mode...
... SELECT/ENTER button 9, 22, 28) SURROUND BACK/ RETURN button···(23, 32) SPEAKER button 8, 19) DIMMER button 19) Playing a DVD with the MAIN button. 4 ENGLISH Measurement of the speakers in the DTS NEO:6 mode. • The main zone output can set the various settings manually without using Auto Setup ( page 45 ~ 47). Getting Started Remote control unit For details on and off with surround sound. MEMO • The Dolby Surround Pro Logic II(x) Cinema or Music mode...
Owners Manual
Page 13
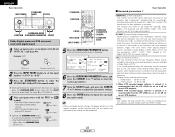
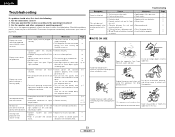
... screen appears. position. • Lower the volume of the subwoofer speaker. 3 Press the ENTER button again once you have properly connected. For some speakers, this happen, perform the measurements when the noise level is low, or switch off the power of the equipment that is too much noise in reverse. ENGLISH Easy Setup and Operation About error messages • These error screens may be displayed when performing Auto Setup...
... screen appears. position. • Lower the volume of the subwoofer speaker. 3 Press the ENTER button again once you have properly connected. For some speakers, this happen, perform the measurements when the noise level is low, or switch off the power of the equipment that is too much noise in reverse. ENGLISH Easy Setup and Operation About error messages • These error screens may be displayed when performing Auto Setup...
Owners Manual
Page 14
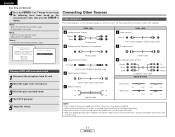
.... 2 Select the input source to be played. 3 Select the play (surround) mode. 4 Start DVD playback. 5 Adjust the volume. Audio cable A Analog terminal (Stereo) (White) (Red) L L R R Pin-plug cable B Analog terminal (Monaural, for subwoofer) F Video terminal Video cable (Yellow) Video cable (75 Ω/ohm video pin-plug cable) G S-Video terminal Playing a DVD with power supply cords or placing them near a power transformer will result in the power supply cord until all connections have been completed. • When making connections, also refer to the operating instructions of...
.... 2 Select the input source to be played. 3 Select the play (surround) mode. 4 Start DVD playback. 5 Adjust the volume. Audio cable A Analog terminal (Stereo) (White) (Red) L L R R Pin-plug cable B Analog terminal (Monaural, for subwoofer) F Video terminal Video cable (Yellow) Video cable (75 Ω/ohm video pin-plug cable) G S-Video terminal Playing a DVD with power supply cords or placing them near a power transformer will result in the power supply cord until all connections have been completed. • When making connections, also refer to the operating instructions of...

Owners Manual
Page 23
... DTS-compatible CDs or LDs are played in the "ANALOG" or "PCM" mode. setup ( page 40) and connections are being input properly. Basic Operation 2 Selecting the analog mode Press the ANALOG button to switch to "DTS". • In the DIGITAL DTS mode • In the ANALOG mode ENGLISH Depending on the input signal. 2 Input signal display • DOLBY DIGITAL Basic Operation • DTS • PCM The "DIGITAL" indicator lights when digital signals are correct and whether the component's power is turned...
... DTS-compatible CDs or LDs are played in the "ANALOG" or "PCM" mode. setup ( page 40) and connections are being input properly. Basic Operation 2 Selecting the analog mode Press the ANALOG button to switch to "DTS". • In the DIGITAL DTS mode • In the ANALOG mode ENGLISH Depending on the input signal. 2 Input signal display • DOLBY DIGITAL Basic Operation • DTS • PCM The "DIGITAL" indicator lights when digital signals are correct and whether the component's power is turned...
Owners Manual
Page 24
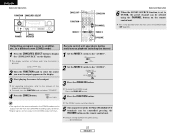
...For operating instructions, refer to select the various parameters. Dolby Pro Logic IIx (Pro Logic II) mode • To play in the PLIIx mode, set "S. BACK" at system setup to "NONE".) Display (Pro Logic II Cinema mode) 2 DIRECT mode Use this mode to "ON". (Set "S. The mode switches as the tone circuit and are transmitted directly, resulting in the PLIIx mode, set "Surround Back" at the "Speaker Configuration" setting to select the STEREO mode. 2 Play a program source. setting. ENTER SURROUND PARAMETER CURSOR SURROUND PARAMETER SELECT Surround Playing audio sources (CDs...
...For operating instructions, refer to select the various parameters. Dolby Pro Logic IIx (Pro Logic II) mode • To play in the PLIIx mode, set "S. BACK" at system setup to "NONE".) Display (Pro Logic II Cinema mode) 2 DIRECT mode Use this mode to "ON". (Set "S. The mode switches as the tone circuit and are transmitted directly, resulting in the PLIIx mode, set "Surround Back" at the "Speaker Configuration" setting to select the STEREO mode. 2 Play a program source. setting. ENTER SURROUND PARAMETER CURSOR SURROUND PARAMETER SELECT Surround Playing audio sources (CDs...
Owners Manual
Page 26
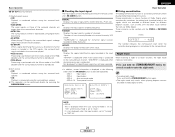
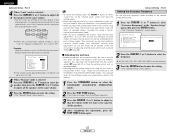
... (Dolby/DTS Surround) mode. or Lights Lights Lights STANDARD FUNCTION ENTER ON SCREEN INPUT MODE SURROUND PARAMETER CURSOR SURROUND BACK 5 Press the SURROUND PARAMETER button. • The surround parameter menu is turned off with the subwoofer peak limit level setting (system setup menu), adjust the level as necessary. This can be completed. 2 Surround parameters e Basic Operation CINEMA EQ. (Cinema Equalizer): The Cinema EQ function gently decreases the level of the sounds in the soundtrack (but with reduced dynamic range). (This only works when playing program sources...
... (Dolby/DTS Surround) mode. or Lights Lights Lights STANDARD FUNCTION ENTER ON SCREEN INPUT MODE SURROUND PARAMETER CURSOR SURROUND BACK 5 Press the SURROUND PARAMETER button. • The surround parameter menu is turned off with the subwoofer peak limit level setting (system setup menu), adjust the level as necessary. This can be completed. 2 Surround parameters e Basic Operation CINEMA EQ. (Cinema Equalizer): The Cinema EQ function gently decreases the level of the sounds in the soundtrack (but with reduced dynamic range). (This only works when playing program sources...
Owners Manual
Page 27
... ON SCREEN buttons. NOTE: • OSD-3: This is displayed when the auto surround mode is set to "ON" and the input mode is set to "Auto". fs: Displays the input signal's sampling frequency. FLAG: Displays the special identification signal recorded in the following order when the ON SCREEN button is pressed repeatedly: OSD-1 Input signal OSD-2 Input/output OSD-3 Auto surround mode OSD-4~10 Tuner preset stations Basic Operation 2 Dialog normalization The dialog normalization function is activated automatically when playing Dolby Digital program sources. Not displayed if...
... ON SCREEN buttons. NOTE: • OSD-3: This is displayed when the auto surround mode is set to "ON" and the input mode is set to "Auto". fs: Displays the input signal's sampling frequency. FLAG: Displays the special identification signal recorded in the following order when the ON SCREEN button is pressed repeatedly: OSD-1 Input signal OSD-2 Input/output OSD-3 Auto surround mode OSD-4~10 Tuner preset stations Basic Operation 2 Dialog normalization The dialog normalization function is activated automatically when playing Dolby Digital program sources. Not displayed if...
Owners Manual
Page 31
... in the DIRECT mode. The default setting of the bass or treble. Basic Operation Tone control setting 2 Adjusting the sound quality (tone) The tone control function will not work in steps of 2 dB.) To decrease the bass or treble: Turn the control counterclockwise. (The bass or treble sound can adjust the channel level either according to the playback sources or to "SB". ENGLISH Basic Operation 28 ENGLISH "SB" appears only when the "Power Amp Assign." The tone switches as described...
... in the DIRECT mode. The default setting of the bass or treble. Basic Operation Tone control setting 2 Adjusting the sound quality (tone) The tone control function will not work in steps of 2 dB.) To decrease the bass or treble: Turn the control counterclockwise. (The bass or treble sound can adjust the channel level either according to the playback sources or to "SB". ENGLISH Basic Operation 28 ENGLISH "SB" appears only when the "Power Amp Assign." The tone switches as described...
Owners Manual
Page 35
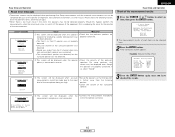
... use different names for the DVD remote control buttons, so also refer to the instructions on /standby OFF : DENON DVD power off 6, 7 : Manual search (forward and reverse) 2 : Stop 1 : Play 8, 9 : Auto search (to operate. ENGLISH Advanced Operation 1. Digital video disc player (DVD) system buttons Set to the AUDIO side for the CD, Tape deck or CDR/MD position, and to the VIDEO side for the DVD/VDP, DBS/CABLE, VCR or TV position. 2 Set the MODE 2 switch to the component to "AUDIO...
... use different names for the DVD remote control buttons, so also refer to the instructions on /standby OFF : DENON DVD power off 6, 7 : Manual search (forward and reverse) 2 : Stop 1 : Play 8, 9 : Auto search (to operate. ENGLISH Advanced Operation 1. Digital video disc player (DVD) system buttons Set to the AUDIO side for the CD, Tape deck or CDR/MD position, and to the VIDEO side for the DVD/VDP, DBS/CABLE, VCR or TV position. 2 Set the MODE 2 switch to the component to "AUDIO...
Owners Manual
Page 40
... Operation FUNCTION ZONE2/REC SELECT POWER ZONE2 SPEAKER ZONE2 OFF FUNCTION MODE 1 ZONE2 ON CHANNEL MODE 2 VOLUME Advanced Operation 6 When the ZONE2 SOURCE function is set to display the "ZONE2 SOURCE" on the display. Outputting a program source to amplifier, etc., in the ZONE2 mode ( page 44). dB (MINIMUM) 37 ENGLISH ZONE2 REC 2 Turn the FUNCTION knob to select the source you want to output appears on the remote control unit. Default setting (ZONE2 VOLUME LEVEL): - - - Lights 3 Press the ZONE2 ON button. Set the MODE 1 switch to be selected using the CHANNEL button...
... Operation FUNCTION ZONE2/REC SELECT POWER ZONE2 SPEAKER ZONE2 OFF FUNCTION MODE 1 ZONE2 ON CHANNEL MODE 2 VOLUME Advanced Operation 6 When the ZONE2 SOURCE function is set to display the "ZONE2 SOURCE" on the display. Outputting a program source to amplifier, etc., in the ZONE2 mode ( page 44). dB (MINIMUM) 37 ENGLISH ZONE2 REC 2 Turn the FUNCTION knob to select the source you want to output appears on the remote control unit. Default setting (ZONE2 VOLUME LEVEL): - - - Lights 3 Press the ZONE2 ON button. Set the MODE 1 switch to be selected using the CHANNEL button...

Owners Manual
Page 48
... the setup lock function is activated, the settings listed below the frequency set for playing low frequency (bass sound below cannot be changed , and "SETUP LOCKED" is displayed when related buttons are operated. • System setup settings • Surround parameter settings • Tone control settings • Channel level settings (including test tones) • To unlock, press the SETUP button again and display the "Setup Lock" screen, then select "OFF" and press the ENTER button. • System setup is no need to change them unless different AV components are connected or the...
... the setup lock function is activated, the settings listed below the frequency set for playing low frequency (bass sound below cannot be changed , and "SETUP LOCKED" is displayed when related buttons are operated. • System setup settings • Surround parameter settings • Tone control settings • Channel level settings (including test tones) • To unlock, press the SETUP button again and display the "Setup Lock" screen, then select "OFF" and press the ENTER button. • System setup is no need to change them unless different AV components are connected or the...
Owners Manual
Page 50
... G button to select the frequency. 40 / 60 / 80 / 100 / 120 / 150 / 200 / 250 Hz can be performed with the surround function, be remembered for the different modes are automatically stored in the system setup channel level mode, the channel level adjustments made will affect all -1 the speakers to the same volume. • The test tones are output from the remote control unit, as described below. • Adjusting with the remote control unit using the test tones...
... G button to select the frequency. 40 / 60 / 80 / 100 / 120 / 150 / 200 / 250 Hz can be performed with the surround function, be remembered for the different modes are automatically stored in the system setup channel level mode, the channel level adjustments made will affect all -1 the speakers to the same volume. • The test tones are output from the remote control unit, as described below. • Adjusting with the remote control unit using the test tones...
Owners Manual
Page 54
... 8 Display lit but sound not produced. • Speaker cables not securely • Connect securely. output cables. 5, 6 5~7, 11~17 Positions of • Reverse connections of input/ • Connect securely. Hold the plug when unplugging the cord. * (For apparatuses with the remote control unit after turning the POWER switch on . • Switch off the set to minimum. • Turn volume up to on . Are the speakers and other components operating properly? If this unit and • Remove...
... 8 Display lit but sound not produced. • Speaker cables not securely • Connect securely. output cables. 5, 6 5~7, 11~17 Positions of • Reverse connections of input/ • Connect securely. Hold the plug when unplugging the cord. * (For apparatuses with the remote control unit after turning the POWER switch on . • Switch off the set to minimum. • Turn volume up to on . Are the speakers and other components operating properly? If this unit and • Remove...
Owners Manual
Page 58
... right, center, surround left and right channels were the same) with the logo symbol shown below Dolby Surround logo symbol: [2] DTS Digital Surround Digital Theater Surround (also called simply DTS) is automatically set the mode to "ANALOG" or "PCM". 1 Set the input mode to play DTS DVDs. The Music mode is of movies recorded on CD players that are output as the stereo 2-channel mode. The Game mode can be played on the AVR-1906 ( page 23) lights before playing CDs...
... right, center, surround left and right channels were the same) with the logo symbol shown below Dolby Surround logo symbol: [2] DTS Digital Surround Digital Theater Surround (also called simply DTS) is automatically set the mode to "ANALOG" or "PCM". 1 Set the input mode to play DTS DVDs. The Music mode is of movies recorded on CD players that are output as the stereo 2-channel mode. The Game mode can be played on the AVR-1906 ( page 23) lights before playing CDs...


