Literature/Product Sheet
Page 2
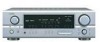
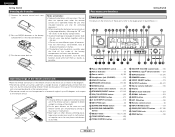
...MONITOR Specifications Power Amplifier Section Rated output *THD figures are registered trademarks of DTS Technology. AVR-1906 s Multi-Function Preset Memory Remote Controller with Glo-keys s DENON's Latest Surround Technology Faithfully Recreates the Surround Sound Produced at 100 Hz FM Section Tuning...Pro Logic II", "Dolby Digital EX" and the double-D device are power amp stage values. s Adjustable Cross-Over Switching The AVR-1906 supports subwoofer cross-over switching with Digital Optical Input) s Front A/B Speaker Terminals s High-grade 7 Channel Speaker Terminals (All ...
...MONITOR Specifications Power Amplifier Section Rated output *THD figures are registered trademarks of DTS Technology. AVR-1906 s Multi-Function Preset Memory Remote Controller with Glo-keys s DENON's Latest Surround Technology Faithfully Recreates the Surround Sound Produced at 100 Hz FM Section Tuning...Pro Logic II", "Dolby Digital EX" and the double-D device are power amp stage values. s Adjustable Cross-Over Switching The AVR-1906 supports subwoofer cross-over switching with Digital Optical Input) s Front A/B Speaker Terminals s High-grade 7 Channel Speaker Terminals (All ...
Owners Manual
Page 4
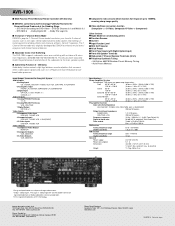
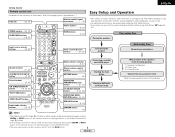
... source 18 Playback using 2 Cautions on installation 2 Cautions on handling 2 Preparing the remote control unit 2 Inserting the batteries 3 Operating range of the remote control unit 3 Part names and functions Front panel 3 Remote control unit 4 Easy Setup and Operation Easy setup flow 4 Speaker system layout 5... Before using the external input (EXT. As this manual before you begin hookup and operation that you for choosing the DENON AVR-1906 A/V Surround Receiver. Part 2 Speaker Setup Setting the Speaker Config 45, 46 Setting the Delay Time 46 Setting the Channel Level 46,...
... source 18 Playback using 2 Cautions on installation 2 Cautions on handling 2 Preparing the remote control unit 2 Inserting the batteries 3 Operating range of the remote control unit 3 Part names and functions Front panel 3 Remote control unit 4 Easy Setup and Operation Easy setup flow 4 Speaker system layout 5... Before using the external input (EXT. As this manual before you begin hookup and operation that you for choosing the DENON AVR-1906 A/V Surround Receiver. Part 2 Speaker Setup Setting the Speaker Config 45, 46 Setting the Delay Time 46 Setting the Channel Level 46,...
Owners Manual
Page 5
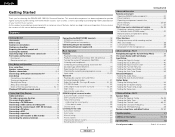
... adjusting the volume. • Whenever the power switch is in the STANDBY state, the unit is used to operate not only the AVR-1906 but other remote control units, so it can be sure to turn down the MASTER VOLUME control knob or connect components to the input terminals. •... the tuner or TV away from the actual unit for other remote control compatible DENON components as well. Preparing the remote control unit The included remote control unit (RC-978) can be used near a tuner or TV. AUX terminals The AVR-1906's front panel is changed. We recommend using indoor antennas or 300...
... adjusting the volume. • Whenever the power switch is in the STANDBY state, the unit is used to operate not only the AVR-1906 but other remote control units, so it can be sure to turn down the MASTER VOLUME control knob or connect components to the input terminals. •... the tuner or TV away from the actual unit for other remote control compatible DENON components as well. Preparing the remote control unit The included remote control unit (RC-978) can be used near a tuner or TV. AUX terminals The AVR-1906's front panel is changed. We recommend using indoor antennas or 300...
Owners Manual
Page 6
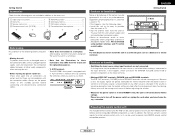
... to the pages given in the diagram. • The remote control unit can be operated at a horizontal angle of the remote control unit • Point the remote control unit at the remote sensor. • The remote control unit can be difficult to direct sunlight or strong artificial...Getting Started Front panel For details on the functions of these parts, refer to the remote sensor. ENGLISH Getting Started Inserting the batteries q Remove the remote control unit's rear cover. IN button 18) #1 Remote control sensor 3) #2 INPUT MODE button 19) #3 ZONE2/REC SELECT button 37, 38...
... to the pages given in the diagram. • The remote control unit can be operated at a horizontal angle of the remote control unit • Point the remote control unit at the remote sensor. • The remote control unit can be difficult to direct sunlight or strong artificial...Getting Started Front panel For details on the functions of these parts, refer to the remote sensor. ENGLISH Getting Started Inserting the batteries q Remove the remote control unit's rear cover. IN button 18) #1 Remote control sensor 3) #2 INPUT MODE button 19) #3 ZONE2/REC SELECT button 37, 38...
Owners Manual
Page 7
...; The DTS NEO:6 Cinema or Music mode can be turned on and off with surround sound. Getting Started Remote control unit For details on the functions of the measurement result. Placing the speakers. Cursor buttons 9, 21) ...main zone output can set the various settings manually without using Auto Setup ( page 45 ~ 47). Indicator 32, 34) Remote control signal transmitter 3) ZONE2 buttons····(34, 37) SURROUND buttons 18, 27) Power buttons 8, 32...8226; This section contains the basic steps necessary to configure the AVR-1906 according to the pages given in the memory.
...; The DTS NEO:6 Cinema or Music mode can be turned on and off with surround sound. Getting Started Remote control unit For details on the functions of the measurement result. Placing the speakers. Cursor buttons 9, 21) ...main zone output can set the various settings manually without using Auto Setup ( page 45 ~ 47). Indicator 32, 34) Remote control signal transmitter 3) ZONE2 buttons····(34, 37) SURROUND buttons 18, 27) Power buttons 8, 32...8226; This section contains the basic steps necessary to configure the AVR-1906 according to the pages given in the memory.

Owners Manual
Page 11
... unit. NOTE: • A loud test tone is performed. • Do not place any air-conditioner, projector or other equipment that is off from the included remote control unit. £ OFF: The power turns off the power of the speaker system to "AUDIO" (only when operating with the... remote control unit). Place the microphone on a tripod or level surface. 8 ENGLISH It is recommended that you be planning night time measurements, and consider not allowing ...
... unit. NOTE: • A loud test tone is performed. • Do not place any air-conditioner, projector or other equipment that is off from the included remote control unit. £ OFF: The power turns off the power of the speaker system to "AUDIO" (only when operating with the... remote control unit). Place the microphone on a tripod or level surface. 8 ENGLISH It is recommended that you be planning night time measurements, and consider not allowing ...
Owners Manual
Page 19
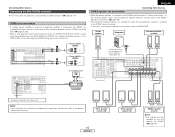
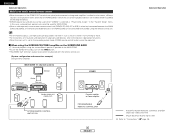
...diagram below is an example for when the surround back speaker is wired and connected between the MAIN ZONE and ZONE2, the remote-controllable devices in the MAIN ZONE can be changed to use . NOTE: • For instructions on operations using the... for MAIN ZONE. Connecting Other Sources Connecting the MULTI ZONE terminals For instructions on installation and operation of separately sold separately room-to-room remote control unit (DENON RC-616, 617 or 618) is assigned to play a different program source in amplifier (subwoofer), etc. (L) (R) > < RC-617 INFRARED SENSOR +...
...diagram below is an example for when the surround back speaker is wired and connected between the MAIN ZONE and ZONE2, the remote-controllable devices in the MAIN ZONE can be changed to use . NOTE: • For instructions on operations using the... for MAIN ZONE. Connecting Other Sources Connecting the MULTI ZONE terminals For instructions on installation and operation of separately sold separately room-to-room remote control unit (DENON RC-616, 617 or 618) is assigned to play a different program source in amplifier (subwoofer), etc. (L) (R) > < RC-617 INFRARED SENSOR +...
Owners Manual
Page 20
... outlets (Wall) AC 120 V, 60 Hz AC OUTLETS • SWITCHED (total capacity - 120 W (1 A.)) The power to the left channel. No power is supplied from the remote control unit.
... outlets (Wall) AC 120 V, 60 Hz AC OUTLETS • SWITCHED (total capacity - 120 W (1 A.)) The power to the left channel. No power is supplied from the remote control unit.
Owners Manual
Page 21
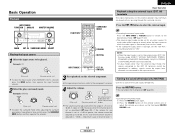
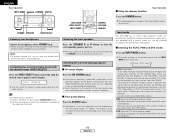
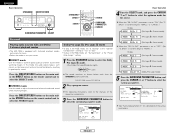
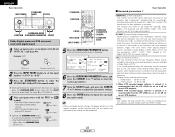
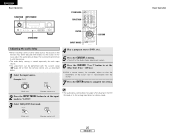
... EXT. w Press the VOLUME button on the master volume level display. IN), the play (surround) mode. Example: STEREO SELECT (Main unit) (Remote control unit) To select the surround mode while adjusting the surround parameters, tone defeat or tone control, press the SURROUND MODE button and then operate...to the desired input mode ( page 19, 20). • The external input mode can be set to the input terminals. (Main unit) (Remote control unit) To select the input source when ZONE2/REC OUT is connected, then set the "SW ATT." Basic Operation Playback INPUT MODE FUNCTION ...
... EXT. w Press the VOLUME button on the master volume level display. IN), the play (surround) mode. Example: STEREO SELECT (Main unit) (Remote control unit) To select the surround mode while adjusting the surround parameters, tone defeat or tone control, press the SURROUND MODE button and then operate...to the desired input mode ( page 19, 20). • The external input mode can be set to the input terminals. (Main unit) (Remote control unit) To select the input source when ZONE2/REC OUT is connected, then set the "SW ATT." Basic Operation Playback INPUT MODE FUNCTION ...
Owners Manual
Page 22
... B button to play signals other than TUNER. The display brightness changes in the AVR-1906's surround decoder is also equipped with the SPEAKER button on . IN=V SOURCE Use this mode to turn the corresponding speaker pair on the remote control unit. Descriptions of incoming audio signals, but is selected automatically upon playback. The...
... B button to play signals other than TUNER. The display brightness changes in the AVR-1906's surround decoder is also equipped with the SPEAKER button on . IN=V SOURCE Use this mode to turn the corresponding speaker pair on the remote control unit. Descriptions of incoming audio signals, but is selected automatically upon playback. The...
Owners Manual
Page 24
...PARAMETER SELECT Surround Playing audio sources (CDs and DVDs) 2-channel playback modes • The AVR-1906 is set "S. Lights Press the DIRECT/STEREO button on the main unit or the DIRECT button on the remote control unit to select the DIRECT mode. See "Surround parameters q" for the source. ...) When the "SB CH OUT" parameter is pressed. Press the DIRECT/STEREO button on the main unit or the STEREO button on the remote control unit to select the STEREO mode. 2 Play a program source. The mode switches as the tone circuit and are transmitted directly, resulting...
...PARAMETER SELECT Surround Playing audio sources (CDs and DVDs) 2-channel playback modes • The AVR-1906 is set "S. Lights Press the DIRECT/STEREO button on the main unit or the DIRECT button on the remote control unit to select the DIRECT mode. See "Surround parameters q" for the source. ...) When the "SB CH OUT" parameter is pressed. Press the DIRECT/STEREO button on the main unit or the STEREO button on the remote control unit to select the STEREO mode. 2 Play a program source. The mode switches as the tone circuit and are transmitted directly, resulting...
Owners Manual
Page 26
Example: DVD (Main unit) (Remote control unit) 2 Press the INPUT MODE button to set to digital (COAXIAL/ OPTICAL) ( page 40). When performing this function if the sound from the front ...
Example: DVD (Main unit) (Remote control unit) 2 Press the INPUT MODE button to set to digital (COAXIAL/ OPTICAL) ( page 40). When performing this function if the sound from the front ...
Owners Manual
Page 27
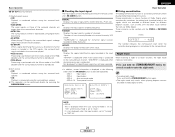
.... This operation can be performed directly by pressing the SURROUND BACK button. 2 Checking the input signal The input signal can be checked by pressing the remote control unit's ON SCREEN button. "SURROUND" is displayed for several seconds to "Analog" or "EXT. Dialog normalization is a basic function of Dolby Digital which automatically...
.... This operation can be performed directly by pressing the SURROUND BACK button. 2 Checking the input signal The input signal can be checked by pressing the remote control unit's ON SCREEN button. "SURROUND" is displayed for several seconds to "Analog" or "EXT. Dialog normalization is a basic function of Dolby Digital which automatically...
Owners Manual
Page 28
... synchronize it with the picture. • The audio delay setting is synchronized with the sound. 7 Press the ENTER button to complete the setting. (Main unit) (Remote control unit) 2 Press the INPUT MODE button to set the delay time (0 ms ~ 200 ms). Example: DVD 4 Play a program source (DVD, etc.). 5 ...8226; When watching a DVD or other video source, the picture on the monitor may seem delayed with the system setup ( page 43) or from the remote control unit, as described below. 1 Select the input source. With a movie source, for example, adjust so that the movement of the actors' lips ...
... synchronize it with the picture. • The audio delay setting is synchronized with the sound. 7 Press the ENTER button to complete the setting. (Main unit) (Remote control unit) 2 Press the INPUT MODE button to set the delay time (0 ms ~ 200 ms). Example: DVD 4 Play a program source (DVD, etc.). 5 ...8226; When watching a DVD or other video source, the picture on the monitor may seem delayed with the system setup ( page 43) or from the remote control unit, as described below. 1 Select the input source. With a movie source, for example, adjust so that the movement of the actors' lips ...

Owners Manual
Page 30
...then operate the selector. 2 Press and hold in the following order each time the DSP SIMULATION button is pressed for the input channel. (Remote control unit) The surround mode switches in the matrix mode. The surround parameter switches in the SURROUND PARAMETER button to select the parameter you ...want to set in 15 steps from the remote control unit 1 Select the surround mode for the different surround modes. EFFECT LEVEL: This sets the strength of 0 to 110 ms only...
...then operate the selector. 2 Press and hold in the following order each time the DSP SIMULATION button is pressed for the input channel. (Remote control unit) The surround mode switches in the matrix mode. The surround parameter switches in the SURROUND PARAMETER button to select the parameter you ...want to set in 15 steps from the remote control unit 1 Select the surround mode for the different surround modes. EFFECT LEVEL: This sets the strength of 0 to 110 ms only...

Owners Manual
Page 32
..., 90.1 / 90.1 MHz 90.1 MHz 90.1 MHz 90.1 MHz 90.1 MHz 90.1 MHz Auto tuning Basic Operation 1 Set the input source to "TUNER". (Main unit) (Remote control unit) 2 Watching the display, press the BAND button to select the desired band (AM or FM). 3 Press the MODE button to tune in the...
..., 90.1 / 90.1 MHz 90.1 MHz 90.1 MHz 90.1 MHz 90.1 MHz 90.1 MHz Auto tuning Basic Operation 1 Set the input source to "TUNER". (Main unit) (Remote control unit) 2 Watching the display, press the BAND button to select the desired band (AM or FM). 3 Press the MODE button to tune in the...
Owners Manual
Page 34
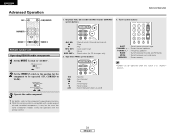
... buttons Advanced Operation MODE 1 MODE 2 Remote control unit Operating DENON audio components 1 Set the MODE 1 switch to the component's operating instructions. While this remote control is compatible with a wide range of infrared controlled components, it may be the case that some component models cannot be operated with this remote control. 6 : Rewind 7 : Fast-forward 2 : Stop...
... buttons Advanced Operation MODE 1 MODE 2 Remote control unit Operating DENON audio components 1 Set the MODE 1 switch to the component's operating instructions. While this remote control is compatible with a wide range of infrared controlled components, it may be the case that some component models cannot be operated with this remote control. 6 : Rewind 7 : Fast-forward 2 : Stop...
Owners Manual
Page 35
...Cursor up, down, left and right ENTER : Enter setting 3 Operate the component. To avoid accidental operation, cover the remote control unit's transmitting window while setting the preset memory. • Depending on /standby OFF : DENON DVD power off 6, 7 : Manual search (forward and reverse) 2 : Stop 1 : Play 8, 9 : ... codes. • Some manufacturers use different names for the DVD remote control buttons, so also refer to the component's operating instructions. Advanced Operation Preset memory • DENON and other makes of components can be operated by setting the preset...
...Cursor up, down, left and right ENTER : Enter setting 3 Operate the component. To avoid accidental operation, cover the remote control unit's transmitting window while setting the preset memory. • Depending on /standby OFF : DENON DVD power off 6, 7 : Manual search (forward and reverse) 2 : Stop 1 : Play 8, 9 : ... codes. • Some manufacturers use different names for the DVD remote control buttons, so also refer to the component's operating instructions. Advanced Operation Preset memory • DENON and other makes of components can be operated by setting the preset...
Owners Manual
Page 38
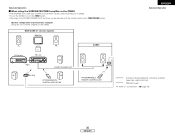
...playback devices are installed. (Refer to ZONE2 on the diagram below.) • ZONE2 speaker out and pre-out can be controlled from ZONE2 using the remote control unit. • For the AUDIO outputs, use the ZONE2 line output, turn on installation and operation of separately sold devices, refer to the ...back speaker out cannot be used for MAIN ZONE. • When a sold separately room-to-room remote control unit (DENON RC-616, 617 or 618) is wired and connected between the MAIN ZONE and ZONE2, the remote-controllable devices in the MAIN ZONE can be used when "ZONE2" is possible in the MAIN...
...playback devices are installed. (Refer to ZONE2 on the diagram below.) • ZONE2 speaker out and pre-out can be controlled from ZONE2 using the remote control unit. • For the AUDIO outputs, use the ZONE2 line output, turn on installation and operation of separately sold devices, refer to the ...back speaker out cannot be used for MAIN ZONE. • When a sold separately room-to-room remote control unit (DENON RC-616, 617 or 618) is wired and connected between the MAIN ZONE and ZONE2, the remote-controllable devices in the MAIN ZONE can be used when "ZONE2" is possible in the MAIN...
Owners Manual
Page 39
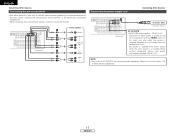
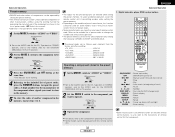
...; To use the ZONE2, turn on the ZONE2 button. • The output of the ZONE2 SPEAKER OUT terminals can be adjusted with the remote control unit's ZONE2 VOLUME button. [System configuration and connections example] Using this unit's internal amplifier as the ZONE2. MAIN ZONE 5.1-channel systems... Operation FL DVD player B Input C This unit FR SW ZONE2 SPEAKER OUT SL RC-616 SR SYSTEM REMOTE CONTROL UNIT RC-978 ZONE2 RC-617 PROGRAMMABLE REMOTE CONTROL UNIT : ROOM-TO-ROOM REMOTE CONTROL SYSTEM (separately sold) control line : SPEAKER cable Refer to "Connections" ( page 16). 36 ENGLISH...
...; To use the ZONE2, turn on the ZONE2 button. • The output of the ZONE2 SPEAKER OUT terminals can be adjusted with the remote control unit's ZONE2 VOLUME button. [System configuration and connections example] Using this unit's internal amplifier as the ZONE2. MAIN ZONE 5.1-channel systems... Operation FL DVD player B Input C This unit FR SW ZONE2 SPEAKER OUT SL RC-616 SR SYSTEM REMOTE CONTROL UNIT RC-978 ZONE2 RC-617 PROGRAMMABLE REMOTE CONTROL UNIT : ROOM-TO-ROOM REMOTE CONTROL SYSTEM (separately sold) control line : SPEAKER cable Refer to "Connections" ( page 16). 36 ENGLISH...


