Literature/Product Sheet
Page 1
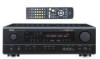
...channel sources with the exciting effects of home theater ambience. ■ Virtual Surround Mode Surround yourself with discrete power output devices on CD. ■ Cinema Equalizer The sound from movie sources recorded in stunning 5.1-channel surround playback...DENON's DSP acoustic environment simulation modes. The AVR-1603's Virtual Surround mode provides a dramatic psychoacoustic surround sound effect, using just one for each of DTS 5.1 channel music recordings available on all five speakers. Rock Arena 4. NEW MODEL I N F O R M A T I O N Dolby Digital and DTS A/V Receiver AVR...
...channel sources with the exciting effects of home theater ambience. ■ Virtual Surround Mode Surround yourself with discrete power output devices on CD. ■ Cinema Equalizer The sound from movie sources recorded in stunning 5.1-channel surround playback...DENON's DSP acoustic environment simulation modes. The AVR-1603's Virtual Surround mode provides a dramatic psychoacoustic surround sound effect, using just one for each of DTS 5.1 channel music recordings available on all five speakers. Rock Arena 4. NEW MODEL I N F O R M A T I O N Dolby Digital and DTS A/V Receiver AVR...
Literature/Product Sheet
Page 2
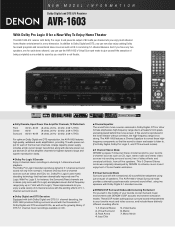
... - 107.9 MHz Usable sensitivity 1.0 µV (11.2 dBf) ■ AM Section Tuning frequency range...... 520 - 1710 kHz Usable sensitivity 18 µV ■ General Power supply AC 120 V, 60 Hz Power consumption 4.0 A Dimensions 434 (W) x 147 (H) x 417 (D) mm 17.1" (W) x 5.8" (H) x 16.4" (D) Weight 10.4 kg, 22.9 lbs Front panel with all...stored, for each program source, so that you do not need to select the mode again for all of DENON's high-grade A/V receiver, the AVR-1603 lets you adjust delay times and other parameters so that program. ■ Multi-Function Preset Memory Remote ...
... - 107.9 MHz Usable sensitivity 1.0 µV (11.2 dBf) ■ AM Section Tuning frequency range...... 520 - 1710 kHz Usable sensitivity 18 µV ■ General Power supply AC 120 V, 60 Hz Power consumption 4.0 A Dimensions 434 (W) x 147 (H) x 417 (D) mm 17.1" (W) x 5.8" (H) x 16.4" (D) Weight 10.4 kg, 22.9 lbs Front panel with all...stored, for each program source, so that you do not need to select the mode again for all of DENON's high-grade A/V receiver, the AVR-1603 lets you adjust delay times and other parameters so that program. ■ Multi-Function Preset Memory Remote ...
Owners Manual
Page 2
...in the set . • Ne pas mettre en contact des insecticides, du benzène et un diluant avec l'appareil. • Handle the power cord carefully. Tenir compte d'une dispersion de chaleur suffisante lors de l'installation sur une étagère. • Keep the set free ...dust. • Protéger l'appareil contre l'humidité, l'eau et la poussière. • Unplug the power cord when not using the set in any interference received, including interference that may be of sufficient magnitude to constitute a risk of electric shock to the presence of important operating and...
...in the set . • Ne pas mettre en contact des insecticides, du benzène et un diluant avec l'appareil. • Handle the power cord carefully. Tenir compte d'une dispersion de chaleur suffisante lors de l'installation sur une étagère. • Keep the set free ...dust. • Protéger l'appareil contre l'humidité, l'eau et la poussière. • Unplug the power cord when not using the set in any interference received, including interference that may be of sufficient magnitude to constitute a risk of electric shock to the presence of important operating and...

Owners Manual
Page 3
... Requiring Service - this product near water - Safety Check - The product should still fail to fit, contact your electrician to lightning and power-line surges. 17. All warnings on the marking label. Water and Moisture - in performance - and the like. 8. Outdoor Antenna Grounding... the operating instructions. FIGURE A EXAMPLE OF ANTENNA GROUNDING AS PER NATIONAL ELECTRICAL CODE GROUND CLAMP ELECTRIC SERVICE EQUIPMENT NEC - Power Lines - An outside antenna system should use a mounting accessory recommended by the manufacturer. 25. Adjust only those controls that...
... Requiring Service - this product near water - Safety Check - The product should still fail to fit, contact your electrician to lightning and power-line surges. 17. All warnings on the marking label. Water and Moisture - in performance - and the like. 8. Outdoor Antenna Grounding... the operating instructions. FIGURE A EXAMPLE OF ANTENNA GROUNDING AS PER NATIONAL ELECTRICAL CODE GROUND CLAMP ELECTRIC SERVICE EQUIPMENT NEC - Power Lines - An outside antenna system should use a mounting accessory recommended by the manufacturer. 25. Adjust only those controls that...
Owners Manual
Page 4
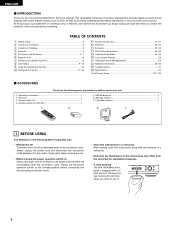
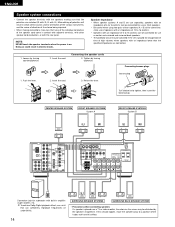
..., we recommend that before you begin hookup and operation that the following before proceeding. Always set for choosing the DENON A/V Surround receiver. AUX terminal The AVR-1604/684's front panel is provided with a V. AUX terminal. Remove the cap covering the terminal when you want ...Using 4 x Cautions on Installation 5 c Cautions on Check once again that all other audio components when moving the set. • Before turning the power operation switch on Handling 5 v Features...5 b Part Names and Functions 6, 7 n Read this unit: • Moving the set To prevent short ...
..., we recommend that before you begin hookup and operation that the following before proceeding. Always set for choosing the DENON A/V Surround receiver. AUX terminal The AVR-1604/684's front panel is provided with a V. AUX terminal. Remove the cap covering the terminal when you want ...Using 4 x Cautions on Installation 5 c Cautions on Check once again that all other audio components when moving the set. • Before turning the power operation switch on Handling 5 v Features...5 b Part Names and Functions 6, 7 n Read this unit: • Moving the set To prevent short ...
Owners Manual
Page 5
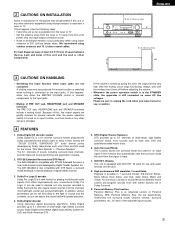
...for each of the separate input sources. 5 Always wait until the muting circuit turns off before adjusting the volume. • Whenever the power operation switch is in the STANDBY state, the apparatus is changed. 4 FEATURES 1. IN jacks This unit is a 6.1-channel surround format proposed... sound, including surround back channels, provide improved sound positioning and expression of space. 2. DTS-ES Extended Surround and DTS Neo:6 The AVR-1604/684 is connected to 5.1 channels of wide-range, high fidelity surround sound. High performance DSP simulates 7 sound fields Playback is an advanced...
...for each of the separate input sources. 5 Always wait until the muting circuit turns off before adjusting the volume. • Whenever the power operation switch is in the STANDBY state, the apparatus is changed. 4 FEATURES 1. IN jacks This unit is a 6.1-channel surround format proposed... sound, including surround back channels, provide improved sound positioning and expression of space. 2. DTS-ES Extended Surround and DTS Neo:6 The AVR-1604/684 is connected to 5.1 channels of wide-range, high fidelity surround sound. High performance DSP simulates 7 sound fields Playback is an advanced...
Owners Manual
Page 6
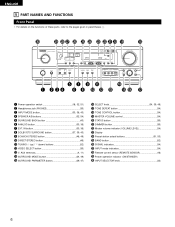
... AND FUNCTIONS Front Panel • For details on the functions of these parts, refer to the pages given in parentheses ( ). #0 @9 @8 @7 @6 @5 @4 @3 @2 @1 @0 !9 !8 t u o !1 !4 q w e r y i !0 !2 !3 !5 !6 !7 q Power operation switch 18, 32, 51) w Headphones jack (PHONES 35) e INPUT MODE button 33, 36, 43) r SPEAKER A/B buttons 32, 54) t SURROUND BACK button 43) y ANALOG button...buttons 51, 53) @5 BAND button 52) @6 SIGNAL indicators 34) @7 INPUT mode indicators 34) @8 Remote control sensor (REMOTE SENSOR 16) @9 Power operation indicator (ON/STANDBY) #0 INPUT SELECTOR knob 33) 6
... AND FUNCTIONS Front Panel • For details on the functions of these parts, refer to the pages given in parentheses ( ). #0 @9 @8 @7 @6 @5 @4 @3 @2 @1 @0 !9 !8 t u o !1 !4 q w e r y i !0 !2 !3 !5 !6 !7 q Power operation switch 18, 32, 51) w Headphones jack (PHONES 35) e INPUT MODE button 33, 36, 43) r SPEAKER A/B buttons 32, 54) t SURROUND BACK button 43) y ANALOG button...buttons 51, 53) @5 BAND button 52) @6 SIGNAL indicators 34) @7 INPUT mode indicators 34) @8 Remote control sensor (REMOTE SENSOR 16) @9 Power operation indicator (ON/STANDBY) #0 INPUT SELECTOR knob 33) 6
Owners Manual
Page 7
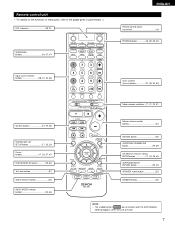
... of these parts, refer to the pages given in parentheses ( ). LED (indicator 28, 31) SURROUND buttons 34, 37, 47) ENGLISH Remote control signal transmitter 16) POWER buttons 18, 28~30, 32) Input source selector buttons 28~31, 33, 39) Tuner system/ System buttons 27, 30, 52, 53) System buttons 27, 29..., 38, 40) SURROUND BACK/ RETURN button 29, 43) SPEAKER select button 32) DIMMER button 35) NOTE: • The shaded buttons do not function with the AVR-1604/684. (Nothing happens when they are pressed.) 7
... of these parts, refer to the pages given in parentheses ( ). LED (indicator 28, 31) SURROUND buttons 34, 37, 47) ENGLISH Remote control signal transmitter 16) POWER buttons 18, 28~30, 32) Input source selector buttons 28~31, 33, 39) Tuner system/ System buttons 27, 30, 52, 53) System buttons 27, 29..., 38, 40) SURROUND BACK/ RETURN button 29, 43) SPEAKER select button 32) DIMMER button 35) NOTE: • The shaded buttons do not function with the AVR-1604/684. (Nothing happens when they are pressed.) 7

Owners Manual
Page 9
...Refer to page 14.) Connecting the AC OUTLETS AC OUTLETS • SWITCHED (total capacity - 120 W (1 A.)) The power to -room remote control unit (DENON RC-616, 617 or 618) is used independently without turning the power of this unit on and standby from the remote control unit. If this happens, turn on the... power of noise. • Use the AC OUTLETS for playback: Connect the tape deck's playback output ...
...Refer to page 14.) Connecting the AC OUTLETS AC OUTLETS • SWITCHED (total capacity - 120 W (1 A.)) The power to -room remote control unit (DENON RC-616, 617 or 618) is used independently without turning the power of this unit on and standby from the remote control unit. If this happens, turn on the... power of noise. • Use the AC OUTLETS for playback: Connect the tape deck's playback output ...
Owners Manual
Page 14
... this effect. If this should happen, move the speaker away to tighten, then insert the banana plug. NOTE: NEVER touch the speaker terminals when the power is played for subwoofer with the rear panel. Push the lever. 2. To achieve Dolby Digital playback effect, use a unit that none of the individual conductors...
... this effect. If this should happen, move the speaker away to tighten, then insert the banana plug. NOTE: NEVER touch the speaker terminals when the power is played for subwoofer with the rear panel. Push the lever. 2. To achieve Dolby Digital playback effect, use a unit that none of the individual conductors...
Owners Manual
Page 15
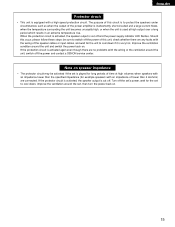
... the ventilation around the unit, switch off the power and contact a DENON service center. If the protection circuit is activated again... even though there are no problems with an impedance of lower than 4 Ω/ohms) are any faults with a high-speed protection circuit. Note on speaker impedance • The protector circuit may be sure to switch off the set , then turn the power...the unit to cool down if it is very hot. Turn off the power of this unit, check whether there are connected. When the protection circuit ...
... the ventilation around the unit, switch off the power and contact a DENON service center. If the protection circuit is activated again... even though there are no problems with an impedance of lower than 4 Ω/ohms) are any faults with a high-speed protection circuit. Note on speaker impedance • The protector circuit may be sure to switch off the set , then turn the power...the unit to cool down if it is very hot. Turn off the power of this unit, check whether there are connected. When the protection circuit ...
Owners Manual
Page 18
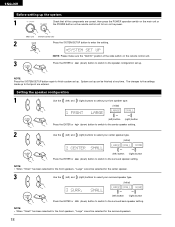
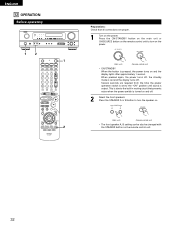
ENGLISH Before setting up the system 1 Check that point are correct, then press the POWER operation switch on the main unit or the POWER button on the remote control unit to turn on the power. (Main unit) (Remote control unit) 2 Press the SYSTEM SETUP button to enter the setting. *SYSTEM SET UP NOTE: Please...
ENGLISH Before setting up the system 1 Check that point are correct, then press the POWER operation switch on the main unit or the POWER button on the remote control unit to turn on the power. (Main unit) (Remote control unit) 2 Press the SYSTEM SETUP button to enter the setting. *SYSTEM SET UP NOTE: Please...
Owners Manual
Page 27
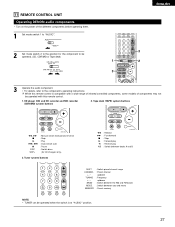
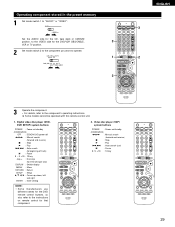
... operating them. 1 Set mode switch 1 to "AUDIO". 2 Set mode switch 2 to the position for CD changers only) 3. 11 REMOTE CONTROL UNIT Operating DENON audio components • Turn on the power of components may not be operated when the switch is compatible with this remote control is at "AUDIO" position. 27 Tape deck...
... operating them. 1 Set mode switch 1 to "AUDIO". 2 Set mode switch 2 to the position for CD changers only) 3. 11 REMOTE CONTROL UNIT Operating DENON audio components • Turn on the power of components may not be operated when the switch is compatible with this remote control is at "AUDIO" position. 27 Tape deck...
Owners Manual
Page 29
... Stop 1 : Play 8,9 : Auto search (cue) 3 : Pause 0~9, +10 : 10 key 29 Digital video disc player (DVD, DVD SETUP) system buttons POWER : Power on/standby (ON/SOURCE) OFF : DENON DVD power off 6,7 : Manual search (forward and reverse) 2 : Stop 1 : Play 8,9 : Auto search (to beginning of track) 3 : Pause 0 ~ 9, ... component stored in the preset memory 1 Set mode switch 1 to the component's operating instructions. Video disc player (VDP) system buttons POWER : Power on remote control for the DVD/VDP, DBS/CABLE, 3 VCR or TV position. 2 Set mode switch 2 to the component you...
... Stop 1 : Play 8,9 : Auto search (cue) 3 : Pause 0~9, +10 : 10 key 29 Digital video disc player (DVD, DVD SETUP) system buttons POWER : Power on/standby (ON/SOURCE) OFF : DENON DVD power off 6,7 : Manual search (forward and reverse) 2 : Stop 1 : Play 8,9 : Auto search (to beginning of track) 3 : Pause 0 ~ 9, ... component stored in the preset memory 1 Set mode switch 1 to the component's operating instructions. Video disc player (VDP) system buttons POWER : Power on remote control for the DVD/VDP, DBS/CABLE, 3 VCR or TV position. 2 Set mode switch 2 to the component you...
Owners Manual
Page 30
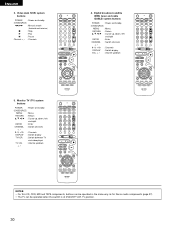
..., buttons can be operated in the same way as for Denon audio components (page 27). • The TV can be operated when the switch is at DVD/VDP, VCR, TV position. 30 Digital broadcast satellite (DBS) tuner and cable (CABLE) system buttons POWER : Power on /standby (ON/SOURCE) 6,7 : Manual search (forward and reverse...
..., buttons can be operated in the same way as for Denon audio components (page 27). • The TV can be operated when the switch is at DVD/VDP, VCR, TV position. 30 Digital broadcast satellite (DBS) tuner and cable (CABLE) system buttons POWER : Power on /standby (ON/SOURCE) 6,7 : Manual search (forward and reverse...
Owners Manual
Page 31
... set . 1 Set mode switch 1 to "VIDEO". 3 3 2 Set mode switch 2 to the component to be registered (DBS/CABLE or TV). 4 3 Press the DVD/VDP power button and the TV power button at the same time. 1 2 • Indicator flash. 4 1 2 3 4 5 6 7 8 9 0 Input the number of the component you to operate the PLAY, STOP, MANUAL SEARCH and...
... set . 1 Set mode switch 1 to "VIDEO". 3 3 2 Set mode switch 2 to the component to be registered (DBS/CABLE or TV). 4 3 Press the DVD/VDP power button and the TV power button at the same time. 1 2 • Indicator flash. 4 1 2 3 4 5 6 7 8 9 0 Input the number of the component you to operate the PLAY, STOP, MANUAL SEARCH and...
Owners Manual
Page 32
... on and off. 2 Select the front speakers. This is due to the built-in muting circuit that all connections are required from the time the power operation switch is set to the "ON" position until sound is set and the display turns off , the standby mode is output. Press the ON.../STANDBY button on the main unit or ON/SOURCE button on the remote control unit to turn on the power. (Main unit) (Remote control unit) • ON/STANDBY When the button is turned on and the display lights after approximately 1 second. Press the SPEAKER A or...
... on and off. 2 Select the front speakers. This is due to the built-in muting circuit that all connections are required from the time the power operation switch is set to the "ON" position until sound is set and the display turns off , the standby mode is output. Press the ON.../STANDBY button on the main unit or ON/SOURCE button on the remote control unit to turn on the power. (Main unit) (Remote control unit) • ON/STANDBY When the button is turned on and the display lights after approximately 1 second. Press the SPEAKER A or...

Owners Manual
Page 34
... provides higher quality sound. (Main unit) 34 DIGITAL ANALOG DIGITAL DIGITAL ANALOG The DIGITAL indicator lights when digital signals are correct and whether the component's power is displayed on . NOTE: • The DIGITAL indicator will light when playing CD-ROMs containing data other than audio signals, but no sound will be...
... provides higher quality sound. (Main unit) 34 DIGITAL ANALOG DIGITAL DIGITAL ANALOG The DIGITAL indicator lights when digital signals are correct and whether the component's power is displayed on . NOTE: • The DIGITAL indicator will light when playing CD-ROMs containing data other than audio signals, but no sound will be...

Owners Manual
Page 46
... the sound field. If you have a source component with a sampling frequency of expansion) processed for the input different sources. Use this to achieve a more realistic, powerful sound. These surround modes can be very noticeable. Signals consisting of the difference component of the input signals (the component that contain 24 bit, 96...
... the sound field. If you have a source component with a sampling frequency of expansion) processed for the input different sources. Use this to achieve a more realistic, powerful sound. These surround modes can be very noticeable. Signals consisting of the difference component of the input signals (the component that contain 24 bit, 96...
Owners Manual
Page 51
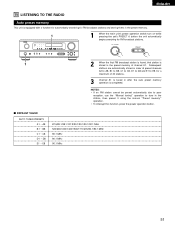
... unit is equipped with a function for automatically searching for FM broadcast stations and storing them in the preset memory. 1 1 When the main unit's power operation switch turn on while pressing the set's PRESET D button the unit automatically begins searching for a maximum of 40 stations. 3 Channel A1 is... preset memory operation is stored in the station, then preset it using the manual "Preset memory" operation. • To interrupt this function, press the power operation button. 2 DEFAULT VALUE AUTO TUNER PRESETS A1 ~ A8 B1 ~ B8 C1 ~ C8 D1 ~ D8 E1 ~ E8 87.5/89.1/98.1/107.9/...
... unit is equipped with a function for automatically searching for FM broadcast stations and storing them in the preset memory. 1 1 When the main unit's power operation switch turn on while pressing the set's PRESET D button the unit automatically begins searching for a maximum of 40 stations. 3 Channel A1 is... preset memory operation is stored in the station, then preset it using the manual "Preset memory" operation. • To interrupt this function, press the power operation button. 2 DEFAULT VALUE AUTO TUNER PRESETS A1 ~ A8 B1 ~ B8 C1 ~ C8 D1 ~ D8 E1 ~ E8 87.5/89.1/98.1/107.9/...


