User's Guide
Page 8
... other resources. To get back on track fast. Minimizing your printer's environmental impact even further. Wireless/network printers allow you 're satisfied. You can scan documents or photographs and save . Duplexing lets you print on both sides of the paper manually or automatically (depending on one side of a sheet of paper. • Print on both...
... other resources. To get back on track fast. Minimizing your printer's environmental impact even further. Wireless/network printers allow you 're satisfied. You can scan documents or photographs and save . Duplexing lets you print on both sides of the paper manually or automatically (depending on one side of a sheet of paper. • Print on both...
User's Guide
Page 21
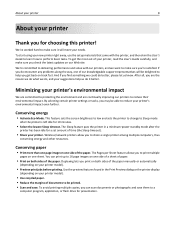
...three-second pause in progress. • Clear current settings or error messages, and return to previous settings. 16 Wi‑Fi indicator Check the wireless status of numbers. 12 Color Switch to color mode. 13 Black 14 Start Switch to black‑and‑white mode. Press the left or...in a fax number to view the last five numbers dialed. Dial the telephone number manually using the keypad before sending the fax. 11 Address Book Access fax numbers from a saved list of your printer. Using the printer control panel buttons and menus 21 Use 8 Redial 9 Pause 10 Dial Tone To ...
...three-second pause in progress. • Clear current settings or error messages, and return to previous settings. 16 Wi‑Fi indicator Check the wireless status of numbers. 12 Color Switch to color mode. 13 Black 14 Start Switch to black‑and‑white mode. Press the left or...in a fax number to view the last five numbers dialed. Dial the telephone number manually using the keypad before sending the fax. 11 Address Book Access fax numbers from a saved list of your printer. Using the printer control panel buttons and menus 21 Use 8 Redial 9 Pause 10 Dial Tone To ...
User's Guide
Page 28
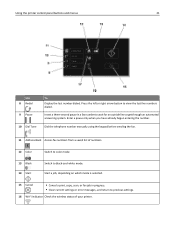
.... 3 Double-click the software installer package, and then follow the instructions on this computer before but need to : Applications > select your printer folder 3 Double‑click Uninstaller. 4 Follow the instructions on the computer screen. b In the Start Search or Run box, type D:\setup... 1 Close all open applications. 2 Insert the installation software CD. Using the Internet Updated printer software may be available at http://support.dell.com. If the installation dialog does not appear after a minute, then launch the CD manually: a Click , or click Start and then click Run.
.... 3 Double-click the software installer package, and then follow the instructions on this computer before but need to : Applications > select your printer folder 3 Double‑click Uninstaller. 4 Follow the instructions on the computer screen. b In the Start Search or Run box, type D:\setup... 1 Close all open applications. 2 Insert the installation software CD. Using the Internet Updated printer software may be available at http://support.dell.com. If the installation dialog does not appear after a minute, then launch the CD manually: a Click , or click Start and then click Run.
User's Guide
Page 45
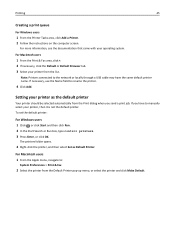
... the Default or Default Browser tab. 3 Select your printer as Default Printer. Setting your printer from the list. For Macintosh users 1 From the Apple menu, navigate to rename the printer. 4 Click Add. Note: Printers connected to the network or locally through a USB cable may have to manually select your operating system. Printing 45 Creating a print queue...
... the Default or Default Browser tab. 3 Select your printer as Default Printer. Setting your printer from the list. For Macintosh users 1 From the Apple menu, navigate to rename the printer. 4 Click Add. Note: Printers connected to the network or locally through a USB cable may have to manually select your operating system. Printing 45 Creating a print queue...
User's Guide
Page 53
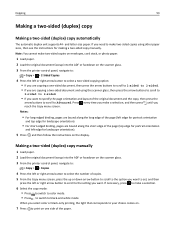
...other paper sizes, then see the instructions for landscape orientation). 5 Press , and then follow the instructions on the scanner glass. 3 From the printer control panel, navigate to make two‑sided copies on envelopes, card stock, or photo paper. 1 Load paper. 2 Load the original ... Copy > > Copies 4 Press the left edge for making a two‑sided copy manually. Making a two‑sided (duplex) copy manually 1 Load paper. 2 Load the original document faceup into the ADF or facedown on one ‑sided document, then press the arrow buttons to scroll to 1‑sided to Advanced...
...other paper sizes, then see the instructions for landscape orientation). 5 Press , and then follow the instructions on the scanner glass. 3 From the printer control panel, navigate to make two‑sided copies on envelopes, card stock, or photo paper. 1 Load paper. 2 Load the original ... Copy > > Copies 4 Press the left edge for making a two‑sided copy manually. Making a two‑sided (duplex) copy manually 1 Load paper. 2 Load the original document faceup into the ADF or facedown on one ‑sided document, then press the arrow buttons to scroll to 1‑sided to Advanced...
User's Guide
Page 56
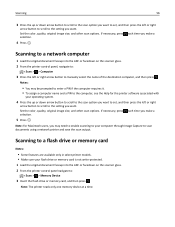
...8209;protected. 1 Load the original document faceup into the ADF or facedown on the scanner glass. 2 From the printer control panel navigate to the setting you want. Note: The printer reads only one memory device at a time. If necessary, press each time you make a selection. 5 Press . Scanning to... through Image Capture to manually select the name of the destination computer, and then press . If necessary, press each time you make a selection. 4 Press . Scanning to a flash drive or memory card Notes: • Some features are available only in select printer models. • Make...
...8209;protected. 1 Load the original document faceup into the ADF or facedown on the scanner glass. 2 From the printer control panel navigate to the setting you want. Note: The printer reads only one memory device at a time. If necessary, press each time you make a selection. 5 Press . Scanning to... through Image Capture to manually select the name of the destination computer, and then press . If necessary, press each time you make a selection. 4 Press . Scanning to a flash drive or memory card Notes: • Some features are available only in select printer models. • Make...
User's Guide
Page 58
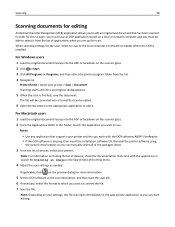
... applicable, click on the scanner glass. 2 From the Applications folder in the appropriate application so you can manually select all of the packages listed. 3 From the list of devices, select your printer and lets you work , you can start the scan job. 6 If necessary, select the format to ... the scan is missing, then insert the installation software CD. The file will be converted into a format that has been scanned. Reinstall the printer software using the custom install option so you must be edited. 6 Open the document in the Search field of applications when you to edit ...
... applicable, click on the scanner glass. 2 From the Applications folder in the appropriate application so you can manually select all of the packages listed. 3 From the list of devices, select your printer and lets you work , you can start the scan job. 6 If necessary, select the format to ... the scan is missing, then insert the installation software CD. The file will be converted into a format that has been scanned. Reinstall the printer software using the custom install option so you must be edited. 6 Open the document in the Search field of applications when you to edit ...
User's Guide
Page 65
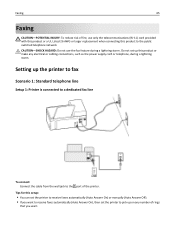
... receive faxes automatically (Auto Answer On) or manually (Auto Answer Off). • If you want. Tips for this setup: • You can set the printer to pick up on any electrical or cabling connections, such as the power supply cord or telephone, during a lightning storm. Faxing 65 ...Faxing CAUTION-POTENTIAL INJURY: To reduce risk of the printer. Setting up this product to the port of fire, use the fax feature during a lightning storm. CAUTION-SHOCK HAZARD: Do not use only ...
... receive faxes automatically (Auto Answer On) or manually (Auto Answer Off). • If you want. Tips for this setup: • You can set the printer to pick up on any electrical or cabling connections, such as the power supply cord or telephone, during a lightning storm. Faxing 65 ...Faxing CAUTION-POTENTIAL INJURY: To reduce risk of the printer. Setting up this product to the port of fire, use the fax feature during a lightning storm. CAUTION-SHOCK HAZARD: Do not use only ...
User's Guide
Page 68
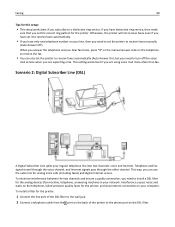
..., and Internet signals pass through the other channel. Otherwise, the printer will not receive faxes even if you have set it to receive faxes manually (Auto Answer Off). When you answer the telephone and you hear fax tones, press *9* or the manual answer code on the telephone to receive the fax. • ... then make sure that you set the correct ring pattern for the printer. Faxing 68 Tips for this setup: • This setup works best if you subscribe to the phone port on the DSL filter. If you have only one telephone number on your regular telephone line into two channels: voice and...
..., and Internet signals pass through the other channel. Otherwise, the printer will not receive faxes even if you have set it to receive faxes manually (Auto Answer Off). When you answer the telephone and you hear fax tones, press *9* or the manual answer code on the telephone to receive the fax. • ... then make sure that you set the correct ring pattern for the printer. Faxing 68 Tips for this setup: • This setup works best if you subscribe to the phone port on the DSL filter. If you have only one telephone number on your regular telephone line into two channels: voice and...
User's Guide
Page 76
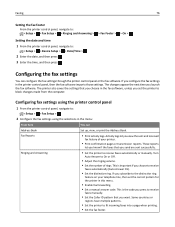
... you want. This is important if you configure the fax settings in this menu. • Enable fax forwarding. • Set a manual answer code. Faxing 76 Setting the fax footer From the printer control panel, navigate to: > Setup > > Fax Setup > > Ringing and Answering > > Fax Footer > > On > Setting the ...sent and received fax history of rings. This is the code you send are sent successfully. The printer also saves the settings that you press to receive faxes automatically or manually. Configuring the fax settings You can Address Book Set up, view, or print the Address Book....
... you want. This is important if you configure the fax settings in this menu. • Enable fax forwarding. • Set a manual answer code. Faxing 76 Setting the fax footer From the printer control panel, navigate to: > Setup > > Fax Setup > > Ringing and Answering > > Fax Footer > > On > Setting the ...sent and received fax history of rings. This is the code you send are sent successfully. The printer also saves the settings that you press to receive faxes automatically or manually. Configuring the fax settings You can Address Book Set up, view, or print the Address Book....
User's Guide
Page 78
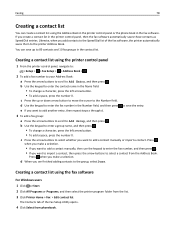
... Speed Dial entries. c Press the arrow buttons to select whether you want to Add Entry, and then press . Creating a contact list using the printer control panel 1 From the printer control panel, navigate to: > Setup > > Fax Setup > > Address Book > 2 To add a fax number to your Address Book: a Press ...the arrow buttons to scroll to add a contact manually or import a contact. to save up or down arrow button to move the cursor to the Number ...
... Speed Dial entries. c Press the arrow buttons to select whether you want to Add Entry, and then press . Creating a contact list using the printer control panel 1 From the printer control panel, navigate to: > Setup > > Fax Setup > > Address Book > 2 To add a fax number to your Address Book: a Press ...the arrow buttons to scroll to add a contact manually or import a contact. to save up or down arrow button to move the cursor to the Number ...
User's Guide
Page 80
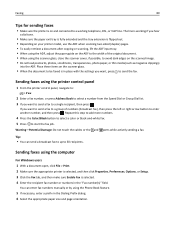
...panel 1 From the printer control panel, navigate to: > Fax 2 Enter a fax number, or press Address Book to select a number from the Speed Dial or Group Dial list. 3 If you want to send a fax to a single recipient, then press . Tip: • You can enter fax numbers manually or by using the... scanner glass, close the scanner cover, if possible, to send the fax. Faxing 80 Tips for sending faxes • Make sure the printer is on and connected to 30 recipients. Sending faxes using the computer...
...panel 1 From the printer control panel, navigate to: > Fax 2 Enter a fax number, or press Address Book to select a number from the Speed Dial or Group Dial list. 3 If you want to send a fax to a single recipient, then press . Tip: • You can enter fax numbers manually or by using the... scanner glass, close the scanner cover, if possible, to send the fax. Faxing 80 Tips for sending faxes • Make sure the printer is on and connected to 30 recipients. Sending faxes using the computer...
User's Guide
Page 81
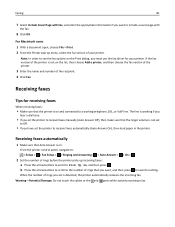
...: a Press the arrow buttons to scroll to : > Setup > > Fax Setup > > Ringing and Answering > > Auto Answer > > On > 2 Set the number of rings before the printer picks up menu, select the fax version of rings you set is on and connected to receive faxes automatically (Auto Answer On), then load paper...ringer volume is not set to Off. • If you have set the printer to a working if you hear a dial tone. • If you set the printer to receive faxes manually (Auto Answer Off), then make sure that the printer is working telephone, DSL, or VoIP line. Note: In order to save ...
...: a Press the arrow buttons to scroll to : > Setup > > Fax Setup > > Ringing and Answering > > Auto Answer > > On > 2 Set the number of rings before the printer picks up menu, select the fax version of rings you set is on and connected to receive faxes automatically (Auto Answer On), then load paper...ringer volume is not set to Off. • If you have set the printer to a working if you hear a dial tone. • If you set the printer to receive faxes manually (Auto Answer Off), then make sure that the printer is working telephone, DSL, or VoIP line. Note: In order to save ...
User's Guide
Page 82
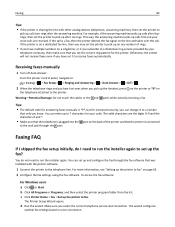
..., or if you subscribe to a distinctive ring service provided by your connection. You can change it to receive faxes automatically. Receiving faxes manually 1 Turn off Auto Answer: From the printer control panel, navigate to: > Setup > > Fax Setup > > Ringing and Answering > > Auto Answer > > Off > 2 ...not touch the cables or the and ports while actively receiving a fax. Tips: • The default code for answering faxes manually is *9*, but for the printer. The Printer Setup Wizard opens. To access the fax software: For Windows users a Click or Start. If the call is a fax...
..., or if you subscribe to a distinctive ring service provided by your connection. You can change it to receive faxes automatically. Receiving faxes manually 1 Turn off Auto Answer: From the printer control panel, navigate to: > Setup > > Fax Setup > > Ringing and Answering > > Auto Answer > > Off > 2 ...not touch the cables or the and ports while actively receiving a fax. Tips: • The default code for answering faxes manually is *9*, but for the printer. The Printer Setup Wizard opens. To access the fax software: For Windows users a Click or Start. If the call is a fax...
User's Guide
Page 85
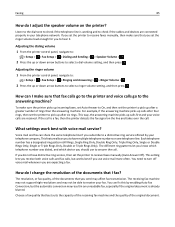
...number was dialed, and which device you send may not be able to receive faxes manually (Auto Answer Off). If you to have distinctive ring service, then set the printer to receive faxes manually, then make sure that you should use voice mail more often. Adjusting the dialing ...volume 1 From the printer control panel, navigate to the answering machine? If the call is already blurred. You can share the same telephone line if you do not have multiple telephone numbers on one...
...number was dialed, and which device you send may not be able to receive faxes manually (Auto Answer Off). If you to have distinctive ring service, then set the printer to receive faxes manually, then make sure that you should use voice mail more often. Adjusting the dialing ...volume 1 From the printer control panel, navigate to the answering machine? If the call is already blurred. You can share the same telephone line if you do not have multiple telephone numbers on one...
User's Guide
Page 91
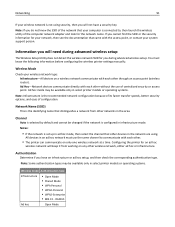
... 802.1X ‑ RADIUS Ad hoc Open Mode Networking 91 If your wireless network is not using . If you will keep it from other . • The printer can communicate on only one wireless network at a time. Ad Hoc-Network devices communicate directly with each other...Note: If you do not know the following information before configuring the wireless printer settings manually: Wireless Mode Check your wireless network type: Infrastructure-All devices on any other devices in infrastructure mode. Configuring the printer for you have a security key. Notes: • If the network...
... 802.1X ‑ RADIUS Ad hoc Open Mode Networking 91 If your wireless network is not using . If you will keep it from other . • The printer can communicate on only one wireless network at a time. Ad Hoc-Network devices communicate directly with each other...Note: If you do not know the following information before configuring the wireless printer settings manually: Wireless Mode Check your wireless network type: Infrastructure-All devices on any other devices in infrastructure mode. Configuring the printer for you have a security key. Notes: • If the network...
User's Guide
Page 92
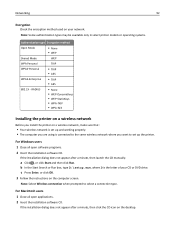
...does not appear after a minute, then click the CD icon on a wireless network, make sure that: • Your wireless network is set up and working properly. • The computer you want to set up the printer. For Macintosh users 1 Close all open applications. 2 Insert the installation... software CD. If the installation dialog does not appear after a minute, then launch the CD manually: a Click ,...
...does not appear after a minute, then click the CD icon on a wireless network, make sure that: • Your wireless network is set up and working properly. • The computer you want to set up the printer. For Macintosh users 1 Close all open applications. 2 Insert the installation... software CD. If the installation dialog does not appear after a minute, then launch the CD manually: a Click ,...
User's Guide
Page 93
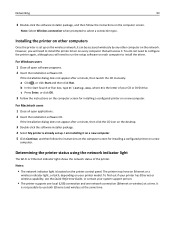
...‑Fi or Ethernet indicator light shows the network status of your system support person. • The printer supports one local (USB) connection and one network connection (Ethernet or wireless) at the same time. If the installation dialog does not appear after a minute, then click the... If the installation dialog does not appear after a minute, then launch the CD manually: a Click , or click Start and then click Run. The printer may have an Ethernet or a wireless indicator light, or both Ethernet and wireless at a time. I am installing it on a new computer. 5 Click Continue,...
...‑Fi or Ethernet indicator light shows the network status of your system support person. • The printer supports one local (USB) connection and one network connection (Ethernet or wireless) at the same time. If the installation dialog does not appear after a minute, then click the... If the installation dialog does not appear after a minute, then launch the CD manually: a Click , or click Start and then click Run. The printer may have an Ethernet or a wireless indicator light, or both Ethernet and wireless at a time. I am installing it on a new computer. 5 Click Continue,...
User's Guide
Page 97
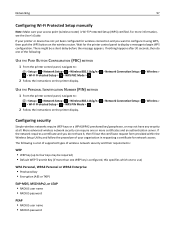
...RADIUS user name • RADIUS password Networking 97 Configuring Wi‑Fi Protected Setup manually Note: Make sure your access point (wireless router) is configured, this specifies which one or more certificates and an authentication server. If your organization in requesting a certificate...PBC) METHOD 1 From the printer control panel, navigate to: > Setup > > Network Setup > > Wireless 802.11b/g/n > > Wi‑Fi Protected Setup > > WPS PBC Mode > 2 Follow the instructions on the wireless router. More‑advanced wireless network security can require one to configure it , then...
...RADIUS user name • RADIUS password Networking 97 Configuring Wi‑Fi Protected Setup manually Note: Make sure your access point (wireless router) is configured, this specifies which one or more certificates and an authentication server. If your organization in requesting a certificate...PBC) METHOD 1 From the printer control panel, navigate to: > Setup > > Network Setup > > Wireless 802.11b/g/n > > Wi‑Fi Protected Setup > > WPS PBC Mode > 2 Follow the instructions on the wireless router. More‑advanced wireless network security can require one to configure it , then...
User's Guide
Page 104
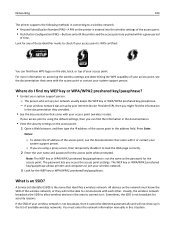
... to it or contact your system support person. - Networking 104 The printer supports the following methods in connecting to a wireless network: • Personal Identification Number (PIN)-A PIN on the printer is entered into the wireless settings of the access point. • Push Button Configuration (PBC)-Buttons...key/passphrase. - If you might find the information in this situation. All devices on the network must enter the network information manually in the documentation. • View the security settings on the side, back, or top of the access point in the documentation...
... to it or contact your system support person. - Networking 104 The printer supports the following methods in connecting to a wireless network: • Personal Identification Number (PIN)-A PIN on the printer is entered into the wireless settings of the access point. • Push Button Configuration (PBC)-Buttons...key/passphrase. - If you might find the information in this situation. All devices on the network must enter the network information manually in the documentation. • View the security settings on the side, back, or top of the access point in the documentation...

