User's Guide
Page 3
... Ordering and replacing supplies 14 Ordering ink cartridges...14 Replacing ink cartridges...15 Recycling Dell products...16 Using the printer control panel buttons and menus 18 Replacing the language sheet...18 Using the printer control panel...20 Changing the Sleep timeout...22 Saving paper and energy...22 Restoring factory default settings...22 Using the...
... Ordering and replacing supplies 14 Ordering ink cartridges...14 Replacing ink cartridges...15 Recycling Dell products...16 Using the printer control panel buttons and menus 18 Replacing the language sheet...18 Using the printer control panel...20 Changing the Sleep timeout...22 Saving paper and energy...22 Restoring factory default settings...22 Using the...
User's Guide
Page 4
...Tips for printing...34 Printing basic documents...34 Printing on specialty media...37 Working with photos...39 Printing on both sides of the paper (duplexing 42 Managing print jobs...44 Copying...49 Tips for copying...49 Making copies...49 Copying an ID card...50 Enlarging or reducing ...images...50 Adjusting copy quality...50 Making a copy lighter or darker...51 Collating copies using the printer control panel 51 Placing separator sheets between copies 51 Copying multiple pages on one sheet...52 Placing an overlay message on each page 52 Removing the background of a copy...52 ...
...Tips for printing...34 Printing basic documents...34 Printing on specialty media...37 Working with photos...39 Printing on both sides of the paper (duplexing 42 Managing print jobs...44 Copying...49 Tips for copying...49 Making copies...49 Copying an ID card...50 Enlarging or reducing ...images...50 Adjusting copy quality...50 Making a copy lighter or darker...51 Collating copies using the printer control panel 51 Placing separator sheets between copies 51 Copying multiple pages on one sheet...52 Placing an overlay message on each page 52 Removing the background of a copy...52 ...
User's Guide
Page 8
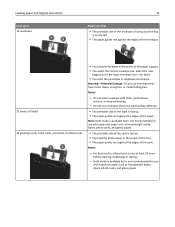
... screen brightness to low and sets the printer to change to Sleep mode after the printer has been idle for 10 minutes. • Select the lowest Sleep timeout. Conserving paper • Print more than one page image on your printer model). • Preview print jobs before.... Wireless/network printers allow you for presentation. We've worked hard to a computer program, application, or flash drive for choosing this printer! By selecting certain printer settings or tasks, you check the latest updates on both sides of the paper manually or automatically (depending on one of paper....
... screen brightness to low and sets the printer to change to Sleep mode after the printer has been idle for 10 minutes. • Select the lowest Sleep timeout. Conserving paper • Print more than one page image on your printer model). • Preview print jobs before.... Wireless/network printers allow you for presentation. We've worked hard to a computer program, application, or flash drive for choosing this printer! By selecting certain printer settings or tasks, you check the latest updates on both sides of the paper manually or automatically (depending on one of paper....
User's Guide
Page 9
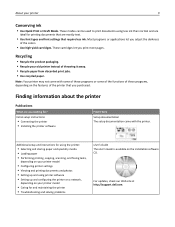
...8226; Recycle your printer 9 Conserving ink • Use Quick Print or Draft Mode. Note: Your printer may not come with the printer. For updates, check our Web site at http://support.dell.com. Finding information about the printer Publications What are you...8226; Connecting the printer • Installing the printer software Find it away. • Recycle paper from discarded print jobs. • Use recycled paper. Additional setup and instructions for using the printer: • Selecting and storing paper and specialty media • Loading paper • Performing printing...
...8226; Recycle your printer 9 Conserving ink • Use Quick Print or Draft Mode. Note: Your printer may not come with the printer. For updates, check our Web site at http://support.dell.com. Finding information about the printer Publications What are you...8226; Connecting the printer • Installing the printer software Find it away. • Recycle paper from discarded print jobs. • Use recycled paper. Additional setup and instructions for using the printer: • Selecting and storing paper and specialty media • Loading paper • Performing printing...
User's Guide
Page 11
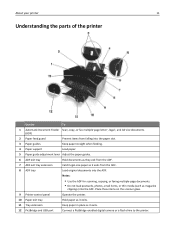
... (such as it exits. 12 PictBridge and USB port Connect a PictBridge-enabled digital camera or a flash drive to the printer. Place these items on the scanner glass. 9 Printer control panel Operate the printer. 10 Paper exit tray Hold paper as it exits from the ADF. 8 ADF tray Load original documents into the ADF. About your...
... (such as it exits. 12 PictBridge and USB port Connect a PictBridge-enabled digital camera or a flash drive to the printer. Place these items on the scanner glass. 9 Printer control panel Operate the printer. 10 Paper exit tray Hold paper as it exits from the ADF. 8 ADF tray Load original documents into the ADF. About your...

User's Guide
Page 12
... Use this port if you to access the phone line to send and receive faxes. 19 Power supply with port Connect the printer to the width of paper. • Clear paper jams. 21 Printhead access area Install the printhead. Note: The carrier moves to a computer using a USB cable. Connect the... printer to the printhead access area when no printhead is supported in your printer Use the 13 ADF paper guide 12 To Keep paper straight when feeding it into the ADF. About your country or region.
... Use this port if you to access the phone line to send and receive faxes. 19 Power supply with port Connect the printer to the width of paper. • Clear paper jams. 21 Printhead access area Install the printhead. Note: The carrier moves to a computer using a USB cable. Connect the... printer to the printhead access area when no printhead is supported in your printer Use the 13 ADF paper guide 12 To Keep paper straight when feeding it into the ADF. About your country or region.

User's Guide
Page 13
About your printer 13 Use the To 22 Jam clearance cover Access and clear paper jams. 23 Ink cartridge access area Install, replace, or remove ink cartridges. 24 Scanner unit • Access the ink cartridges and printhead. • Clear paper jams.
About your printer 13 Use the To 22 Jam clearance cover Access and clear paper jams. 23 Ink cartridge access area Install, replace, or remove ink cartridges. 24 Scanner unit • Access the ink cartridges and printhead. • Clear paper jams.
User's Guide
Page 18
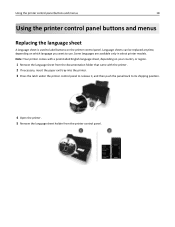
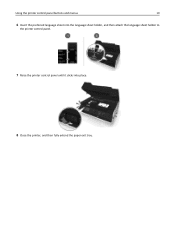
... sheet from the documentation folder that came with a preinstalled English language sheet, depending on the printer control panel. Note: Your printer comes with the printer. 2 If necessary, insert the paper exit tray into the printer. 3 Press the latch under the printer control panel to release it, and then push the panel back to use. Language sheets...
... sheet from the documentation folder that came with a preinstalled English language sheet, depending on the printer control panel. Note: Your printer comes with the printer. 2 If necessary, insert the paper exit tray into the printer. 3 Press the latch under the printer control panel to release it, and then push the panel back to use. Language sheets...
User's Guide
Page 19
Using the printer control panel buttons and menus 19 6 Insert the preferred language sheet into the language sheet holder, and then attach the language sheet holder to the printer control panel. 7 Raise the printer control panel until it clicks into place. 8 Close the printer, and then fully extend the paper exit tray.
Using the printer control panel buttons and menus 19 6 Insert the preferred language sheet into the language sheet holder, and then attach the language sheet holder to the printer control panel. 7 Raise the printer control panel until it clicks into place. 8 Close the printer, and then fully extend the paper exit tray.
User's Guide
Page 22
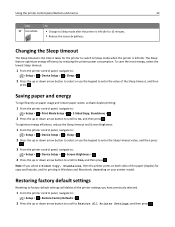
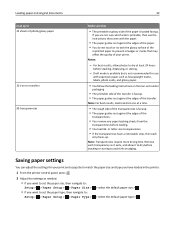
...efficiency, reduce the Sleep timeout and Screen Brightness: 1 From the printer control panel, navigate to: > Setup > > Device Setup > > Sleep > 2 Press the up or down arrow button to select or use the keypad to enter the value of the paper (duplex) for copy and fax jobs, and for printing in ...Windows and Macintosh, depending on your printer model. Restoring factory default settings Resetting to factory default settings will delete all the...
...efficiency, reduce the Sleep timeout and Screen Brightness: 1 From the printer control panel, navigate to: > Setup > > Device Setup > > Sleep > 2 Press the up or down arrow button to select or use the keypad to enter the value of the paper (duplex) for copy and fax jobs, and for printing in ...Windows and Macintosh, depending on your printer model. Restoring factory default settings Resetting to factory default settings will delete all the...
User's Guide
Page 26
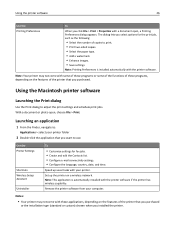
... Printing Preferences is automatically installed with the printer software if the printer has wireless capability. Using the Macintosh printer software Launching the Print dialog Use the Print dialog to use. Use the Printer Settings Shortcuts Wireless Setup Assistant Uninstaller To • Customize ... these applications, depending on a wireless network. Note: This application is installed automatically with your computer. Speed up the printer on the features of copies to print. • Print two‑sided copies. • Select the paper type. • Add a watermark...
... Printing Preferences is automatically installed with the printer software if the printer has wireless capability. Using the Macintosh printer software Launching the Print dialog Use the Print dialog to use. Use the Printer Settings Shortcuts Wireless Setup Assistant Uninstaller To • Customize ... these applications, depending on a wireless network. Note: This application is installed automatically with your computer. Speed up the printer on the features of copies to print. • Print two‑sided copies. • Select the paper type. • Add a watermark...
User's Guide
Page 29
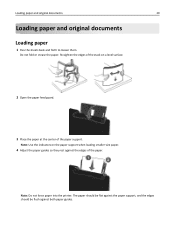
... not force paper into the printer. The paper should be flat against the paper support, and the edges should be flush against the edges of the paper support. Do not fold or crease the paper. Note: Use the indicators on a level surface. 2 Open the paper feed guard. 3 Place the paper at the center of the paper. Straighten the edges...
... not force paper into the printer. The paper should be flat against the paper support, and the edges should be flush against the edges of the paper support. Do not fold or crease the paper. Note: Use the indicators on a level surface. 2 Open the paper feed guard. 3 Place the paper at the center of the paper. Straighten the edges...
User's Guide
Page 30
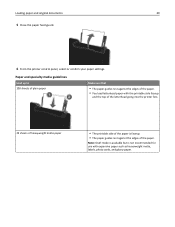
... original documents 30 5 Close the paper feed guard. 6 From the printer control panel, select or confirm your paper settings. Paper and specialty media guidelines Load up to 100 sheets of plain paper Make sure that • The paper guides rest against the edges of the paper. • You load letterhead paper with expensive paper such as heavyweight matte, labels...
... original documents 30 5 Close the paper feed guard. 6 From the printer control panel, select or confirm your paper settings. Paper and specialty media guidelines Load up to 100 sheets of plain paper Make sure that • The paper guides rest against the edges of the paper. • You load letterhead paper with expensive paper such as heavyweight matte, labels...
User's Guide
Page 31
... card is not recommended for use envelopes that • The printable side of the envelope is faceup and the flap is faceup. • The paper guides rest against the edges of the envelopes. 25 sheets of labels 25 greeting cards, index cards, postcards, or photo cards • You load... the envelope in the center of the paper. Warning-Potential Damage: Do not use with holes, perforations, cutouts, or deep embossing. - For best results, allow photos to 10 envelopes 31 Make ...
... card is not recommended for use envelopes that • The printable side of the envelope is faceup and the flap is faceup. • The paper guides rest against the edges of the envelopes. 25 sheets of labels 25 greeting cards, index cards, postcards, or photo cards • You load... the envelope in the center of the paper. Warning-Potential Damage: Do not use with holes, perforations, cutouts, or deep embossing. - For best results, allow photos to 10 envelopes 31 Make ...
User's Guide
Page 32
Note: For best results, load transfers one at least 24 hours before stacking or storing to 25 sheets of photo/glossy paper 10 iron‑on transfer packaging. • The printable side of the transfer is loaded faceup. Note: ...paper to : Setup > > Paper Setup > > Paper Type > > select the default paper size > > select the default paper type > For best results, allow it to dry at a time. • The rough side of the transparencies is not recommended for your prints. or letter-size transparencies. • If the transparencies have loaded in the printer. 1 From the printer...
Note: For best results, load transfers one at least 24 hours before stacking or storing to 25 sheets of photo/glossy paper 10 iron‑on transfer packaging. • The printable side of the transfer is loaded faceup. Note: ...paper to : Setup > > Paper Setup > > Paper Type > > select the default paper size > > select the default paper type > For best results, allow it to dry at a time. • The rough side of the transparencies is not recommended for your prints. or letter-size transparencies. • If the transparencies have loaded in the printer. 1 From the printer...
User's Guide
Page 33
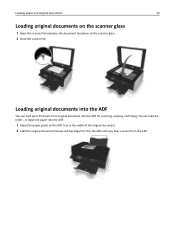
You can load up to the width of an original document into the ADF until you hear a sound from the ADF. Loading paper and original documents 33 Loading original documents on the scanner glass 1 Open the scanner lid and place the document facedown on the ADF tray to ... into the ADF for scanning, copying, and faxing. Loading original documents into the ADF You can load A4‑, letter‑, or legal‑size paper into the ADF. 1 Adjust the paper guide on the scanner glass. 2 Close the scanner lid.
You can load up to the width of an original document into the ADF until you hear a sound from the ADF. Loading paper and original documents 33 Loading original documents on the scanner glass 1 Open the scanner lid and place the document facedown on the ADF tray to ... into the ADF for scanning, copying, and faxing. Loading original documents into the ADF You can load A4‑, letter‑, or legal‑size paper into the ADF. 1 Adjust the paper guide on the scanner glass. 2 Close the scanner lid.
User's Guide
Page 34
... copies of a document, you can choose to print each sheet as a set the printer, paper size, and orientation. 3 Click OK. 4 From the menu bar, choose File > Print. 5 From the Printer pop‑up menu, choose your printer. 6 From the print options menu, choose the print quality, the number of copies ...to print, the type of paper to use , and how the pages should print. 7 Click Print. Printing 34 Printing...
... copies of a document, you can choose to print each sheet as a set the printer, paper size, and orientation. 3 Click OK. 4 From the menu bar, choose File > Print. 5 From the Printer pop‑up menu, choose your printer. 6 From the print options menu, choose the print quality, the number of copies ...to print, the type of paper to use , and how the pages should print. 7 Click Print. Printing 34 Printing...
User's Guide
Page 35
.... 2 Click Properties, Preferences, Options, or Setup. 3 Navigate to close any printer software dialogs. 6 Click OK or Print. For Windows users 1 With a document open , choose File > Page Setup. 2 From the Page Setup dialog, set the printer, paper size, and orientation. 3 Click OK. 4 From the menu bar, choose File... > Print. 5 From the Printer pop‑up menu, choose your printer. 6 From the Copies area, enter the number of copies that you want ...
.... 2 Click Properties, Preferences, Options, or Setup. 3 Navigate to close any printer software dialogs. 6 Click OK or Print. For Windows users 1 With a document open , choose File > Page Setup. 2 From the Page Setup dialog, set the printer, paper size, and orientation. 3 Click OK. 4 From the menu bar, choose File... > Print. 5 From the Printer pop‑up menu, choose your printer. 6 From the Copies area, enter the number of copies that you want ...
User's Guide
Page 36
... open, choose File > Page Setup. 2 From the Page Setup dialog, set the printer, paper size, and orientation. 3 Click OK. 4 From the menu bar, choose File > Print. 5 From the Printer pop‑up menu, choose your printer. 6 From the print options pop‑up menu, choose Layout. 7 From the ...• To print the last page first, choose Reverse. 8 Click Print. Printing multiple pages on one sheet For Windows users 1 With a document open , choose File > Page Setup. 2 From the Page Setup dialog, set the printer, paper size, and orientation. 3 Click OK. 4 From the menu bar, choose File > Print. ...
... open, choose File > Page Setup. 2 From the Page Setup dialog, set the printer, paper size, and orientation. 3 Click OK. 4 From the menu bar, choose File > Print. 5 From the Printer pop‑up menu, choose your printer. 6 From the print options pop‑up menu, choose Layout. 7 From the ...• To print the last page first, choose Reverse. 8 Click Print. Printing multiple pages on one sheet For Windows users 1 With a document open , choose File > Page Setup. 2 From the Page Setup dialog, set the printer, paper size, and orientation. 3 Click OK. 4 From the menu bar, choose File > Print. ...
User's Guide
Page 37
... menu bar, choose File > Print. 6 From the Printer pop‑up menu, choose your printer. 7 Click Print. Printing on specialty media Printing envelopes For Windows users 1 With a document open , choose File > Page Setup. 2 From the "Format for" pop‑up menu, choose your printer. 3 From the Paper Size pop‑up menu, choose your...
... menu bar, choose File > Print. 6 From the Printer pop‑up menu, choose your printer. 7 Click Print. Printing on specialty media Printing envelopes For Windows users 1 With a document open , choose File > Page Setup. 2 From the "Format for" pop‑up menu, choose your printer. 3 From the Paper Size pop‑up menu, choose your...


