Quick Start Guide
Page 1
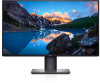
... 2 4 USB DP HDMI USB Type-C (5 V/3 A) USB Type-C USB Type-C i 1 3 2 i Dell.com/U2720Q Dell.com/U2720QM 746.05C02.0001 (DELL P/N:583K5 rev.A00) HDMI DP USB Type-C 5 6 © 2020 Dell Inc. In addition, a tighter grey-scale tracking on each U2720Q helps enable ultra-smooth color gradation. Please retain...and for your reference as Dell is displayed onscreen. CN00WG2J7444572B046L Tester 2008L0415 Test CA-210/CA-310 Equipment CA-2000S Chroma 2326/2235/2233 Avg. The factory measurements from this Report for this new Dell U2720Q UltraSharp monitor. Delta E ≤ 2...
... 2 4 USB DP HDMI USB Type-C (5 V/3 A) USB Type-C USB Type-C i 1 3 2 i Dell.com/U2720Q Dell.com/U2720QM 746.05C02.0001 (DELL P/N:583K5 rev.A00) HDMI DP USB Type-C 5 6 © 2020 Dell Inc. In addition, a tighter grey-scale tracking on each U2720Q helps enable ultra-smooth color gradation. Please retain...and for your reference as Dell is displayed onscreen. CN00WG2J7444572B046L Tester 2008L0415 Test CA-210/CA-310 Equipment CA-2000S Chroma 2326/2235/2233 Avg. The factory measurements from this Report for this new Dell U2720Q UltraSharp monitor. Delta E ≤ 2...

Users Guide
Page 3
... and Controls 7 Monitor Specifications 10 Plug-and-Play 20 LCD Monitor Quality and Pixel Policy 20 Setting Up the Monitor 21 Attaching the Stand 21 Using the Tilt, Swivel, and Vertical Extension 24 Adjusting the Rotation Display Settings of Your System 25 Connecting Your Monitor 26 Requirements to ...view or play HDR content 28 Organizing Your Cables 29 Removing the Monitor Stand 29 Wall Mounting (Optional 30 Operating the Monitor 31 Turning on the Monitor 31 Using the Front Panel Controls 31 Using ...
... and Controls 7 Monitor Specifications 10 Plug-and-Play 20 LCD Monitor Quality and Pixel Policy 20 Setting Up the Monitor 21 Attaching the Stand 21 Using the Tilt, Swivel, and Vertical Extension 24 Adjusting the Rotation Display Settings of Your System 25 Connecting Your Monitor 26 Requirements to ...view or play HDR content 28 Organizing Your Cables 29 Removing the Monitor Stand 29 Wall Mounting (Optional 30 Operating the Monitor 31 Turning on the Monitor 31 Using the Front Panel Controls 31 Using ...

Users Guide
Page 4
only) and Other Regulatory Information 58 Contacting Dell 58 Setting Up Your Monitor 59 Maintenance Guidelines 61 4 | Contents Using the On-Screen Display (OSD) Menu 36 Troubleshooting 51 Self-Test 51 Built-in Diagnostics 53 Common Problems 54 Product Specific Problems 56 Appendix 58 Safety Instructions 58 FCC Notices (U.S.
only) and Other Regulatory Information 58 Contacting Dell 58 Setting Up Your Monitor 59 Maintenance Guidelines 61 4 | Contents Using the On-Screen Display (OSD) Menu 36 Troubleshooting 51 Self-Test 51 Built-in Diagnostics 53 Common Problems 54 Product Specific Problems 56 Appendix 58 Safety Instructions 58 FCC Notices (U.S.

Users Guide
Page 5
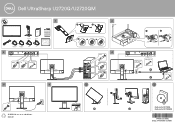
Monitor Stand riser Stand base Power cable (varies by country) USB Type-C cable (C to C) About Your Monitor | 5 NOTE: Some items may be optional and may not be available in certain countries. About Your Monitor Package Contents Your monitor ships with your monitor. Some features or media may not ship with the components shown below. Make sure that you have received all the components and contact Dell if something is missing.
Monitor Stand riser Stand base Power cable (varies by country) USB Type-C cable (C to C) About Your Monitor | 5 NOTE: Some items may be optional and may not be available in certain countries. About Your Monitor Package Contents Your monitor ships with your monitor. Some features or media may not ship with the components shown below. Make sure that you have received all the components and contact Dell if something is missing.
Users Guide
Page 6
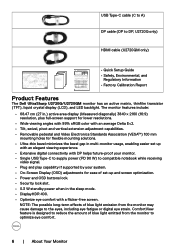
...duplicate. • Quick Setup Guide • Safety, Environmental, and Regulatory Information • Factory Calibration Report Product Features The Dell UltraSharp U2720Q/U2720QM monitor has an active matrix, thinfilm transistor (TFT), liquid crystal display (LCD), and LED backlight. Standard mode (sRGB) Serial ...resolution, plus full-screen support for this new Dell U2720Q UltraSharp monitor. USB Type-C cable (C to A) DP cable (DP to DP, U2720Q only) HDMI cable (U2720QM only) U2720Q Color Calibration Factory Report Every Dell U2720Q is shipped incorporating pre-tuned standard mode(sRGB...
...duplicate. • Quick Setup Guide • Safety, Environmental, and Regulatory Information • Factory Calibration Report Product Features The Dell UltraSharp U2720Q/U2720QM monitor has an active matrix, thinfilm transistor (TFT), liquid crystal display (LCD), and LED backlight. Standard mode (sRGB) Serial ...resolution, plus full-screen support for this new Dell U2720Q UltraSharp monitor. USB Type-C cable (C to A) DP cable (DP to DP, U2720Q only) HDMI cable (U2720QM only) U2720Q Color Calibration Factory Report Every Dell U2720Q is shipped incorporating pre-tuned standard mode(sRGB...

Users Guide
Page 7
Identifying Parts and Controls Front view 1 2 Label 1 2 Description Function buttons (For more information, see Operating the Monitor) Power on/off button (with LED indicator) About Your Monitor | 7
Identifying Parts and Controls Front view 1 2 Label 1 2 Description Function buttons (For more information, see Operating the Monitor) Power on/off button (with LED indicator) About Your Monitor | 7
Users Guide
Page 8
...BC 1.2. Back View 1 2 3 5 4 Label Description Use 1 VESA mounting holes (100 mm x 100 Wall mount monitor using VESA- icon supports 3 A. 8 | About Your Monitor mm-behind attached VESA cover) compatible wall mount kit (100 mm x 100 mm). 2 Regulatory label Lists the regulatory approvals.... 3 Stand release button Release stand from monitor. 4 Barcode, serial number, and Service Refer to this label if you need to contact Dell Tag label for technical support. 5 Cable management slot Use to organize cables by placing...
...BC 1.2. Back View 1 2 3 5 4 Label Description Use 1 VESA mounting holes (100 mm x 100 Wall mount monitor using VESA- icon supports 3 A. 8 | About Your Monitor mm-behind attached VESA cover) compatible wall mount kit (100 mm x 100 mm). 2 Regulatory label Lists the regulatory approvals.... 3 Stand release button Release stand from monitor. 4 Barcode, serial number, and Service Refer to this label if you need to contact Dell Tag label for technical support. 5 Cable management slot Use to organize cables by placing...

Users Guide
Page 9
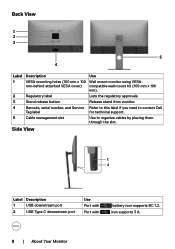
... Type-C cable (C to C). Bottom View 8 1 2 3 4 56 7 Label Description Use 1 AC power port To connect the monitor power cable. 2 Security lock slot Secures monitor with security cable lock (sold separately). 3 HDMI port Connect your computer with HDMI cable. 4 DP port Connect your computer with DP ...Type-C is not supported on Windows versions that are prior to Windows 10. 6 Audio line-out port Connect speakers to your USB device. About Your Monitor | 9 NOTE: The audio line-out port does not support headphones. 7 USB downstream Connect your computer using a M3 x 6 mm screw (...
... Type-C cable (C to C). Bottom View 8 1 2 3 4 56 7 Label Description Use 1 AC power port To connect the monitor power cable. 2 Security lock slot Secures monitor with security cable lock (sold separately). 3 HDMI port Connect your computer with HDMI cable. 4 DP port Connect your computer with DP ...Type-C is not supported on Windows versions that are prior to Windows 10. 6 Audio line-out port Connect speakers to your USB device. About Your Monitor | 9 NOTE: The audio line-out port does not support headphones. 7 USB downstream Connect your computer using a M3 x 6 mm screw (...

Users Guide
Page 10
... BC1.2 charging capability at 2 A (max) • 1 x Analog 2.0 audio line out (3.5 mm jack) • 1 x USB 3.0 Type-C downstream port with charging capability at 3 A (max) 10 | About Your Monitor Monitor Specifications Screen type Active matrix -
... BC1.2 charging capability at 2 A (max) • 1 x Analog 2.0 audio line out (3.5 mm jack) • 1 x USB 3.0 Type-C downstream port with charging capability at 3 A (max) 10 | About Your Monitor Monitor Specifications Screen type Active matrix -

Users Guide
Page 11
... USB Type-C alternate mode) 30 khz to 140 khz 24 Hz to panel) * At panel native only, under Custom Mode preset. Border width (edge of monitor 7.3 mm (Top) to active area) 7.3 mm (Left/Right) 9 mm (Bottom) Adjustability Height adjustable stand 130 mm Tilt -5° to 21° Swivel... Pivot Cable management Dell Display Manager (DDM) Compatibility Security -45° to 45° -90° to 90° Yes Easy Arrange and other key features Security lock ...
... USB Type-C alternate mode) 30 khz to 140 khz 24 Hz to panel) * At panel native only, under Custom Mode preset. Border width (edge of monitor 7.3 mm (Top) to active area) 7.3 mm (Left/Right) 9 mm (Bottom) Adjustability Height adjustable stand 130 mm Tilt -5° to 21° Swivel... Pivot Cable management Dell Display Manager (DDM) Compatibility Security -45° to 45° -90° to 90° Yes Easy Arrange and other key features Security lock ...

Users Guide
Page 13
... connector x 3 (Port with battery icon supports BC 1.2.) • USB 3.0 Type-C downstream port connector x 1 (Port with icon supports 3 A) DP to DP 1.8 M cable (U2720Q only) HDMI 1.8 M cable (U2720QM only) USB Type-C (C to C) 1.0 M cable USB Type-C (C to A) 1.8 M cable 525.2 mm (20.68 in.) 395.2 mm (15.56 in.) 611.3 mm (24.07 in.) 185....) 611.3 mm (24.07 in.) 49.7 mm (1.96 in.) 418.4 mm (16.47 in.) 369.4 mm (14.54 in.) 245.0 mm (9.65 in.) About Your Monitor | 13
... connector x 3 (Port with battery icon supports BC 1.2.) • USB 3.0 Type-C downstream port connector x 1 (Port with icon supports 3 A) DP to DP 1.8 M cable (U2720Q only) HDMI 1.8 M cable (U2720QM only) USB Type-C (C to C) 1.0 M cable USB Type-C (C to A) 1.8 M cable 525.2 mm (20.68 in.) 395.2 mm (15.56 in.) 611.3 mm (24.07 in.) 185....) 611.3 mm (24.07 in.) 49.7 mm (1.96 in.) 418.4 mm (16.47 in.) 369.4 mm (14.54 in.) 245.0 mm (9.65 in.) About Your Monitor | 13

Users Guide
Page 14
...16 lb) 6.6 kg (14.55 lb) 4.4 kg (9.70 lb) 1.8 kg (3.97 lb) Environmental Characteristics Compliant Standards • ENERGY STAR certified Monitor • EPEAT registered where applicable. See www.epeat.net for registration status by country. EPEAT registration varies by country. • TCO Certified Display ...• RoHS Compliant • BFR/PVC Free monitor (excluding external cables) • Meets NFPA 99 leakage current requirements • Arsenic-Free glass and Mercury-Free for the panel ...
...16 lb) 6.6 kg (14.55 lb) 4.4 kg (9.70 lb) 1.8 kg (3.97 lb) Environmental Characteristics Compliant Standards • ENERGY STAR certified Monitor • EPEAT registered where applicable. See www.epeat.net for registration status by country. EPEAT registration varies by country. • TCO Certified Display ...• RoHS Compliant • BFR/PVC Free monitor (excluding external cables) • Meets NFPA 99 leakage current requirements • Arsenic-Free glass and Mercury-Free for the panel ...
Users Guide
Page 15
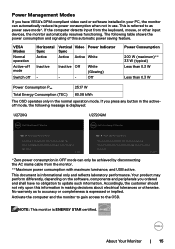
... tolerances or otherwise. This document is ENERGY STAR certified. If there is no display, press the monitor button again to accuracy or completeness is displayed: U2720Q U2720QM Dell UltraSharp 27 Monitor Dell UltraSharp 27 Monitor No DP signal from the monitor. **Maximum power consumption with maximum luminance, and USB active. Press any key on the keyboard or...
... tolerances or otherwise. This document is ENERGY STAR certified. If there is no display, press the monitor button again to accuracy or completeness is displayed: U2720Q U2720QM Dell UltraSharp 27 Monitor Dell UltraSharp 27 Monitor No DP signal from the monitor. **Maximum power consumption with maximum luminance, and USB active. Press any key on the keyboard or...

Users Guide
Page 16
... 12 ML0(p) 13 CONFIG1 14 CONFIG2 15 AUX CH (p) 16 GND 17 AUX CH (n) 18 Hot Plug Detect 19 Return 20 DP_PWR 16 | About Your Monitor TEC: Total energy consumption in kWh as defined in Energy Star 8.0 version. Pin Assignments DP port Pin number 20-pin side of the connected signal...
... 12 ML0(p) 13 CONFIG1 14 CONFIG2 15 AUX CH (p) 16 GND 17 AUX CH (n) 18 Hot Plug Detect 19 Return 20 DP_PWR 16 | About Your Monitor TEC: Total energy consumption in kWh as defined in Energy Star 8.0 version. Pin Assignments DP port Pin number 20-pin side of the connected signal...

Users Guide
Page 17
TMDS DATA 2- 13 CEC TMDS DATA 1+ 14 Reserved (N.C. HDMI port Pin number 1 2 3 4 5 6 7 8 9 10 19-pin side of Pin number 19-pin side of the connected signal cable the connected signal cable TMDS DATA 2+ 11 TMDS CLOCK SHIELD TMDS DATA 2 SHIELD 12 TMDS CLOCK- on device) TMDS DATA 1 SHIELD 15 DDC CLOCK (SCL) TMDS DATA 1- 16 DDC DATA (SDA) TMDS DATA 0+ 17 DDC/CEC Ground TMDS DATA 0 SHIELD 18 +5 V POWER TMDS DATA 0- 19 HOT PLUG DETECT TMDS CLOCK+ About Your Monitor | 17
TMDS DATA 2- 13 CEC TMDS DATA 1+ 14 Reserved (N.C. HDMI port Pin number 1 2 3 4 5 6 7 8 9 10 19-pin side of Pin number 19-pin side of the connected signal cable the connected signal cable TMDS DATA 2+ 11 TMDS CLOCK SHIELD TMDS DATA 2 SHIELD 12 TMDS CLOCK- on device) TMDS DATA 1 SHIELD 15 DDC CLOCK (SCL) TMDS DATA 1- 16 DDC DATA (SDA) TMDS DATA 0+ 17 DDC/CEC Ground TMDS DATA 0 SHIELD 18 +5 V POWER TMDS DATA 0- 19 HOT PLUG DETECT TMDS CLOCK+ About Your Monitor | 17

Users Guide
Page 18
USB Type-C port Pin Signal A1 GND A2 SSTXp1 A3 SSTXn1 A4 VBUS A5 CC1 A6 Dp1 A7 Dn1 A8 SBU1 A9 VBUS A10 SSRXn2 A11 SSRXp2 A12 GND Pin Signal B12 GND B11 SSRXp1 B10 SSRXn1 B9 VBUS B8 SBU2 B7 Dn1 B6 Dp1 B5 CC2 B4 VBUS B3 SSTXn2 B2 SSTXp2 B1 GND 18 | About Your Monitor
USB Type-C port Pin Signal A1 GND A2 SSTXp1 A3 SSTXn1 A4 VBUS A5 CC1 A6 Dp1 A7 Dn1 A8 SBU1 A9 VBUS A10 SSRXn2 A11 SSRXp2 A12 GND Pin Signal B12 GND B11 SSRXp1 B10 SSRXn1 B9 VBUS B8 SBU2 B7 Dn1 B6 Dp1 B5 CC2 B4 VBUS B3 SSTXn2 B2 SSTXp2 B1 GND 18 | About Your Monitor

Users Guide
Page 19
...to Type-C) is plugged in, the USB ports can work normally. Universal Serial Bus (USB) This section gives you turn off the monitor and then turn it on, the attached peripherals may take a few seconds to 0.9 A on USB downstream port (port with battery... VBUS DD+ GND StdA_SSRX- the ports with BC 1.2 compliance devices; Pin number 6 7 8 9 Shell Signal StdA_SSRX+ GND_DRAIN StdA_SSTXStdA_SSTX+ Shield About Your Monitor | 19 If you information about the USB ports available on USB Type-C downstream port (port with icon) with icon supports fast current charging capability if...
...to Type-C) is plugged in, the USB ports can work normally. Universal Serial Bus (USB) This section gives you turn off the monitor and then turn it on, the attached peripherals may take a few seconds to 0.9 A on USB downstream port (port with battery... VBUS DD+ GND StdA_SSRX- the ports with BC 1.2 compliance devices; Pin number 6 7 8 9 Shell Signal StdA_SSRX+ GND_DRAIN StdA_SSTXStdA_SSTX+ Shield About Your Monitor | 19 If you information about the USB ports available on USB Type-C downstream port (port with icon) with icon supports fast current charging capability if...

Users Guide
Page 20
... process, it is not uncommon for one or more information on LCD Monitor Pixel Policy, see Operating the Monitor. For more information about changing the monitor settings, see Dell support site at: www.dell.com/support/monitors. 20 | About Your Monitor The monitor automatically provides the computer system with its extended display identification data (EDID) using display data...
... process, it is not uncommon for one or more information on LCD Monitor Pixel Policy, see Operating the Monitor. For more information about changing the monitor settings, see Dell support site at: www.dell.com/support/monitors. 20 | About Your Monitor The monitor automatically provides the computer system with its extended display identification data (EDID) using display data...

Users Guide
Page 21
... screw clockwise. 4 After fully tightening the screw, fold the screw handle flat within the recess. Setting Up the Monitor | 21 To attach the monitor stand: 1 Align the stand base protruded blocks to set it up. Setting Up the Monitor Attaching the Stand NOTE: The stand riser and stand base are detached when the...
... screw clockwise. 4 After fully tightening the screw, fold the screw handle flat within the recess. Setting Up the Monitor | 21 To attach the monitor stand: 1 Align the stand base protruded blocks to set it up. Setting Up the Monitor Attaching the Stand NOTE: The stand riser and stand base are detached when the...

Users Guide
Page 22
b.Press the stand down till it snaps into place. a.Fit the two tabs on the back of the stand to the monitor. b a 22 | Setting Up the Monitor 5 Lift the cover, as shown, to expose the VESA area for stand assembly. 6 Attach the stand assembly to the groove on the upper part of the monitor.
b.Press the stand down till it snaps into place. a.Fit the two tabs on the back of the stand to the monitor. b a 22 | Setting Up the Monitor 5 Lift the cover, as shown, to expose the VESA area for stand assembly. 6 Attach the stand assembly to the groove on the upper part of the monitor.


