Information and Firmware Update
Page 1
Dell™ Systems Information and Firmware Update www.dell.com | support.dell.com
Dell™ Systems Information and Firmware Update www.dell.com | support.dell.com

Information and Firmware Update
Page 3
... Diskettes 1-1 Updating the System BIOS With Dell OpenManage Server Administrator 1-2 Updating the System Management Module Firmware 1-3 Updating the KVM Firmware 1-4 Updating the System Management Module KVM Firmware . . 1-5 Globally Updating the Server Module KVM Firmware . . . . . 1-6 Individually Updating the Server Module KVM Firmware . . . 1-6 Updating the Network Switch Module Firmware 1-7 Setting Up the Remote System Serial Connection Baud...
... Diskettes 1-1 Updating the System BIOS With Dell OpenManage Server Administrator 1-2 Updating the System Management Module Firmware 1-3 Updating the KVM Firmware 1-4 Updating the System Management Module KVM Firmware . . 1-5 Globally Updating the Server Module KVM Firmware . . . . . 1-6 Individually Updating the Server Module KVM Firmware . . . 1-6 Updating the Network Switch Module Firmware 1-7 Setting Up the Remote System Serial Connection Baud...
Information and Firmware Update
Page 4
... . . . . . . 1-15 1-15 1-16 Online Diagnostics SCSI Controller Test Issue When Using a Linux Console 1-16 SCSI Device Errors During System Boot 1-17 Using a Dell-Branded Logitech PS/2 Mouse 1-17 Figures Figure 1-1. Figure 1-2. Figure 1-4. Replacing the System Battery 1-2 1-4 1-8 1-12 1-13 4 Contents Figure 1-5. Attaching the Drive Shelf Steps for Updating KVM Firmware Network Switch Module Jumper...
... . . . . . . 1-15 1-15 1-16 Online Diagnostics SCSI Controller Test Issue When Using a Linux Console 1-16 SCSI Device Errors During System Boot 1-17 Using a Dell-Branded Logitech PS/2 Mouse 1-17 Figures Figure 1-1. Figure 1-2. Figure 1-4. Replacing the System Battery 1-2 1-4 1-8 1-12 1-13 4 Contents Figure 1-5. Attaching the Drive Shelf Steps for Updating KVM Firmware Network Switch Module Jumper...
Information and Firmware Update
Page 5
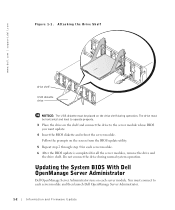
...shelf rests on the attached server module. Information and Firmware Update 1-1 If it is used only with Dell OpenManage™ Server Administrator • Updating the system management module firmware • Updating the KVM firmware • Updating the network switch module firmware •... Online diagnostics SCSI controller test issue when using a Linux console • SCSI device errors during system boot • Using a Dell-branded, two-button Logitech mouse Updating the System BIOS From Diskettes Each server module has a USB port on the front of the server module ...
...shelf rests on the attached server module. Information and Firmware Update 1-1 If it is used only with Dell OpenManage™ Server Administrator • Updating the system management module firmware • Updating the KVM firmware • Updating the network switch module firmware •... Online diagnostics SCSI controller test issue when using a Linux console • SCSI device errors during system boot • Using a Dell-branded, two-button Logitech mouse Updating the System BIOS From Diskettes Each server module has a USB port on the front of the server module ...
Information and Firmware Update
Page 6
... and connect the drive to each server module and then launch Dell OpenManage Server Administrator. 1-2 Information and Firmware Update Updating the System BIOS With Dell OpenManage Server Administrator Dell OpenManage Server Administrator runs on the drive shelf during normal system operation. www.dell.com | support.dell.com Figure 1-1. The drive must be horizontal and level to operate...
... and connect the drive to each server module and then launch Dell OpenManage Server Administrator. 1-2 Information and Firmware Update Updating the System BIOS With Dell OpenManage Server Administrator Dell OpenManage Server Administrator runs on the drive shelf during normal system operation. www.dell.com | support.dell.com Figure 1-1. The drive must be horizontal and level to operate...
Information and Firmware Update
Page 7
...Guide and the online help for more information. 1 Set up your remote system as a TFTP server. 2 On your server module. 2 Start a Dell OpenManage session. 3 From the Server Administrator home page, click the System object. 4 Click the Main System Chassis object. 5 Click the BIOS object. 6 Click the Update object.... NOTE: You must be found by typing ipconfig at support.dell.com to the TFTP server's root directory. 3 Log into the system with administrator privileges to update your system BIOS. 1 From the Dell Support website at support.dell.com, select the BIOS version that you are updating to ...
...Guide and the online help for more information. 1 Set up your remote system as a TFTP server. 2 On your server module. 2 Start a Dell OpenManage session. 3 From the Server Administrator home page, click the System object. 4 Click the Main System Chassis object. 5 Click the BIOS object. 6 Click the Update object.... NOTE: You must be found by typing ipconfig at support.dell.com to the TFTP server's root directory. 3 Log into the system with administrator privileges to update your system BIOS. 1 From the Dell Support website at support.dell.com, select the BIOS version that you are updating to ...
Information and Firmware Update
Page 8
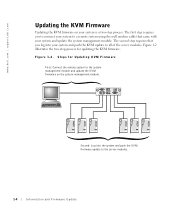
... Firmware First: Connect the remote system to the system management module and update the KVM firmware on your system and update the system management module. Second: Log into your system to a remote system using the null modem cable that you log into the system and push the KVM firmware update... modules. Figure 1-2. The first step requires you to connect your system and push the KVM update to the server modules. 1-4 Information and Firmware Update Steps for updating the KVM firmware. www.dell.com | support.dell.com Updating the KVM Firmware Updating the KVM firmware on the...
... Firmware First: Connect the remote system to the system management module and update the KVM firmware on your system and update the system management module. Second: Log into your system to a remote system using the null modem cable that you log into the system and push the KVM firmware update... modules. Figure 1-2. The first step requires you to connect your system and push the KVM update to the server modules. 1-4 Information and Firmware Update Steps for updating the KVM firmware. www.dell.com | support.dell.com Updating the KVM Firmware Updating the KVM firmware on the...
Information and Firmware Update
Page 9
... in step 2. 9 Click Load. The firmware update procedure begins. See the System Configuration Guide for information about connecting and configuring your remote system. 3 On the remote system, create a wupdate directory. 4 Download the wupdate.zip file from the Dell Support website at support.dell.com to the directory that you created in step 3. 5 Unzip the wupdate...
... in step 2. 9 Click Load. The firmware update procedure begins. See the System Configuration Guide for information about connecting and configuring your remote system. 3 On the remote system, create a wupdate directory. 4 Download the wupdate.zip file from the Dell Support website at support.dell.com to the directory that you created in step 3. 5 Unzip the wupdate...

Information and Firmware Update
Page 10
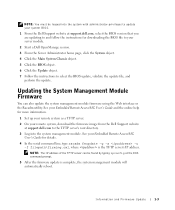
... on, the power-on indicator is solid green. 2 Press to begin updating all of updating the selected server module. NOTICE: To prevent damage to the system, do not turn the power off once the update process has begun. 5 From the Blade Status dialog box, click Update to display the On-Screen... server modules are powered on turns amber. After the server module has been updated, the dot turns back to green. 1-6 Information and Firmware Update www.dell.com | support.dell.com Globally Updating the Server Module KVM Firmware 1 Ensure that the server module is powered on .
... on, the power-on indicator is solid green. 2 Press to begin updating all of updating the selected server module. NOTICE: To prevent damage to the system, do not turn the power off once the update process has begun. 5 From the Blade Status dialog box, click Update to display the On-Screen... server modules are powered on turns amber. After the server module has been updated, the dot turns back to green. 1-6 Information and Firmware Update www.dell.com | support.dell.com Globally Updating the Server Module KVM Firmware 1 Ensure that the server module is powered on .
Information and Firmware Update
Page 11
... of the component update procedures. Setting Up the Remote System Serial Connection Baud Rate This procedure is recommended that the runtime component be updated by typing show version from the Dell Support website at support.dell.com with updating the network switch module firmware. You need...Programs→ Accessories→ Communications, and then click HyperTerminal. 2 From the Connection Description dialog box, enter a name for that came with your system to update only the new components. e Set Flow control to None. 6 Click OK to return to 8. However, step 2 through step 8...
... of the component update procedures. Setting Up the Remote System Serial Connection Baud Rate This procedure is recommended that the runtime component be updated by typing show version from the Dell Support website at support.dell.com with updating the network switch module firmware. You need...Programs→ Accessories→ Communications, and then click HyperTerminal. 2 From the Connection Description dialog box, enter a name for that came with your system to update only the new components. e Set Flow control to None. 6 Click OK to return to 8. However, step 2 through step 8...
Information and Firmware Update
Page 12
Connecting the cable to a phone line connector could damage the remote system. 4 Connect the RJ-11-to-serial cable that came with your system to the RJ-11 connector on a remote system. Figure 1-3. www.dell.com | support.dell.com 7 Click OK to return to the HyperTerminal window. 8 On the HyperTerminal toolbar, click Call to connect the...
Connecting the cable to a phone line connector could damage the remote system. 4 Connect the RJ-11-to-serial cable that came with your system to the RJ-11 connector on a remote system. Figure 1-3. www.dell.com | support.dell.com 7 Click OK to return to the HyperTerminal window. 8 On the HyperTerminal toolbar, click Call to connect the...
Information and Firmware Update
Page 13
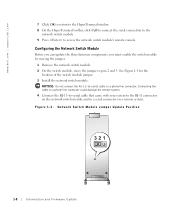
... press any key to continue, and proceed to "Updating the Loader Component" or "Updating the Runtime Component." If you wait too long and your operating system begins to pins 1 and 2 (default). Updating the Diagnostics Component 1 With the RJ-11-to-serial cable connected to the network switch module, reset ... use ERA/MC console redirection to log into the network switch module. NOTE: If you do not move the jumper back to load let the system complete the load operation, and then repeat step 1 and step 2. The download takes approximately 30 seconds. 9 After the download is complete, press ...
... press any key to continue, and proceed to "Updating the Loader Component" or "Updating the Runtime Component." If you wait too long and your operating system begins to pins 1 and 2 (default). Updating the Diagnostics Component 1 With the RJ-11-to-serial cable connected to the network switch module, reset ... use ERA/MC console redirection to log into the network switch module. NOTE: If you do not move the jumper back to load let the system complete the load operation, and then repeat step 1 and step 2. The download takes approximately 30 seconds. 9 After the download is complete, press ...
Information and Firmware Update
Page 14
... loader component. 8 Click Send to enter the diagnostic mode. www.dell.com | support.dell.com 3 Type 0 (zero) for more information about updating the switch module firmware. If you wait too long and your network switch module documentation for image update. 4 Change the remote system's baud rate to 115200 (see "Setting Up the Remote...
... loader component. 8 Click Send to enter the diagnostic mode. www.dell.com | support.dell.com 3 Type 0 (zero) for more information about updating the switch module firmware. If you wait too long and your network switch module documentation for image update. 4 Change the remote system's baud rate to 115200 (see "Setting Up the Remote...
Information and Firmware Update
Page 15
... inside the computer, and protecting against electrostatic discharge. 3 Type 0 (zero) for image update. 4 Change the remote system's baud rate to 115200 (see "Setting Up the Remote System Serial Connection Baud Rate"). 5 Click Send to access the Send File dialog box. 6 Select Xmodem protocol. 7 Browse and... select the file runtimexxx.bix, where xxx is complete, change the remote system's baud rate to 9600 (see "Setting Up the Remote System Serial Connection Baud Rate"). 12 To update other components, remove the network switch module and move the jumper ...
... inside the computer, and protecting against electrostatic discharge. 3 Type 0 (zero) for image update. 4 Change the remote system's baud rate to 115200 (see "Setting Up the Remote System Serial Connection Baud Rate"). 5 Click Send to access the Send File dialog box. 6 Select Xmodem protocol. 7 Browse and... select the file runtimexxx.bix, where xxx is complete, change the remote system's baud rate to 9600 (see "Setting Up the Remote System Serial Connection Baud Rate"). 12 To update other components, remove the network switch module and move the jumper ...
Information and Firmware Update
Page 16
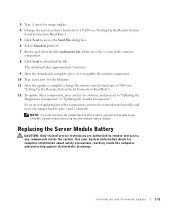
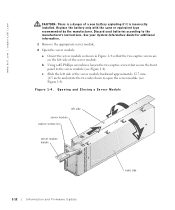
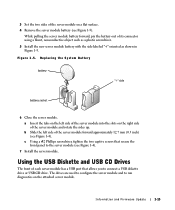
...(0.5 inch) and rotate the two sides down to the manufacturer's instructions. Discard used batteries according to open the server module (see Figure 1-4). www.dell.com | support.dell.com CAUTION: There is incorrectly installed. Replace the battery only with the same or equivalent type recommended by the manufacturer. Figure 1-4. b Using a ... and Closing a Server Module left side of a new battery exploding if it is a danger of the server module. See your System Information Guide for additional information. 1 Remove the appropriate server module. 2 Open the server module.
...(0.5 inch) and rotate the two sides down to the manufacturer's instructions. Discard used batteries according to open the server module (see Figure 1-4). www.dell.com | support.dell.com CAUTION: There is incorrectly installed. Replace the battery only with the same or equivalent type recommended by the manufacturer. Figure 1-4. b Using a ... and Closing a Server Module left side of a new battery exploding if it is a danger of the server module. See your System Information Guide for additional information. 1 Remove the appropriate server module. 2 Open the server module.
Information and Firmware Update
Page 17
... Drives The front of each server module has a USB port that secure the front panel to run diagnostics on the attached server module. Replacing the System Battery battery "+" side battery socket 6 Close the server module. a Insert the tabs on the left side of the server module forward approximately 12.7 mm (0.5 inch...
... Drives The front of each server module has a USB port that secure the front panel to run diagnostics on the attached server module. Replacing the System Battery battery "+" side battery socket 6 Close the server module. a Insert the tabs on the left side of the server module forward approximately 12.7 mm (0.5 inch...

Information and Firmware Update
Page 18
... device as the first boot device in a future BIOS release. This will be corrected in the System Setup program, do not use the Dell OpenManage Server Assistant CD that came with CD burner software packages causes a non-system disk failure. This will be corrected in a future firmware release. Chassis Summary window, the login...
... device as the first boot device in a future BIOS release. This will be corrected in the System Setup program, do not use the Dell OpenManage Server Assistant CD that came with CD burner software packages causes a non-system disk failure. This will be corrected in a future firmware release. Chassis Summary window, the login...
Information and Firmware Update
Page 19
... diskette drive to the server module and turn the server module on. 3 Insert the system board replacement utility diskette in use before replacing the system board, perform the following sections. Setting the System Management Module's Time You must log out and close the session when finished. This will... be corrected in the following steps: 1 Replace the system board. 2 Install the server module in the system, but do not turn it on the system board. Logging Out of a Network Switch Module HTTP Session When connected to AC power, ...
... diskette drive to the server module and turn the server module on. 3 Insert the system board replacement utility diskette in use before replacing the system board, perform the following sections. Setting the System Management Module's Time You must log out and close the session when finished. This will... be corrected in the following steps: 1 Replace the system board. 2 Install the server module in the system, but do not turn it on the system board. Logging Out of a Network Switch Module HTTP Session When connected to AC power, ...
Information and Firmware Update
Page 20
...Sequence option. This is Degraded At this point, the hard drive begins to the screen. Replacing Hard Drives in the system. 6 Turn on the server module. www.dell.com | support.dell.com 5 Press to display the OSCAR menu, and then double-click the appropriate server module. 6 Press to recreate... the mirror and reboot the server module. 10 Remove the USB diskette drive. If there were an actual error, the operating system would report an...
...Sequence option. This is Degraded At this point, the hard drive begins to the screen. Replacing Hard Drives in the system. 6 Turn on the server module. www.dell.com | support.dell.com 5 Press to display the OSCAR menu, and then double-click the appropriate server module. 6 Press to recreate... the mirror and reboot the server module. 10 Remove the USB diskette drive. If there were an actual error, the operating system would report an...
Information and Firmware Update
Page 21
An error was detected on device \Device\Harddisk0\DR0 during system boot and do not affect normal operation. Using a Dell-Branded Logitech PS/2 Mouse If you are intermittently displayed in the Microsoft® Windows® system event log: The device, \Device\SCIS\symmpi1, did not respond within the ...timeout period. SCSI Device Errors During System Boot The following errors are using a Dell-branded, two-button Logitech PS/2 mouse and it is not performing correctly, replace it with a different model of Logitech PS/2 ...
An error was detected on device \Device\Harddisk0\DR0 during system boot and do not affect normal operation. Using a Dell-Branded Logitech PS/2 Mouse If you are intermittently displayed in the Microsoft® Windows® system event log: The device, \Device\SCIS\symmpi1, did not respond within the ...timeout period. SCSI Device Errors During System Boot The following errors are using a Dell-branded, two-button Logitech PS/2 mouse and it is not performing correctly, replace it with a different model of Logitech PS/2 ...


