Information and Firmware Update
Page 4
... the System Battery 1-2 1-4 1-8 1-12 1-13 4 Contents Figure 1-3. Replacing Hard Drives in a Mirrored Configuration . . . . . . 1-15 1-15 1-16 Online Diagnostics SCSI Controller Test Issue When Using a Linux Console 1-16 SCSI Device Errors During System Boot 1-17 Using a Dell-Branded Logitech PS/2 Mouse 1-17 Figures Figure 1-1. Attaching the Drive Shelf Steps for Updating KVM Firmware Network Switch...
... the System Battery 1-2 1-4 1-8 1-12 1-13 4 Contents Figure 1-3. Replacing Hard Drives in a Mirrored Configuration . . . . . . 1-15 1-15 1-16 Online Diagnostics SCSI Controller Test Issue When Using a Linux Console 1-16 SCSI Device Errors During System Boot 1-17 Using a Dell-Branded Logitech PS/2 Mouse 1-17 Figures Figure 1-1. Attaching the Drive Shelf Steps for Updating KVM Firmware Network Switch...
Information and Firmware Update
Page 20
... Issue When Using a Linux Console When you replace a hard drive in a mirrored configuration and the new hard drive does not automatically resynchronize, perform the following message displays: Logical Drive is first in the system without the new hard drive installed. 3 Turn on the server module. www.dell.com | support.dell.com 5 Press to display the OSCAR menu, and then...
... Issue When Using a Linux Console When you replace a hard drive in a mirrored configuration and the new hard drive does not automatically resynchronize, perform the following message displays: Logical Drive is first in the system without the new hard drive installed. 3 Turn on the server module. www.dell.com | support.dell.com 5 Press to display the OSCAR menu, and then...
System Configuration Guide
Page 5
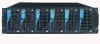
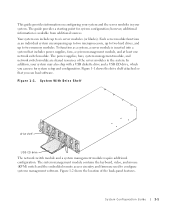
In addition, your system may also ship with a USB diskette drive and a USB CD drive, which you can load software. Figure 1-1 shows the drive shelf attached so that includes power supplies, fans, a system management module, and at least one network ...blades). To function as an individual system encompassing up to two microprocessors, up to two hard drives, and up to configure systems management software. System With Drive Shelf drive shelf USB CD drive The network switch module and a system management module require additional configuration. Figure 1-1. The guide...
In addition, your system may also ship with a USB diskette drive and a USB CD drive, which you can load software. Figure 1-1 shows the drive shelf attached so that includes power supplies, fans, a system management module, and at least one network ...blades). To function as an individual system encompassing up to two microprocessors, up to two hard drives, and up to configure systems management software. System With Drive Shelf drive shelf USB CD drive The network switch module and a system management module require additional configuration. Figure 1-1. The guide...
System Configuration Guide
Page 7
... 5 If required, configure the hard drives for RAID 1 or integrated mirroring. It is available while using the remote access features on the systems management module, including default settings for the remote access features. • The online Dell PowerEdge Integrated Switch User's Guide describes ...the features and how to use the network switch modules. • The Dell OpenManage Server Assistant User's Guide provides detailed information on the systems ...
... 5 If required, configure the hard drives for RAID 1 or integrated mirroring. It is available while using the remote access features on the systems management module, including default settings for the remote access features. • The online Dell PowerEdge Integrated Switch User's Guide describes ...the features and how to use the network switch modules. • The Dell OpenManage Server Assistant User's Guide provides detailed information on the systems ...
Replacing the Server Module Board
Page 3
Contents Required Tools 1-1 Parts Kit 1-1 Before You Begin 1-2 Turning Off the Server Module 1-2 Verifying the Hard-Drive Mirroring Mode 1-3 Manually Deconfiguring Mirrored Mode 1-4 Replacing the Server Module Board 1-6 Removing the Server Module 1-6 Opening the Server Module ... Removing a Processor 1-10 Removing the Server Module Board 1-11 Installing the Server Module Board 1-12 Installing the Processor 1-12 Connecting the Hard-Drive Module to the Server Module Board 1-13 Installing Memory Modules 1-14 Closing the Server Module 1-14 Installing a Server Module 1-15 Verifying ...
Contents Required Tools 1-1 Parts Kit 1-1 Before You Begin 1-2 Turning Off the Server Module 1-2 Verifying the Hard-Drive Mirroring Mode 1-3 Manually Deconfiguring Mirrored Mode 1-4 Replacing the Server Module Board 1-6 Removing the Server Module 1-6 Opening the Server Module ... Removing a Processor 1-10 Removing the Server Module Board 1-11 Installing the Server Module Board 1-12 Installing the Processor 1-12 Connecting the Hard-Drive Module to the Server Module Board 1-13 Installing Memory Modules 1-14 Closing the Server Module 1-14 Installing a Server Module 1-15 Verifying ...
Replacing the Server Module Board
Page 6
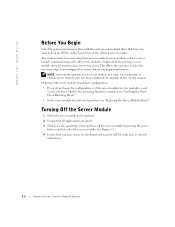
...Module 1 Select the server module to deconfigure their system before you do not know the configuration or if the server module has two hard drives and you begin maintenance. This allows the customer to take the necessary steps to be replaced. 2 Ensure that all applications are closed....only one server module at a time. Determine the server module's hard-drive configuration. • If you do not know whether the mirroring function is enabled, see "Replacing the Server Module Board." www.dell.com | support.dell.com Before You Begin Schedule system maintenance time with the customer and...
...Module 1 Select the server module to deconfigure their system before you do not know the configuration or if the server module has two hard drives and you begin maintenance. This allows the customer to take the necessary steps to be replaced. 2 Ensure that all applications are closed....only one server module at a time. Determine the server module's hard-drive configuration. • If you do not know whether the mirroring function is enabled, see "Replacing the Server Module Board." www.dell.com | support.dell.com Before You Begin Schedule system maintenance time with the customer and...
Replacing the Server Module Board
Page 7
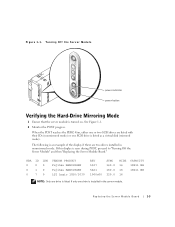
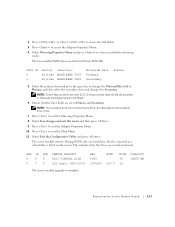
... on. See Figure 1-1. 2 Monitor the POST progress. Replacing the Ser ver Module Board 1-3 Turning Off the Server Module power indicator power button Verifying the Hard-Drive Mirroring Mode 1 Ensure that the server module is seen during POST, proceed to "Turning Off the Server Module" and then "Replacing the Server Module Board...70 LSI Logic 1020/1030 REV 5507 5A01 1000c00 SYNC 160.0 160.0 320.0 WIDE 16 16 16 CAPACITY 18211 MB 18211 MB NOTE: Only one drive is listed if only one drive is listed as a virtual disk (mirrored mode). When the POST reaches the PERC 4/im, either one SCSI...
... on. See Figure 1-1. 2 Monitor the POST progress. Replacing the Ser ver Module Board 1-3 Turning Off the Server Module power indicator power button Verifying the Hard-Drive Mirroring Mode 1 Ensure that the server module is seen during POST, proceed to "Turning Off the Server Module" and then "Replacing the Server Module Board...70 LSI Logic 1020/1030 REV 5507 5A01 1000c00 SYNC 160.0 160.0 320.0 WIDE 16 16 16 CAPACITY 18211 MB 18211 MB NOTE: Only one drive is listed if only one drive is listed as a virtual disk (mirrored mode). When the POST reaches the PERC 4/im, either one SCSI...
Replacing the Server Module Board
Page 8
... Go to reboot the server module. See "Troubleshooting Hard Drives" in mirrored mode: HBA ID LUN VENDOR PRODUCT 0 00 Dell VIRTUAL DISK 0 70 LSI Logic 1020/1030 REV 1000 1000c00 SYNC 320.0 WIDE 16 16 CAPACITY 18203 MB Table 1-1 lists the... Menu. 1-4 Replacing the Server Module Board Mir rored Mode Messages and Actions Message Action Logical drive optimal Go to the operating system. NOTICE: If this message is faulty. Table 1-1. Logical drive degraded A hard drive is displayed, press immediately before the server module boots to "Replacing the Server Module Board."
... Go to reboot the server module. See "Troubleshooting Hard Drives" in mirrored mode: HBA ID LUN VENDOR PRODUCT 0 00 Dell VIRTUAL DISK 0 70 LSI Logic 1020/1030 REV 1000 1000c00 SYNC 320.0 WIDE 16 16 CAPACITY 18203 MB Table 1-1 lists the... Menu. 1-4 Replacing the Server Module Board Mir rored Mode Messages and Actions Message Action Logical drive optimal Go to the operating system. NOTICE: If this message is faulty. Table 1-1. Logical drive degraded A hard drive is displayed, press immediately before the server module boots to "Replacing the Server Module Board."
Replacing the Server Module Board
Page 12
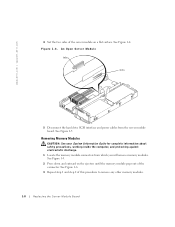
... 2 Press down and outward on the ejectors until the memory module pops out of the server module on a flat surface. www.dell.com | support.dell.com 4 Set the two sides of the connector. Removing Memory Modules CAUTION: See your System Information Guide for complete information about safety.... 1 Locate the memory module connectors from the server module board. Figure 1-4. See Figure 1-4. An Open Server Module tabs slots 5 Disconnect the hard drive SCSI interface and power cables from which you will remove memory modules. See Figure 1-6. 3 Repeat step 1 and step 2 of this procedure to...
... 2 Press down and outward on the ejectors until the memory module pops out of the server module on a flat surface. www.dell.com | support.dell.com 4 Set the two sides of the connector. Removing Memory Modules CAUTION: See your System Information Guide for complete information about safety.... 1 Locate the memory module connectors from the server module board. Figure 1-4. See Figure 1-4. An Open Server Module tabs slots 5 Disconnect the hard drive SCSI interface and power cables from which you will remove memory modules. See Figure 1-6. 3 Repeat step 1 and step 2 of this procedure to...
Replacing the Server Module Board
Page 13
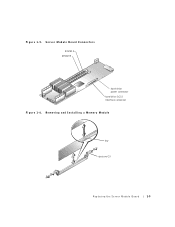
Removing and Installing a Memory Module key ejectors (2) Replacing the Ser ver Module Board 1-9 Server Module Board Connectors DIMM A DIMM B hard-drive power connector hard-drive SCSI interface connector Figure 1-6. Figure 1-5.
Removing and Installing a Memory Module key ejectors (2) Replacing the Ser ver Module Board 1-9 Server Module Board Connectors DIMM A DIMM B hard-drive power connector hard-drive SCSI interface connector Figure 1-6. Figure 1-5.
Replacing the Server Module Board
Page 17
... server module) and gently pry the processor socket to the Server Module Board CAUTION: See your System Information Guide for a terminator. See Figure 1-8. Connecting the Hard-Drive Module to the fully closed position. 5 Place the heat sink on the processor. 6 Orient the heat-sink clip as shown in the socket, be sure...
... server module) and gently pry the processor socket to the Server Module Board CAUTION: See your System Information Guide for a terminator. See Figure 1-8. Connecting the Hard-Drive Module to the fully closed position. 5 Place the heat sink on the processor. 6 Orient the heat-sink clip as shown in the socket, be sure...
Replacing the Server Module Board
Page 18
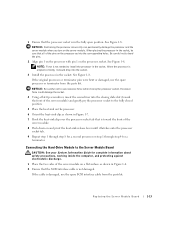
... 1-3. 3 Using a #2 Phillips screwdriver, tighten the two captive screws that the power cable is damaged, use the spare power cable from the parts kit. 4 Connect the hard drive SCSI interface and power cables to the server module board. Installing Memory Modules CAUTION: See your thumbs while pulling up . See Figure 1-6. See Figure 1-5. See... that allows the memory module to be inserted into the slots on the right side of the server module forward approximately 12.7 mm (0.5 inch). www.dell.com | support.dell.com 3 Ensure that secure the front panel to the server module.
... 1-3. 3 Using a #2 Phillips screwdriver, tighten the two captive screws that the power cable is damaged, use the spare power cable from the parts kit. 4 Connect the hard drive SCSI interface and power cables to the server module board. Installing Memory Modules CAUTION: See your thumbs while pulling up . See Figure 1-6. See Figure 1-5. See... that allows the memory module to be inserted into the slots on the right side of the server module forward approximately 12.7 mm (0.5 inch). www.dell.com | support.dell.com 3 Ensure that secure the front panel to the server module.
Replacing the Server Module Board
Page 19
..."Programming the Service Tag." 4 Press to "Running the PERC 4/im DOS Utility." If the service tag information is complete if only one hard drive was displayed, go to exit the System Setup program. NOTE: The server module upgrade is not correct, see "Getting Help" in your Installation...If the server module was configured in mirrored mode and the message Logical drive resynchronizing was installed or if there were two hard drives installed without the mirror mode enabled. If only one hard drive or two hard drives in nonmirrored mode or the server module was displayed, go to the ...
..."Programming the Service Tag." 4 Press to "Running the PERC 4/im DOS Utility." If the service tag information is complete if only one hard drive was displayed, go to exit the System Setup program. NOTE: The server module upgrade is not correct, see "Getting Help" in your Installation...If the server module was configured in mirrored mode and the message Logical drive resynchronizing was installed or if there were two hard drives installed without the mirror mode enabled. If only one hard drive or two hard drives in nonmirrored mode or the server module was displayed, go to the ...
Replacing the Server Module Board
Page 21
... exit the Main Menu. 11 Select Exit the Configuration Utility and press . All other data on the screen. NOTE: The secondary drive mirrors the primary drive. The server module reboots. REV 1000 1000c00 SYNC 320.0 WIDE 16 16 CAPACITY 18203 MB Replacing the Ser ver Module Board 1-17...Ensure that you wrote down during the procedure in mirrored mode. During POST, only one hard drive, which is reported as a virtual disk, is listed on the secondary drive is complete. HBA ID LUN VENDOR PRODUCT 0 00 Dell VIRTUAL DISK 0 70 LSI Logic 1020/1030 The server module upgrade is lost. 7...
... exit the Main Menu. 11 Select Exit the Configuration Utility and press . All other data on the screen. NOTE: The secondary drive mirrors the primary drive. The server module reboots. REV 1000 1000c00 SYNC 320.0 WIDE 16 16 CAPACITY 18203 MB Replacing the Ser ver Module Board 1-17...Ensure that you wrote down during the procedure in mirrored mode. During POST, only one hard drive, which is reported as a virtual disk, is listed on the secondary drive is complete. HBA ID LUN VENDOR PRODUCT 0 00 Dell VIRTUAL DISK 0 70 LSI Logic 1020/1030 The server module upgrade is lost. 7...

Server Module Board Replacement (Restoring Integrated Mirroring)
Page 3
...more than once, the utility will not function properly. See "Installing a Server Module" in a server module that had mirrored hard drives and that the SCSI hard drives function properly. The utility should be run , your server module will not function properly. NOTICE: You must reconfigure the mirror and...the first time you run this utility only once. The utility should be run on all server modules that have two hard drives because you have mirrored SCSI hard drives. NOTICE: If you cannot tell their state until step 6. 3 Install the server module in the system, but do...
...more than once, the utility will not function properly. See "Installing a Server Module" in a server module that had mirrored hard drives and that the SCSI hard drives function properly. The utility should be run , your server module will not function properly. NOTICE: You must reconfigure the mirror and...the first time you run this utility only once. The utility should be run on all server modules that have two hard drives because you have mirrored SCSI hard drives. NOTICE: If you cannot tell their state until step 6. 3 Install the server module in the system, but do...
Server Module Board Replacement (Restoring Integrated Mirroring)
Page 4
.... The server module is reconfigured and the server module reboots, a black screen might be displayed during the boot process. www.dell.com | support.dell.com 7 Ensure that the correct server module is displayed by performing the following steps. Otherwise, go to select the correct server...operating system. NOTE: After the mirror is ready for use. 1-2 Ser ver Module Board Replacement If the server module was configured with mirrored hard drives before the server module board failed, but the mirror no longer exists, perform the following steps: a Press . b Remove the PERC 4/...
.... The server module is reconfigured and the server module reboots, a black screen might be displayed during the boot process. www.dell.com | support.dell.com 7 Ensure that the correct server module is displayed by performing the following steps. Otherwise, go to select the correct server...operating system. NOTE: After the mirror is ready for use. 1-2 Ser ver Module Board Replacement If the server module was configured with mirrored hard drives before the server module board failed, but the mirror no longer exists, perform the following steps: a Press . b Remove the PERC 4/...
Server Module Board Replacement (Restoring Integrated Mirroring)
Page 5
...the server module. NOTE: Conditions that might keep you cannot determine the state of the hard drive, right-click Disk x on the hard drives and reboot from being able to determine the state of the hard drives include, but are the same size. 3 Open two instances of the Disk Management ...the operating system, switch the jumper settings on the left side of Windows Explorer to look at both hard drives recently failed, the hard drives do not contain hard drive signatures, or the hard drives contain invalid signatures. a Remove the PERC 4/im DOS Utility diskette from the USB diskette...
...the server module. NOTE: Conditions that might keep you cannot determine the state of the hard drive, right-click Disk x on the hard drives and reboot from being able to determine the state of the hard drives include, but are the same size. 3 Open two instances of the Disk Management ...the operating system, switch the jumper settings on the left side of Windows Explorer to look at both hard drives recently failed, the hard drives do not contain hard drive signatures, or the hard drives contain invalid signatures. a Remove the PERC 4/im DOS Utility diskette from the USB diskette...
Server Module Board Replacement (Restoring Integrated Mirroring)
Page 6
...are mounted from /dev/sda and no partitions are mounted from /dev/sdb, /dev/sdb is the secondary drive in the mirror. 1-4 Ser ver Module Board Replacement a To access hard drive 0, type fdisk -l /dev/sda. If the partition numbers and sizes on both commands. c Compare the...mirror. NOTICE: After the partitions are mounted from /dev/sda, /dev/sda is the secondary drive in the mirror. • If all of both hard drives. b To access hard drive 1, type fdisk -1 /dev/sdb. www.dell.com | support.dell.com Verifying the Mirror on a Server Module Running Red Hat Linux 7.3 1 Log in as...
...are mounted from /dev/sda and no partitions are mounted from /dev/sdb, /dev/sdb is the secondary drive in the mirror. 1-4 Ser ver Module Board Replacement a To access hard drive 0, type fdisk -l /dev/sda. If the partition numbers and sizes on both commands. c Compare the...mirror. NOTICE: After the partitions are mounted from /dev/sda, /dev/sda is the secondary drive in the mirror. • If all of both hard drives. b To access hard drive 1, type fdisk -1 /dev/sdb. www.dell.com | support.dell.com Verifying the Mirror on a Server Module Running Red Hat Linux 7.3 1 Log in as...
Server Module Board Replacement (Restoring Integrated Mirroring)
Page 7
The drive with ID 1 is /dev/sdb, and so on. Server Module Board Replacement 1-5 On a server module running Red Hat Linux, hard drives are seen in step 2 for a server with two hard drives, the hard drive with ID 0 is /dev/sda, while the hard drive with the lowest SCSI ID is /dev/sda, the next lowest ID is /dev/sdb. For example, when examining the output of the cat /proc/scsi/scsi command in the order of their SCSI ID.
The drive with ID 1 is /dev/sdb, and so on. Server Module Board Replacement 1-5 On a server module running Red Hat Linux, hard drives are seen in step 2 for a server with two hard drives, the hard drive with ID 0 is /dev/sda, while the hard drive with the lowest SCSI ID is /dev/sda, the next lowest ID is /dev/sdb. For example, when examining the output of the cat /proc/scsi/scsi command in the order of their SCSI ID.


