Dell PowerEdge 2900 Support and Manuals
Get Help and Manuals for this Dell item
View All Support Options Below
Free Dell PowerEdge 2900 manuals!
Problems with Dell PowerEdge 2900?
Ask a Question
Free Dell PowerEdge 2900 manuals!
Problems with Dell PowerEdge 2900?
Ask a Question
Most Recent Dell PowerEdge 2900 Questions

Dell Poweredge 2950 Not Booting
Dell Poweredge 2950 not booting server display panel show error e1410 system fatal error.
Dell Poweredge 2950 not booting server display panel show error e1410 system fatal error.
(Posted by rblasad 5 years ago)

E161c E1614
I have ben a fail a in message monitor the Server PEdge 2900E1624E161C
I have ben a fail a in message monitor the Server PEdge 2900E1624E161C
(Posted by rmiciano 5 years ago)

We Want To Install A Fc Card There Inpe2900, Which Model Can It Be Supported
(Posted by pkmal87 8 years ago)

E122b 0.9 Over Volt Instruction On Dell Power Edge 2900
E122B 0.9 over volt instruction on Dell power Edge 2900, server not start
E122B 0.9 over volt instruction on Dell power Edge 2900, server not start
(Posted by mspshahriar 8 years ago)

Dell Poweredge 2900 Systems Problems
i3;k2; l3;l0;m4;k7;k4;l6;l4; l0;l5;k6;l0;l2;k2;m0;l6;l8;k7; k9;k2;k5;l6;l8;k2;k7;m0;l9;n3; l6;l8;k2;...
i3;k2; l3;l0;m4;k7;k4;l6;l4; l0;l5;k6;l0;l2;k2;m0;l6;l8;k7; k9;k2;k5;l6;l8;k2;k7;m0;l9;n3; l6;l8;k2;...
(Posted by vitkost 9 years ago)
Dell PowerEdge 2900 Videos

DELL POWEREDGE 2900 RAID 10 REBUILD PART 1/2
Duration: 3:19
Total Views: 118
Duration: 3:19
Total Views: 118
Hand on Dell PowerEdge 2900
Duration: 3:20
Total Views: 8,826
Duration: 3:20
Total Views: 8,826
Free Dell PowerEdge 2900 Dual Xeon Server
Duration: 8:53
Total Views: 812
Duration: 8:53
Total Views: 812
Dell Poweredge 2900
Duration: 4:03
Total Views: 3,663
Duration: 4:03
Total Views: 3,663
Popular Dell PowerEdge 2900 Manual Pages
Hardware Owner's Manual (PDF) - Page 55
... carrier -
Depending on your configuration, you use only drives that makes the SATA hard drive usable in the hard-drive bays. The interposer card provides enhanced functionality that have been tested and approved for the optional SAS RAID controller daughter card to use with a SATA hard drive.
• SATAu drive carrier -
Installing System Components
55 You may need to ensure...
Information Update - Page 146

Memory configuration does not support Node Interleaving. PCIe PCIe SAS
146 DIMM
!!*** Error: Remote Access Controller initialization failure *** RAC virtual USB devices may not be available...
Node Interleaving disabled! RAC
Invalid PCIe card found in the Internal_Storage slot!
표 1-1 PowerEdge 2900 III
표 1-1
메시지
&#...
Tower-to-Rack Conversion Guide - Page 7

... and rack kit in any component when servicing other racks. Systems are secured to the rack, extended to ensure that the final combination of the rack rests on any other rack, be components in a Dell rack cabinet using the customer rack kit. CAUTION: Safety Instructions
Use the following precautions for specific caution statements and procedures. Therefore, always install the...
Tower-to-Rack Conversion Guide - Page 9
...: Before installing systems in a rack, install front and side stabilizers on stand-alone racks or the front stabilizer on racks joined to -Rack Conversion Guide
7 The stabilizer feet help prevent the rack from tipping over , potentially resulting in bodily injury under certain circumstances.
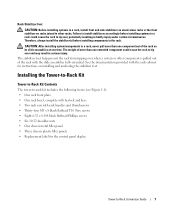
Installing the Tower-to-Rack Kit
Tower-to-Rack Kit Contents
The tower-to-rack kit includes the...
Tower-to-Rack Conversion Guide - Page 12

... lock on the back of the hard drives in your system and remove all hard drive carriers and drive blanks from the drive bays.
3 If present, remove the filler panels from the electrical outlet and peripherals.
2 Note the order of the system chassis. NOTE: It is not necessary to -Rack Conversion Guide
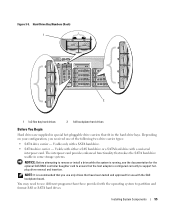
Removing the Tower Bezel
1
3
2
1 bezel
2 keylock
3 release latch...
Tower-to-Rack Conversion Guide - Page 15

...1-4. a Carefully pull up on the locking ring on the ends of the cable connector.
See Figure 1-4. b Gently work the connector out of the socket. 4... module and gently
pry the label off. b Remove the cable. 2 Using the T10 Torx driver, remove the three M3 Torx panhead screws that secure the
panel to the... the chassis bay.
Tower-to-Rack Conversion Guide
13 See Figure 1-4.
Tower-to-Rack Conversion Guide - Page 16

... 9
3 4 5
6
7 8
1 control panel board (top view) 2
4 control panel cable
5
7 M3 x 12 T10 Torx panhead
8
screw (2)
10 control panel cable connector 11
M3 x 5 T10 Torx panhead screw (3) tower chassis cutouts display module label
display module cable connector
3 control panel board (bottom view)
6 display module
9 display module cable
14
Tower-to-Rack Conversion Guide
Tower-to-Rack Conversion Guide - Page 17

... the system chassis. NOTICE: Do not over -tighten the screws. Removing the Tower Front Plate
1
2
1 tower front plate
2 M3 x 8 T10 Torx flathead screw (29)
Installing the Rack Front Plate
1 Using a T-10 Torx driver, install the 34 screws (that secure the tower front plate to -Rack Conversion Guide
15
See Figure 1-6.
b Align the flanges with the screw holes and secure the ear...
Tower-to-Rack Conversion Guide - Page 18

Figure 1-6. Installing the Rack Front Plate and Rack Ears 1
2 3
4 7
6
5
1 metal filler panel
2
4 6-32 Phillips flathead screw (8) 5
7 left rack ear
chassis double wall
3
M3 x 8 T10 Torx flathead screw 6 (34)
right rack ear rack front plate
16
Tower-to-Rack Conversion Guide
Tower-to-Rack Conversion Guide - Page 19

...Figure 1-6.
3 Reinstall the hard-drive carriers, drive blanks, and filler panels into the chassis cutout where the control panel cable formerly routed. Installing the Control Panel Assembly
1 Install the control panel assembly. b Locate the replacement label for the front of ... the control panel interface cable to -Rack Conversion Guide
17
The devices should be labeled appropriately.
Tower-to-Rack Conversion Guide - Page 20

Figure 1-7. Installing the Control Panel Assembly
3
4
5
6
2
1
8
7
1 M3 x 12 T10 Torx panhead screw (2)
4 control panel board
7 system chassis
2 display module
5 M3 x 5 T10 Torx panhead screw (3)
8 display module label
3 display module cable 6 control panel cable
18
Tower-to-Rack Conversion Guide
Tower-to-Rack Conversion Guide - Page 21

... bay
5
2 SAS cable (SAS_B_IN connector)
5 1x2 flex bay drive bracket
3 SAS cable (SAS_B_OUT connector)
6 slot key
Tower-to the flex bay backplane. See Figure 1-8. 4 Push the flex bay bracket the rest of the way into the peripheral bay. 2 Reconnect the power cable to -Rack Conversion Guide
19
See Figure 1-8. 3 Reconnect the SAS cables to the...
Tower-to-Rack Conversion Guide - Page 22
Installing the Shoulder Nuts and Plastic Filler Panels
1 Using a 3/8-inch or 10-mm nut driver, attach the 10-32 shoulder nuts included in the rack.
20
Tower-to the locked position. 5 Replace the ...Rack Conversion Guide Installing the System Cover
1 Lift up on the left and right exterior chassis walls. NOTE: Tighten the shoulder nuts so that the bottom of the nut is ready to install in the kit...
Tower-to-Rack Conversion Guide - Page 23

... rack for instructions on removing rack doors. Installing the Shoulder Nuts 1
2 3
1 plastic filler panel (3)
2 10-32 shoulder nut (6)
3 shoulder mount (6)
Removing the Rack Doors
You must remove the doors from the rack cabinet to provide access to the interior of the rack and to prevent damage to -Rack Conversion Guide
21 Tower-to the doors while installing the system in the system Rack...
Tower-to-Rack Conversion Guide - Page 24

...Guide. Installing the Rack Bezel
To install the bezel, hook the right end of the bezel onto the chassis, then fit the free end of the bezel onto the system. Installing the Rack Bezel
1
2
1 keylock
2 rack bezel
Installing the Rack Doors
See the documentation provided with the keylock. Secure the bezel with the rack for instructions on installing rack doors.
22
Tower-to-Rack Conversion Guide...
Dell PowerEdge 2900 Reviews
We have not received any reviews for Dell yet.