
Information and Firmware Update
Page 3
Contents Updating the System BIOS From Diskettes 1-1 Updating the System BIOS With Dell OpenManage Server Administrator 1-2 Updating the System Management Module Firmware 1-3 Updating the KVM Firmware 1-4 Updating the System Management Module KVM... the Network Switch Module Firmware 1-7 Setting Up the Remote System Serial Connection Baud Rate . . 1-7 Configuring the Network Switch Module 1-8 Updating the Diagnostics Component 1-9 Updating the Loader Component 1-9 Updating the Runtime Component 1-10 Replacing the Server Module Battery 1-11 Using the USB Diskette and USB CD Drives...
Contents Updating the System BIOS From Diskettes 1-1 Updating the System BIOS With Dell OpenManage Server Administrator 1-2 Updating the System Management Module Firmware 1-3 Updating the KVM Firmware 1-4 Updating the System Management Module KVM... the Network Switch Module Firmware 1-7 Setting Up the Remote System Serial Connection Baud Rate . . 1-7 Configuring the Network Switch Module 1-8 Updating the Diagnostics Component 1-9 Updating the Loader Component 1-9 Updating the Runtime Component 1-10 Replacing the Server Module Battery 1-11 Using the USB Diskette and USB CD Drives...
Information and Firmware Update
Page 4
Replacing Hard Drives in a Mirrored Configuration . . . . . . 1-15 1-15 1-16 Online Diagnostics SCSI Controller Test Issue When Using a Linux Console 1-16 SCSI Device Errors During System Boot 1-17 Using a Dell-Branded Logitech PS/2 Mouse 1-17 Figures Figure 1-1. Figure 1-4. Attaching the Drive Shelf Steps for Updating KVM Firmware Network Switch Module Jumper Update Position Opening...
Replacing Hard Drives in a Mirrored Configuration . . . . . . 1-15 1-15 1-16 Online Diagnostics SCSI Controller Test Issue When Using a Linux Console 1-16 SCSI Device Errors During System Boot 1-17 Using a Dell-Branded Logitech PS/2 Mouse 1-17 Figures Figure 1-1. Figure 1-4. Attaching the Drive Shelf Steps for Updating KVM Firmware Network Switch Module Jumper Update Position Opening...
Information and Firmware Update
Page 5
... issues • Logging out of a network switch module HTTP session • Integrated mirroring issues • Online diagnostics SCSI controller test issue when using a Linux console • SCSI device errors during system boot • Using a Dell-branded, two-button Logitech mouse Updating the System BIOS From Diskettes Each server module has a USB port...
... issues • Logging out of a network switch module HTTP session • Integrated mirroring issues • Online diagnostics SCSI controller test issue when using a Linux console • SCSI device errors during system boot • Using a Dell-branded, two-button Logitech mouse Updating the System BIOS From Diskettes Each server module has a USB port...
Information and Firmware Update
Page 11
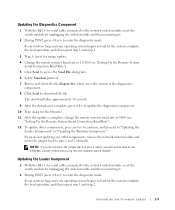
You need to 1. NOTE: All three of the firmware components (loader, diagnostics, and runtime) of the component update procedures. Setting Up the Remote System Serial Connection Baud Rate This procedure is recommended that you are using either ... on the network switch module. If you are referenced in each of the network switch module can be updated by typing show version from the Dell Support website at support.dell.com with updating the network switch module firmware. Information and Firmware Update 1-7
You need to 1. NOTE: All three of the firmware components (loader, diagnostics, and runtime) of the component update procedures. Setting Up the Remote System Serial Connection Baud Rate This procedure is recommended that you are using either ... on the network switch module. If you are referenced in each of the network switch module can be updated by typing show version from the Dell Support website at support.dell.com with updating the network switch module firmware. Information and Firmware Update 1-7
Information and Firmware Update
Page 13
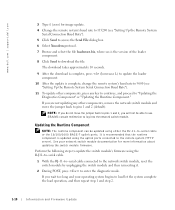
... not be able to use ERA/MC console redirection to log into the network switch module. Information and Firmware Update 1-9 Updating the Diagnostics Component 1 With the RJ-11-to-serial cable connected to the network switch module, reset the switch module by unplugging the switch ... Loader Component" or "Updating the Runtime Component." The download takes approximately 30 seconds. 9 After the download is complete, press to update the diagnostics component. 10 Type diag for image update. 4 Change the remote system's baud rate to 115200 (see "Setting Up the Remote System Serial ...
... not be able to use ERA/MC console redirection to log into the network switch module. Information and Firmware Update 1-9 Updating the Diagnostics Component 1 With the RJ-11-to-serial cable connected to the network switch module, reset the switch module by unplugging the switch ... Loader Component" or "Updating the Runtime Component." The download takes approximately 30 seconds. 9 After the download is complete, press to update the diagnostics component. 10 Type diag for image update. 4 Change the remote system's baud rate to 115200 (see "Setting Up the Remote System Serial ...
Information and Firmware Update
Page 14
... to the remote system (TFTP server). Perform the following steps to update the switch module's firmware using either the RJ-11-to "Updating the Diagnostics Component" or "Updating the Runtime Component." It is recommended that the runtime component is complete, change the remote system's baud rate to 9600 (... Xmodem protocol. 7 Browse and select the file loaderxxx.bix, where xxx is the version of the loader component. 8 Click Send to enter the diagnostic mode. NOTE: If you do not move the jumper back to load let the system complete the load operation, and then repeat step 1 and step...
... to the remote system (TFTP server). Perform the following steps to update the switch module's firmware using either the RJ-11-to "Updating the Diagnostics Component" or "Updating the Runtime Component." It is recommended that the runtime component is complete, change the remote system's baud rate to 9600 (... Xmodem protocol. 7 Browse and select the file loaderxxx.bix, where xxx is the version of the loader component. 8 Click Send to enter the diagnostic mode. NOTE: If you do not move the jumper back to load let the system complete the load operation, and then repeat step 1 and step...
Information and Firmware Update
Page 15
... component. 10 Type runtime for complete information about safety precautions, working inside the system. If you do not move the jumper back to "Updating the Diagnostics Component" or "Updating the Loader Component." See your System Information Guide for the filename. 11 After the update is complete, change the remote system's baud...
... component. 10 Type runtime for complete information about safety precautions, working inside the system. If you do not move the jumper back to "Updating the Diagnostics Component" or "Updating the Loader Component." See your System Information Guide for the filename. 11 After the update is complete, change the remote system's baud...
Information and Firmware Update
Page 17
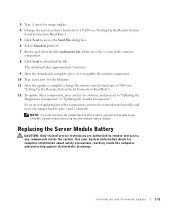
... of the server module into the slots on the right side of each server module has a USB port that secure the front panel to run diagnostics on a flat surface. 4 Remove the server module battery (see Figure 1-5). 3 Set the two sides of its connector using a blunt, nonconductive object such as a plastic screwdriver...
... of the server module into the slots on the right side of each server module has a USB port that secure the front panel to run diagnostics on a flat surface. 4 Remove the server module battery (see Figure 1-5). 3 Set the two sides of its connector using a blunt, nonconductive object such as a plastic screwdriver...

Information and Firmware Update
Page 18
... Summary window, the login date and time fields display incorrect data. 1-14 Information and Firmware Update Using the System Diagnostics • When running the video diagnostics test from a remote terminal, the remote keyboard functionality is displayed at the top of the screen instead of the ...BIOS release. When both of the remote keyboard, restart the HyperTerminal session. Using the System Management Module to power on . www.dell.com | support.dell.com NOTICE: If you are using the serial interface or the Racadm utility, the next time the Web console updates the Properties...
... Summary window, the login date and time fields display incorrect data. 1-14 Information and Firmware Update Using the System Diagnostics • When running the video diagnostics test from a remote terminal, the remote keyboard functionality is displayed at the top of the screen instead of the ...BIOS release. When both of the remote keyboard, restart the HyperTerminal session. Using the System Management Module to power on . www.dell.com | support.dell.com NOTICE: If you are using the serial interface or the Racadm utility, the next time the Web console updates the Properties...
Information and Firmware Update
Page 20
.... This allows the firmware to detect that the USB diskette drive is Degraded At this point, the hard drive begins to run the online diagnostics SCSI controller test from a Linux console, the LSI driver for information only and does not indicate an error. Online...run the system board replacement utility. 9 When prompted, press any key to enter the System Setup program, and select the Boot Sequence option. www.dell.com | support.dell.com 5 Press to display the OSCAR menu, and then double-click the appropriate server module. 6 Press to recreate the mirror and reboot the server...
.... This allows the firmware to detect that the USB diskette drive is Degraded At this point, the hard drive begins to run the online diagnostics SCSI controller test from a Linux console, the LSI driver for information only and does not indicate an error. Online...run the system board replacement utility. 9 When prompted, press any key to enter the System Setup program, and select the Boot Sequence option. www.dell.com | support.dell.com 5 Press to display the OSCAR menu, and then double-click the appropriate server module. 6 Press to recreate the mirror and reboot the server...
Microprocessor Upgrade Installation Guide
Page 40
16 5-3 17 18 19 5-1 5-2 20 12.7 mm 5-1 21 #2 2 5-1 22 Installing a Server Module Installation and Troubleshooting Guide 23 24 On-Screen Configuration and Activity Reporting OSCAR 25 Using the System Setup Program One 1.26 GHz Processor, Processor Bus:133 MHz, L2 cache 512 KB Advanced 26 Using the System Setup Program 27 28 Troubleshooting Guide Installation and Running the System Diagnostics 5-6
16 5-3 17 18 19 5-1 5-2 20 12.7 mm 5-1 21 #2 2 5-1 22 Installing a Server Module Installation and Troubleshooting Guide 23 24 On-Screen Configuration and Activity Reporting OSCAR 25 Using the System Setup Program One 1.26 GHz Processor, Processor Bus:133 MHz, L2 cache 512 KB Advanced 26 Using the System Setup Program 27 28 Troubleshooting Guide Installation and Running the System Diagnostics 5-6


