Owners Manual
Page 6
Installing The Input/Output Panel 81 25 Speaker...83 Removing The Speakers 83 Installing The Speakers 85 26 DC-In Port 87 Removing The DC-In Port 87 Installing The DC-In Port 89 27 Display Bezel 91 Removing The Display Bezel 91 Installing The Display Bezel 92 28 Display Panel 93 Removing The...
Installing The Input/Output Panel 81 25 Speaker...83 Removing The Speakers 83 Installing The Speakers 85 26 DC-In Port 87 Removing The DC-In Port 87 Installing The DC-In Port 89 27 Display Bezel 91 Removing The Display Bezel 91 Installing The Display Bezel 92 28 Display Panel 93 Removing The...
Owners Manual
Page 11
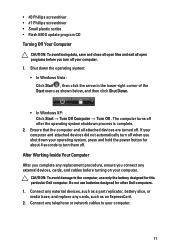
...the operating system shutdown process is complete. 2. Connect any telephone or network cables to the computer, use batteries designed for this particular Dell computer. After Working Inside Your Computer After you complete any replacement procedure, ensure you connect any cards, such as shown below, and...Shut Down. • In Windows XP: Click Start → Turn Off Computer → Turn Off . Connect any external devices, such as a port replicator, battery slice, or media base, and replace any external devices, cards, and cables before you shut down the operating system: • In ...
...the operating system shutdown process is complete. 2. Connect any telephone or network cables to the computer, use batteries designed for this particular Dell computer. After Working Inside Your Computer After you complete any replacement procedure, ensure you connect any cards, such as shown below, and...Shut Down. • In Windows XP: Click Start → Turn Off Computer → Turn Off . Connect any external devices, such as a port replicator, battery slice, or media base, and replace any external devices, cards, and cables before you shut down the operating system: • In ...
Owners Manual
Page 87
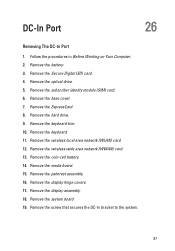
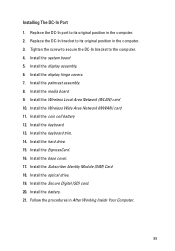
.... 11. Remove the wireless local area network (WLAN) card. 12. Remove the Secure Digital (SD) card. 4. Remove the system board 19. DC-In Port 26 Removing The DC-In Port 1. Follow the procedures in Before Working on Your Computer. 2. Remove the subscriber identity module (SIM) card. 6. Remove the hard drive. 9. Remove the...
.... 11. Remove the wireless local area network (WLAN) card. 12. Remove the Secure Digital (SD) card. 4. Remove the system board 19. DC-In Port 26 Removing The DC-In Port 1. Follow the procedures in Before Working on Your Computer. 2. Remove the subscriber identity module (SIM) card. 6. Remove the hard drive. 9. Remove the...
Owners Manual
Page 89
.... Install the keyboard trim. 14. Install the palmrest assembly. 8. Install the ExpressCard. 16. Install the display assembly. 6. Install the battery. 21. Installing The DC-In Port 1. Install the system board 5. Install the optical drive. 19. Install the Wireless Local Area Network (WLAN) card 10. Replace the DC-In...
.... Install the keyboard trim. 14. Install the palmrest assembly. 8. Install the ExpressCard. 16. Install the display assembly. 6. Install the battery. 21. Installing The DC-In Port 1. Install the system board 5. Install the optical drive. 19. Install the Wireless Local Area Network (WLAN) card 10. Replace the DC-In...
Owners Manual
Page 98
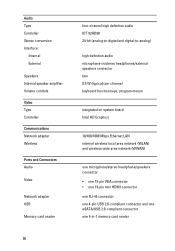
Audio Type Controller Stereo conversion Interface: Internal External Speakers Internal speaker amplifier Volume controls Video Type Controller Communications Network adapter Wireless Ports and Connectors Audio Video Network adapter USB Memory card reader 98 four-channel high definition audio IDT 92HD90 24-bit (analog-to-digital and digital-...
Audio Type Controller Stereo conversion Interface: Internal External Speakers Internal speaker amplifier Volume controls Video Type Controller Communications Network adapter Wireless Ports and Connectors Audio Video Network adapter USB Memory card reader 98 four-channel high definition audio IDT 92HD90 24-bit (analog-to-digital and digital-...
Owners Manual
Page 105
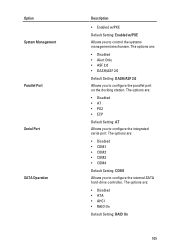
...mechanism. The options are : • Disabled • AT • PS2 • ECP Default Setting: AT Allows you to configure the parallel port on the docking station. The options are : • Disabled • Alert Only • ASF 2.0 • DASH/ASF 2.0 Default Setting:... DASH/ASF 2.0 Allows you to configure the integrated serial port. Option System Management Parallel Port Serial Port SATA Operation Description • Enabled w/PXE Default Setting: Enabled w/PXE Allows you to configure the internal SATA hard-drive controller....
...mechanism. The options are : • Disabled • AT • PS2 • ECP Default Setting: AT Allows you to configure the parallel port on the docking station. The options are : • Disabled • Alert Only • ASF 2.0 • DASH/ASF 2.0 Default Setting:... DASH/ASF 2.0 Allows you to configure the integrated serial port. Option System Management Parallel Port Serial Port SATA Operation Description • Enabled w/PXE Default Setting: Enabled w/PXE Allows you to configure the internal SATA hard-drive controller....
Owners Manual
Page 106
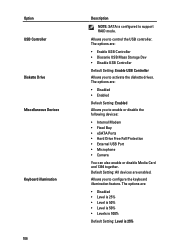
... Default Setting: Enabled Allows you to enable or disable the following devices: • Internal Modem • Fixed Bay • eSATA Ports • Hard Drive Free Fall Protection • External USB Port • Microphone • Camera You can also enable or disable Media Card and 1394 together. The options are enabled. Option USB...
... Default Setting: Enabled Allows you to enable or disable the following devices: • Internal Modem • Fixed Bay • eSATA Ports • Hard Drive Free Fall Protection • External USB Port • Microphone • Camera You can also enable or disable Media Card and 1394 together. The options are enabled. Option USB...
Owners Manual
Page 111
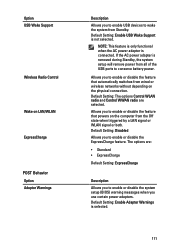
... messages when you to enable or disable the ExpressCharge feature. Allows you to enable USB devices to wake the system from all of the USB ports to enable or disable the feature that automatically switches from wired or wireless networks without depending on the computer from the Off state when triggered...
... messages when you to enable or disable the ExpressCharge feature. Allows you to enable USB devices to wake the system from all of the USB ports to enable or disable the feature that automatically switches from wired or wireless networks without depending on the computer from the Off state when triggered...


