
User Manual
Page 5
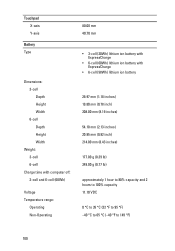
Battery Type Dimensions: 3-cell Depth Height Width 6-cell Depth Height Width Weight: 3-cell 6-cell Voltage Temperature range: Operating Non-Operating Coin-cell battery AC Adapter Type Input voltage Input current (maximum) Input frequency • 3-cell (30WHr) Lithium ion battery with ExpressCharge • 6-cell (60WHr) Lithium ion battery with ExpressCharge • 6-cell (58WHr) Lithium ion battery 29.97...°C (32 °F to 95 °F) -40 °C to 65 °C (-40 °F to 149 °F) 3 V CR2032 lithium coin cell 65 W and 90 W 100 VAC to 240 VAC 1.50 A/1.60 A/1.70 A 50 Hz to 60 Hz 5
Battery Type Dimensions: 3-cell Depth Height Width 6-cell Depth Height Width Weight: 3-cell 6-cell Voltage Temperature range: Operating Non-Operating Coin-cell battery AC Adapter Type Input voltage Input current (maximum) Input frequency • 3-cell (30WHr) Lithium ion battery with ExpressCharge • 6-cell (60WHr) Lithium ion battery with ExpressCharge • 6-cell (58WHr) Lithium ion battery 29.97...°C (32 °F to 95 °F) -40 °C to 65 °C (-40 °F to 149 °F) 3 V CR2032 lithium coin cell 65 W and 90 W 100 VAC to 240 VAC 1.50 A/1.60 A/1.70 A 50 Hz to 60 Hz 5

User Manual
Page 6
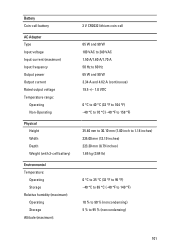
AC Adapter Output power Output current Rated output voltage Temperature range: Operating Non-Operating Physical Height Width Depth Weight (with 3-cell battery) Environmental Temperature: Operating Storage Relative humidity (maximum): Operating Storage Altitude (maximum): Operating Non-Operating Airborne contaminant level 65 W and 90 W 3.34 A and 4.62 A (continuous) 19.5 +/- 1.0 ...
AC Adapter Output power Output current Rated output voltage Temperature range: Operating Non-Operating Physical Height Width Depth Weight (with 3-cell battery) Environmental Temperature: Operating Storage Relative humidity (maximum): Operating Storage Altitude (maximum): Operating Non-Operating Airborne contaminant level 65 W and 90 W 3.34 A and 4.62 A (continuous) 19.5 +/- 1.0 ...
Owners Manual
Page 4
... Base Cover 27 Installing The Base Cover 28 9 Memory Card 29 Removing The Memory 29 Installing The Memory...30 10 Coin-Cell Battery 31 Removing The Coin-Cell Battery 31 Installing The Coin-Cell Battery 32 11 Wireless Local Area Network (WLAN) Card 33 Removing The Wireless Local Area Network (WLAN) Card 33 Installing The Wireless...
... Base Cover 27 Installing The Base Cover 28 9 Memory Card 29 Removing The Memory 29 Installing The Memory...30 10 Coin-Cell Battery 31 Removing The Coin-Cell Battery 31 Installing The Coin-Cell Battery 32 11 Wireless Local Area Network (WLAN) Card 33 Removing The Wireless Local Area Network (WLAN) Card 33 Installing The Wireless...
Owners Manual
Page 31
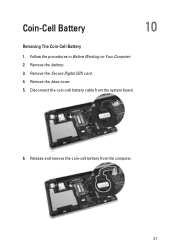
Coin-Cell Battery 10 Removing The Coin-Cell Battery 1. Follow the procedures in Before Working on Your Computer. 2. Release and remove the coin-cell battery from the system board. 6. Remove the battery. 3. Remove the base cover. 5. Remove the Secure Digital (SD) card. 4. Disconnect the coin-cell battery cable from the computer. 31
Coin-Cell Battery 10 Removing The Coin-Cell Battery 1. Follow the procedures in Before Working on Your Computer. 2. Release and remove the coin-cell battery from the system board. 6. Remove the battery. 3. Remove the base cover. 5. Remove the Secure Digital (SD) card. 4. Disconnect the coin-cell battery cable from the computer. 31

Owners Manual
Page 32
Install the base cover. 4. Install the Secure Digital (SD) card. 5. Place the coin-cell battery in After working inside your computer. 32 Connect the coin-cell battery cable to the system board. 3. Follow the procedures in its location. 2. Installing The Coin-Cell Battery 1. Install the battery 6.
Install the base cover. 4. Install the Secure Digital (SD) card. 5. Place the coin-cell battery in After working inside your computer. 32 Connect the coin-cell battery cable to the system board. 3. Follow the procedures in its location. 2. Installing The Coin-Cell Battery 1. Install the battery 6.
Owners Manual
Page 69
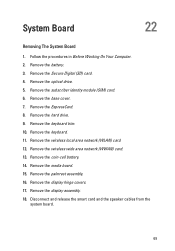
... local area network (WLAN) card. 12. Disconnect and release the smart card and the speaker cables from the system board. 69 Remove the battery. 3. Remove the keyboard trim. 10. Remove the palmrest assembly. 16. Remove the Secure Digital (SD) card. 4. Remove the ExpressCard. ... card. 13. Remove the optical drive. 5. Remove the subscriber identity module (SIM) card. 6. Remove the hard drive. 9. Remove the coin-cell battery. 14. Remove the display hinge covers. 17. Remove the display assembly. 18. Remove the media board. 15. Follow the procedures in Before Working...
... local area network (WLAN) card. 12. Disconnect and release the smart card and the speaker cables from the system board. 69 Remove the battery. 3. Remove the keyboard trim. 10. Remove the palmrest assembly. 16. Remove the Secure Digital (SD) card. 4. Remove the ExpressCard. ... card. 13. Remove the optical drive. 5. Remove the subscriber identity module (SIM) card. 6. Remove the hard drive. 9. Remove the coin-cell battery. 14. Remove the display hinge covers. 17. Remove the display assembly. 18. Remove the media board. 15. Follow the procedures in Before Working...
Owners Manual
Page 75
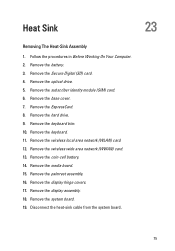
Remove the optical drive. 5. Remove the coin-cell battery. 14. Remove the display assembly. 18. Follow the procedures in Before Working On Your Computer. 2. Remove the subscriber identity module (SIM) card. 6. Remove the base .... Disconnect the heat-sink cable from the system board. 75 Remove the wireless local area network (WLAN) card. 12. Remove the hard drive. 9. Remove the battery. 3. Remove the media board. 15. Heat Sink 23 Removing The Heat-Sink Assembly 1.
Remove the optical drive. 5. Remove the coin-cell battery. 14. Remove the display assembly. 18. Follow the procedures in Before Working On Your Computer. 2. Remove the subscriber identity module (SIM) card. 6. Remove the base .... Disconnect the heat-sink cable from the system board. 75 Remove the wireless local area network (WLAN) card. 12. Remove the hard drive. 9. Remove the battery. 3. Remove the media board. 15. Heat Sink 23 Removing The Heat-Sink Assembly 1.
Owners Manual
Page 79
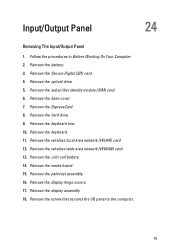
... (SIM) card. 6. Remove the ExpressCard. 8. Remove the wireless wide area network (WWAN) card. 13. Remove the display hinge covers. 17. Remove the battery. 3. Remove the wireless local area network (WLAN) card. 12. Remove the base cover. 7. Follow the procedures in Before Working On Your Computer. 2. Remove...I/O panel to the computer. 79 Remove the keyboard. 11. Remove the hard drive. 9. Remove the keyboard trim. 10. Remove the coin-cell battery. 14. Remove the optical drive. 5. Remove the media board. 15. Remove the palmrest assembly. 16. Remove the display assembly. 18.
... (SIM) card. 6. Remove the ExpressCard. 8. Remove the wireless wide area network (WWAN) card. 13. Remove the display hinge covers. 17. Remove the battery. 3. Remove the wireless local area network (WLAN) card. 12. Remove the base cover. 7. Follow the procedures in Before Working On Your Computer. 2. Remove...I/O panel to the computer. 79 Remove the keyboard. 11. Remove the hard drive. 9. Remove the keyboard trim. 10. Remove the coin-cell battery. 14. Remove the optical drive. 5. Remove the media board. 15. Remove the palmrest assembly. 16. Remove the display assembly. 18.
Owners Manual
Page 83
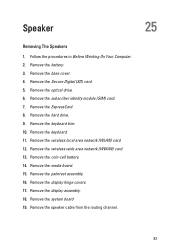
.... Remove the media board. 15. Speaker 25 Removing The Speakers 1. Remove the subscriber identity module (SIM) card. 7. Remove the palmrest assembly. 16. Remove the coin-cell battery. 14. Remove the battery. 3. Remove the ExpressCard. 8.
.... Remove the media board. 15. Speaker 25 Removing The Speakers 1. Remove the subscriber identity module (SIM) card. 7. Remove the palmrest assembly. 16. Remove the coin-cell battery. 14. Remove the battery. 3. Remove the ExpressCard. 8.
Owners Manual
Page 85
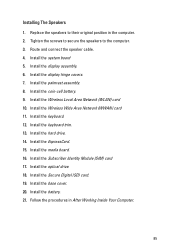
.... Install the display assembly. 6. Install the keyboard. 12. Install the Secure Digital (SD) card. 19. Install the system board 5. Install the coin-cell battery. 9. Install the Subscriber Identity Module (SIM) card 17. Install the optical drive. 18. Route and connect the speaker cable. 4. Install the Wireless Local Area Network (...
.... Install the display assembly. 6. Install the keyboard. 12. Install the Secure Digital (SD) card. 19. Install the system board 5. Install the coin-cell battery. 9. Install the Subscriber Identity Module (SIM) card 17. Install the optical drive. 18. Route and connect the speaker cable. 4. Install the Wireless Local Area Network (...
Owners Manual
Page 87
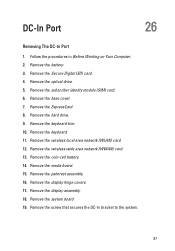
...7. Remove the wireless wide area network (WWAN) card. 13. Remove the media board. 15. Follow the procedures in Before Working on Your Computer. 2. Remove the battery. 3. Remove the optical drive. 5. Remove the display hinge covers. 17. Remove the Secure Digital (SD) card. 4. Remove the keyboard. 11. Remove the system ...board 19. Remove the keyboard trim. 10. DC-In Port 26 Removing The DC-In Port 1. Remove the ExpressCard. 8. Remove the coin-cell battery. 14. Remove the palmrest assembly. 16. Remove the screw that secures the DC-In bracket to the system. 87
...7. Remove the wireless wide area network (WWAN) card. 13. Remove the media board. 15. Follow the procedures in Before Working on Your Computer. 2. Remove the battery. 3. Remove the optical drive. 5. Remove the display hinge covers. 17. Remove the Secure Digital (SD) card. 4. Remove the keyboard. 11. Remove the system ...board 19. Remove the keyboard trim. 10. DC-In Port 26 Removing The DC-In Port 1. Remove the ExpressCard. 8. Remove the coin-cell battery. 14. Remove the palmrest assembly. 16. Remove the screw that secures the DC-In bracket to the system. 87
Owners Manual
Page 89
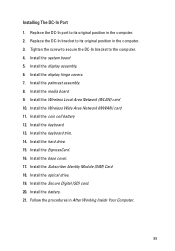
... computer. 2. Install the palmrest assembly. 8. Install the media board 9. Install the keyboard. 13. Install the Wireless Local Area Network (WLAN) card 10. Install the coin cell battery 12. Install the keyboard trim. 14. Installing The DC-In Port 1. Replace the DC-In port to the computer. 4. Install the display assembly. 6. Install the...
... computer. 2. Install the palmrest assembly. 8. Install the media board 9. Install the keyboard. 13. Install the Wireless Local Area Network (WLAN) card 10. Install the coin cell battery 12. Install the keyboard trim. 14. Installing The DC-In Port 1. Replace the DC-In port to the computer. 4. Install the display assembly. 6. Install the...
Owners Manual
Page 100
Touchpad X-axis Y-axis Battery Type Dimensions: 3-cell Depth Height Width 6-cell Depth Height Width Weight: 3-cell 6-cell Charge time with computer off: 3-cell and 6-cell (60Wh) Voltage Temperature range: Operating Non-Operating 80.00 mm 40.70 mm • 3-cell (30Wh) lithium ion battery with ExpressCharge • 6-cell (60Wh) lithium ion battery with ExpressCharge • 6-cell (58Wh) lithium ion battery 29.97 mm (1.18...
Touchpad X-axis Y-axis Battery Type Dimensions: 3-cell Depth Height Width 6-cell Depth Height Width Weight: 3-cell 6-cell Charge time with computer off: 3-cell and 6-cell (60Wh) Voltage Temperature range: Operating Non-Operating 80.00 mm 40.70 mm • 3-cell (30Wh) lithium ion battery with ExpressCharge • 6-cell (60Wh) lithium ion battery with ExpressCharge • 6-cell (58Wh) lithium ion battery 29.97 mm (1.18...
Owners Manual
Page 101
... Output power Output current Rated output voltage Temperature range: Operating Non-Operating Physical Height Width Depth Weight (with 3-cell battery) Environmental Temperature: Operating Storage Relative humidity (maximum): Operating Storage Altitude (maximum): 3 V CR2032 lithium coin cell 65 W and 90 W 100 VAC to 240 VAC 1.50 A/1.60 A/1.70 A 50 Hz to 60 Hz 65 W and...
... Output power Output current Rated output voltage Temperature range: Operating Non-Operating Physical Height Width Depth Weight (with 3-cell battery) Environmental Temperature: Operating Storage Relative humidity (maximum): Operating Storage Altitude (maximum): 3 V CR2032 lithium coin cell 65 W and 90 W 100 VAC to 240 VAC 1.50 A/1.60 A/1.70 A 50 Hz to 60 Hz 65 W and...


